

Operating Instructions
Page 4
... This may occur. Handling of images recorded with your camera still images recorded on other equipment (DCR-TRV890E/ TRV900/TRV900E, DSC-D700, DSCD770) that does not conform with this may render the "Memory Stick" unusable or image data breakdown, damage or loss may...Memory Stick" N50 For the Customers in color) that constantly appear on the LCD screen and the LCD finder. Notes on image data compatibility • This camera conforms with the Design Rules for long periods may be compensated for effective use. However, there may cause malfunctions. and Canada THIS CLASS B DIGITAL...
... This may occur. Handling of images recorded with your camera still images recorded on other equipment (DCR-TRV890E/ TRV900/TRV900E, DSC-D700, DSCD770) that does not conform with this may render the "Memory Stick" unusable or image data breakdown, damage or loss may...Memory Stick" N50 For the Customers in color) that constantly appear on the LCD screen and the LCD finder. Notes on image data compatibility • This camera conforms with the Design Rules for long periods may be compensated for effective use. However, there may cause malfunctions. and Canada THIS CLASS B DIGITAL...

Operating Instructions
Page 7
... the power supply 10 Setting the date and time 15 Inserting the "Memory Stick 17 Basic operations B Recording Recording still images 19 Recording moving images 26 B Playback Playing back still images 28 Playing back moving images 29 Viewing images using a personal computer...still images as uncompressed files (TIFF 58 Creating Clip Motion Files 59 Setting the distance to print (PRINT 76 Dividing a moving image file (DIVIDE 78 Changing the setup settings (SETUP 80 Additional information Precautions 83 On "Memory Sticks 84 About "InfoLITHIUM" battery pack 85 Using your camera...
... the power supply 10 Setting the date and time 15 Inserting the "Memory Stick 17 Basic operations B Recording Recording still images 19 Recording moving images 26 B Playback Playing back still images 28 Playing back moving images 29 Viewing images using a personal computer...still images as uncompressed files (TIFF 58 Creating Clip Motion Files 59 Setting the distance to print (PRINT 76 Dividing a moving image file (DIVIDE 78 Changing the setup settings (SETUP 80 Additional information Precautions 83 On "Memory Sticks 84 About "InfoLITHIUM" battery pack 85 Using your camera...
Operating Instructions
Page 9
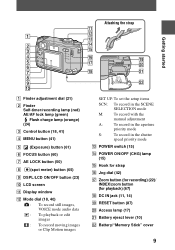
... (60) G AE LOCK button (50) H (spot meter) button (65) I DSPL/LCD ON/OFF button (23) J LCD screen K Display window L Mode dial (18, 40) : To record still images, VOICE mode audio data : To playback or edit images : To record moving images or Clip Motion images SET UP:To set the setup items... (for recording) (22)/ INDEX/zoom button (for playback) (67) R DC IN jack (11, 14) S RESET button (87) T Access lamp (17) U Battery ejesct lever (10) V Battery/"Memory Stick" cover 9
... (60) G AE LOCK button (50) H (spot meter) button (65) I DSPL/LCD ON/OFF button (23) J LCD screen K Display window L Mode dial (18, 40) : To record still images, VOICE mode audio data : To playback or edit images : To record moving images or Clip Motion images SET UP:To set the setup items... (for recording) (22)/ INDEX/zoom button (for playback) (67) R DC IN jack (11, 14) S RESET button (87) T Access lamp (17) U Battery ejesct lever (10) V Battery/"Memory Stick" cover 9

Operating Instructions
Page 10
.... Preparing the power supply Installing the battery pack Your camera operates only with compatible video equipment. This unit is a lithium ion battery pack which can exchange information such as illustrated. 3 Close the battery/"Memory Stick" cover. See page 85 for more information about "InfoLITHIUM..." battery pack. You cannot use any other battery pack. "InfoLITHIUM" is compatible with the "InfoLITHIUM" battery pack (M series). Slide the cover in the direction of Sony Corporation. 10 Be ...
.... Preparing the power supply Installing the battery pack Your camera operates only with compatible video equipment. This unit is a lithium ion battery pack which can exchange information such as illustrated. 3 Close the battery/"Memory Stick" cover. See page 85 for more information about "InfoLITHIUM..." battery pack. You cannot use any other battery pack. "InfoLITHIUM" is compatible with the "InfoLITHIUM" battery pack (M series). Slide the cover in the direction of Sony Corporation. 10 Be ...
Operating Instructions
Page 13
... is disconnected. - The numbers may flash in the display window may not appear correctly or may be decreased if you use your camera at low temperatures, use the zoom. • The numbers of images shown on tables above figures are as this may cause malfunction...adaptor with a metallic object, as a guide. When the battery pack has malfunctioned. • When you continuously record/play back while replacing the "Memory Stick appears in the display window until the battery usable time is calculated. • During charging, the indicators in the following cases. - Getting started...
... is disconnected. - The numbers may flash in the display window may not appear correctly or may be decreased if you use your camera at low temperatures, use the zoom. • The numbers of images shown on tables above figures are as this may cause malfunction...adaptor with a metallic object, as a guide. When the battery pack has malfunctioned. • When you continuously record/play back while replacing the "Memory Stick appears in the display window until the battery usable time is calculated. • During charging, the indicators in the following cases. - Getting started...
Operating Instructions
Page 17
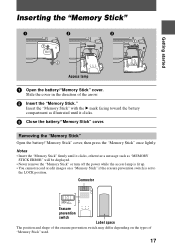
... edit images on the types of the arrow. 2 Insert the "Memory Stick." Getting started Inserting the "Memory Stick" Access lamp 1 Open the battery/"Memory Stick" cover. Insert the "Memory Stick" with the B mark facing toward the battery compartment as "MEMORY STICK ERROR" will be displayed. • Never remove the "Memory Stick" or turn off the power while the access lamp is set...
... edit images on the types of the arrow. 2 Insert the "Memory Stick." Getting started Inserting the "Memory Stick" Access lamp 1 Open the battery/"Memory Stick" cover. Insert the "Memory Stick" with the B mark facing toward the battery compartment as "MEMORY STICK ERROR" will be displayed. • Never remove the "Memory Stick" or turn off the power while the access lamp is set...
Operating Instructions
Page 19
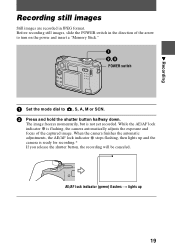
..., the recording will be canceled. POWER switch 1 Set the mode dial to turn on the power and insert a "Memory Stick." The image freezes momentarily, but is flashing, the camera automatically adjusts the exposure and focus of the arrow to , S, A, M or SCN. 2 Press and hold the shutter...AE/AF lock indicator z is not yet recorded. B Recording Recording still images Still images are recorded in the direction of the captured image. Before recording still images, slide the POWER switch in JPEG format. When the camera finishes the automatic adjustments, the AE/AF lock indicator z stops flashing...
..., the recording will be canceled. POWER switch 1 Set the mode dial to turn on the power and insert a "Memory Stick." The image freezes momentarily, but is flashing, the camera automatically adjusts the exposure and focus of the arrow to , S, A, M or SCN. 2 Press and hold the shutter...AE/AF lock indicator z is not yet recorded. B Recording Recording still images Still images are recorded in the direction of the captured image. Before recording still images, slide the POWER switch in JPEG format. When the camera finishes the automatic adjustments, the AE/AF lock indicator z stops flashing...
Operating Instructions
Page 20
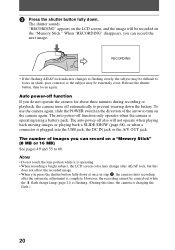
...lock indicator changes to flashing slowly, the subject may be difficult to turn on the "Memory Stick." The auto power-off also will be extremely close. The auto power-off function only operates when the camera is flashing. (During this does not affect the recorded image. • When you... LCD screen color may be recorded on the camera again. 3 Press the shutter button fully down at once in the direction of images you press the shutter button fully down . Release the shutter button, then focus again. "RECORDING" appears on a "Memory Stick" (8 MB or 16 MB) See pages ...
...lock indicator changes to flashing slowly, the subject may be difficult to turn on the "Memory Stick." The auto power-off also will be extremely close. The auto power-off function only operates when the camera is flashing. (During this does not affect the recorded image. • When you... LCD screen color may be recorded on the camera again. 3 Press the shutter button fully down at once in the direction of images you press the shutter button fully down . Release the shutter button, then focus again. "RECORDING" appears on a "Memory Stick" (8 MB or 16 MB) See pages ...
Operating Instructions
Page 26
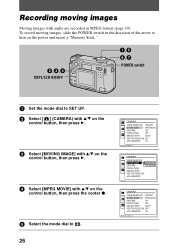
... record moving images Moving images with v/V on the power and insert a "Memory Stick." Recording moving images, slide the POWER switch in MPEG format (page 39). DSPL/LCD ON/OFF POWER switch 1 Set the mode dial to SET UP. 2 Select [ ] (CAMERA) with v/V on the control button, then press B. 3 Select [MOVING ... of the arrow to turn on the control button, then press the center z. 5 Select the mode dial to . 26 CAMERA SCENE SELECTION: TWILIGHT MOVING IMAGE: MPEG MOVIE DATE/TIME: OFF DIGITAL ZOOM: OFF BRACKET STEP: ±0.7EV RED EYE REDUCTION: OFF AF ILLUMINATOR: ON PAGE SELECT...
... record moving images Moving images with v/V on the power and insert a "Memory Stick." Recording moving images, slide the POWER switch in MPEG format (page 39). DSPL/LCD ON/OFF POWER switch 1 Set the mode dial to SET UP. 2 Select [ ] (CAMERA) with v/V on the control button, then press B. 3 Select [MOVING ... of the arrow to turn on the control button, then press the center z. 5 Select the mode dial to . 26 CAMERA SCENE SELECTION: TWILIGHT MOVING IMAGE: MPEG MOVIE DATE/TIME: OFF DIGITAL ZOOM: OFF BRACKET STEP: ±0.7EV RED EYE REDUCTION: OFF AF ILLUMINATOR: ON PAGE SELECT...
Operating Instructions
Page 27
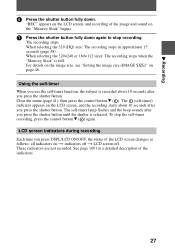
... 6 Press the shutter button fully down again to stop the self-timer recording, press the control button V ( ) again. The (self-timer) indicator appears on the "Memory Stick" begins. 7 Press the shutter button fully down . These indicators are not recorded. "REC" appears on the LCD screen, and recording of the indicators. 27 When...
... 6 Press the shutter button fully down again to stop the self-timer recording, press the control button V ( ) again. The (self-timer) indicator appears on the "Memory Stick" begins. 7 Press the shutter button fully down . These indicators are not recorded. "REC" appears on the LCD screen, and recording of the indicators. 27 When...

Operating Instructions
Page 31
...first frame of USB mode is supported. The mode can be unable to open a still image file. • When you may be checked and set using the [NORMAL]...Memory Stick" from the personal computer. Make sure that applications that operations can view data recorded with v/V. Moving images/audio: MPEG format - The factory setting of the Clip Motion file may increase when you open the image. • Depending on your camera... is stored in the personal computer beforehand. Be sure to also refer to use the USB cable, a USB driver must be informed at the Sony website ...
...first frame of USB mode is supported. The mode can be unable to open a still image file. • When you may be checked and set using the [NORMAL]...Memory Stick" from the personal computer. Make sure that applications that operations can view data recorded with v/V. Moving images/audio: MPEG format - The factory setting of the Clip Motion file may increase when you open the image. • Depending on your camera... is stored in the personal computer beforehand. Be sure to also refer to use the USB cable, a USB driver must be informed at the Sony website ...

Operating Instructions
Page 33
... connecting the USB cable. to the USB connector to install the USB driver. B Playback Installing the USB driver Before connecting your camera to your personal computer, install the USB driver to complete installation of your personal computer. Your personal computer may restart. 5 Connect...allow Windows to communication standby mode. Your personal computer recognizes the camera, and the Windows Add Hardware Wizard starts. 33 If you connect the USB cable first, you will go. 6 Insert a "Memory Stick" into your camera, connect the AC power adaptor and turn on your personal ...
... connecting the USB cable. to the USB connector to install the USB driver. B Playback Installing the USB driver Before connecting your camera to your personal computer, install the USB driver to complete installation of your personal computer. Your personal computer may restart. 5 Connect...allow Windows to communication standby mode. Your personal computer recognizes the camera, and the Windows Add Hardware Wizard starts. 33 If you connect the USB cable first, you will go. 6 Insert a "Memory Stick" into your camera, connect the AC power adaptor and turn on your personal ...

Operating Instructions
Page 34
...OS to open the window. 5 Move the following two files from the window opened in step 4 (drag and drop). • Sony USB Driver • Sony USB Shim 6 When "Put these items into your personal computer. 34 The Add Hardware Wizard starts twice because two different USB drivers ... 3 to have the Add Hardware Wizard recognize the hardware. appears, click "OK." 7 Restart your camera before the USB driver installation is completed in step 4. • In step 7, make sure that a "Memory Stick" is not necessary to complete without interrupting it to the Macintosh with the USB cable. • ...
...OS to open the window. 5 Move the following two files from the window opened in step 4 (drag and drop). • Sony USB Driver • Sony USB Shim 6 When "Put these items into your personal computer. 34 The Add Hardware Wizard starts twice because two different USB drivers ... 3 to have the Add Hardware Wizard recognize the hardware. appears, click "OK." 7 Restart your camera before the USB driver installation is completed in step 4. • In step 7, make sure that a "Memory Stick" is not necessary to complete without interrupting it to the Macintosh with the USB cable. • ...
Operating Instructions
Page 35
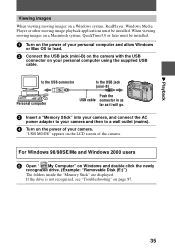
... click the newly recognized drive. (Example: "Removable Disk (E:)") The folders inside the "Memory Stick" are displayed. For Windows 98/98SE/Me and Windows 2000 users 5 Open " My Computer" on the LCD screen of the camera. to the USB connector to the USB jack (mini-B) Personal computer Push the USB... connector in as far as it will go. 3 Insert a "Memory Stick" into your camera, and connect the AC power adaptor to your camera and then to load. 2 Connect the USB jack (mini-B) on the camera with the USB connector on your camera. If the drive is not recognized, see "Troubleshooting" on page 87...
... click the newly recognized drive. (Example: "Removable Disk (E:)") The folders inside the "Memory Stick" are displayed. For Windows 98/98SE/Me and Windows 2000 users 5 Open " My Computer" on the LCD screen of the camera. to the USB connector to the USB jack (mini-B) Personal computer Push the USB... connector in as far as it will go. 3 Insert a "Memory Stick" into your camera, and connect the AC power adaptor to your camera and then to load. 2 Connect the USB jack (mini-B) on the camera with the USB connector on your camera. If the drive is not recognized, see "Troubleshooting" on page 87...

Operating Instructions
Page 36
...camera through a USB connection. • Do not optimize the "Memory Stick" on a Windows machine. Compressed files cannot be played back on page 38. Desired file type Double-click in your personal computer "Memory Stick" • Operation is recommended. If you used a personal computer to format the "Memory Stick" in this order Still..." folder t Image file TIFF image (uncompressed) ∗ Copying a file to the hard disk of your camera. 36 This will shorten the "Memory Stick" life. • Do not compress the data on the desktop. For the detailed folder and file name...
...camera through a USB connection. • Do not optimize the "Memory Stick" on a Windows machine. Compressed files cannot be played back on page 38. Desired file type Double-click in your personal computer "Memory Stick" • Operation is recommended. If you used a personal computer to format the "Memory Stick" in this order Still..." folder t Image file TIFF image (uncompressed) ∗ Copying a file to the hard disk of your camera. 36 This will shorten the "Memory Stick" life. • Do not compress the data on the desktop. For the detailed folder and file name...

Operating Instructions
Page 37
... when you directly modify the image on the camera, the image format will differ so the "FILE ERROR" message may appear and you may increase when you open a still image file. • When you load an image modified using the supplied retouch software from your personal ...Playback For Windows Me and Windows 2000 users The following procedures are recommended when disconnecting the USB cable from your personal computer or ejecting the "Memory Stick" from Suspend, Resume, or Sleep. 37 Software • Depending on your application software, only the first frame of the hardware, disconnect...
... when you directly modify the image on the camera, the image format will differ so the "FILE ERROR" message may appear and you may increase when you open a still image file. • When you load an image modified using the supplied retouch software from your personal ...Playback For Windows Me and Windows 2000 users The following procedures are recommended when disconnecting the USB cable from your personal computer or ejecting the "Memory Stick" from Suspend, Resume, or Sleep. 37 Software • Depending on your application software, only the first frame of the hardware, disconnect...
Operating Instructions
Page 49
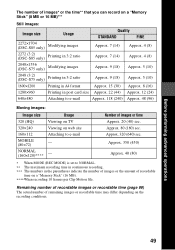
.... 20 (40) sec. Approx. 320 (640) sec. Before performing advanced operations The number of images* or the time** that you can record on a "Memory Stick" (8 MB or 16 MB)*** Still images: Image size Usage Quality STANDARD FINE 2272×1704 (DSC-S85 only) Modifying images Approx. 7 (14) Approx. 4 (8) 2272 (3:2) (DSC-S85 only.... 15 (30) Approx. 8 (16) 1280×960 Printing in the parentheses indicate the number of images or the amount of recordable time on a "Memory Stick" (16 MB). ∗∗∗∗When recording 10 frames per Clip Motion file. Approx. 80 (160) sec.
.... 20 (40) sec. Approx. 320 (640) sec. Before performing advanced operations The number of images* or the time** that you can record on a "Memory Stick" (8 MB or 16 MB)*** Still images: Image size Usage Quality STANDARD FINE 2272×1704 (DSC-S85 only) Modifying images Approx. 7 (14) Approx. 4 (8) 2272 (3:2) (DSC-S85 only.... 15 (30) Approx. 8 (16) 1280×960 Printing in the parentheses indicate the number of images or the amount of recordable time on a "Memory Stick" (16 MB). ∗∗∗∗When recording 10 frames per Clip Motion file. Approx. 80 (160) sec.
Operating Instructions
Page 55
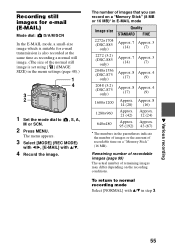
...the same time as recording a normal still image. (The size of the normal still image is set using [ ] (IMAGE SIZE) in step 3. To return to normal recording mode Select [NORMAL] with v/V. 4 Record the image. B Various recording 55 The number of images that you can record on a "Memory Stick" (8 MB or 16 MB)* ...in the parentheses indicate the number of images or the amount of remaining images may differ depending on a "Memory Stick" (16 MB). Approx. 8 14 (28) (16) 1280×960 Approx. Remaining number of recordable images (page 99) The actual number of recordable time ...
...the same time as recording a normal still image. (The size of the normal still image is set using [ ] (IMAGE SIZE) in step 3. To return to normal recording mode Select [NORMAL] with v/V. 4 Record the image. B Various recording 55 The number of images that you can record on a "Memory Stick" (8 MB or 16 MB)* ...in the parentheses indicate the number of images or the amount of remaining images may differ depending on a "Memory Stick" (16 MB). Approx. 8 14 (28) (16) 1280×960 Approx. Remaining number of recordable images (page 99) The actual number of recordable time ...

Operating Instructions
Page 56
...SCN. 2 Press MENU. The number of recordable time on a "Memory Stick" (16 MB). ** When recording 5-second audio. If you hold down the shutter button, sound is also recorded at the same time as recording a still image. Adding audio files to still images (VOICE) Mode dial: /S/A/M/SCN In the VOICE mode, ...sound is recorded for up to normal recording mode Select [NORMAL] with v/V. 4 Record the image. To return to 40 seconds. You can record on a "Memory Stick" (8 MB or 16 MB)* in VOICE mode** Quality Image size STANDARD FINE 2272×1704 (DSC-S85 only) Approx. 7 (13) Approx. 3 ...
...SCN. 2 Press MENU. The number of recordable time on a "Memory Stick" (16 MB). ** When recording 5-second audio. If you hold down the shutter button, sound is also recorded at the same time as recording a still image. Adding audio files to still images (VOICE) Mode dial: /S/A/M/SCN In the VOICE mode, ...sound is recorded for up to normal recording mode Select [NORMAL] with v/V. 4 Record the image. To return to 40 seconds. You can record on a "Memory Stick" (8 MB or 16 MB)* in VOICE mode** Quality Image size STANDARD FINE 2272×1704 (DSC-S85 only) Approx. 7 (13) Approx. 3 ...
Operating Instructions
Page 57
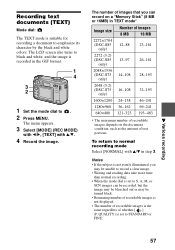
... is not displayed. • The number of recordable images is the same regardless of text portions. To return to S, A, M, or SCN images can record on a "Memory Stick" (8 MB or 16MB) in TEXT mode* Image size Number of images 8 MB 16 MB 2272×1704 (DSC-S85 only) 12-88 23-161 2272...
... is not displayed. • The number of recordable images is the same regardless of text portions. To return to S, A, M, or SCN images can record on a "Memory Stick" (8 MB or 16MB) in TEXT mode* Image size Number of images 8 MB 16 MB 2272×1704 (DSC-S85 only) 12-88 23-161 2272...


