Instruction Manual
Page 8
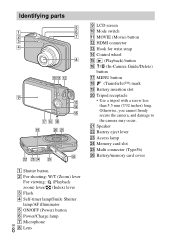
...) lever/ (Index) lever C Flash D Self-timer lamp/Smile Shutter lamp/AF illuminator E ON/OFF (Power) button F Power/Charge lamp G Microphone 8GB H Lens Identifying parts I LCD screen J Mode switch K MOVIE (Movie) button L HDMI connector M Hook for wrist strap N Control wheel O (Playback) button P / (In-Camera Guide/Delete) button Q MENU button R (TransferJet™) mark...
...) lever/ (Index) lever C Flash D Self-timer lamp/Smile Shutter lamp/AF illuminator E ON/OFF (Power) button F Power/Charge lamp G Microphone 8GB H Lens Identifying parts I LCD screen J Mode switch K MOVIE (Movie) button L HDMI connector M Hook for wrist strap N Control wheel O (Playback) button P / (In-Camera Guide/Delete) button Q MENU button R (TransferJet™) mark...
Instruction Manual
Page 13
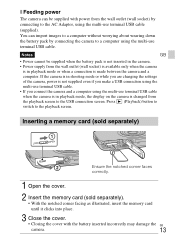
... is in playback mode or when a connection is changed from the wall outlet (wall socket) by connecting the camera to the USB connection screen. Notes GB • Power cannot be supplied with the battery inserted incorrectly may damage the GB camera. 13 Press (Playback) button to ... as illustrated, insert the memory card until it clicks into place. 3 Close the cover. • Closing the cover with power from the playback screen to a computer using the multi-use terminal USB cable. x Feeding power The camera can import images to a computer without worrying about wearing down...
... is in playback mode or when a connection is changed from the wall outlet (wall socket) by connecting the camera to the USB connection screen. Notes GB • Power cannot be supplied with the battery inserted incorrectly may damage the GB camera. 13 Press (Playback) button to ... as illustrated, insert the memory card until it clicks into place. 3 Close the cover. • Closing the cover with power from the playback screen to a computer using the multi-use terminal USB cable. x Feeding power The camera can import images to a computer without worrying about wearing down...
Instruction Manual
Page 15
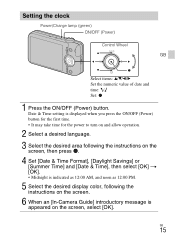
...; It may take time for the power to turn on and allow operation. 2 Select a desired language. 3 Select the desired area following the instructions on the screen, then press z. 4 Set [Date & Time Format], [Daylight Savings] or [Summer Time] and [Date & Time], then select [OK] t [OK]. • Midnight is indicated as 12:00... AM, and noon as 12:00 PM. 5 Select the desired display color, following the instructions on the screen. 6 When an [In-Camera Guide] introductory message is appeared on the...
...; It may take time for the power to turn on and allow operation. 2 Select a desired language. 3 Select the desired area following the instructions on the screen, then press z. 4 Set [Date & Time Format], [Daylight Savings] or [Summer Time] and [Date & Time], then select [OK] t [OK]. • Midnight is indicated as 12:00... AM, and noon as 12:00 PM. 5 Select the desired display color, following the instructions on the screen. 6 When an [In-Camera Guide] introductory message is appeared on the...
Instruction Manual
Page 17
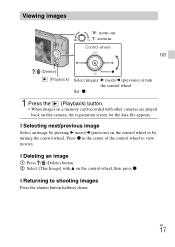
... by turning the control wheel. x Deleting an image 1 Press / (Delete) button. 2 Select [This Image] with other cameras are played back on this camera, the registration screen for the data file appears. GB 17 Viewing images W: zoom out T: zoom in the center of the control wheel to shooting images Press the shutter...
... by turning the control wheel. x Deleting an image 1 Press / (Delete) button. 2 Select [This Image] with other cameras are played back on this camera, the registration screen for the data file appears. GB 17 Viewing images W: zoom out T: zoom in the center of the control wheel to shooting images Press the shutter...
Instruction Manual
Page 19
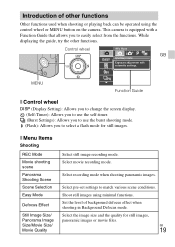
... background defocus effect when shooting in Background Defocus mode. Control wheel GB MENU Function Guide x Control wheel DISP (Display Setting): Allows you to change the screen display. (Self-Timer): Allows you to use the self-timer. (Burst Settings): Allows you to use the burst shooting mode. (Flash): Allows you to match...
... background defocus effect when shooting in Background Defocus mode. Control wheel GB MENU Function Guide x Control wheel DISP (Display Setting): Allows you to change the screen display. (Self-Timer): Allows you to use the self-timer. (Burst Settings): Allows you to use the burst shooting mode. (Flash): Allows you to match...
Instruction Manual
Page 20
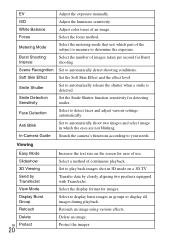
... the shutter when a smile is detected. Adjust the luminous sensitivity. Select the number of use. Set to display burst images in 3D mode on the screen for ease of images taken per second for Burst shooting. Select a method of continuous playback. Select to automatically detect shooting conditions. Transfer data by TransferJet...
... the shutter when a smile is detected. Adjust the luminous sensitivity. Select the number of use. Set to display burst images in 3D mode on the screen for ease of images taken per second for Burst shooting. Select a method of continuous playback. Select to automatically detect shooting conditions. Transfer data by TransferJet...
Instruction Manual
Page 21
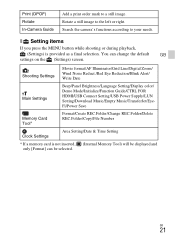
... right. Search the camera's functions according to your needs. You can be displayed and only [Format] can change the default GB settings on the (Settings) screen. GB 21
... right. Search the camera's functions according to your needs. You can be displayed and only [Format] can change the default GB settings on the (Settings) screen. GB 21
Instruction Manual
Page 24
...magnetic place. On camera's temperature Your camera and battery may get into the camera. However, some cases this may appear on the LCD screen before the power turns off and wait until the camera and battery temperature goes down in a chair or other place with excellent contrast. ...pocket of Carl Zeiss in Germany. On the overheat protection Depending on the camera and battery temperature, you may be displayed on the LCD screen. These dots are operational for the camera has been produced under a quality assurance system certified by Carl Zeiss in accordance with a Carl ...
...magnetic place. On camera's temperature Your camera and battery may get into the camera. However, some cases this may appear on the LCD screen before the power turns off and wait until the camera and battery temperature goes down in a chair or other place with excellent contrast. ...pocket of Carl Zeiss in Germany. On the overheat protection Depending on the camera and battery temperature, you may be displayed on the LCD screen. These dots are operational for the camera has been produced under a quality assurance system certified by Carl Zeiss in accordance with a Carl ...
Instruction Manual
Page 27
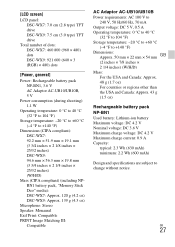
GB 27 [LCD screen] LCD panel: DSC-WX7: 7.0 cm (2.8 type) TFT drive DSC-WX9: 7.5 cm (3.0 type) TFT drive Total number of dots: DSC-WX7: 460 800 (960 × 480) dots DSC-WX9: 921 600 (640 × 3 (RGB) × 480) dots [Power, general] Power: Rechargeable battery pack NP-BN1...× 2 1/4 inches × 25/32 inches) (W/H/D) Mass (CIPA compliant) (including NPBN1 battery pack, "Memory Stick Duo" media): DSC-WX7: Approx. 120 g (4.2 oz) DSC-WX9: Approx. 139 g (4.3 oz) Microphone: Stereo Speaker: Monaural Exif Print: Compatible PRINT Image Matching III: Compatible AC Adaptor AC-UB10/UB10B Power...
GB 27 [LCD screen] LCD panel: DSC-WX7: 7.0 cm (2.8 type) TFT drive DSC-WX9: 7.5 cm (3.0 type) TFT drive Total number of dots: DSC-WX7: 460 800 (960 × 480) dots DSC-WX9: 921 600 (640 × 3 (RGB) × 480) dots [Power, general] Power: Rechargeable battery pack NP-BN1...× 2 1/4 inches × 25/32 inches) (W/H/D) Mass (CIPA compliant) (including NPBN1 battery pack, "Memory Stick Duo" media): DSC-WX7: Approx. 120 g (4.2 oz) DSC-WX9: Approx. 139 g (4.3 oz) Microphone: Stereo Speaker: Monaural Exif Print: Compatible PRINT Image Matching III: Compatible AC Adaptor AC-UB10/UB10B Power...


