Operating Instructions
Page 3
...not installed and used with the equipment in order to comply with the limits for a Class B digital device, pursuant to radio communications. Increase the separation between the equipment and receiver. - For Customers ...attach the fuse cover after you should lose the fuse cover, please contact your nearest Sony service station. Connect the equipment into an outlet on , the user is fitted to...://www.rbrc.org/ Caution: Do not handle damaged or leaking Nickel Metal Hydride batteries. If this camera. Consult the dealer or an experienced radio/TV technician for help preserve our environment...
...not installed and used with the equipment in order to comply with the limits for a Class B digital device, pursuant to radio communications. Increase the separation between the equipment and receiver. - For Customers ...attach the fuse cover after you should lose the fuse cover, please contact your nearest Sony service station. Connect the equipment into an outlet on , the user is fitted to...://www.rbrc.org/ Caution: Do not handle damaged or leaking Nickel Metal Hydride batteries. If this camera. Consult the dealer or an experienced radio/TV technician for help preserve our environment...

Operating Instructions
Page 4
... stick to record images, this may not be compensated for this camera is working correctly. • Be careful not to record or play back properly. • Using the camera in a cool, dry place. Also, even if batteries are not fully charged, you can use the partially charged capacity ...of the batteries as is capable of data loss. Carl Zeiss lens This camera is equipped with your camera. • "Memory Stick Duo": you...
... stick to record images, this may not be compensated for this camera is working correctly. • Be careful not to record or play back properly. • Using the camera in a cool, dry place. Also, even if batteries are not fully charged, you can use the partially charged capacity ...of the batteries as is capable of data loss. Carl Zeiss lens This camera is equipped with your camera. • "Memory Stick Duo": you...

Operating Instructions
Page 6
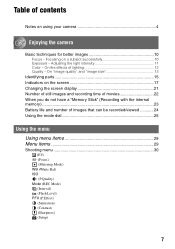
For full use of the digital still camera Prepare the camera and shoot in auto adjustment mode "Read This First" (separate volume) 1 Prepare the battery 2 Turn the camera on/set the clock 3 Insert a "Memory Stick" (not supplied) 4 Select the image size for use 5 Shoot images easily (Auto adjustment mode) Shoot still images (Scene Selection) 6 View images/Delete images...
For full use of the digital still camera Prepare the camera and shoot in auto adjustment mode "Read This First" (separate volume) 1 Prepare the battery 2 Turn the camera on/set the clock 3 Insert a "Memory Stick" (not supplied) 4 Select the image size for use 5 Shoot images easily (Auto adjustment mode) Shoot still images (Scene Selection) 6 View images/Delete images...
Operating Instructions
Page 7
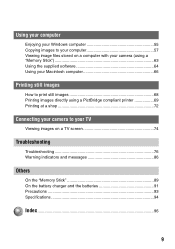
... 15 Indicators on the screen 17 Changing the screen display 21 Number of still images and recording time of movies 22 When you do not have a "Memory Stick" (Recording with the internal memory 23 Battery life and number of lighting 12 Quality - On the effects of images...(Metering Mode) WB (White Bal) ISO (P.Quality) Mode (REC Mode) M (Interval) (Flash Level) PFX (P.Effect) (Saturation) (Contrast) (Sharpness) (Setup) 7 Focusing on using your camera 4 Enjoying the camera Basic techniques for better images 10 Focus - Table of contents Notes on a subject successfully 10 Exposure -
... 15 Indicators on the screen 17 Changing the screen display 21 Number of still images and recording time of movies 22 When you do not have a "Memory Stick" (Recording with the internal memory 23 Battery life and number of lighting 12 Quality - On the effects of images...(Metering Mode) WB (White Bal) ISO (P.Quality) Mode (REC Mode) M (Interval) (Flash Level) PFX (P.Effect) (Saturation) (Contrast) (Sharpness) (Setup) 7 Focusing on using your camera 4 Enjoying the camera Basic techniques for better images 10 Focus - Table of contents Notes on a subject successfully 10 Exposure -
Operating Instructions
Page 9
... computer 57 Viewing image files stored on a computer with your camera (using a "Memory Stick 63 Using the supplied software 64 Using your Macintosh computer 66 Printing still images How to print still images 68 Printing images directly using a PictBridge compliant printer 69... Printing at a shop 72 Connecting your camera to your TV Viewing images on a TV screen 74 Troubleshooting Troubleshooting 76 Warning indicators and messages 86 Others On the "Memory Stick 89 On the battery charger and the batteries...
... computer 57 Viewing image files stored on a computer with your camera (using a "Memory Stick 63 Using the supplied software 64 Using your Macintosh computer 66 Printing still images How to print still images 68 Printing images directly using a PictBridge compliant printer 69... Printing at a shop 72 Connecting your camera to your TV Viewing images on a TV screen 74 Troubleshooting Troubleshooting 76 Warning indicators and messages 86 Others On the "Memory Stick 89 On the battery charger and the batteries...
Operating Instructions
Page 16
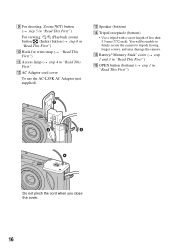
... This First") Do not pinch the cord when you close the cover. 16 You will be unable to firmly secure the camera to tripods having longer screws, and may damage the camera. O Battery/"Memory Stick" cover (t step 1 and 3 in "Read This First") P OPEN button (bottom) (t step 1 in "Read This First" L AC Adaptor cord...
... This First") Do not pinch the cord when you close the cover. 16 You will be unable to firmly secure the camera to tripods having longer screws, and may damage the camera. O Battery/"Memory Stick" cover (t step 1 and 3 in "Read This First") P OPEN button (bottom) (t step 1 in "Read This First" L AC Adaptor cord...
Operating Instructions
Page 17
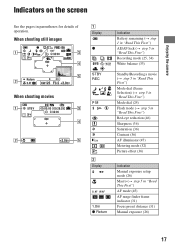
Enjoying the camera Indicators on the screen See the pages in "Read This First") AF mode (45) AF range finder frame indicator (31) Focus preset distance (31) Manual exposure (26) 17 When shooting still images When shooting movies STBY STD 640 101 00:00:00 [00:28:25] C:32:00 + +2.0EV... A Display z M WB STBY REC SL 5 6 ON B Display S AF M AF 1.0m z Return Indication Battery remaining (t step 1 in "Read This First") AE/AF ...
Enjoying the camera Indicators on the screen See the pages in "Read This First") AF mode (45) AF range finder frame indicator (31) Focus preset distance (31) Manual exposure (26) 17 When shooting still images When shooting movies STBY STD 640 101 00:00:00 [00:28:25] C:32:00 + +2.0EV... A Display z M WB STBY REC SL 5 6 ON B Display S AF M AF 1.0m z Return Indication Battery remaining (t step 1 in "Read This First") AE/AF ...

Operating Instructions
Page 18
However, we recommend holding the camera steadily and turning off the indicator to avoid the effects of recordable images (22) Self-timer (t step 5 in W17 only) "Read This First") 5M 3:2 3M ... Indication 7M (DSC-W7/ Image size (t step 4 in "Read This First") C:32:00 Self-diagnosis display (86) Date/Time (46) ISO number (33) D Display E + Indication Vibration warning (10) • Indicates vibration will prevent you can still shoot images. Even if the vibration warning appears, you from shooting clear images. Low battery warning (24) Spot...
However, we recommend holding the camera steadily and turning off the indicator to avoid the effects of recordable images (22) Self-timer (t step 5 in W17 only) "Read This First") 5M 3:2 3M ... Indication 7M (DSC-W7/ Image size (t step 4 in "Read This First") C:32:00 Self-diagnosis display (86) Date/Time (46) ISO number (33) D Display E + Indication Vibration warning (10) • Indicates vibration will prevent you can still shoot images. Even if the vibration warning appears, you from shooting clear images. Low battery warning (24) Spot...
Operating Instructions
Page 19
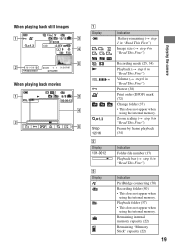
...This does not appear when using the internal memory. Remaining internal memory capacity (22) Remaining "Memory Stick" capacity (22) 19 Enjoying the camera When playing back still images M VGA 101 101 12/12 C:32:00 1.3 +2.0EV 500 F3.5 BACK/NEXT VOLUME When playing back movies A Display 7M 5M... 3:2 3M 1M VGA FINE 640 STD 640 160 M N - 1.3 Step 12/16 Indication Battery remaining (t step 1 in "Read This First") Image size (t step...
...This does not appear when using the internal memory. Remaining internal memory capacity (22) Remaining "Memory Stick" capacity (22) 19 Enjoying the camera When playing back still images M VGA 101 101 12/12 C:32:00 1.3 +2.0EV 500 F3.5 BACK/NEXT VOLUME When playing back movies A Display 7M 5M... 3:2 3M 1M VGA FINE 640 STD 640 160 M N - 1.3 Step 12/16 Indication Battery remaining (t step 1 in "Read This First") Image size (t step...

Operating Instructions
Page 24
... turns on and off many times - The surrounding temperature is low When shooting still images Battery LCD screen No. Shooting once every 30 seconds - The flash strobes once every two times - The camera has been turned on and off once every ten times • The measurement method...flash is used frequently - [LCD Backlight] is set to [Bright] - [AF Mode] is set to [Single] - The numbers of images (Approx.) Battery life (min.) DSC-W7/W17 NH-AA- The zoom is switched alternately between the W and T ends - On DA Off (Ni-MH) (supplied) 380 190 500 250 Alkaline...
... turns on and off many times - The surrounding temperature is low When shooting still images Battery LCD screen No. Shooting once every 30 seconds - The flash strobes once every two times - The camera has been turned on and off once every ten times • The measurement method...flash is used frequently - [LCD Backlight] is set to [Bright] - [AF Mode] is set to [Single] - The numbers of images (Approx.) Battery life (min.) DSC-W7/W17 NH-AA- The zoom is switched alternately between the W and T ends - On DA Off (Ni-MH) (supplied) 380 190 500 250 Alkaline...
Operating Instructions
Page 34
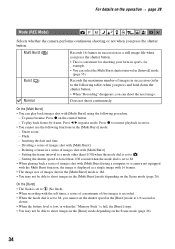
... the shutter speed in the [Burst] mode to 1/6 second or slower. • When the battery level is low, or when the "Memory Stick" is 1M. • You may not be able...on the control button. - To play back images shot with [Multi Burst] using a computer or a camera not equipped with 16 frames. • The image size of images shot with [Multi Burst] - Smart zoom - Deleting...Records 16 frames in succession as a single image with the Multi Burst function, the image is displayed as a still image file when you press the shutter button. • This is set to M, you cannot set to ...
... the shutter speed in the [Burst] mode to 1/6 second or slower. • When the battery level is low, or when the "Memory Stick" is 1M. • You may not be able...on the control button. - To play back images shot with [Multi Burst] using a computer or a camera not equipped with 16 frames. • The image size of images shot with [Multi Burst] - Smart zoom - Deleting...Records 16 frames in succession as a single image with the Multi Burst function, the image is displayed as a still image file when you press the shutter button. • This is set to M, you cannot set to ...
Operating Instructions
Page 45
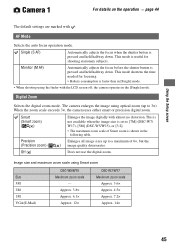
...the LCD screen off, the camera operates in the following table. Digital Zoom Selects the digital zoom mode. Smart (Smart zoom) ( ) Enlarges the image digitally with . Off ( ) Does not use the digital zoom. This mode is useful for focusing. • Battery consumption is pressed and held...215; Approx. 6.1× Approx. 12× DSC-W7/W17 Maximum zoom scale Approx. 3.6× Approx. 4.5× Approx. 7.2× Approx. 14× 45 When the zoom scale exceeds 3×, the camera uses either smart or precision digital zoom. This is not available when the image size...
...the LCD screen off, the camera operates in the following table. Digital Zoom Selects the digital zoom mode. Smart (Smart zoom) ( ) Enlarges the image digitally with . Off ( ) Does not use the digital zoom. This mode is useful for focusing. • Battery consumption is pressed and held...215; Approx. 6.1× Approx. 12× DSC-W7/W17 Maximum zoom scale Approx. 3.6× Approx. 4.5× Approx. 7.2× Approx. 14× 45 When the zoom scale exceeds 3×, the camera uses either smart or precision digital zoom. This is not available when the image size...
Operating Instructions
Page 51
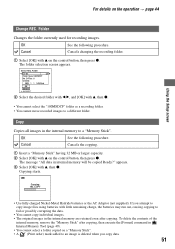
...on the control button, then press z. If you copy data. 51 The folder selection screen appears. appears. 3 Select [OK] with little remaining charge, the batteries may run out, causing copying to fail or possibly corrupting the data. • You cannot copy individual images. • The original images in Internal Memory...". For details on a "Memory Stick". • A (Print order) mark added to an image is deleted when you attempt to copy image files using batteries with v, then z. OK See the following procedure. Folder Changes the folder currently used for recording images.
...on the control button, then press z. If you copy data. 51 The folder selection screen appears. appears. 3 Select [OK] with little remaining charge, the batteries may run out, causing copying to fail or possibly corrupting the data. • You cannot copy individual images. • The original images in Internal Memory...". For details on a "Memory Stick". • A (Print order) mark added to an image is deleted when you attempt to copy image files using batteries with v, then z. OK See the following procedure. Folder Changes the folder currently used for recording images.
Operating Instructions
Page 52
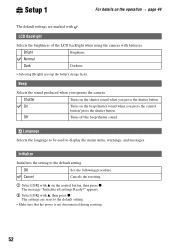
...warnings, and messages. Cancel Cancels the resetting. 1 Select [OK] with . appears. 2 Select [OK] with batteries. Normal Dark Darkens. • Selecting [Bright] uses up the battery charge faster. Shutter Turns on the operation t page 44 The default settings are reset to the default setting. ...• Make sure that the power is not disconnected during resetting. 52 Beep Selects the sound produced when you operate the camera. Language...
...warnings, and messages. Cancel Cancels the resetting. 1 Select [OK] with . appears. 2 Select [OK] with batteries. Normal Dark Darkens. • Selecting [Bright] uses up the battery charge faster. Shutter Turns on the operation t page 44 The default settings are reset to the default setting. ...• Make sure that the power is not disconnected during resetting. 52 Beep Selects the sound produced when you operate the camera. Language...
Operating Instructions
Page 58
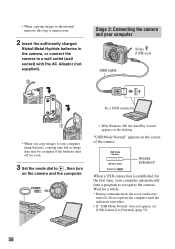
... If "USB Mode Normal" does not appear, set [USB Connect] to recognize the camera. Wait for the first time, your computer using batteries, copying may fail or image data may be corrupted if the batteries shut off too soon. 3 Set the mode dial to a wall outlet (wall socket)... USB Mode Normal Memory Stick Switch on MENU Access indicators* When a USB connection is unnecessary. 2 Insert the sufficiently charged Nickel-Metal Hydride batteries in the internal memory, this step is established for a while. * During communication, the access indicators turn red. Do not operate the ...
... If "USB Mode Normal" does not appear, set [USB Connect] to recognize the camera. Wait for the first time, your computer using batteries, copying may fail or image data may be corrupted if the batteries shut off too soon. 3 Set the mode dial to a wall outlet (wall socket)... USB Mode Normal Memory Stick Switch on MENU Access indicators* When a USB connection is unnecessary. 2 Insert the sufficiently charged Nickel-Metal Hydride batteries in the internal memory, this step is established for a while. * During communication, the access indicators turn red. Do not operate the ...
Operating Instructions
Page 76
Please understand that you give your consent that the contents of the internal memory may be repaired. 76 Troubleshooting Troubleshooting If you send your camera to 85. If a code such as "C/E:ss:ss" appears on the screen, see page 86. 2 Remove the batteries, and insert the batteries again after about one minute, and turn on pages 77 to be checked when you experience trouble with your camera, try the following solutions. 1 Check the items on the power. 3 Initialize the settings (pages 52) 4 Consult your Sony dealer or local authorized Sony service facility.
Please understand that you give your consent that the contents of the internal memory may be repaired. 76 Troubleshooting Troubleshooting If you send your camera to 85. If a code such as "C/E:ss:ss" appears on the screen, see page 86. 2 Remove the batteries, and insert the batteries again after about one minute, and turn on pages 77 to be checked when you experience trouble with your camera, try the following solutions. 1 Check the items on the power. 3 Initialize the settings (pages 52) 4 Consult your Sony dealer or local authorized Sony service facility.
Operating Instructions
Page 77
... The poles of batteries or the terminals of the battery cover are dirty so the batteries are not charged sufficiently. Install charged batteries (t step 1 in "Read This First") - Install charged batteries (t step 1 in "Read This First"). • The batteries are discharged. Shooting still images/movies The ... switch on the camera. • Install the batteries correctly (t step 1 in "Read This First"). Cannot turn on even when the power is on the screen (page 21). Batteries and power The battery remaining indicator is incorrect, or sufficient battery remaining indicator is displayed...
... The poles of batteries or the terminals of the battery cover are dirty so the batteries are not charged sufficiently. Install charged batteries (t step 1 in "Read This First") - Install charged batteries (t step 1 in "Read This First"). • The batteries are discharged. Shooting still images/movies The ... switch on the camera. • Install the batteries correctly (t step 1 in "Read This First"). Cannot turn on even when the power is on the screen (page 21). Batteries and power The battery remaining indicator is incorrect, or sufficient battery remaining indicator is displayed...
Operating Instructions
Page 80
Install charged batteries. Viewing images Refer to "Computers" (page 81) in conjunction with the following items. Your camera cannot play back images. • Set the mode dial to (page 25). • The folder/file name has been changed on the screen. • .... • The internal memory or the "Memory Stick" is connected. Delete unnecessary images (t step 6 in "Read This First"). • The battery level is not a malfunction. Deleting/Editing images Your camera cannot delete an image. • Cancel the protection (page 39). • Set the write-protect switch on your TV (page 53...
Install charged batteries. Viewing images Refer to "Computers" (page 81) in conjunction with the following items. Your camera cannot play back images. • Set the mode dial to (page 25). • The folder/file name has been changed on the screen. • .... • The internal memory or the "Memory Stick" is connected. Delete unnecessary images (t step 6 in "Read This First"). • The battery level is not a malfunction. Deleting/Editing images Your camera cannot delete an image. • Cancel the protection (page 39). • Set the write-protect switch on your TV (page 53...
Operating Instructions
Page 81
...hub or other than about two seconds). • Cancel the protection (page 39). • Still images cannot be cut (shorter than the keyboard and the mouse from both the computer and the camera, and connect it . Install the USB driver (page 57). • Your computer does not... set protection on an image (page 38), or set the write-protect switch on the camera (t step 2 in "Read This First"). • When the battery level is not long enough to your computer with the camera. • Check "Recommended computer environment" (page 56) for Windows, and "Recommended environment...
...hub or other than about two seconds). • Cancel the protection (page 39). • Still images cannot be cut (shorter than the keyboard and the mouse from both the computer and the camera, and connect it . Install the USB driver (page 57). • Your computer does not... set protection on an image (page 38), or set the write-protect switch on the camera (t step 2 in "Read This First"). • When the battery level is not long enough to your computer with the camera. • Check "Recommended computer environment" (page 56) for Windows, and "Recommended environment...
Operating Instructions
Page 85
... • Wait for a long time. • This is not working properly. Cannot operate the camera after one minute, insert the batteries and turn on the printer. Cannot identify an indicator on the camera. • Set the date and time again (t step 2 in "Read This First"). The lens ...it for a while as the printer is low (The E indicator appears). Replace them with this camera (page 91). • The battery level is carrying out the cancellation. Turn off the camera. • The batteries are discharged. The Clock Set screen appears when you turn on the screen. • See ...
... • Wait for a long time. • This is not working properly. Cannot operate the camera after one minute, insert the batteries and turn on the printer. Cannot identify an indicator on the camera. • Set the date and time again (t step 2 in "Read This First"). The lens ...it for a while as the printer is low (The E indicator appears). Replace them with this camera (page 91). • The battery level is carrying out the cancellation. Turn off the camera. • The batteries are discharged. The Clock Set screen appears when you turn on the screen. • See ...


