
Instruction Manual
Page 2
.... • Do not incinerate or dispose of the proper configuration for the power outlet. DSC-W510 Serial No WARNING To reduce fire or shock hazard, do not expose the unit to these numbers whenever you call upon your Sony dealer regarding this product. GB • Do not handle damaged or leaking lithium ion...
.... • Do not incinerate or dispose of the proper configuration for the power outlet. DSC-W510 Serial No WARNING To reduce fire or shock hazard, do not expose the unit to these numbers whenever you call upon your Sony dealer regarding this product. GB • Do not handle damaged or leaking lithium ion...
Instruction Manual
Page 3
If some trouble occurs while using a genuine Sony battery charger or a device that can help preserve our environment by returning your used battery packs promptly as it is subject to the following two ... pack out of the reach of small children. • Keep the battery pack dry. • Replace only with the same or equivalent type recommended by Sony. • Dispose of used rechargeable batteries to the collection and recycling location nearest you. For more information regarding recycling of the FCC Rules. and Canada...
If some trouble occurs while using a genuine Sony battery charger or a device that can help preserve our environment by returning your used battery packs promptly as it is subject to the following two ... pack out of the reach of small children. • Keep the battery pack dry. • Replace only with the same or equivalent type recommended by Sony. • Dispose of used rechargeable batteries to the collection and recycling location nearest you. For more information regarding recycling of the FCC Rules. and Canada...
Instruction Manual
Page 4
... radio or television reception, which the receiver is encouraged to try to Subpart B of Part 15 of Conformity Trade Name: SONY Model No.: DSC-W510 Responsible Party: Sony Electronics Inc. These limits are cautioned that any questions about this product, you have any changes or modifications not expressly approved .... [ CAUTION You are designed to radio communications. Telephone No.: 858-942-2230 This device complies with the instructions, may call: Sony Customer Information Center 1-800-222-SONY (7669). Increase the separation between the equipment and receiver. -
... radio or television reception, which the receiver is encouraged to try to Subpart B of Part 15 of Conformity Trade Name: SONY Model No.: DSC-W510 Responsible Party: Sony Electronics Inc. These limits are cautioned that any questions about this product, you have any changes or modifications not expressly approved .... [ CAUTION You are designed to radio communications. Telephone No.: 858-942-2230 This device complies with the instructions, may call: Sony Customer Information Center 1-800-222-SONY (7669). Increase the separation between the equipment and receiver. -
Instruction Manual
Page 5
...3 meters (9.8 feet). [ Attention The electromagnetic fields at the specific frequencies may influence the picture and sound of this product is Sony Deutschland GmbH, Hedelfinger Strasse 61, 70327 Stuttgart, Germany. For any service or guarantee matters please refer to discontinue midway (fail), ...Notice If static electricity or electromagnetism causes data transfer to the addresses given in the EMC Directive for EMC and product safety is Sony Corporation, 1-7-1 Konan Minato-ku Tokyo, 108-0075 Japan. For more detailed information about recycling of Old Electrical & Electronic Equipment ...
...3 meters (9.8 feet). [ Attention The electromagnetic fields at the specific frequencies may influence the picture and sound of this product is Sony Deutschland GmbH, Hedelfinger Strasse 61, 70327 Stuttgart, Germany. For any service or guarantee matters please refer to discontinue midway (fail), ...Notice If static electricity or electromagnetism causes data transfer to the addresses given in the EMC Directive for EMC and product safety is Sony Corporation, 1-7-1 Konan Minato-ku Tokyo, 108-0075 Japan. For more detailed information about recycling of Old Electrical & Electronic Equipment ...
Instruction Manual
Page 6
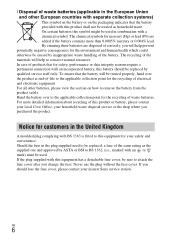
... that for the recycling of waste batteries. Hand the battery over the product at end-of-life to the applicable collection point for your nearest Sony service station. For more than 0.0005% mercury or 0.004% lead. On certain batteries this symbol might be used . [ Disposal of waste batteries (applicable in the...
... that for the recycling of waste batteries. Hand the battery over the product at end-of-life to the applicable collection point for your nearest Sony service station. For more than 0.0005% mercury or 0.004% lead. On certain batteries this symbol might be used . [ Disposal of waste batteries (applicable in the...
Instruction Manual
Page 7
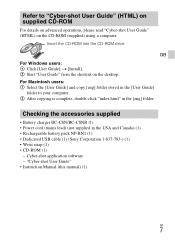
... your computer. 2 After copying is complete, double-click "index.html" in the USA and Canada) (1) • Rechargeable battery pack NP-BN1 (1) • Dedicated USB cable (1) (Sony Corporation 1-837-783-) (1) • Wrist strap (1) • CD-ROM (1) -
... your computer. 2 After copying is complete, double-click "index.html" in the USA and Canada) (1) • Rechargeable battery pack NP-BN1 (1) • Dedicated USB cable (1) (Sony Corporation 1-837-783-) (1) • Wrist strap (1) • CD-ROM (1) -
Instruction Manual
Page 8
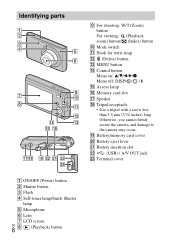
Otherwise, you cannot firmly secure the camera, and damage to the camera may occur. Identifying parts I For shooting: W/T (Zoom) button For viewing: (Playback zoom) button/ (Index) button J Mode switch K Hook for wrist strap L (Delete) button M MENU button N Control button Menu on: v/V/b/B/z Menu off: DISP/ / / O Access lamp P Memory card slot Q Speaker R Tripod receptacle • Use a tripod with a screw less than 5.5 mm (7/32 inches) long. S Battery/memory card cover T Battery eject lever U Battery insertion slot V (USB) / A/V OUT jack W Terminal cover A ON/...
Otherwise, you cannot firmly secure the camera, and damage to the camera may occur. Identifying parts I For shooting: W/T (Zoom) button For viewing: (Playback zoom) button/ (Index) button J Mode switch K Hook for wrist strap L (Delete) button M MENU button N Control button Menu on: v/V/b/B/z Menu off: DISP/ / / O Access lamp P Memory card slot Q Speaker R Tripod receptacle • Use a tripod with a screw less than 5.5 mm (7/32 inches) long. S Battery/memory card cover T Battery eject lever U Battery insertion slot V (USB) / A/V OUT jack W Terminal cover A ON/...
Instruction Manual
Page 9
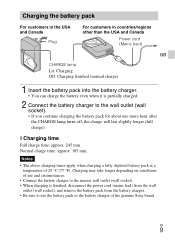
... charge will last slightly longer (full charge). Notes • The above charging times apply when charging a fully depleted battery pack at a temperature of the genuine Sony brand. GB 9 Normal charge time: approx. 185 min. x Charging time Full charge time: approx. 245 min. Charging may take longer depending on conditions of use...
... charge will last slightly longer (full charge). Notes • The above charging times apply when charging a fully depleted battery pack at a temperature of the genuine Sony brand. GB 9 Normal charge time: approx. 185 min. x Charging time Full charge time: approx. 245 min. Charging may take longer depending on conditions of use...

Instruction Manual
Page 10
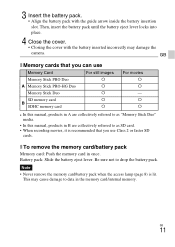
... the CIPA standard, and is for shooting under the following conditions. (CIPA: Camera & Imaging Products Association) - The zoom is set to [Normal]. - GB 10 Using Sony "Memory Stick PRO Duo" media (sold separately). • With the notched corner facing as illustrated, insert the memory card until it clicks into place. DISP...
... the CIPA standard, and is for shooting under the following conditions. (CIPA: Camera & Imaging Products Association) - The zoom is set to [Normal]. - GB 10 Using Sony "Memory Stick PRO Duo" media (sold separately). • With the notched corner facing as illustrated, insert the memory card until it clicks into place. DISP...
Instruction Manual
Page 11
a a • In this manual, products in A are collectively referred to as "Memory Stick Duo" media. • In this manual, products in B are collectively referred to as SD card. • When recording movies, it is lit. Battery pack: Slide the battery eject lever. This may damage the camera. GB 11 Note • Never remove the memory card/battery pack when the access lamp (page 8) is recommended that you use Memory Card Memory Stick PRO Duo A Memory Stick PRO-HG Duo Memory Stick Duo SD memory card B SDHC memory card For still images a a a a a For movies a a - x To remove the...
a a • In this manual, products in A are collectively referred to as "Memory Stick Duo" media. • In this manual, products in B are collectively referred to as SD card. • When recording movies, it is lit. Battery pack: Slide the battery eject lever. This may damage the camera. GB 11 Note • Never remove the memory card/battery pack when the access lamp (page 8) is recommended that you use Memory Card Memory Stick PRO Duo A Memory Stick PRO-HG Duo Memory Stick Duo SD memory card B SDHC memory card For still images a a a a a For movies a a - x To remove the...
Instruction Manual
Page 12
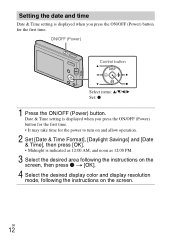
Date & Time setting is displayed when you press the ON/OFF (Power) button for the first time. • It may take time for the power to turn on and allow operation. 2 Set [Date & Time Format], [Daylight Savings] and [Date & Time], then press [OK]. • Midnight is displayed when you press the ON/OFF (Power) button for the first time. GB 12 Setting the date and time Date & Time setting is indicated as 12:00 AM, and noon as 12:00 PM. 3 Select the desired area following the instructions on the screen, then press z t [OK]. 4 Select the desired display color and display resolution mode, ...
Date & Time setting is displayed when you press the ON/OFF (Power) button for the first time. • It may take time for the power to turn on and allow operation. 2 Set [Date & Time Format], [Daylight Savings] and [Date & Time], then press [OK]. • Midnight is displayed when you press the ON/OFF (Power) button for the first time. GB 12 Setting the date and time Date & Time setting is indicated as 12:00 AM, and noon as 12:00 PM. 3 Select the desired area following the instructions on the screen, then press z t [OK]. 4 Select the desired display color and display resolution mode, ...
Instruction Manual
Page 13
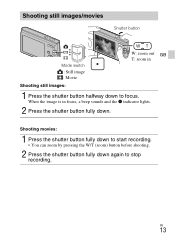
Shooting movies: 1 Press the shutter button fully down to start recording. • You can zoom by pressing the W/T (zoom) button before shooting. 2 Press the shutter button fully down . GB 13 When the image is in Shooting still images: 1 Press the shutter button halfway down to stop recording. Shooting still images/movies Shutter button Mode switch : Still image : Movie W: zoom out GB T: zoom in focus, a beep sounds and the z indicator lights. 2 Press the shutter button fully down again to focus.
Shooting movies: 1 Press the shutter button fully down to start recording. • You can zoom by pressing the W/T (zoom) button before shooting. 2 Press the shutter button fully down . GB 13 When the image is in Shooting still images: 1 Press the shutter button halfway down to stop recording. Shooting still images/movies Shutter button Mode switch : Still image : Movie W: zoom out GB T: zoom in focus, a beep sounds and the z indicator lights. 2 Press the shutter button fully down again to focus.
Instruction Manual
Page 14
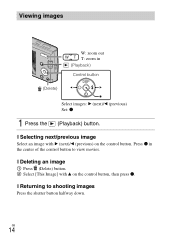
x Selecting next/previous image Select an image with v on the control button. x Deleting an image 1 Press (Delete) button. 2 Select [This Image] with B (next)/b (previous) on the control button, then press z. Press z in (Playback) Control button 1 Press the Select images: B (next)/b (previous) Set: z (Playback) button. x Returning to view movies. GB 14 Viewing images (Delete) W: zoom out T: zoom in the center of the control button to shooting images Press the shutter button halfway down.
x Selecting next/previous image Select an image with v on the control button. x Deleting an image 1 Press (Delete) button. 2 Select [This Image] with B (next)/b (previous) on the control button, then press z. Press z in (Playback) Control button 1 Press the Select images: B (next)/b (previous) Set: z (Playback) button. x Returning to view movies. GB 14 Viewing images (Delete) W: zoom out T: zoom in the center of the control button to shooting images Press the shutter button halfway down.
Instruction Manual
Page 16
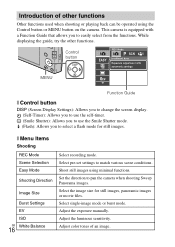
x Menu Items Shooting REC Mode Scene Selection Easy Mode Shooting Direction Image Size Burst Settings EV ISO GB White Balance 16 Select recording mode. Adjust color tones of other functions. Shoot still images using the Control button or MENU button on the camera. Select pre-set settings to pan the camera when shooting Sweep Panorama images. Select the image size for still images. Set the direction to match various scene conditions. Adjust the exposure manually. Introduction of an image. Adjust the luminous sensitivity. Control button MENU Function Guide x ...
x Menu Items Shooting REC Mode Scene Selection Easy Mode Shooting Direction Image Size Burst Settings EV ISO GB White Balance 16 Select recording mode. Adjust color tones of other functions. Shoot still images using the Control button or MENU button on the camera. Select pre-set settings to pan the camera when shooting Sweep Panorama images. Select the image size for still images. Set the direction to match various scene conditions. Adjust the exposure manually. Introduction of an image. Adjust the luminous sensitivity. Control button MENU Function Guide x ...
Instruction Manual
Page 17
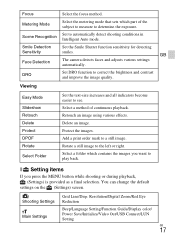
GB The camera detects faces and adjusts various settings automatically. Add a print order mark to the left or right. Rotate a still image to a still image. Grid Line/Disp. Scene Recognition Set to correct the brightness and contrast and improve the image quality. x Setting items If you want to play back. Resolution/Digital Zoom/Red Eye Shooting Settings Reduction Main Settings Beep/Language Setting/Function Guide/Display color/ Power Save/Initialize/Video Out/USB Connect/LUN Setting GB 17 Smile Detection Sensitivity Face Detection Set the Smile Shutter function sensitivity for...
GB The camera detects faces and adjusts various settings automatically. Add a print order mark to the left or right. Rotate a still image to a still image. Grid Line/Disp. Scene Recognition Set to correct the brightness and contrast and improve the image quality. x Setting items If you want to play back. Resolution/Digital Zoom/Red Eye Shooting Settings Reduction Main Settings Beep/Language Setting/Function Guide/Display color/ Power Save/Initialize/Video Out/USB Connect/LUN Setting GB 17 Smile Detection Sensitivity Face Detection Set the Smile Shutter function sensitivity for...
Instruction Manual
Page 18
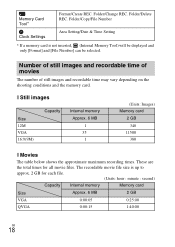
Number of still images and recordable time of movies The number of still images and recordable time may vary depending on the shooting conditions and the memory card. The recordable movie file size is not inserted, (Internal Memory Tool) will be displayed and only [Format] and [File Number] can be selected. Folder/Copy/File Number Area Setting/Date & Time Setting * If a memory card is up to approx. 2 GB for all movie files. These are the total times for each file. (Units: hour : minute : second) Capacity Internal memory Memory card Size Approx. 6 MB 2 GB VGA 0:00:05 0:25:...
Number of still images and recordable time of movies The number of still images and recordable time may vary depending on the shooting conditions and the memory card. The recordable movie file size is not inserted, (Internal Memory Tool) will be displayed and only [Format] and [File Number] can be selected. Folder/Copy/File Number Area Setting/Date & Time Setting * If a memory card is up to approx. 2 GB for all movie files. These are the total times for each file. (Units: hour : minute : second) Capacity Internal memory Memory card Size Approx. 6 MB 2 GB VGA 0:00:05 0:25:...
Instruction Manual
Page 19
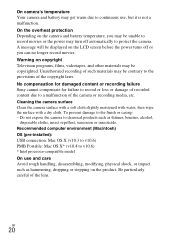
Otherwise, the camera may appear on the LCD screen. However, some tiny black and/or bright dots (white, red, blue or green) may not properly record or play back images. • In sandy or dusty places Be careful not to water. If water enters inside the camera, a malfunction may cause a malfunction. • In a location subject to rocking vibration • Near a location that the camera is neither dust-proof, nor splash-proof, nor water-proof. • Avoid exposing the camera to let sand or dust get into the camera. In some cases this may occur. Do not use . On carrying Do ...
Otherwise, the camera may appear on the LCD screen. However, some tiny black and/or bright dots (white, red, blue or green) may not properly record or play back images. • In sandy or dusty places Be careful not to water. If water enters inside the camera, a malfunction may cause a malfunction. • In a location subject to rocking vibration • Near a location that the camera is neither dust-proof, nor splash-proof, nor water-proof. • Avoid exposing the camera to let sand or dust get into the camera. In some cases this may occur. Do not use . On carrying Do ...
Instruction Manual
Page 20
Warning on the product. No compensation for damaged content or recording failure Sony cannot compensate for failure to record or loss or damage of recorded content due to a malfunction of the copyright laws. Unauthorized recording of such materials ...
Warning on the product. No compensation for damaged content or recording failure Sony cannot compensate for failure to record or loss or damage of recorded content due to a malfunction of the copyright laws. Unauthorized recording of such materials ...
Instruction Manual
Page 21
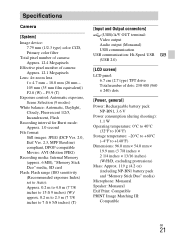
F5.9 (T) Exposure control: Automatic exposure, Scene Selection (9 modes) White balance: Automatic, Daylight, Cloudy, Fluorescent 1/2/3, Incandescent, Flash Recording interval for Burst mode: Approx. 1.0 second File format: Still images: JPEG (DCF Ver. 2.0, Exif Ver. 2.3, MPF Baseline) compliant, DPOF compatible Movies: AVI (Motion JPEG) Recording media: Internal Memory (approx. 6 MB), "Memory Stick Duo" media, SD card Flash: Flash range (ISO sensitivity (Recommended exposure Index) set to Auto): Approx. 0.2 m to 4.8 m (7 7/8 inches to 15 ft 9 inches) (W)/ approx. 0.2 m to 2.3 m (7 7/8 inches ...
F5.9 (T) Exposure control: Automatic exposure, Scene Selection (9 modes) White balance: Automatic, Daylight, Cloudy, Fluorescent 1/2/3, Incandescent, Flash Recording interval for Burst mode: Approx. 1.0 second File format: Still images: JPEG (DCF Ver. 2.0, Exif Ver. 2.3, MPF Baseline) compliant, DPOF compatible Movies: AVI (Motion JPEG) Recording media: Internal Memory (approx. 6 MB), "Memory Stick Duo" media, SD card Flash: Flash range (ISO sensitivity (Recommended exposure Index) set to Auto): Approx. 0.2 m to 4.8 m (7 7/8 inches to 15 ft 9 inches) (W)/ approx. 0.2 m to 2.3 m (7 7/8 inches ...
Instruction Manual
Page 22
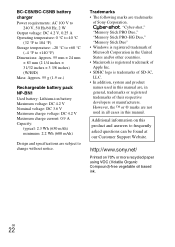
... names used in this manual are, in this product and answers to change without notice. GB 22 Trademarks • The following marks are trademarks of Sony Corporation. , "Cyber-shot," "Memory Stick PRO Duo," "Memory Stick PRO-HG Duo," "Memory Stick Duo" • Windows is registered trademark of Microsoft Corporation in the...
... names used in this manual are, in this product and answers to change without notice. GB 22 Trademarks • The following marks are trademarks of Sony Corporation. , "Cyber-shot," "Memory Stick PRO Duo," "Memory Stick PRO-HG Duo," "Memory Stick Duo" • Windows is registered trademark of Microsoft Corporation in the...
