Operating Instructions
Page 7
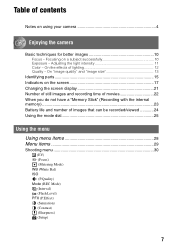
Adjusting the light intensity 11 Color - On the effects of contents Notes on using your camera 4 Enjoying the camera Basic techniques for better images 10 Focus - On "image quality" and "image size 13 Identifying parts 15 Indicators on a subject successfully 10 Exposure - ... of images that can be recorded/viewed 24 Using the mode dial 25 Using the menu Using menu items 28 Menu items 29 Shooting menu 30 (EV) 9 (Focus) (Metering Mode) WB (White Bal) ISO (P.Quality) Mode (REC Mode) M (Interval) (Flash Level) PFX (P.Effect) (Saturation) (Contrast) (Sharpness) (Setup) 7 Table of...
Adjusting the light intensity 11 Color - On the effects of contents Notes on using your camera 4 Enjoying the camera Basic techniques for better images 10 Focus - On "image quality" and "image size 13 Identifying parts 15 Indicators on a subject successfully 10 Exposure - ... of images that can be recorded/viewed 24 Using the mode dial 25 Using the menu Using menu items 28 Menu items 29 Shooting menu 30 (EV) 9 (Focus) (Metering Mode) WB (White Bal) ISO (P.Quality) Mode (REC Mode) M (Interval) (Flash Level) PFX (P.Effect) (Saturation) (Contrast) (Sharpness) (Setup) 7 Table of...
Operating Instructions
Page 10
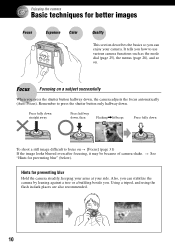
... Flashing,lit/beeps VGA FINE 101 96 Press fully down . Remember to press the shutter button only halfway down S AF 30 F3.5 To shoot a still image difficult to use various camera functions such as the mode dial (page 25), the menus (page 28), and so on. Focus Focusing on t [...Focus] (page 31) If the image looks blurred even after focusing, it may be because of camera shake. t See "Hints for preventing blur Hold the camera steadily, keeping your arms at your camera. Using a tripod, and using the flash in dark places are also recommended. 10 Hints for preventing blur...
... Flashing,lit/beeps VGA FINE 101 96 Press fully down . Remember to press the shutter button only halfway down S AF 30 F3.5 To shoot a still image difficult to use various camera functions such as the mode dial (page 25), the menus (page 28), and so on. Focus Focusing on t [...Focus] (page 31) If the image looks blurred even after focusing, it may be because of camera shake. t See "Hints for preventing blur Hold the camera steadily, keeping your arms at your camera. Using a tripod, and using the flash in dark places are also recommended. 10 Hints for preventing blur...
Operating Instructions
Page 11
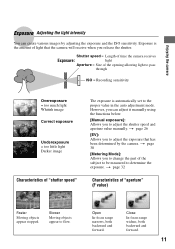
...auto adjustment mode. Open In-focus range narrows, both backward and forward. 11 t page 30 [Metering Mode]: Allows you release the shutter. However, you can create various images by the camera. Slower Moving objects appear to pass through ISO = Recording sensitivity Overexposure = too much ...the exposure. t page 32 Characteristics of light that has been determined by adjusting the exposure and the ISO sensitivity. Enjoying the camera Exposure Adjusting the light intensity You can adjust it manually using the functions below. [Manual exposure]: Allows you to adjust the ...
...auto adjustment mode. Open In-focus range narrows, both backward and forward. 11 t page 30 [Metering Mode]: Allows you release the shutter. However, you can create various images by the camera. Slower Moving objects appear to pass through ISO = Recording sensitivity Overexposure = too much ...the exposure. t page 32 Characteristics of light that has been determined by adjusting the exposure and the ISO sensitivity. Enjoying the camera Exposure Adjusting the light intensity You can adjust it manually using the functions below. [Manual exposure]: Allows you to adjust the ...

Operating Instructions
Page 18
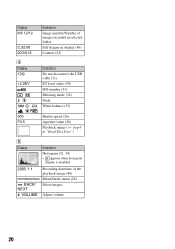
C Display Indication 7M (DSC-W7/ Image size (t step 4 in "Read This First") C:32:00 Self-diagnosis display (86) Date/Time (46) ISO number (33) D Display E + Indication Vibration warning (10) &#... slow shutter (26) 125 Shutter speed (26) F3.5 Aperture value (26) +2.0EV EV level value (30) DPOF Menu/Guide menu (28) (not displayed on the screen on the previous page) 18 However, we recommend holding the camera steadily and turning off the indicator to avoid the effects of recordable images (22) Self...
C Display Indication 7M (DSC-W7/ Image size (t step 4 in "Read This First") C:32:00 Self-diagnosis display (86) Date/Time (46) ISO number (33) D Display E + Indication Vibration warning (10) &#... slow shutter (26) 125 Shutter speed (26) F3.5 Aperture value (26) +2.0EV EV level value (30) DPOF Menu/Guide menu (28) (not displayed on the screen on the previous page) 18 However, we recommend holding the camera steadily and turning off the indicator to avoid the effects of recordable images (22) Self...
Operating Instructions
Page 20
.../time of images recorded in selected folder Self-diagnosis display (86) Counter (22) Indication Do not disconnect the USB cable (71) EV level value (30) ISO number (33) Metering mode (32) Flash White balance (33) 500 F3.5 Shutter speed (26) Aperture value (26) Playback image (t step ...6 in "Read This First") E Display 2005 1 1 DPOF BACK/ NEXT VOLUME Indication Histogram (21, 30) • appears when histogram display is disabled. Display 8/8 12/12 C:32:00 00:00:12 D Display +2.0EV WB Indication Image number/Number of the playback...
.../time of images recorded in selected folder Self-diagnosis display (86) Counter (22) Indication Do not disconnect the USB cable (71) EV level value (30) ISO number (33) Metering mode (32) Flash White balance (33) 500 F3.5 Shutter speed (26) Aperture value (26) Playback image (t step ...6 in "Read This First") E Display 2005 1 1 DPOF BACK/ NEXT VOLUME Indication Histogram (21, 30) • appears when histogram display is disabled. Display 8/8 12/12 C:32:00 00:00:12 D Display +2.0EV WB Indication Image number/Number of the playback...
Operating Instructions
Page 21
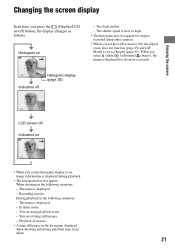
... histogram does not appear: When shooting in the following situations - The menu is displayed. - Enjoying the camera Changing the screen display Each time you set the LCD screen to Off, the digital zoom does not function (page 45) and [AF Mode] is set the histogram display to [Single] ...page 30) S AF LCD screen off ) button, the display changes as follows. Histogram on /off Indicators on VGA 96 S AF • When you select (flash)/ (self-timer)/ (macro), the image is displayed for images recorded using playback zoom. - You are rotating still images. - You are using other cameras....
... histogram does not appear: When shooting in the following situations - The menu is displayed. - Enjoying the camera Changing the screen display Each time you set the LCD screen to Off, the digital zoom does not function (page 45) and [AF Mode] is set the histogram display to [Single] ...page 30) S AF LCD screen off ) button, the display changes as follows. Histogram on /off Indicators on VGA 96 S AF • When you select (flash)/ (self-timer)/ (macro), the image is displayed for images recorded using playback zoom. - You are rotating still images. - You are using other cameras....
Operating Instructions
Page 24
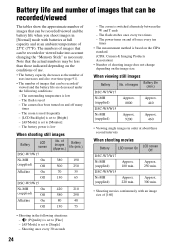
...many times - The flash is switched alternately between the W and T ends - of use. • The battery capacity decreases as necessary. Shooting once every 30 seconds 24 The flash strobes once every two times - When viewing still images Battery No. Approx. 220 min. The zoom is used frequently - [LCD ...screen No. LCD screen Off Approx. 250 min. The camera has been turned on the conditions of images (Approx.) Battery life (min.) DSC-W7/W17 Ni-MH On 380 190 (supplied) Off 500 250 Alkaline On 70 35 Off 130 65 DSC-W5/W15 Ni-MH On 420 210 (supplied) Off 580...
...many times - The flash is switched alternately between the W and T ends - of use. • The battery capacity decreases as necessary. Shooting once every 30 seconds 24 The flash strobes once every two times - When viewing still images Battery No. Approx. 220 min. The zoom is used frequently - [LCD ...screen No. LCD screen Off Approx. 250 min. The camera has been turned on the conditions of images (Approx.) Battery life (min.) DSC-W7/W17 Ni-MH On 380 190 (supplied) Off 500 250 Alkaline On 70 35 Off 130 65 DSC-W5/W15 Ni-MH On 420 210 (supplied) Off 580...
Operating Instructions
Page 26
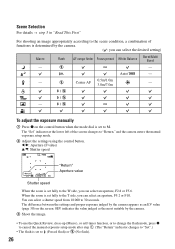
...indicates the value judged as an EV value (page 30) on the control button when the mode dial is set to 30 seconds. The "Set" indicator at the lower left of functions is determined by the camera appears as the most suitable by the camera. 3 Shoot the image. • To use the...to cancel the manual exposure setup mode after step 1. (The "Return" indicator changes to "Set".) • The flash is set to "Return," and the camera enters the manual exposure setup mode. 2 Adjust the settings using the control button. The difference between the settings and proper exposure judged by the...
...indicates the value judged as an EV value (page 30) on the control button when the mode dial is set to 30 seconds. The "Set" indicator at the lower left of functions is determined by the camera appears as the most suitable by the camera. 3 Shoot the image. • To use the...to cancel the manual exposure setup mode after step 1. (The "Return" indicator changes to "Set".) • The flash is set to "Return," and the camera enters the manual exposure setup mode. 2 Adjust the settings using the control button. The difference between the settings and proper exposure judged by the...
Operating Instructions
Page 29
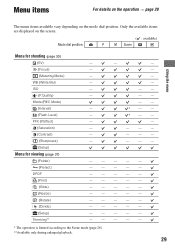
Only the available items are displayed on the mode dial position. Mode dial position: ( : available) P M Scene Menu for shooting (page 30) (EV) 9 (Focus) (Metering Mode) WB (White Bal) ISO (P.Quality) Mode (REC Mode) M (Interval) (Flash Level) PFX (P.Effect) (Saturation) (Contrast) (Sharpness) (Setup) Menu for viewing (page ...
Only the available items are displayed on the mode dial position. Mode dial position: ( : available) P M Scene Menu for shooting (page 30) (EV) 9 (Focus) (Metering Mode) WB (White Bal) ISO (P.Quality) Mode (REC Mode) M (Interval) (Flash Level) PFX (P.Effect) (Saturation) (Contrast) (Sharpness) (Setup) Menu for viewing (page ...
Operating Instructions
Page 30
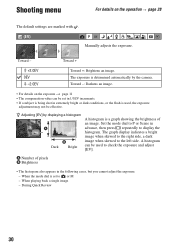
... skewed to the right side, a dark image when skewed to or M - When the mode dial is set in 1/3EV increments. • If a subject is being shot in extremely bright or dark conditions, or the flash is a graph showing the brightness of pixels B Brightness • The histogram also appears in advance, then... an image. • For details on the operation t page 28 The default settings are marked with . (EV) Manually adjusts the exposure. Toward - During Quick Review 30 z Adjusting [EV] by the camera.
... skewed to the right side, a dark image when skewed to or M - When the mode dial is set in 1/3EV increments. • If a subject is being shot in extremely bright or dark conditions, or the flash is a graph showing the brightness of pixels B Brightness • The histogram also appears in advance, then... an image. • For details on the operation t page 28 The default settings are marked with . (EV) Manually adjusts the exposure. Toward - During Quick Review 30 z Adjusting [EV] by the camera.

Operating Instructions
Page 32
...]. VGA FINE P 98 AE/AF lock indicator AF range finder frame S AF F2.8 30 As long as you do as you want. 2 When the AE/AF lock indicator stops flashing and remains on, return to the fully composed shot, and press the shutter button fully down , you can retry the procedure as... the shutter button fully down . For details on the operation t page 28 z If the subject is strong contrast between the subject and the background. the camera may not focus on a subject at the edge of the subject to measure to focus on the metering position (page 31). 32 Spot (Spot metering...
...]. VGA FINE P 98 AE/AF lock indicator AF range finder frame S AF F2.8 30 As long as you do as you want. 2 When the AE/AF lock indicator stops flashing and remains on, return to the fully composed shot, and press the shutter button fully down , you can retry the procedure as... the shutter button fully down . For details on the operation t page 28 z If the subject is strong contrast between the subject and the background. the camera may not focus on a subject at the edge of the subject to measure to focus on the metering position (page 31). 32 Spot (Spot metering...
Operating Instructions
Page 34
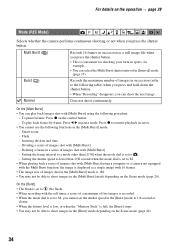
...refer to - To pause/resume: Press z on the Scene mode (page 26). 34 Smart zoom - To play back images shot with 16 frames. • The image size of images shot with [Multi Burst] using the following functions in the [Multi Burst] mode depending on the operation t page 28 Mode (REC ...Mode) Selects whether the camera performs continuous shooting or not when you press the shutter button. Setting the frame interval to a mode other than 1/30 second when the mode dial is set the shutter speed in the [Burst] mode to 1/6...
...refer to - To pause/resume: Press z on the Scene mode (page 26). 34 Smart zoom - To play back images shot with 16 frames. • The image size of images shot with [Multi Burst] using the following functions in the [Multi Burst] mode depending on the operation t page 28 Mode (REC ...Mode) Selects whether the camera performs continuous shooting or not when you press the shutter button. Setting the frame interval to a mode other than 1/30 second when the mode dial is set the shutter speed in the [Burst] mode to 1/6...
Operating Instructions
Page 35
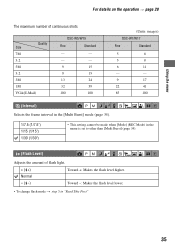
...than [Multi Burst] (page 34). (Flash Level) Adjusts the amount of continuous shots Quality Size 7M 3:2 5M 3:2 3M 1M VGA(E-Mail) DSC-W5/W15 Fine Standard - - - - 9 15 9 15 13 24 32 59 100 100 (Units: images) DSC-W7/W17 Fine Standard 5 8 5 8 6 11 - - 9 17 ...22 41 85 100 M (Interval) Selects the frame interval in the [Multi Burst] mode (page 34). 1/7.5 (1/7.5") 1/15 (1/15") 1/30 (1/30") •...
...than [Multi Burst] (page 34). (Flash Level) Adjusts the amount of continuous shots Quality Size 7M 3:2 5M 3:2 3M 1M VGA(E-Mail) DSC-W5/W15 Fine Standard - - - - 9 15 9 15 13 24 32 59 100 100 (Units: images) DSC-W7/W17 Fine Standard 5 8 5 8 6 11 - - 9 17 ...22 41 85 100 M (Interval) Selects the frame interval in the [Multi Burst] mode (page 34). 1/7.5 (1/7.5") 1/15 (1/15") 1/30 (1/30") •...
Operating Instructions
Page 39
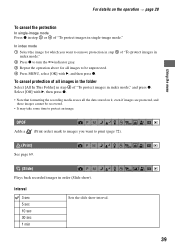
... operation above for which you want to remove protection in step 5 of "To protect images in index mode," and press z. Interval 3 sec 5 sec 10 sec 30 sec 1 min Sets the slide show ). In index mode 1 Select the image for all images to print (page 72). (Print) See page 69. (Slide) Plays...
... operation above for which you want to remove protection in step 5 of "To protect images in index mode," and press z. Interval 3 sec 5 sec 10 sec 30 sec 1 min Sets the slide show ). In index mode 1 Select the image for all images to print (page 72). (Print) See page 69. (Slide) Plays...
Operating Instructions
Page 78
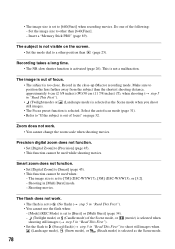
...work . • The flash is set to position the lens farther away from the subject than the shortest shooting distance, approximately 6 cm (2 3/8 inches) (W)/30 cm (11 7/8 inches) (T), when shooting (t step 5 in [Multi Burst] mode. - Do one of focus" on the screen. • Set the ...Forced flash) (t step 5 in the close . Precision digital zoom does not function. • Set [Digital Zoom] to [Burst] or [Multi Burst] (page 34). - (Twilight mode) or (Candle mode) of focus. • The subject is set to [7M] (DSC-W7/W17), [5M] (DSC-W5/W15), or [3:2]. - The flash does not work ....
...work . • The flash is set to position the lens farther away from the subject than the shortest shooting distance, approximately 6 cm (2 3/8 inches) (W)/30 cm (11 7/8 inches) (T), when shooting (t step 5 in [Multi Burst] mode. - Do one of focus" on the screen. • Set the ...Forced flash) (t step 5 in the close . Precision digital zoom does not function. • Set [Digital Zoom] to [Burst] or [Multi Burst] (page 34). - (Twilight mode) or (Candle mode) of focus. • The subject is set to [7M] (DSC-W7/W17), [5M] (DSC-W5/W15), or [3:2]. - The flash does not work ....
Operating Instructions
Page 79
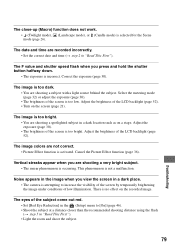
...shoot the subject. 79 Troubleshooting There is activated. Vertical streaks appear when you view the screen in "Read This First"). Adjust the exposure (page 30). • The brightness of the screen is not a malfunction. The image colors are recorded incorrectly. • Set the correct date and ...time (t step 2 in a dark place. • The camera is occurring. The close-up (Macro) function does not work. • (Twilight mode), (Landscape mode), or (Candle mode) is incorrect. The F ...
...shoot the subject. 79 Troubleshooting There is activated. Vertical streaks appear when you view the screen in "Read This First"). Adjust the exposure (page 30). • The brightness of the screen is not a malfunction. The image colors are recorded incorrectly. • Set the correct date and ...time (t step 2 in a dark place. • The camera is occurring. The close-up (Macro) function does not work. • (Twilight mode), (Landscape mode), or (Candle mode) is incorrect. The F ...
Operating Instructions
Page 95
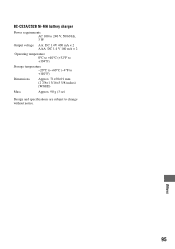
BC-CS2A/CS2B Ni-MH battery charger Power requirements AC 100 to 240 V, 50/60 Hz, 3 W Output voltage AA: DC 1.4V 400 mA × 2 AAA: DC 1.4 V 160 mA × 2 Operating temperature 0°C to +40°C (+32°F to +104°F) Storage temperature -20°C to +60°C (-4°F to +140°F) Dimensions Approx. 71×30×91 mm (2 7/8×1 3/16×3 5/8 inches) (W/H/D) Mass Approx. 90 g (3 oz) Design and specifications are subject to change without notice. Others 95
BC-CS2A/CS2B Ni-MH battery charger Power requirements AC 100 to 240 V, 50/60 Hz, 3 W Output voltage AA: DC 1.4V 400 mA × 2 AAA: DC 1.4 V 160 mA × 2 Operating temperature 0°C to +40°C (+32°F to +104°F) Storage temperature -20°C to +60°C (-4°F to +140°F) Dimensions Approx. 71×30×91 mm (2 7/8×1 3/16×3 5/8 inches) (W/H/D) Mass Approx. 90 g (3 oz) Design and specifications are subject to change without notice. Others 95
Operating Instructions
Page 96
... Daylight 33 Delete t step 6 in "Read This First" Digital Zoom 45 DirectX 56 Divide 41 DPOF 72 E Effective pixels 94 Electronic transformer t step 1 in "Read This First" Enlarged Icon 48 Enlarging an image t step 6 in "Read This First" EV 30 Exposure 11, 26 Extension 63 F F value 11, 26 ...Read This First" Beach mode t step 5 in "Read This First" Beep 52 Blur 10 Burst 34 C Camera 1 45 Camera 2 48 96 Candle mode t step 5 in "Read This First" Format 49, 50 H Histogram 21, 30 Folder 51 Charging battery pack t step 1 in "Read This First" Cleaning 93 Clock Set 54 Cloudy 33 ...
... Daylight 33 Delete t step 6 in "Read This First" Digital Zoom 45 DirectX 56 Divide 41 DPOF 72 E Effective pixels 94 Electronic transformer t step 1 in "Read This First" Enlarged Icon 48 Enlarging an image t step 6 in "Read This First" EV 30 Exposure 11, 26 Extension 63 F F value 11, 26 ...Read This First" Beach mode t step 5 in "Read This First" Beep 52 Blur 10 Burst 34 C Camera 1 45 Camera 2 48 96 Candle mode t step 5 in "Read This First" Format 49, 50 H Histogram 21, 30 Folder 51 Charging battery pack t step 1 in "Read This First" Cleaning 93 Clock Set 54 Cloudy 33 ...
Operating Instructions
Page 97
... This First" Format 50 Number of images/ recording time 22 Write-protect switch ..... 89 Memory Stick Tool 50 Menu 28 Items 29 Shooting 30 Viewing 37 Metering Mode 32 Mode 34 Moisture condensation ......... 93 Monitor 45 Monochrome 36 MPG 62 Multi AF 31 Multi Burst 34 Multi-pattern metering..., 12, 33 J JPG 62 L Landscape mode t step 5 in "Read This First" Language 52 t step 2 in "Read This First" Index 97 Holding the camera t step 5 in "Read This First" I Identifying parts 15 Image file storage destinations and file names 62 Image quality 13, 33 Image size 13 t step 4 in...
... This First" Format 50 Number of images/ recording time 22 Write-protect switch ..... 89 Memory Stick Tool 50 Menu 28 Items 29 Shooting 30 Viewing 37 Metering Mode 32 Mode 34 Moisture condensation ......... 93 Monitor 45 Monochrome 36 MPG 62 Multi AF 31 Multi Burst 34 Multi-pattern metering..., 12, 33 J JPG 62 L Landscape mode t step 5 in "Read This First" Language 52 t step 2 in "Read This First" Index 97 Holding the camera t step 5 in "Read This First" I Identifying parts 15 Image file storage destinations and file names 62 Image quality 13, 33 Image size 13 t step 4 in...
Operating Instructions
Page 98
...display...........86 Self-timer t step 5 in "Read This First" Sepia 36 Setting the clock t step 2 in "Read This First" Setup 36, 43, 44 Camera 1 45 Camera 2 48 Internal Memory Tool ...49 Memory Stick Tool .......50 Setup 1 52 Setup 2 53 Setup 1 52 Setup 2 53 Sharpness 36 Shooting Movie t step 5 ...in "Read This First" Still image 98 t step 5 in "Read This First" Shooting menu 30 Shooting movies 25 Shutter speed 11, 26 Single 45 ...
...display...........86 Self-timer t step 5 in "Read This First" Sepia 36 Setting the clock t step 2 in "Read This First" Setup 36, 43, 44 Camera 1 45 Camera 2 48 Internal Memory Tool ...49 Memory Stick Tool .......50 Setup 1 52 Setup 2 53 Setup 1 52 Setup 2 53 Sharpness 36 Shooting Movie t step 5 ...in "Read This First" Still image 98 t step 5 in "Read This First" Shooting menu 30 Shooting movies 25 Shutter speed 11, 26 Single 45 ...
