Cyber-shot® Handbook
Page 5
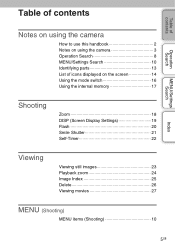
Table of contents Table of contents Operation Search MENU/Settings Search Index Notes on using the camera How to use this handbook 2 Notes on using the camera 3 Operation Search 8 MENU/Settings Search 10 Identifying parts 13 List of icons displayed on the screen 14 Using the mode switch 16 Using the internal memory 17 Shooting Zoom 18 DISP (Screen Display Settings 19 Flash 20 Smile Shutter 21 Self-Timer 22 Viewing Viewing still images 23 Playback zoom 24 Image Index 25 Delete 26 Viewing movies 27 MENU (Shooting) MENU items (Shooting 10 5GB
Table of contents Table of contents Operation Search MENU/Settings Search Index Notes on using the camera How to use this handbook 2 Notes on using the camera 3 Operation Search 8 MENU/Settings Search 10 Identifying parts 13 List of icons displayed on the screen 14 Using the mode switch 16 Using the internal memory 17 Shooting Zoom 18 DISP (Screen Display Settings 19 Flash 20 Smile Shutter 21 Self-Timer 22 Viewing Viewing still images 23 Playback zoom 24 Image Index 25 Delete 26 Viewing movies 27 MENU (Shooting) MENU items (Shooting 10 5GB

Cyber-shot® Handbook
Page 6
Table of contents MENU (Viewing) MENU items (Viewing 11 Settings Setting items 12 Operation Search TV Viewing images on a TV 77 MENU/Settings Search Computer Using with your computer 79 Using the software 80 Connecting the camera to the computer 82 Uploading images to a media service 84 Index Printing Printing still images 86 Troubleshooting Troubleshooting 88 Warning indicators and messages 96 Others "Memory Stick Duo" media 99 Battery pack 101 Battery charger 102 6GB
Table of contents MENU (Viewing) MENU items (Viewing 11 Settings Setting items 12 Operation Search TV Viewing images on a TV 77 MENU/Settings Search Computer Using with your computer 79 Using the software 80 Connecting the camera to the computer 82 Uploading images to a media service 84 Index Printing Printing still images 86 Troubleshooting Troubleshooting 88 Warning indicators and messages 96 Others "Memory Stick Duo" media 99 Battery pack 101 Battery charger 102 6GB
Cyber-shot® Handbook
Page 9
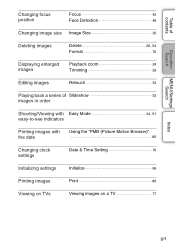
... Search MENU/Settings Search Changing focus position Focus 42 Face Detection 48 Changing image size Image Size 35 Deleting images Delete 26, 54 Format 70 Displaying enlarged images Playback zoom 24 Trimming 53 Editing images Retouch 53 Playing back a series of Slideshow 52 images in order Shooting/Viewing with Easy Mode 34, 51 easy-to-see indicators Printing images with the date Using the "PMB (Picture Motion Browser)" 80 Changing clock settings Date & Time Setting 76 Initializing settings Initialize 66 Printing images Print 86 Viewing on TVs Viewing images...
... Search MENU/Settings Search Changing focus position Focus 42 Face Detection 48 Changing image size Image Size 35 Deleting images Delete 26, 54 Format 70 Displaying enlarged images Playback zoom 24 Trimming 53 Editing images Retouch 53 Playing back a series of Slideshow 52 images in order Shooting/Viewing with Easy Mode 34, 51 easy-to-see indicators Printing images with the date Using the "PMB (Picture Motion Browser)" 80 Changing clock settings Date & Time Setting 76 Initializing settings Initialize 66 Printing images Print 86 Viewing on TVs Viewing images...
Cyber-shot® Handbook
Page 10
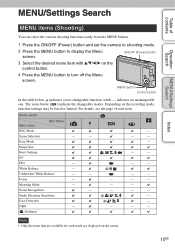
...Easy Mode - Focus - - - - The icons below , indicates a user-changeable function, while - Scene Selection - - - - MENU/Settings Search Table of each mode are available for each item. For details, see the page of contents Operation Search MENU/Settings Search Index MENU items (Shooting) You can select the various shooting functions easily from the MENU button. 1 Press the ON/OFF (Power) button and set the camera to shooting mode. 2 Press the MENU button to turn off the Menu screen. Underwater White Balance - - - - Image Size Burst Settings - - White Balance...
...Easy Mode - Focus - - - - The icons below , indicates a user-changeable function, while - Scene Selection - - - - MENU/Settings Search Table of each mode are available for each item. For details, see the page of contents Operation Search MENU/Settings Search Index MENU items (Shooting) You can select the various shooting functions easily from the MENU button. 1 Press the ON/OFF (Power) button and set the camera to shooting mode. 2 Press the MENU button to turn off the Menu screen. Underwater White Balance - - - - Image Size Burst Settings - - White Balance...
Cyber-shot® Handbook
Page 12
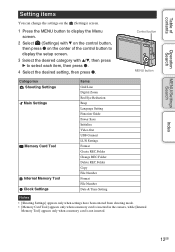
... z. Control button MENU button Categories Shooting Settings Main Settings Memory Card Tool Internal Memory Tool Clock Settings Items Grid Line Digital Zoom Red Eye Reduction Beep Language Setting Function Guide Power Save Initialize Video Out USB Connect LUN Settings Format Create REC.Folder Change REC.Folder Delete REC.Folder Copy File Number Format File Number Date & Time Setting Notes • [Shooting Settings] appears only when settings have been entered from shooting mode. • [Memory Card Tool] appears only when a memory card is inserted in the camera, while [Internal Memory Tool...
... z. Control button MENU button Categories Shooting Settings Main Settings Memory Card Tool Internal Memory Tool Clock Settings Items Grid Line Digital Zoom Red Eye Reduction Beep Language Setting Function Guide Power Save Initialize Video Out USB Connect LUN Settings Format Create REC.Folder Change REC.Folder Delete REC.Folder Copy File Number Format File Number Date & Time Setting Notes • [Shooting Settings] appears only when settings have been entered from shooting mode. • [Memory Card Tool] appears only when a memory card is inserted in the camera, while [Internal Memory Tool...
Cyber-shot® Handbook
Page 15
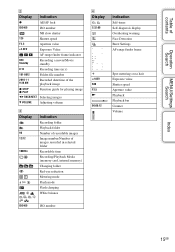
...Standby Recording a movie/Movie standby 0:12 Recording time (m:s) 101-0012 Folder-file number 2010 1 1 9:30 AM Recorded date/time of the playback image z STOP z PLAY Function guide for playing image bB BACK/NEXT Selecting images V VOLUME Adjusting volume C Display 96 12/12 100Min Indication Recording folder Playback folder Number of recordable images Image number/Number of images recorded in selected folder Recordable time Recording/Playback Media (memory card, internal memory) Changing folder Red-eye reduction Metering mode Flash mode Flash charging White balance D Display C:32...
...Standby Recording a movie/Movie standby 0:12 Recording time (m:s) 101-0012 Folder-file number 2010 1 1 9:30 AM Recorded date/time of the playback image z STOP z PLAY Function guide for playing image bB BACK/NEXT Selecting images V VOLUME Adjusting volume C Display 96 12/12 100Min Indication Recording folder Playback folder Number of recordable images Image number/Number of images recorded in selected folder Recordable time Recording/Playback Media (memory card, internal memory) Changing folder Red-eye reduction Metering mode Flash mode Flash charging White balance D Display C:32...
Cyber-shot® Handbook
Page 25
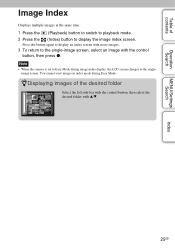
... images of contents Operation Search MENU/Settings Search Index Image Index Displays multiple images at the same time. 1 Press the (Playback) button to switch to playback mode. 2 Press the (Index) button to the single-image screen, select an image with v/V. 25GB Press the button again to display an index screen with more images. 3 To return to display the image index screen. You cannot view images in index mode during image index display, the LCD screen changes to Easy Mode during Easy Mode. image screen. Note • When the camera is set...
... images of contents Operation Search MENU/Settings Search Index Image Index Displays multiple images at the same time. 1 Press the (Playback) button to switch to playback mode. 2 Press the (Index) button to the single-image screen, select an image with v/V. 25GB Press the button again to display an index screen with more images. 3 To return to display the image index screen. You cannot view images in index mode during image index display, the LCD screen changes to Easy Mode during Easy Mode. image screen. Note • When the camera is set...
Cyber-shot® Handbook
Page 37
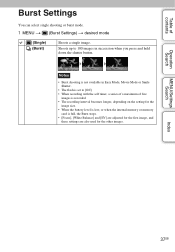
... Shutter. • The flash is set to [Off]. • When recording with the self timer, a series of a maximum of contents Operation Search Burst Settings You can select single shooting or burst mode. 1 MENU t (Burst Settings) t desired mode (Single) (Burst) Shoots a single image. Table of five images is recorded. • The recording interval becomes longer, depending on the setting for the image size. • When the battery level is low, or when the internal memory...
... Shutter. • The flash is set to [Off]. • When recording with the self timer, a series of a maximum of contents Operation Search Burst Settings You can select single shooting or burst mode. 1 MENU t (Burst Settings) t desired mode (Single) (Burst) Shoots a single image. Table of five images is recorded. • The recording interval becomes longer, depending on the setting for the image size. • When the battery level is low, or when the internal memory...
Cyber-shot® Handbook
Page 69
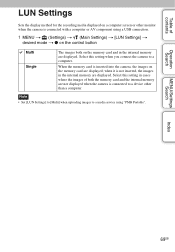
... screen or other than a computer. when it is not inserted, the images in the internal memory are displayed. Table of both on the memory card are not displayed when the camera is connected to a device other monitor when the camera is connected with a computer or AV component using "PMB Portable". Select this setting when you connect the camera to a media service using a USB connection. 1 MENU t (Settings) t (Main Settings) t [LUN Settings] t desired mode t z on the control button Multi...
... screen or other than a computer. when it is not inserted, the images in the internal memory are displayed. Table of both on the memory card are not displayed when the camera is connected to a device other monitor when the camera is connected with a computer or AV component using "PMB Portable". Select this setting when you connect the camera to a media service using a USB connection. 1 MENU t (Settings) t (Main Settings) t [LUN Settings] t desired mode t z on the control button Multi...
Cyber-shot® Handbook
Page 80
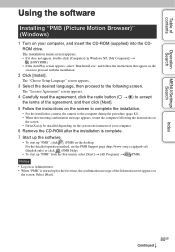
... as Administrator. • When "PMB" is complete. 7 Start up the software. • To start up "PMB", click (PMB) on your computer. 6 Remove the CD-ROM after the installation is started up for the first time, the confirmation message of contents Operation Search MENU/Settings Search Index Using the software Installing "PMB (Picture Motion Browser)" (Windows) 1 Turn on the desktop. The installation menu screen appears. • If it does not appear...
... as Administrator. • When "PMB" is complete. 7 Start up the software. • To start up "PMB", click (PMB) on your computer. 6 Remove the CD-ROM after the installation is started up for the first time, the confirmation message of contents Operation Search MENU/Settings Search Index Using the software Installing "PMB (Picture Motion Browser)" (Windows) 1 Turn on the desktop. The installation menu screen appears. • If it does not appear...
Cyber-shot® Handbook
Page 86
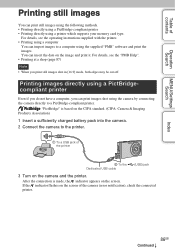
... contents Operation Search MENU/Settings Search Printing still images You can print images shot using the camera by connecting the camera directly to a PictBridge-compliant printer. Printing images directly using a PictBridgecompliant printer Even if you do not have a computer, you print still images shot in [16:9] mode, both edges may be cut off. After the connection is based on the screen. If the indicator flashes on the screen of the printer 2 To the Dedicated USB cable (USB) jack 3 Turn on the image and print it...
... contents Operation Search MENU/Settings Search Printing still images You can print images shot using the camera by connecting the camera directly to a PictBridge-compliant printer. Printing images directly using a PictBridgecompliant printer Even if you do not have a computer, you print still images shot in [16:9] mode, both edges may be cut off. After the connection is based on the screen. If the indicator flashes on the screen of the printer 2 To the Dedicated USB cable (USB) jack 3 Turn on the image and print it...
Cyber-shot® Handbook
Page 87
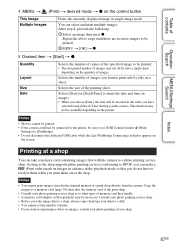
Table of images you want to superimpose dates on images, consult your photo printing service shop. Selects the number of contents Operation Search MENU/Settings Search 4 MENU t (Print) t desired mode t z on the control button This Image Multiple Images Prints the currently displayed image in single-image mode. Selects the size of prints. • If you print them out at a shop You can take a memory card containing images shot with the camera to a photo printing service shop. You can make a (Print order) mark on a sheet. After step 4, perform the...
Table of images you want to superimpose dates on images, consult your photo printing service shop. Selects the number of contents Operation Search MENU/Settings Search 4 MENU t (Print) t desired mode t z on the control button This Image Multiple Images Prints the currently displayed image in single-image mode. Selects the size of prints. • If you print them out at a shop You can take a memory card containing images shot with the camera to a photo printing service shop. You can make a (Print order) mark on a sheet. After step 4, perform the...
Cyber-shot® Handbook
Page 91
...] t [Red Eye Correction] in viewing menu (page 53), or correct using other cameras. • The camera is in USB mode. Cannot shoot images in index mode. • The camera is set to Easy Mode. Viewing images Cannot play back images. • Make sure that the memory card is fully inserted into the camera. • The folder/file name has been changed on your TV (page 67). • Check whether the connection is set to the camera, disconnect it. The date and time...
...] t [Red Eye Correction] in viewing menu (page 53), or correct using other cameras. • The camera is in USB mode. Cannot shoot images in index mode. • The camera is set to Easy Mode. Viewing images Cannot play back images. • Make sure that the memory card is fully inserted into the camera. • The folder/file name has been changed on your TV (page 67). • Check whether the connection is set to the camera, disconnect it. The date and time...
Cyber-shot® Handbook
Page 92
... computer correctly making a USB connection, "PMB" does not start . • Set [LUN Settings] to [Multi] (page 69). • Set [USB Connect] to [Auto] or [Mass Storage] (page 68). • Connect the computer to a computer. Import the movie to the computer (page 82). Users of contents Deleting Cannot delete an image. • Cancel the protection (page 55). Cannot import images. • Connect the camera and your computer using a memory card formatted by manufacturers other device. After making a USB connection (page...
... computer correctly making a USB connection, "PMB" does not start . • Set [LUN Settings] to [Multi] (page 69). • Set [USB Connect] to [Auto] or [Mass Storage] (page 68). • Connect the computer to a computer. Import the movie to the computer (page 82). Users of contents Deleting Cannot delete an image. • Cancel the protection (page 55). Cannot import images. • Connect the camera and your computer using a memory card formatted by manufacturers other device. After making a USB connection (page...
Cyber-shot® Handbook
Page 94
... USB cable again. • Movies cannot be printed. • Images shot using the dedicated USB cable. • Turn on and can provide the desired size. Set [Date] to whether the printer provides these functions or not. • The date may take some time depending on the printer, refer to the operating instructions supplied with the printer. • If you have the recording data so the date cannot be inserted. Consult the printer manufacturer. Cannot operate the camera after connecting...
... USB cable again. • Movies cannot be printed. • Images shot using the dedicated USB cable. • Turn on and can provide the desired size. Set [Date] to whether the printer provides these functions or not. • The date may take some time depending on the printer, refer to the operating instructions supplied with the printer. • If you have the recording data so the date cannot be inserted. Consult the printer manufacturer. Cannot operate the camera after connecting...

Cyber-shot® Handbook
Page 96
... contents Operation Search MENU/Settings Search Index Warning indicators and messages Self-diagnosis display If a code starting with a letter of the camera. C:32:ss • There is damaged. Turn the power off and on the camera again, or taking out and inserting the memory card several times. • The internal memory has experienced a format error, or an unformatted memory card is working. E:61:ss E:62:ss E:91:ss • A camera malfunction has occurred. Messages If the...
... contents Operation Search MENU/Settings Search Index Warning indicators and messages Self-diagnosis display If a code starting with a letter of the camera. C:32:ss • There is damaged. Turn the power off and on the camera again, or taking out and inserting the memory card several times. • The internal memory has experienced a format error, or an unformatted memory card is working. E:61:ss E:62:ss E:91:ss • A camera malfunction has occurred. Messages If the...
Cyber-shot® Handbook
Page 97
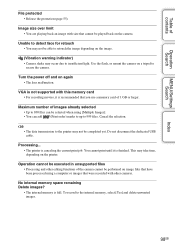
... internal memory. • No images that cannot be used in this camera, files containing images which were processed on a computer or images which were shot using the memory card with the write-protect switch, and the switch is set as a recording folder on the memory card. Select another folder, or create a new folder (pages 71, 72). MENU/Settings Search Error formatting internal memory Error formatting memory card • Format the media again (page 70). Operation Search Reinsert the memory card • The inserted memory card cannot be set to record movies. Folder...
... internal memory. • No images that cannot be used in this camera, files containing images which were processed on a computer or images which were shot using the memory card with the write-protect switch, and the switch is set as a recording folder on the memory card. Select another folder, or create a new folder (pages 71, 72). MENU/Settings Search Error formatting internal memory Error formatting memory card • Format the media again (page 70). Operation Search Reinsert the memory card • The inserted memory card cannot be set to record movies. Folder...
Cyber-shot® Handbook
Page 98
... printer may take time, depending on again • The lens malfunction. Image size over limit • You are playing back an image with size that cannot be played back on image files that have been processed using [Multiple Images]. • You can add (Print order) marks to up to 999 files. Maximum number of contents Operation Search MENU/Settings Search Index File protected • Release the protection (page 55). Do not disconnect the dedicated USB cable...
... printer may take time, depending on again • The lens malfunction. Image size over limit • You are playing back an image with size that cannot be played back on image files that have been processed using [Multiple Images]. • You can add (Print order) marks to up to 999 files. Maximum number of contents Operation Search MENU/Settings Search Index File protected • Release the protection (page 55). Do not disconnect the dedicated USB cable...

Cyber-shot® Handbook
Page 103
... 44 Change REC.Folder 72 Changing the display 19 Clock Settings 76 Computer 79 Importing images 82 Connecting Computer 82 Printer 86 TV 77 Control button 13 Copy 74 Create REC.Folder 71 D Date & Time Setting 76 Delete 26, 54 Delete REC.Folder 73 Digital Zoom 60 DISP 19 DPOF 56 DRO 50 E Easy Mode Shooting 34 Viewing 51 EV 38 Exposure 38 F Face Detection 48 File Number 75 Flash 20 Focus 42 Folder Changing 72 Creating 71 Deleting 73 Selecting 58 Format 70 Function Guide...
... 44 Change REC.Folder 72 Changing the display 19 Clock Settings 76 Computer 79 Importing images 82 Connecting Computer 82 Printer 86 TV 77 Control button 13 Copy 74 Create REC.Folder 71 D Date & Time Setting 76 Delete 26, 54 Delete REC.Folder 73 Digital Zoom 60 DISP 19 DPOF 56 DRO 50 E Easy Mode Shooting 34 Viewing 51 EV 38 Exposure 38 F Face Detection 48 File Number 75 Flash 20 Focus 42 Folder Changing 72 Creating 71 Deleting 73 Selecting 58 Format 70 Function Guide...

Instruction Manual
Page 9
... stick to record images. GB 9 Notes on the flash surface to become unusable or image data may cause dirt on the LCD screen and lens • The LCD screen is recommended to water. The heat of the memory card before use a memory card with this camera for the first time, it is unrecoverable. Insert a charged battery pack and turn on recording/playback • When you use . It may cause a malfunction and you start recording, make sure...
... stick to record images. GB 9 Notes on the flash surface to become unusable or image data may cause dirt on the LCD screen and lens • The LCD screen is recommended to water. The heat of the memory card before use a memory card with this camera for the first time, it is unrecoverable. Insert a charged battery pack and turn on recording/playback • When you use . It may cause a malfunction and you start recording, make sure...


