Instruction Manual
Page 1
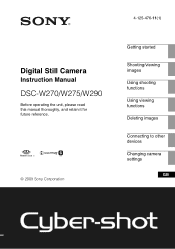
4-125-476-11(1) Digital Still Camera Instruction Manual DSC-W270/W275/W290 Before operating the unit, please read this manual thoroughly, and retain it for future reference. © 2009 Sony Corporation Getting started Shooting/viewing images Using shooting functions Using viewing functions Deleting images Connecting to other devices Changing camera settings GB
4-125-476-11(1) Digital Still Camera Instruction Manual DSC-W270/W275/W290 Before operating the unit, please read this manual thoroughly, and retain it for future reference. © 2009 Sony Corporation Getting started Shooting/viewing images Using shooting functions Using viewing functions Deleting images Connecting to other devices Changing camera settings GB

Instruction Manual
Page 2
... as in direct sunlight or in a car parked in the sun. • Do not incinerate or dispose of in the space provided below. Model No. DSC-W270/W275/W290 Serial No WARNING To reduce fire or shock hazard, do not expose the unit to these numbers whenever you call upon your... the serial number in fire. • Do not handle damaged or leaking lithium ion batteries. • Be sure to charge the battery pack using a genuine Sony battery charger or a device that can burst, cause a fire or even chemical burns. Owner's Record The model and serial numbers are located on it. •...
... as in direct sunlight or in a car parked in the sun. • Do not incinerate or dispose of in the space provided below. Model No. DSC-W270/W275/W290 Serial No WARNING To reduce fire or shock hazard, do not expose the unit to these numbers whenever you call upon your... the serial number in fire. • Do not handle damaged or leaking lithium ion batteries. • Be sure to charge the battery pack using a genuine Sony battery charger or a device that can burst, cause a fire or even chemical burns. Owner's Record The model and serial numbers are located on it. •...
Instruction Manual
Page 3
...related matters only. [ Regulatory Information Declaration of Conformity Trade Name: SONY Model No.: DSC-W290 Responsible Party: Sony Electronics Inc. • Replace only with the same or equivalent type recommended by Sony. • Dispose of used rechargeable batteries to the collection and ... received, including interference that may cause undesired operation. 3GB This Class B digital apparatus complies with Part 15 of Conformity Trade Name: SONY Model No.: DSC-W270 Responsible Party: Sony Electronics Inc. Operation is subject to the following two conditions: (1) This device...
...related matters only. [ Regulatory Information Declaration of Conformity Trade Name: SONY Model No.: DSC-W290 Responsible Party: Sony Electronics Inc. • Replace only with the same or equivalent type recommended by Sony. • Dispose of used rechargeable batteries to the collection and ... received, including interference that may cause undesired operation. 3GB This Class B digital apparatus complies with Part 15 of Conformity Trade Name: SONY Model No.: DSC-W270 Responsible Party: Sony Electronics Inc. Operation is subject to the following two conditions: (1) This device...
Instruction Manual
Page 4
... disposal service or the shop where you will help prevent potential negative consequences for a Class B digital device, pursuant to radio or television reception, which the receiver is Sony Deutschland GmbH, Hedelfinger Strasse 61, 70327 Stuttgart, Germany. This product has been tested and found ...to Part 15 of electrical and electronic equipment. For Customers in Europe [ Notice for the customers in the EMC Directive for a digital device pursuant to Subpart B of Part 15 of Old Electrical & Electronic Equipment (Applicable in the European Union and other European countries...
... disposal service or the shop where you will help prevent potential negative consequences for a Class B digital device, pursuant to radio or television reception, which the receiver is Sony Deutschland GmbH, Hedelfinger Strasse 61, 70327 Stuttgart, Germany. This product has been tested and found ...to Part 15 of electrical and electronic equipment. For Customers in Europe [ Notice for the customers in the EMC Directive for a digital device pursuant to Subpart B of Part 15 of Old Electrical & Electronic Equipment (Applicable in the European Union and other European countries...

Instruction Manual
Page 5
... negative consequences for the recycling of waste batteries. Hand the battery over the product at end-oflife to the applicable collection point for your nearest Sony service station. 5GB If you purchased the product. Disposal of waste batteries (applicable in the European Union and other batteries, please view the section on...
... negative consequences for the recycling of waste batteries. Hand the battery over the product at end-oflife to the applicable collection point for your nearest Sony service station. 5GB If you purchased the product. Disposal of waste batteries (applicable in the European Union and other batteries, please view the section on...
Instruction Manual
Page 6
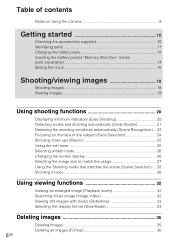
Table of contents Notes on using the camera 8 Getting started 10 Checking the accessories supplied 10 Identifying parts 11 Charging the battery pack 12 Inserting the battery pack/a "Memory Stick Duo" media (sold ... (Scene Selection) .... 28 Shooting movies 30 Using viewing functions 32 Viewing an enlarged image (Playback zoom 32 Searching for an image (Image Index 32 Viewing still images with music (Slideshow 33 Selecting the display format (View Mode 34 Deleting images 35 Deleting images 35 Deleting all images (Format 36 6GB
Table of contents Notes on using the camera 8 Getting started 10 Checking the accessories supplied 10 Identifying parts 11 Charging the battery pack 12 Inserting the battery pack/a "Memory Stick Duo" media (sold ... (Scene Selection) .... 28 Shooting movies 30 Using viewing functions 32 Viewing an enlarged image (Playback zoom 32 Searching for an image (Image Index 32 Viewing still images with music (Slideshow 33 Selecting the display format (View Mode 34 Deleting images 35 Deleting images 35 Deleting all images (Format 36 6GB
Instruction Manual
Page 7
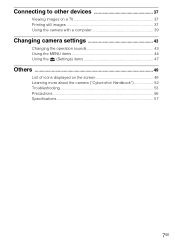
Connecting to other devices 37 Viewing images on a TV 37 Printing still images 37 Using the camera with a computer 39 Changing camera settings 43 Changing the operation sounds 43 Using the MENU items 44 Using the (Settings) items 47 Others 49 List of icons displayed on the screen 49 Learning more about the camera ("Cyber-shot Handbook 52 Troubleshooting 53 Precautions 56 Specifications 57 7GB
Connecting to other devices 37 Viewing images on a TV 37 Printing still images 37 Using the camera with a computer 39 Changing camera settings 43 Changing the operation sounds 43 Using the MENU items 44 Using the (Settings) items 47 Others 49 List of icons displayed on the screen 49 Learning more about the camera ("Cyber-shot Handbook 52 Troubleshooting 53 Precautions 56 Specifications 57 7GB
Instruction Manual
Page 8
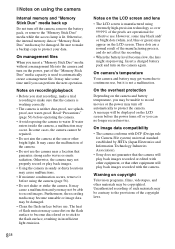
... in sandy or dusty locations may occur. These dots are a normal result of the pixels are operational for Camera File system) universal standard established by JEITA (Japan Electronics and Information Technology Industries Association). • Sony does not guarantee that generates strong radio waves or emits radiation. On image data compatibility • The...
... in sandy or dusty locations may occur. These dots are a normal result of the pixels are operational for Camera File system) universal standard established by JEITA (Japan Electronics and Information Technology Industries Association). • Sony does not guarantee that generates strong radio waves or emits radiation. On image data compatibility • The...

Instruction Manual
Page 9
On illustrations Illustrations used in this manual are of the camera or recording media, etc. No compensation for damaged content or recording failure Sony cannot compensate for failure to record or loss or damage of recorded content due to a malfunction of the DSC-W290 unless noted otherwise. 9GB
On illustrations Illustrations used in this manual are of the camera or recording media, etc. No compensation for damaged content or recording failure Sony cannot compensate for failure to record or loss or damage of recorded content due to a malfunction of the DSC-W290 unless noted otherwise. 9GB

Instruction Manual
Page 10
... USA and Canada) • Rechargeable battery pack NP-BG1 (1)/ Battery case (1) • USB, A/V cable for multi-use terminal (1) • Soft carrying case (1) (DSC-W275 only) • CD-ROM (1) - "Cyber-shot Handbook" - "Cyber-shot Step-up Guide" • Instruction Manual (this manual) (1) x Using the wrist strap Attach the strap and place your hand through the loop...
... USA and Canada) • Rechargeable battery pack NP-BG1 (1)/ Battery case (1) • USB, A/V cable for multi-use terminal (1) • Soft carrying case (1) (DSC-W275 only) • CD-ROM (1) - "Cyber-shot Handbook" - "Cyber-shot Step-up Guide" • Instruction Manual (this manual) (1) x Using the wrist strap Attach the strap and place your hand through the loop...
Instruction Manual
Page 11
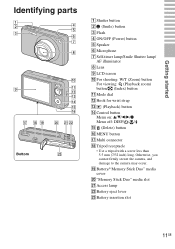
.../ / / O (Delete) button P MENU button Q Multi connector R Tripod receptacle • Use a tripod with a screw less than 5.5 mm (7/32 inch) long. Otherwise, you cannot firmly secure the camera, and damage to the...
.../ / / O (Delete) button P MENU button Q Multi connector R Tripod receptacle • Use a tripod with a screw less than 5.5 mm (7/32 inch) long. Otherwise, you cannot firmly secure the camera, and damage to the...

Instruction Manual
Page 12
Battery pack 2 Connect the battery charger to the wall outlet (wall socket). For customers in the USA and Canada Plug CHARGE lamp Lit: Charging Off: Charging finished (normal charge) CHARGE lamp For customers in countries/regions other than the USA and Canada Power cord (mains lead) CHARGE lamp 3 When charging is partially charged. Getting started Charging the battery pack 1 Insert the battery pack into the battery charger. • You can charge the battery even when it is finished, disconnect the battery charger. 12GB If you continue charging the battery pack for about one more...
Battery pack 2 Connect the battery charger to the wall outlet (wall socket). For customers in the USA and Canada Plug CHARGE lamp Lit: Charging Off: Charging finished (normal charge) CHARGE lamp For customers in countries/regions other than the USA and Canada Power cord (mains lead) CHARGE lamp 3 When charging is partially charged. Getting started Charging the battery pack 1 Insert the battery pack into the battery charger. • You can charge the battery even when it is finished, disconnect the battery charger. 12GB If you continue charging the battery pack for about one more...
Instruction Manual
Page 13
... battery charger of the genuine Sony brand. of still images may cause a malfunction. 13GB Normal charge time Approx. 270 min. Notes • The table above shows the time required to 240 V AC, 50/60 Hz. zUsing the camera abroad You can record/view Shooting still images Viewing still images DSC-W290 DSC-W270/W275 DSC-W290 DSC-W270/W275 Battery life...
... battery charger of the genuine Sony brand. of still images may cause a malfunction. 13GB Normal charge time Approx. 270 min. Notes • The table above shows the time required to 240 V AC, 50/60 Hz. zUsing the camera abroad You can record/view Shooting still images Viewing still images DSC-W290 DSC-W270/W275 DSC-W290 DSC-W270/W275 Battery life...

Instruction Manual
Page 14
Insert the battery while pressing the lever in the direction of the arrow. 4 Close the cover. 14GB Getting started Inserting the battery pack/a "Memory Stick Duo" media (sold separately) 1 Open the cover. 2 Insert the "Memory Stick Duo" media (sold separately). With the terminal side facing the lens, insert the "Memory Stick Duo" media until it clicks into place. 3 Insert the battery pack.
Insert the battery while pressing the lever in the direction of the arrow. 4 Close the cover. 14GB Getting started Inserting the battery pack/a "Memory Stick Duo" media (sold separately) 1 Open the cover. 2 Insert the "Memory Stick Duo" media (sold separately). With the terminal side facing the lens, insert the "Memory Stick Duo" media until it clicks into place. 3 Insert the battery pack.
Instruction Manual
Page 15
...time per charge decreases markedly, the battery pack needs to drop the battery pack. x "Memory Stick" media that you do not operate the camera for about one minute until the correct remaining charge indicator appears. • The remaining charge indicator may cause damage to a "Memory Stick ...Duo" media, insert the "Memory Stick Duo" media in the camera, then select MENU t (Settings) t ("Memory Stick" Tool) t [Copy]. For details on the upper left of "Memory Stick" media or memory ...
...time per charge decreases markedly, the battery pack needs to drop the battery pack. x "Memory Stick" media that you do not operate the camera for about one minute until the correct remaining charge indicator appears. • The remaining charge indicator may cause damage to a "Memory Stick ...Duo" media, insert the "Memory Stick Duo" media in the camera, then select MENU t (Settings) t ("Memory Stick" Tool) t [Copy]. For details on the upper left of "Memory Stick" media or memory ...
Instruction Manual
Page 16
... power to next], then press z. 16GB Getting started Setting the clock 1 Press the ON/OFF (Power) button. Date & Time: Sets the date and time. The camera is indicated as 12:00 AM, and noon as 12:00 PM. 4 Select [Go to turn on and allow operation. 2 Select a setting item with v/ V on...
... power to next], then press z. 16GB Getting started Setting the clock 1 Press the ON/OFF (Power) button. Date & Time: Sets the date and time. The camera is indicated as 12:00 AM, and noon as 12:00 PM. 4 Select [Go to turn on and allow operation. 2 Select a setting item with v/ V on...
Instruction Manual
Page 17
Getting started 5 Select your desired area with the date. Note • The camera does not have a feature for superimposing dates on the control button, then press z. 6 Select [OK], then press z. By using "PMB" in the CD-ROM (supplied), you can print or save images with b/B on images. x Setting the date and time again Press the MENU button, then select (Settings) t (Clock Settings) (page 48). 17GB
Getting started 5 Select your desired area with the date. Note • The camera does not have a feature for superimposing dates on the control button, then press z. 6 Select [OK], then press z. By using "PMB" in the CD-ROM (supplied), you can print or save images with b/B on images. x Setting the date and time again Press the MENU button, then select (Settings) t (Clock Settings) (page 48). 17GB
Instruction Manual
Page 18
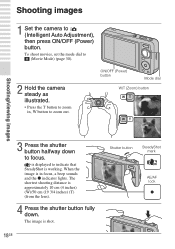
..., set the mode dial to (Movie Mode) (page 30). 2 Hold the camera steady as illustrated. • Press the T button to zoom in focus, a beep sounds and the z indicator lights. When the image is in , W button to focus. The image is shot. 18GB Shutter button SteadyShot mark AE/AF lock The shortest shooting...) button. ON/OFF (Power) button Mode dial W/T (Zoom) button Shooting/viewing images 3 Press the shutter button halfway down . Shooting/viewing images Shooting images 1 Set the camera to indicate that SteadyShot is working.
..., set the mode dial to (Movie Mode) (page 30). 2 Hold the camera steady as illustrated. • Press the T button to zoom in focus, a beep sounds and the z indicator lights. When the image is in , W button to focus. The image is shot. 18GB Shutter button SteadyShot mark AE/AF lock The shortest shooting...) button. ON/OFF (Power) button Mode dial W/T (Zoom) button Shooting/viewing images 3 Press the shutter button halfway down . Shooting/viewing images Shooting images 1 Set the camera to indicate that SteadyShot is working.
Instruction Manual
Page 19
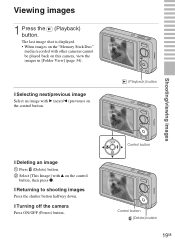
...) on the control button. (Playback) button Shooting/viewing images x Deleting an image 1 Press (Delete) button. 2 Select [This Image] with other cameras cannot be played back on the control button, then press z. x Returning to shooting images Press the shutter button halfway down. The last image... shot is displayed. • When images on the "Memory Stick Duo" media recorded with v on this camera, view the images in [Folder View] (page 34). Viewing images 1 Press the (Playback) button...
...) on the control button. (Playback) button Shooting/viewing images x Deleting an image 1 Press (Delete) button. 2 Select [This Image] with other cameras cannot be played back on the control button, then press z. x Returning to shooting images Press the shutter button halfway down. The last image... shot is displayed. • When images on the "Memory Stick Duo" media recorded with v on this camera, view the images in [Folder View] (page 34). Viewing images 1 Press the (Playback) button...

Instruction Manual
Page 20
The text size increases and indicators become easier to see. 1 Set the mode dial to Shooting). (Easy Action Self-Timer Image Size Flash How to see. Press MENU t Select [Large] or [Small] from [Image Size]. Press on the control button t Select [Self-Timer 10sec] or [SelfTimer Off]. zOn Easy Viewing mode When you press the (Playback) button with [Delete All Images]. 20GB MENU button: Select [OK] t z. You can delete the currently displayed image. In addition, the functions that can be used are limited. (Delete) button: You can delete the currently displayed image with [Delete...
The text size increases and indicators become easier to see. 1 Set the mode dial to Shooting). (Easy Action Self-Timer Image Size Flash How to see. Press MENU t Select [Large] or [Small] from [Image Size]. Press on the control button t Select [Self-Timer 10sec] or [SelfTimer Off]. zOn Easy Viewing mode When you press the (Playback) button with [Delete All Images]. 20GB MENU button: Select [OK] t z. You can delete the currently displayed image. In addition, the functions that can be used are limited. (Delete) button: You can delete the currently displayed image with [Delete...
