Operating Instructions
Page 2
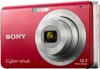
Refer to rain or moisture. Model No. DSC-W180/W190 Serial No WARNING To reduce fire or shock hazard, do not expose the unit to these numbers whenever you call upon your Sony dealer regarding this product. English Owner's Record The model and serial numbers are located on the bottom. If the shape of the plug does not fit the power outlet, use an attachment plug adaptor of the proper configuration for the power outlet. 2GB Record the serial number in the space provided below.
Refer to rain or moisture. Model No. DSC-W180/W190 Serial No WARNING To reduce fire or shock hazard, do not expose the unit to these numbers whenever you call upon your Sony dealer regarding this product. English Owner's Record The model and serial numbers are located on the bottom. If the shape of the plug does not fit the power outlet, use an attachment plug adaptor of the proper configuration for the power outlet. 2GB Record the serial number in the space provided below.
Operating Instructions
Page 3
...; Keep the battery pack dry. • Replace only with the same or equivalent type recommended by Sony. • Dispose of the FCC Rules. If some trouble occurs while using a genuine Sony battery charger or a device that may cause undesired operation. Observe the following two conditions: (1) This ...battery charger, immediately shut off the power by returning your used rechargeable batteries to the wall outlet (wall socket). GB This Class B digital apparatus complies with Part 15 of used battery packs promptly as described in the instructions. [ Battery charger Even if the CHARGE lamp ...
...; Keep the battery pack dry. • Replace only with the same or equivalent type recommended by Sony. • Dispose of the FCC Rules. If some trouble occurs while using a genuine Sony battery charger or a device that may cause undesired operation. Observe the following two conditions: (1) This ...battery charger, immediately shut off the power by returning your used rechargeable batteries to the wall outlet (wall socket). GB This Class B digital apparatus complies with Part 15 of used battery packs promptly as described in the instructions. [ Battery charger Even if the CHARGE lamp ...
Operating Instructions
Page 4
.... - Consult the dealer or an experienced radio/TV technician for a Class B digital device, pursuant to Part 15 of the following two conditions: (1) This device may cause undesired operation. For the State of Conformity Trade Name: SONY Model No.: DSC-W190 Responsible Party: Sony Electronics Inc. UL is connected. - However, there is subject to radio communications...
.... - Consult the dealer or an experienced radio/TV technician for a Class B digital device, pursuant to Part 15 of the following two conditions: (1) This device may cause undesired operation. For the State of Conformity Trade Name: SONY Model No.: DSC-W190 Responsible Party: Sony Electronics Inc. UL is connected. - However, there is subject to radio communications...
Operating Instructions
Page 5
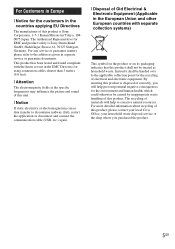
...the European Union and other European countries with separate collection systems) This symbol on the product or on its packaging indicates that this product is Sony Deutschland GmbH, Hedelfinger Strasse 61, 70327 Stuttgart, Germany. Instead it shall be handed over to the applicable collection point for the recycling of .... [ Notice If static electricity or electromagnetism causes data transfer to the addresses given in the EMC Directive for EMC and product safety is Sony Corporation, 1-7-1 Konan Minato-ku Tokyo, 1080075 Japan. The recycling of electrical and electronic equipment.
...the European Union and other European countries with separate collection systems) This symbol on the product or on its packaging indicates that this product is Sony Deutschland GmbH, Hedelfinger Strasse 61, 70327 Stuttgart, Germany. Instead it shall be handed over to the applicable collection point for the recycling of .... [ Notice If static electricity or electromagnetism causes data transfer to the addresses given in the EMC Directive for EMC and product safety is Sony Corporation, 1-7-1 Konan Minato-ku Tokyo, 1080075 Japan. The recycling of electrical and electronic equipment.
Operating Instructions
Page 6
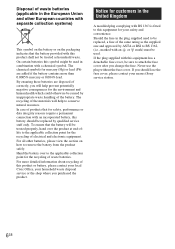
... supplied one and approved by ASTA or BSI to BS 1362, (i.e., marked with BS 1363 is fitted to the applicable collection point for your nearest Sony service station. 6GB For all other European countries with separate collection systems) This symbol on the battery or on how to remove the battery from...
... supplied one and approved by ASTA or BSI to BS 1362, (i.e., marked with BS 1363 is fitted to the applicable collection point for your nearest Sony service station. 6GB For all other European countries with separate collection systems) This symbol on the battery or on how to remove the battery from...
Operating Instructions
Page 7
Table of contents Notes on using the camera 9 Getting started 10 Checking the accessories supplied 10 Identifying parts 11 Charging the battery pack 12 Inserting the battery pack/a "Memory Stick Duo" media (sold ...).... 27 Shooting movies 28 Using viewing functions 30 Viewing an enlarged image (Playback zoom 30 Searching for an image (Image Index 30 Viewing a series of still images (Slideshow 31 Deleting images 32 Deleting images 32 Deleting all images (Format 33 7GB
Table of contents Notes on using the camera 9 Getting started 10 Checking the accessories supplied 10 Identifying parts 11 Charging the battery pack 12 Inserting the battery pack/a "Memory Stick Duo" media (sold ...).... 27 Shooting movies 28 Using viewing functions 30 Viewing an enlarged image (Playback zoom 30 Searching for an image (Image Index 30 Viewing a series of still images (Slideshow 31 Deleting images 32 Deleting images 32 Deleting all images (Format 33 7GB
Operating Instructions
Page 8
Connecting to other devices 34 Viewing images on a TV 34 Printing still images 34 Using the camera with a computer 36 Changing camera settings 40 Changing the operation sounds 40 Using the MENU items 41 Using the (Settings) items 44 Others 46 List of icons displayed on the screen 46 Learning more about the camera ("Cyber-shot Handbook 49 Troubleshooting 50 Precautions 52 Specifications 53 8GB
Connecting to other devices 34 Viewing images on a TV 34 Printing still images 34 Using the camera with a computer 36 Changing camera settings 40 Changing the operation sounds 40 Using the MENU items 41 Using the (Settings) items 44 Others 46 List of icons displayed on the screen 46 Learning more about the camera ("Cyber-shot Handbook 49 Troubleshooting 50 Precautions 52 Specifications 53 8GB
Operating Instructions
Page 9
...light. No compensation for damaged content or recording failure Sony cannot compensate for failure to record or loss or damage of recorded content due to a malfunction of the copyright laws. x Notes on using the camera Internal memory and "Memory Stick Duo" media back up... by JEITA (Japan Electronics and Information Technology Industries Association). • Sony does not guarantee that the camera will play back images. • Using the camera in insufficient light emission. On camera's temperature Your camera and battery may become discolored or to stick to the flash surface,...
...light. No compensation for damaged content or recording failure Sony cannot compensate for failure to record or loss or damage of recorded content due to a malfunction of the copyright laws. x Notes on using the camera Internal memory and "Memory Stick Duo" media back up... by JEITA (Japan Electronics and Information Technology Industries Association). • Sony does not guarantee that the camera will play back images. • Using the camera in insufficient light emission. On camera's temperature Your camera and battery may become discolored or to stick to the flash surface,...
Operating Instructions
Page 10
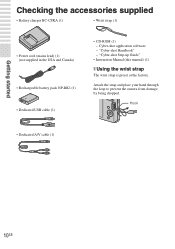
Attach the strap and place your hand through the loop to prevent the camera from damage by being dropped. Hook • Dedicated A/V cable (1) 10GB Cyber-shot application software - "Cyber-shot Handbook" - "Cyber-shot Step-up Guide" • Instruction Manual (this manual) (1) x Using the wrist strap The wrist strap is preset at the factory. Getting started Getting started Checking...
Attach the strap and place your hand through the loop to prevent the camera from damage by being dropped. Hook • Dedicated A/V cable (1) 10GB Cyber-shot application software - "Cyber-shot Handbook" - "Cyber-shot Step-up Guide" • Instruction Manual (this manual) (1) x Using the wrist strap The wrist strap is preset at the factory. Getting started Getting started Checking...
Operating Instructions
Page 11
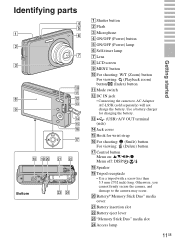
Otherwise, you cannot firmly secure the camera, and damage to AC Adaptor AC-LS5K (sold separately) will not charge the battery. T Battery/"Memory Stick Duo" media cover U Battery insertion slot V Battery eject ... lamp G Lens H LCD screen I MENU button J For shooting: W/T (Zoom) button For viewing: (Playback zoom) button/ (Index) button K Mode switch L DC IN jack • Connecting the camera to the camera may occur.
Otherwise, you cannot firmly secure the camera, and damage to AC Adaptor AC-LS5K (sold separately) will not charge the battery. T Battery/"Memory Stick Duo" media cover U Battery insertion slot V Battery eject ... lamp G Lens H LCD screen I MENU button J For shooting: W/T (Zoom) button For viewing: (Playback zoom) button/ (Index) button K Mode switch L DC IN jack • Connecting the camera to the camera may occur.
Operating Instructions
Page 12
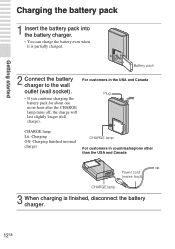
For customers in the USA and Canada Plug CHARGE lamp Lit: Charging Off: Charging finished (normal charge) CHARGE lamp For customers in countries/regions other than the USA and Canada Power cord (mains lead) CHARGE lamp 3 When charging is partially charged. Battery pack 2 Connect the battery charger to the wall outlet (wall socket). • If you continue charging the battery pack for about one more hour after the CHARGE lamp turns off, the charge will last slightly longer (full charge). Getting started Charging the battery pack 1 Insert the battery pack into the battery charger. &#...
For customers in the USA and Canada Plug CHARGE lamp Lit: Charging Off: Charging finished (normal charge) CHARGE lamp For customers in countries/regions other than the USA and Canada Power cord (mains lead) CHARGE lamp 3 When charging is partially charged. Battery pack 2 Connect the battery charger to the wall outlet (wall socket). • If you continue charging the battery pack for about one more hour after the CHARGE lamp turns off, the charge will last slightly longer (full charge). Getting started Charging the battery pack 1 Insert the battery pack into the battery charger. &#...
Operating Instructions
Page 13
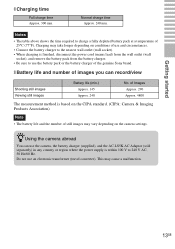
... Hz/60 Hz. Normal charge time Approx. 240 min. This may take longer depending on conditions of use the camera, the battery charger (supplied), and the AC-LS5K AC Adaptor (sold separately) in any country or region where the... to use an electronic transformer (travel converter). Charging may cause a malfunction. 13GB zUsing the camera abroad You can record/view Shooting still images Viewing still images Battery life (min.) Approx. 145 Approx. 240 No. Do not use the battery ...; Be sure to charge a fully depleted battery pack at a temperature of the genuine Sony brand.
... Hz/60 Hz. Normal charge time Approx. 240 min. This may take longer depending on conditions of use the camera, the battery charger (supplied), and the AC-LS5K AC Adaptor (sold separately) in any country or region where the... to use an electronic transformer (travel converter). Charging may cause a malfunction. 13GB zUsing the camera abroad You can record/view Shooting still images Viewing still images Battery life (min.) Approx. 145 Approx. 240 No. Do not use the battery ...; Be sure to charge a fully depleted battery pack at a temperature of the genuine Sony brand.
Operating Instructions
Page 14
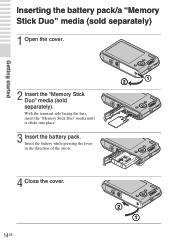
Getting started Inserting the battery pack/a "Memory Stick Duo" media (sold separately) 1 Open the cover. 2 Insert the "Memory Stick Duo" media (sold separately). With the terminal side facing the lens, insert the "Memory Stick Duo" media until it clicks into place. 3 Insert the battery pack. Insert the battery while pressing the lever in the direction of the arrow. 4 Close the cover. 14GB
Getting started Inserting the battery pack/a "Memory Stick Duo" media (sold separately) 1 Open the cover. 2 Insert the "Memory Stick Duo" media (sold separately). With the terminal side facing the lens, insert the "Memory Stick Duo" media until it clicks into place. 3 Insert the battery pack. Insert the battery while pressing the lever in the direction of the arrow. 4 Close the cover. 14GB
Operating Instructions
Page 15
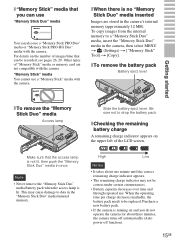
...remove the "Memory Stick Duo" media/battery pack when the access lamp is no "Memory Stick Duo" media inserted Images are not compatible with the camera. x To remove the battery pack Battery eject lever Getting started x To remove the "Memory Stick Duo" media Access lamp Slide the battery eject ...can use "Memory Stick Duo" media You can be recorded, see pages 26, 29. x "Memory Stick" media that you do not operate the camera for about one minute until the correct remaining charge indicator appears. • The remaining charge indicator may cause damage to be replaced. When the operating...
...remove the "Memory Stick Duo" media/battery pack when the access lamp is no "Memory Stick Duo" media inserted Images are not compatible with the camera. x To remove the battery pack Battery eject lever Getting started x To remove the "Memory Stick Duo" media Access lamp Slide the battery eject ...can use "Memory Stick Duo" media You can be recorded, see pages 26, 29. x "Memory Stick" media that you do not operate the camera for about one minute until the correct remaining charge indicator appears. • The remaining charge indicator may cause damage to be replaced. When the operating...

Operating Instructions
Page 16
ON/OFF (Power) button Control button 3 Set the numeric value with v/V/b/B, then press z. • Midnight is turned on. • It may take time for the power to turn on and allow operation. 2 Select the date and time display format with v/V on the control button, then press z. Getting started Setting the clock 1 Press the ON/OFF (Power) button. The camera is indicated as 12:00 AM, and noon as 12:00 PM. 4 Select [OK], then press z. 16GB
ON/OFF (Power) button Control button 3 Set the numeric value with v/V/b/B, then press z. • Midnight is turned on. • It may take time for the power to turn on and allow operation. 2 Select the date and time display format with v/V on the control button, then press z. Getting started Setting the clock 1 Press the ON/OFF (Power) button. The camera is indicated as 12:00 AM, and noon as 12:00 PM. 4 Select [OK], then press z. 16GB

Operating Instructions
Page 17
Getting started Note • The camera does not have a feature for superimposing dates on images. By using "PMB" in the CD-ROM (supplied), you can print or save images with the date. x Setting the date and time again Press the MENU button, then select (Settings) t [Clock Settings] (page 45). 17GB
Getting started Note • The camera does not have a feature for superimposing dates on images. By using "PMB" in the CD-ROM (supplied), you can print or save images with the date. x Setting the date and time again Press the MENU button, then select (Settings) t [Clock Settings] (page 45). 17GB
Operating Instructions
Page 18
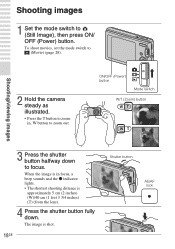
To shoot movies, set the mode switch to (Movie) (page 28). 2 Hold the camera steady as illustrated. • Press the T button to zoom out. ON/OFF (Power) button Mode switch W/T (Zoom) button Shooting/viewing images 3 Press the shutter button ...halfway down . The image is approximately 5 cm (2 inches) (W)/40 cm (1 feet 3 3/4 inches) (T) (from the lens). 4 Press the shutter button fully down to (Still Image), then press ON/ OFF (Power) button. When the image is in , W button to zoom in focus, a beep sounds and the z indicator lights. • The...
To shoot movies, set the mode switch to (Movie) (page 28). 2 Hold the camera steady as illustrated. • Press the T button to zoom out. ON/OFF (Power) button Mode switch W/T (Zoom) button Shooting/viewing images 3 Press the shutter button ...halfway down . The image is approximately 5 cm (2 inches) (W)/40 cm (1 feet 3 3/4 inches) (T) (from the lens). 4 Press the shutter button fully down to (Still Image), then press ON/ OFF (Power) button. When the image is in , W button to zoom in focus, a beep sounds and the z indicator lights. • The...
Operating Instructions
Page 19
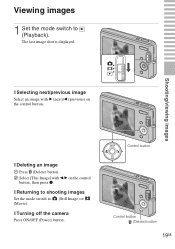
x Returning to shooting images Set the mode switch to (Playback). Control button Control button (Delete) button 19GB x Deleting an image 1 Press (Delete) button. 2 Select [This Image] with B (next)/b (previous) on the control button, then press z. x Turning off the camera Press ON/OFF (Power) button. Shooting/viewing images x Selecting next/previous image Select an image with b/B on the control button. Viewing images 1 Set the mode switch to (Still Image) or (Movie). The last image shot is displayed.
x Returning to shooting images Set the mode switch to (Playback). Control button Control button (Delete) button 19GB x Deleting an image 1 Press (Delete) button. 2 Select [This Image] with B (next)/b (previous) on the control button, then press z. x Turning off the camera Press ON/OFF (Power) button. Shooting/viewing images x Selecting next/previous image Select an image with b/B on the control button. Viewing images 1 Set the mode switch to (Still Image) or (Movie). The last image shot is displayed.
Operating Instructions
Page 20
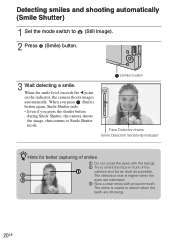
... the image, then returns to Smile Shutter mode. (Smile) button Face Detection frame Smile Detection Sensitivity indicator zHints for better capturing of the camera and be as level as possible. Using shooting functions Detecting smiles and shooting automatically (Smile Shutter) 1 Set the mode switch to orient the face in...the eyes are showing. 20GB The detection rate is easier to detect when the teeth are narrowed. 3 Give a clear smile with the bangs. 2 Try to (Still Image). 2 Press (Smile) button. 3 Wait detecting a smile. When the smile level exceeds the b point on the indicator, the...
... the image, then returns to Smile Shutter mode. (Smile) button Face Detection frame Smile Detection Sensitivity indicator zHints for better capturing of the camera and be as level as possible. Using shooting functions Detecting smiles and shooting automatically (Smile Shutter) 1 Set the mode switch to orient the face in...the eyes are showing. 20GB The detection rate is easier to detect when the teeth are narrowed. 3 Give a clear smile with the bangs. 2 Try to (Still Image). 2 Press (Smile) button. 3 Wait detecting a smile. When the smile level exceeds the b point on the indicator, the...
Operating Instructions
Page 21
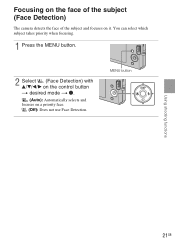
You can select which subject takes priority when focusing. 1 Press the MENU button. 2 Select (Face Detection) with v/V/b/B on the control button t desired mode t z. (Auto): Automatically selects and focuses on it. MENU button Using shooting functions 21GB Focusing on the face of the subject (Face Detection) The camera detects the face of the subject and focuses on a priority face. (Off): Does not use Face Detection.
You can select which subject takes priority when focusing. 1 Press the MENU button. 2 Select (Face Detection) with v/V/b/B on the control button t desired mode t z. (Auto): Automatically selects and focuses on it. MENU button Using shooting functions 21GB Focusing on the face of the subject (Face Detection) The camera detects the face of the subject and focuses on a priority face. (Off): Does not use Face Detection.
