Instruction Manual
Page 2
... a suitable outlet installed. If you are not sure of the type of power source indicated on the set should still fail to fit, contact your dealer or local power company. Never spill liquid of important operating and maintenance (servicing) instructions in the literature accompanying the appliance. 2 IMPORTANT SAFEGUARDS For your Sony dealer regarding this product. Record the serial number in the U.S.A. Model No. This...
... a suitable outlet installed. If you are not sure of the type of power source indicated on the set should still fail to fit, contact your dealer or local power company. Never spill liquid of important operating and maintenance (servicing) instructions in the literature accompanying the appliance. 2 IMPORTANT SAFEGUARDS For your Sony dealer regarding this product. Record the serial number in the U.S.A. Model No. This...
Instruction Manual
Page 3
... the set to qualified service personnel. [ Replacement parts When replacement parts are required, be sure the service technician has used replacement parts specified by the manufacturer. [ Ventilation The slots and openings in the cabinet are specified in a wet basement, or near a swimming pool, etc. [ Power-Cord Protection Route the power cord so that have the same characteristics as opening or removing covers may result in safe operating condition. 3 Improper adjustment...
... the set to qualified service personnel. [ Replacement parts When replacement parts are required, be sure the service technician has used replacement parts specified by the manufacturer. [ Ventilation The slots and openings in the cabinet are specified in a wet basement, or near a swimming pool, etc. [ Power-Cord Protection Route the power cord so that have the same characteristics as opening or removing covers may result in safe operating condition. 3 Improper adjustment...
Instruction Manual
Page 5
... the limits set out in a particular installation. Increase the separation between the equipment and receiver. - For Customers in Europe This product has been tested and found to comply with the limits for using connection cables shorter than 3 meters (9.8 feet). [ Attention The electromagnetic fields at the specific frequencies may cause harmful interference to Subpart B of Part 15 of...
... the limits set out in a particular installation. Increase the separation between the equipment and receiver. - For Customers in Europe This product has been tested and found to comply with the limits for using connection cables shorter than 3 meters (9.8 feet). [ Attention The electromagnetic fields at the specific frequencies may cause harmful interference to Subpart B of Part 15 of...
Instruction Manual
Page 7
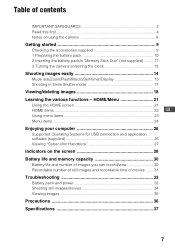
...26 Supported Operating Systems for USB connection and application software (supplied 26 Viewing "Cyber-shot Handbook 27 Indicators on /setting the clock 13 Shooting images easily 14 Mode dial/Zoom/Flash/Macro/Self-timer/Display 15 Shooting in Smile Shutter mode 17 Viewing/deleting images 18 Learning the various functions - Table of contents IMPORTANT SAFEGUARDS 2 Read this first 4 Notes on using the camera 8 Getting started 9 Checking the accessories supplied 9 1 Preparing the battery pack 10 2 Inserting the battery pack/a "Memory Stick Duo" (not supplied) ........ 11 3 Turning...
...26 Supported Operating Systems for USB connection and application software (supplied 26 Viewing "Cyber-shot Handbook 27 Indicators on /setting the clock 13 Shooting images easily 14 Mode dial/Zoom/Flash/Macro/Self-timer/Display 15 Shooting in Smile Shutter mode 17 Viewing/deleting images 18 Learning the various functions - Table of contents IMPORTANT SAFEGUARDS 2 Read this first 4 Notes on using the camera 8 Getting started 9 Checking the accessories supplied 9 1 Preparing the battery pack 10 2 Inserting the battery pack/a "Memory Stick Duo" (not supplied) ........ 11 3 Turning...
Instruction Manual
Page 8
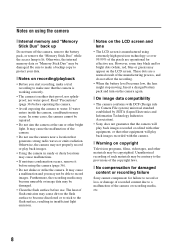
... of flash emission may be copyrighted. Notes on using the camera [ Internal memory and "Memory Stick Duo" back up Do not turn on the camera again. [ On image data compatibility • The camera conforms with DCF (Design rule for Camera File system) universal standard established by JEITA (Japan Electronics and Information Technology Industries Association). • Sony does not guarantee that the camera will play back images recorded or edited...
... of flash emission may be copyrighted. Notes on using the camera [ Internal memory and "Memory Stick Duo" back up Do not turn on the camera again. [ On image data compatibility • The camera conforms with DCF (Design rule for Camera File system) universal standard established by JEITA (Japan Electronics and Information Technology Industries Association). • Sony does not guarantee that the camera will play back images recorded or edited...
Instruction Manual
Page 11
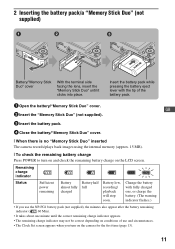
... of the battery pack. 1 Open the battery/"Memory Stick Duo" cover. Insert the battery pack while pressing the battery eject lever with fully charged one, or charge the battery. (The warning indicator flashes.) • If you turn on and check the remaining battery charge on the camera for the first time (page 13). 11 Change the battery with the tip of use and circumstances. • The Clock Set screen appears when...
... of the battery pack. 1 Open the battery/"Memory Stick Duo" cover. Insert the battery pack while pressing the battery eject lever with fully charged one, or charge the battery. (The warning indicator flashes.) • If you turn on and check the remaining battery charge on the camera for the first time (page 13). 11 Change the battery with the tip of use and circumstances. • The Clock Set screen appears when...
Instruction Manual
Page 13
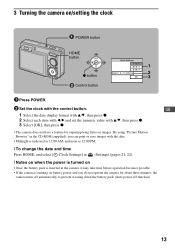
... superimposing dates on battery power and you can print or save images with the control button. By using "Picture Motion Browser" in the CD-ROM (supplied), you do not operate the camera for about three minutes, the camera turns off automatically to prevent wearing down the battery pack (Auto power-off function). 13 3 Turning the camera on/setting the clock POWER button HOME button 1 2 z button 3 ɟ Control button 1 Press POWER. 2 Set the clock with the date. • Midnight is indicated as...
... superimposing dates on battery power and you can print or save images with the control button. By using "Picture Motion Browser" in the CD-ROM (supplied), you do not operate the camera for about three minutes, the camera turns off automatically to prevent wearing down the battery pack (Auto power-off function). 13 3 Turning the camera on/setting the clock POWER button HOME button 1 2 z button 3 ɟ Control button 1 Press POWER. 2 Set the clock with the date. • Midnight is indicated as...
Instruction Manual
Page 15
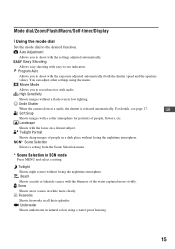
... the nighttime atmosphere. Fireworks Shoots fireworks in white more vividly. Auto Adjustment Allows you to the desired function. Twilight Portrait Shoots sharp images of people in natural colors using the menu. Smile Shutter When the camera detects a smile, the shutter is released automatically. Mode dial/Zoom/Flash/Macro/Self-timer/Display [ Using the mode dial Set the mode dial to shoot with the exposure adjusted automatically (both the shutter speed and the aperture value). Landscape Shoots with the blueness of people...
... the nighttime atmosphere. Fireworks Shoots fireworks in white more vividly. Auto Adjustment Allows you to the desired function. Twilight Portrait Shoots sharp images of people in natural colors using the menu. Smile Shutter When the camera detects a smile, the shutter is released automatically. Mode dial/Zoom/Flash/Macro/Self-timer/Display [ Using the mode dial Set the mode dial to shoot with the exposure adjusted automatically (both the shutter speed and the aperture value). Landscape Shoots with the blueness of people...
Instruction Manual
Page 16
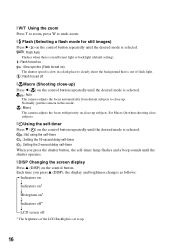
... the shutter button, the self-timer lamp flashes and a beep sounds until the shutter operates. [ DISP Changing the screen display Press v (DISP) on the control button. [ W/T Using the zoom Press T to zoom, press W to undo zoom. [ Flash (Selecting a flash mode for still images) Press B ( ) on the control button repeatedly until the desired mode is selected. : Flash Auto Flashes when there is insufficient light or backlight (default setting). : Flash forced on : Slow synchro (Flash forced on) The shutter speed is slow in this mode. : Macro The camera adjusts the focus...
... the shutter button, the self-timer lamp flashes and a beep sounds until the shutter operates. [ DISP Changing the screen display Press v (DISP) on the control button. [ W/T Using the zoom Press T to zoom, press W to undo zoom. [ Flash (Selecting a flash mode for still images) Press B ( ) on the control button repeatedly until the desired mode is selected. : Flash Auto Flashes when there is insufficient light or backlight (default setting). : Flash forced on : Slow synchro (Flash forced on) The shutter speed is slow in this mode. : Macro The camera adjusts the focus...
Instruction Manual
Page 17
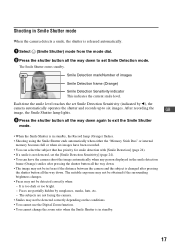
... recording the GB image, the Smile Shutter lamp lights. 3 Press the shutter button all the way down again to exit the Smile Shutter mode. • When the Smile Shutter is in standby, the Record lamp (Orange) flashes. • Shooting using the Smile Shutter ends automatically when either the "Memory Stick Duo" or internal memory becomes full or when six images have the camera shoot the image automatically when any person displayed in...
... recording the GB image, the Smile Shutter lamp lights. 3 Press the shutter button all the way down again to exit the Smile Shutter mode. • When the Smile Shutter is in standby, the Record lamp (Orange) flashes. • Shooting using the Smile Shutter ends automatically when either the "Memory Stick Duo" or internal memory becomes full or when six images have the camera shoot the image automatically when any person displayed in...
Instruction Manual
Page 18
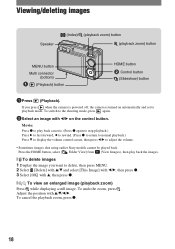
... powered off, the camera is turned on automatically and set to the shooting mode, press again. 2Select an image with v/V/b/B. Adjust the position with b/B on the control button. To undo the zoom, press . Press the HOME button, select [ Folder View] from (View Images), then play back a movie. (Press z again to stop playback.) Press B to fast forward, b to rewind. (Press z to return to normal playback.) Press V to display the volume control screen, then press b/B to delete...
... powered off, the camera is turned on automatically and set to the shooting mode, press again. 2Select an image with v/V/b/B. Adjust the position with b/B on the control button. To undo the zoom, press . Press the HOME button, select [ Folder View] from (View Images), then play back a movie. (Press z again to stop playback.) Press B to fast forward, b to rewind. (Press z to return to normal playback.) Press V to display the volume control screen, then press b/B to delete...
Instruction Manual
Page 19
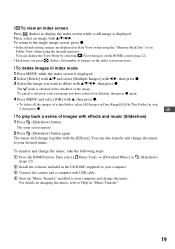
.... 3 Connect the camera and a computer with USB cable. 4 Start up "Music Transfer" installed to Help in Folder View (when using the internal memory). [ To view an index screen Press (Index) to your desired music. You can change the music to display the index screen while a still image is displayed. 2 Select [Delete] with v/V and select [Multiple Images] with v/V/b/B, then press z. The setup screen appears. 2 Press (Slideshow) button again. To transfer and change together with v/V/b/B. You can also transfer and change the View Mode...
.... 3 Connect the camera and a computer with USB cable. 4 Start up "Music Transfer" installed to Help in Folder View (when using the internal memory). [ To view an index screen Press (Index) to your desired music. You can change the music to display the index screen while a still image is displayed. 2 Select [Delete] with v/V and select [Multiple Images] with v/V/b/B, then press z. The setup screen appears. 2 Press (Slideshow) button again. To transfer and change together with v/V/b/B. You can also transfer and change the View Mode...
Instruction Manual
Page 22
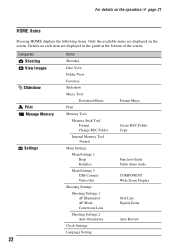
... Shooting View Images Slideshow Print Manage Memory Settings 22 Items Shooting Date View Folder View Favorites Slideshow Music Tool Download Music Print Memory Tool Memory Stick Tool Format Change REC.Folder Internal Memory Tool Format Main Settings Main Settings 1 Beep Initialize Main Settings 2 USB Connect Video Out Shooting Settings Shooting Settings 1 AF Illuminator AF Mode Conversion Lens Shooting Settings 2 Auto Orientation Clock Settings Language Setting Format Music Create REC.Folder Copy Function Guide Smile demo mode COMPONENT Wide Zoom Display Grid Line Digital Zoom Auto Review...
... Shooting View Images Slideshow Print Manage Memory Settings 22 Items Shooting Date View Folder View Favorites Slideshow Music Tool Download Music Print Memory Tool Memory Stick Tool Format Change REC.Folder Internal Memory Tool Format Main Settings Main Settings 1 Beep Initialize Main Settings 2 USB Connect Video Out Shooting Settings Shooting Settings 1 AF Illuminator AF Mode Conversion Lens Shooting Settings 2 Auto Orientation Clock Settings Language Setting Format Music Create REC.Folder Copy Function Guide Smile demo mode COMPONENT Wide Zoom Display Grid Line Digital Zoom Auto Review...
Instruction Manual
Page 26
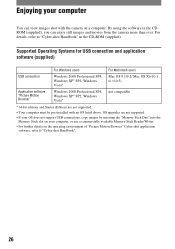
... does not support USB connections, copy images by inserting the "Memory Stick Duo" into the Memory Stick slot on your computer You can enjoy still images and movies from the camera more than ever. OS upgrades are not supported. • Your computer must be pre-installed with the camera on a computer. By using the software in the CD-ROM (supplied). For details, refer to "Cyber-shot Handbook" in the...
... does not support USB connections, copy images by inserting the "Memory Stick Duo" into the Memory Stick slot on your computer You can enjoy still images and movies from the camera more than ever. OS upgrades are not supported. • Your computer must be pre-installed with the camera on a computer. By using the software in the CD-ROM (supplied). For details, refer to "Cyber-shot Handbook" in the...
Instruction Manual
Page 28
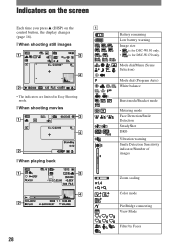
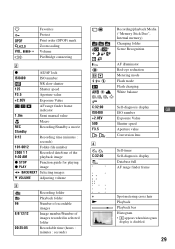
.../Menu (Scene Selection) Mode dial (Program Auto) White balance Burst mode/Bracket mode Metering mode Face Detection/Smile Detection SteadyShot DRO Vibration warning Smile Detection Sensitivity indicator/Number of images Zoom scaling Color mode PictBridge connecting View Mode Filter by Faces Indicators on the screen Each time you press v (DISP) on the A control button, the display changes (page 16). [ When shooting still images • The indicators are limited in Easy Shooting mode. [ When shooting movies +2.0EV [ When playing back 28 Battery remaining Low battery warning Image size...
.../Menu (Scene Selection) Mode dial (Program Auto) White balance Burst mode/Bracket mode Metering mode Face Detection/Smile Detection SteadyShot DRO Vibration warning Smile Detection Sensitivity indicator/Number of images Zoom scaling Color mode PictBridge connecting View Mode Filter by Faces Indicators on the screen Each time you press v (DISP) on the A control button, the display changes (page 16). [ When shooting still images • The indicators are limited in Easy Shooting mode. [ When shooting movies +2.0EV [ When playing back 28 Battery remaining Low battery warning Image size...
Instruction Manual
Page 29
... Protect Print order (DPOF) mark Zoom scaling Volume PictBridge connecting B z AE/AF lock ISO400 ISO number NR slow shutter 125 Shutter speed F3.5 Aperture value +2.0EV Exposure Value AF range finder frame indicator 1.0m Semi manual value Macro REC Standby Recording/Standby a movie 0:12 Recording time (minutes : seconds) 101-0012 Folder-file number 2008 1 1 9:30 AM Recorded date/time of the playback image z STOP z PLAY Function guide for playing image BACK/NEXT Selecting images V VOLUME Adjusting volume C 96 8/8 12/12 00:25:05 Recording folder Playback folder...
... Protect Print order (DPOF) mark Zoom scaling Volume PictBridge connecting B z AE/AF lock ISO400 ISO number NR slow shutter 125 Shutter speed F3.5 Aperture value +2.0EV Exposure Value AF range finder frame indicator 1.0m Semi manual value Macro REC Standby Recording/Standby a movie 0:12 Recording time (minutes : seconds) 101-0012 Folder-file number 2008 1 1 9:30 AM Recorded date/time of the playback image z STOP z PLAY Function guide for playing image BACK/NEXT Selecting images V VOLUME Adjusting volume C 96 8/8 12/12 00:25:05 Recording folder Playback folder...
Instruction Manual
Page 30
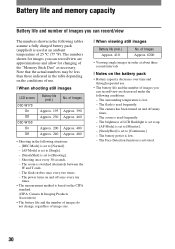
... allow for changing of image size. [ When viewing still images Battery life (min.) Approx. 410 No. The numbers shown for images you can record/view are decreased under the following tables assume a fully charged battery pack (supplied) is based on the conditions of LCD Backlight is set to up. - [AF Mode] is set to [Monitor]. - [SteadyShot] is used frequently. - The camera has been turned on and off many times. - Shooting once...
... allow for changing of image size. [ When viewing still images Battery life (min.) Approx. 410 No. The numbers shown for images you can record/view are decreased under the following tables assume a fully charged battery pack (supplied) is based on the conditions of LCD Backlight is set to up. - [AF Mode] is set to [Monitor]. - [SteadyShot] is used frequently. - The camera has been turned on and off many times. - Shooting once...
Instruction Manual
Page 31
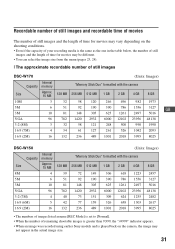
... shooting conditions. • Even if the capacity of your recording media is the same as the one in the table below, the number of still images and the length of time for movies may be different. • You can select the image size from the menu (pages 23, 24). [ The approximate recordable number of still images DSC-W170 (Units: Images) Internal Capacity memory "Memory Stick Duo" formatted with the camera Size...
... shooting conditions. • Even if the capacity of your recording media is the same as the one in the table below, the number of still images and the length of time for movies may be different. • You can select the image size from the menu (pages 23, 24). [ The approximate recordable number of still images DSC-W170 (Units: Images) Internal Capacity memory "Memory Stick Duo" formatted with the camera Size...
Instruction Manual
Page 33
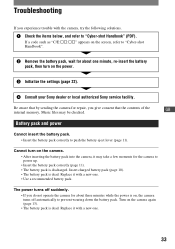
... camera for the camera to "Cyber-shot Handbook". 2 Remove the battery pack, wait for about one minute, re-insert the battery pack, then turn on the power. 3 Initialize the settings (page 22). 4 Consult your Sony dealer or local authorized Sony service facility. Replace it may take a few moments for repair, you give consent that the contents of the GB internal memory, Music files may be checked. Turn on the screen, refer to power...
... camera for the camera to "Cyber-shot Handbook". 2 Remove the battery pack, wait for about one minute, re-insert the battery pack, then turn on the power. 3 Initialize the settings (page 22). 4 Consult your Sony dealer or local authorized Sony service facility. Replace it may take a few moments for repair, you give consent that the contents of the GB internal memory, Music files may be checked. Turn on the screen, refer to power...
Instruction Manual
Page 37
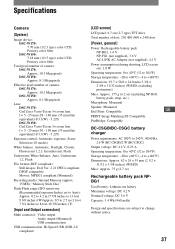
... number of camera: DSC-W170: Approx. 10.1 Megapixels DSC-W150: Approx. 8.1 Megapixels Lens: DSC-W170: Carl Zeiss Vario-Tessar 5× zoom lens f = 5 - 25 mm (28 - 140 mm (35 mm film equivalent)) F3.3(W) - 5.2(T) DSC-W150: Carl Zeiss Vario-Tessar 5× zoom lens f = 5 - 25 mm (30 - 150 mm (35 mm film equivalent)) F3.3(W) - 5.2(T) Exposure control: Automatic exposure, Scene Selection (10 modes) White balance: Automatic, Daylight, Cloudy, Fluorescent 1,2,3, Incandescent, Flash Underwater White Balance: Auto, Underwater 1,2, Flash File format (DCF compliant): Still images...
... number of camera: DSC-W170: Approx. 10.1 Megapixels DSC-W150: Approx. 8.1 Megapixels Lens: DSC-W170: Carl Zeiss Vario-Tessar 5× zoom lens f = 5 - 25 mm (28 - 140 mm (35 mm film equivalent)) F3.3(W) - 5.2(T) DSC-W150: Carl Zeiss Vario-Tessar 5× zoom lens f = 5 - 25 mm (30 - 150 mm (35 mm film equivalent)) F3.3(W) - 5.2(T) Exposure control: Automatic exposure, Scene Selection (10 modes) White balance: Automatic, Daylight, Cloudy, Fluorescent 1,2,3, Incandescent, Flash Underwater White Balance: Auto, Underwater 1,2, Flash File format (DCF compliant): Still images...


