Instruction Manual
Page 2
...kind on the marking label. Refer to have a suitable outlet installed. DSC-W150/W170 Serial No WARNING To reduce fire or shock hazard, do not... your protection, please read these numbers whenever you call upon your Sony dealer regarding this product. If you are unable to rain or ... the operating instructions. [ Polarization This set . [ Attachments Do not use attachments not recommended by forcing it in fire or electric shock. [ ...Liquid Entry Never push objects of any kind into the set should still fail to fit, contact your electrician to these safety instructions completely ...
...kind on the marking label. Refer to have a suitable outlet installed. DSC-W150/W170 Serial No WARNING To reduce fire or shock hazard, do not... your protection, please read these numbers whenever you call upon your Sony dealer regarding this product. If you are unable to rain or ... the operating instructions. [ Polarization This set . [ Attachments Do not use attachments not recommended by forcing it in fire or electric shock. [ ...Liquid Entry Never push objects of any kind into the set should still fail to fit, contact your electrician to these safety instructions completely ...
Instruction Manual
Page 3
...Refer all servicing to qualified service personnel. [ Replacement parts When replacement parts are required, be sure the service technician has used replacement parts specified by the manufacturer that are specified in the cabinet are provided for necessary ventilation. [ Cleaning Unplug the...been spilled or objects have the same characteristics as specified by the manufacturer. [ Ventilation The slots and openings in the operating instructions. Use a cloth lightly dampened with a cloth or other hazards. [ Safety Check Upon completion of the set . Unauthorized substitutions may fall,...
...Refer all servicing to qualified service personnel. [ Replacement parts When replacement parts are required, be sure the service technician has used replacement parts specified by the manufacturer that are specified in the cabinet are provided for necessary ventilation. [ Cleaning Unplug the...been spilled or objects have the same characteristics as specified by the manufacturer. [ Ventilation The slots and openings in the operating instructions. Use a cloth lightly dampened with a cloth or other hazards. [ Safety Check Upon completion of the set . Unauthorized substitutions may fall,...
Instruction Manual
Page 4
You can help preserve our environment by returning your used rechargeable batteries to the collection and recycling location nearest you may call toll free 1-800-822-8837, or visit http://www.rbrc.org/ Caution: Do ... No.: 858-942-2230 This device complies with Part 15 of the FCC Rules. Read this product, you . Declaration of Conformity Trade Name: SONY Model No.: DSC-W150 Responsible Party: Sony Electronics Inc. Operation is intended to excessive heat such as sunshine, fire or the like. Address: 16530 Via Esprillo, San Diego, CA 92127U...
You can help preserve our environment by returning your used rechargeable batteries to the collection and recycling location nearest you may call toll free 1-800-822-8837, or visit http://www.rbrc.org/ Caution: Do ... No.: 858-942-2230 This device complies with Part 15 of the FCC Rules. Read this product, you . Declaration of Conformity Trade Name: SONY Model No.: DSC-W150 Responsible Party: Sony Electronics Inc. Operation is intended to excessive heat such as sunshine, fire or the like. Address: 16530 Via Esprillo, San Diego, CA 92127U...
Instruction Manual
Page 5
Increase the separation between the equipment and receiver. - The supplied interface cable must be used in accordance with the limits for a Class B digital device, pursuant to Part 15 of the FCC Rules. For Customers in Europe This product has been tested and found ...the environment and human health, which the receiver is disposed of electrical and electronic equipment. This equipment generates, uses, and can be handed over to the applicable collection point for a digital device pursuant to Subpart B of Part 15 of this product is connected. - By ensuring this product....
Increase the separation between the equipment and receiver. - The supplied interface cable must be used in accordance with the limits for a Class B digital device, pursuant to Part 15 of the FCC Rules. For Customers in Europe This product has been tested and found ...the environment and human health, which the receiver is disposed of electrical and electronic equipment. This equipment generates, uses, and can be handed over to the applicable collection point for a digital device pursuant to Subpart B of Part 15 of this product is connected. - By ensuring this product....
Instruction Manual
Page 6
...data integrity reasons require a permanent connection with an incorporated battery, this battery should lose the fuse cover, please contact your nearest Sony service station. 6 In case of waste batteries (applicable in the European Union and other batteries, please view the section on the...contact your local Civic Office, your safety and convenience. For more detailed information about recycling of this product shall not be used. The Authorized Representative for your household waste disposal service or the shop where you will help prevent potentially negative consequences for...
...data integrity reasons require a permanent connection with an incorporated battery, this battery should lose the fuse cover, please contact your nearest Sony service station. 6 In case of waste batteries (applicable in the European Union and other batteries, please view the section on the...contact your local Civic Office, your safety and convenience. For more detailed information about recycling of this product shall not be used. The Authorized Representative for your household waste disposal service or the shop where you will help prevent potentially negative consequences for...
Instruction Manual
Page 7
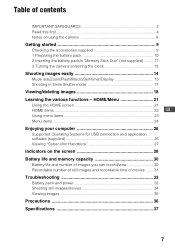
... "Memory Stick Duo" (not supplied) ........ 11 3 Turning the camera on the screen 28 Battery life and memory capacity 30 Battery life and number of images you can record/view 30 Recordable number of still images and recordable time of movies ...... 31 Troubleshooting 33 Battery pack and... still images/movies 34 Viewing images 35 Precautions 36 Specifications 37 7 HOME/Menu 21 Using the HOME screen 21 HOME items 22 GB Using menu items 23 Menu items 24 Enjoying your computer 26 Supported Operating Systems for USB connection and application software (supplied 26 Viewing "Cyber-shot...
... "Memory Stick Duo" (not supplied) ........ 11 3 Turning the camera on the screen 28 Battery life and memory capacity 30 Battery life and number of images you can record/view 30 Recordable number of still images and recordable time of movies ...... 31 Troubleshooting 33 Battery pack and... still images/movies 34 Viewing images 35 Precautions 36 Specifications 37 7 HOME/Menu 21 Using the HOME screen 21 HOME items 22 GB Using menu items 23 Menu items 24 Enjoying your computer 26 Supported Operating Systems for USB connection and application software (supplied 26 Viewing "Cyber-shot...
Instruction Manual
Page 8
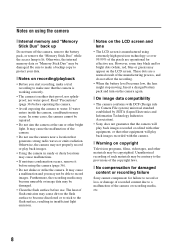
...unusable or image data may be copyrighted. However, some cases, the camera cannot be contrary to the provisions of the copyright laws. [ No compensation for damaged content or recording failure Sony cannot compensate for effective use . It may be able to record images. Insert a charged ...battery pack and turn off the camera, remove the battery pack, or remove the "Memory Stick Duo" while ...
...unusable or image data may be copyrighted. However, some cases, the camera cannot be contrary to the provisions of the copyright laws. [ No compensation for damaged content or recording failure Sony cannot compensate for effective use . It may be able to record images. Insert a charged ...battery pack and turn off the camera, remove the battery pack, or remove the "Memory Stick Duo" while ...
Instruction Manual
Page 9
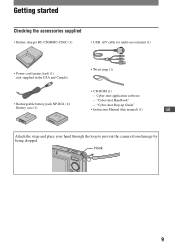
Hook 9 Getting started Checking the accessories supplied • Battery charger BC-CSGB/BC-CSGC (1) • USB, A/V cable for multi-use terminal (1) • Power cord (mains lead) (1) (not supplied in the USA and Canada) • Wrist strap (1) • CD-ROM (1) - Cyber-shot application software - "Cyber-shot Handbook" • Rechargeable battery pack NP-BG1 (1)/ - "Cyber-shot Step-up Guide" Battery case (1) • Instruction Manual (this manual) (1) GB Attach the strap and place your hand through the loop to prevent the camera from damage by being dropped.
Hook 9 Getting started Checking the accessories supplied • Battery charger BC-CSGB/BC-CSGC (1) • USB, A/V cable for multi-use terminal (1) • Power cord (mains lead) (1) (not supplied in the USA and Canada) • Wrist strap (1) • CD-ROM (1) - Cyber-shot application software - "Cyber-shot Handbook" • Rechargeable battery pack NP-BG1 (1)/ - "Cyber-shot Step-up Guide" Battery case (1) • Instruction Manual (this manual) (1) GB Attach the strap and place your hand through the loop to prevent the camera from damage by being dropped.
Instruction Manual
Page 10
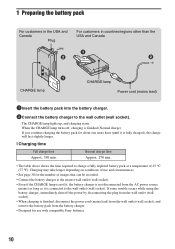
Charging may take longer depending on conditions of use with compatible Sony batteries. 10 Normal charge time Approx. 270 min. • The...the wall outlet (wall socket). The CHARGE lamp lights up, and charging starts. If some trouble occurs while using the battery charger, immediately shut off , charging is fully charged), the charge will last slightly longer. [... the CHARGE lamp turns off the power by disconnecting the plug from the battery charger. • Designed for use and circumstances. • See page 30 for about one more hour (until it is finished, disconnect the ...
Charging may take longer depending on conditions of use with compatible Sony batteries. 10 Normal charge time Approx. 270 min. • The...the wall outlet (wall socket). The CHARGE lamp lights up, and charging starts. If some trouble occurs while using the battery charger, immediately shut off , charging is fully charged), the charge will last slightly longer. [... the CHARGE lamp turns off the power by disconnecting the plug from the battery charger. • Designed for use and circumstances. • See page 30 for about one more hour (until it is finished, disconnect the ...
Instruction Manual
Page 11
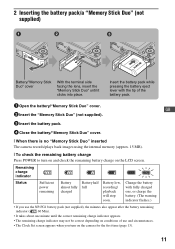
...charged one, or charge the battery. (The warning indicator flashes.) • If you use and circumstances. • The Clock Set screen appears when you turn on and check the remaining battery charge on the camera for the first time (page 13). 11 2 Inserting the battery pack/a "Memory ...3 Insert the battery pack. 4 Close the battery/"Memory Stick Duo" cover. [ When there is no "Memory Stick Duo" inserted The camera records/plays back images using the internal memory (approx. 15 MB). [ To check the remaining battery charge Press POWER to turn on the LCD screen. Remaining charge...
...charged one, or charge the battery. (The warning indicator flashes.) • If you use and circumstances. • The Clock Set screen appears when you turn on and check the remaining battery charge on the camera for the first time (page 13). 11 2 Inserting the battery pack/a "Memory ...3 Insert the battery pack. 4 Close the battery/"Memory Stick Duo" cover. [ When there is no "Memory Stick Duo" inserted The camera records/plays back images using the internal memory (approx. 15 MB). [ To check the remaining battery charge Press POWER to turn on the LCD screen. Remaining charge...
Instruction Manual
Page 13
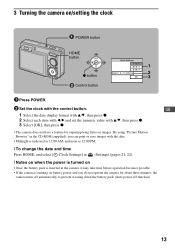
...HOME button 1 2 z button 3 ɟ Control button 1 Press POWER. 2 Set the clock with the control button. By using "Picture Motion Browser" in the camera, it may take time before operation becomes possible. • If the camera is inserted in the CD-ROM (supplied), you do not operate the... camera for superimposing dates on images. 3 Turning the camera on battery power and you can print or save images with v/V, then press z. 3 Select [OK], then press z. • The camera does not have a feature for about three minutes, the camera turns off automatically to ...
...HOME button 1 2 z button 3 ɟ Control button 1 Press POWER. 2 Set the clock with the control button. By using "Picture Motion Browser" in the camera, it may take time before operation becomes possible. • If the camera is inserted in the CD-ROM (supplied), you do not operate the... camera for superimposing dates on images. 3 Turning the camera on battery power and you can print or save images with v/V, then press z. 3 Select [OK], then press z. • The camera does not have a feature for about three minutes, the camera turns off automatically to ...
Instruction Manual
Page 15
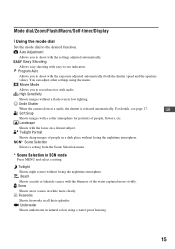
..., etc. Program Auto Allows you to shoot with easy-to shoot with the focus on a distant subject. Smile Shutter When the camera detects a smile, the shutter is released automatically. GB Soft Snap Shoots images with audio. Twilight Shoots night scenes without losing the ... you to the desired function. High Sensitivity Shoots images without a flash even in all their splendor. You can adjust other settings using a water-proof housing. 15 Underwater Shoots underwater in a dark place without losing the nighttime atmosphere. Twilight Portrait Shoots sharp images of...
..., etc. Program Auto Allows you to shoot with easy-to shoot with the focus on a distant subject. Smile Shutter When the camera detects a smile, the shutter is released automatically. GB Soft Snap Shoots images with audio. Twilight Shoots night scenes without losing the ... you to the desired function. High Sensitivity Shoots images without a flash even in all their splendor. You can adjust other settings using a water-proof housing. 15 Underwater Shoots underwater in a dark place without losing the nighttime atmosphere. Twilight Portrait Shoots sharp images of...
Instruction Manual
Page 16
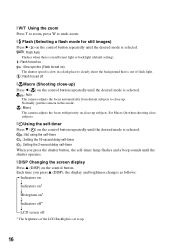
...display and brightness changes as follows: Indicators on r Indicators on* r Histogram on the control button. [ W/T Using the zoom Press T to zoom, press W to undo zoom. [ Flash (Selecting a flash mode for still images) Press B ( ) on the control button repeatedly until the desired mode is selected. : Flash Auto ...focus with priority on the control button repeatedly until the desired mode is selected. : Auto The camera adjusts the focus automatically from distant subjects to up. 16 Normally, put the camera in a dark place to clearly shoot the background that is out of flash light. : ...
...display and brightness changes as follows: Indicators on r Indicators on* r Histogram on the control button. [ W/T Using the zoom Press T to zoom, press W to undo zoom. [ Flash (Selecting a flash mode for still images) Press B ( ) on the control button repeatedly until the desired mode is selected. : Flash Auto ...focus with priority on the control button repeatedly until the desired mode is selected. : Auto The camera adjusts the focus automatically from distant subjects to up. 16 Normally, put the camera in a dark place to clearly shoot the background that is out of flash light. : ...
Instruction Manual
Page 17
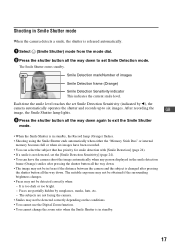
...not be in focus if the distance between the camera and the subject is changed after pressing the shutter button all the way down. • The image may not be detected correctly depending on the conditions. • You cannot use the Digital Zoom function. • You cannot change the zoom... ratio when the Smile Shutter is in standby. 17 It is too dark or too bright. - Faces are not facing the camera. • Smiles may not be detected correctly when: -...
...not be in focus if the distance between the camera and the subject is changed after pressing the shutter button all the way down. • The image may not be detected correctly depending on the conditions. • You cannot use the Digital Zoom function. • You cannot change the zoom... ratio when the Smile Shutter is in standby. 17 It is too dark or too bright. - Faces are not facing the camera. • Smiles may not be detected correctly when: -...
Instruction Manual
Page 18
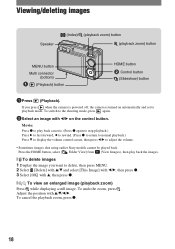
...) button 1Press (Playback). If you want to play back the images. [ To delete images 1 Display the image you press when the camera is powered off, the camera is turned on the control button. Movie: Press z to delete, then press MENU. 2 Select [Delete] with v/V and select [This...enlarged image (playback zoom) Press while displaying a still image. To cancel the playback zoom, press z. 18 To undo the zoom, press . Adjust the position with b/B on automatically and set to adjust the volume. • Sometimes images shot using earlier Sony models cannot be played back. To switch to the...
...) button 1Press (Playback). If you want to play back the images. [ To delete images 1 Display the image you press when the camera is powered off, the camera is turned on the control button. Movie: Press z to delete, then press MENU. 2 Select [Delete] with v/V and select [This...enlarged image (playback zoom) Press while displaying a still image. To cancel the playback zoom, press z. 18 To undo the zoom, press . Adjust the position with b/B on automatically and set to adjust the volume. • Sometimes images shot using earlier Sony models cannot be played back. To switch to the...
Instruction Manual
Page 19
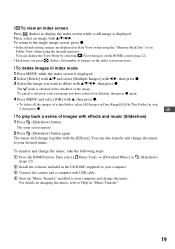
... the index screen is displayed. The music will change the music. [ To view an index screen Press (Index) to display the index screen while a still image is displayed. 2 Select [Delete] with v/V and select [Multiple Images] with b/B, then press z. 3 Select the image you want to delete with.... [ To delete images in the CD-ROM (supplied) to your computer. 3 Connect the camera and a computer with effects and music (Slideshow) 1 Press (Slideshow) button. To return to Help in Folder View (when using the "Memory Stick Duo") or in "Music Transfer". (Slideshow) 19 GB [ To play ...
... the index screen is displayed. The music will change the music. [ To view an index screen Press (Index) to display the index screen while a still image is displayed. 2 Select [Delete] with v/V and select [Multiple Images] with b/B, then press z. 3 Select the image you want to delete with.... [ To delete images in the CD-ROM (supplied) to your computer. 3 Connect the camera and a computer with effects and music (Slideshow) 1 Press (Slideshow) button. To return to Help in Folder View (when using the "Memory Stick Duo") or in "Music Transfer". (Slideshow) 19 GB [ To play ...
Instruction Manual
Page 20
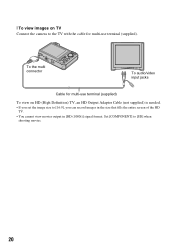
[ To view images on HD (High Definition) TV, an HD Output Adaptor Cable (not supplied) is needed. • If you can record images in the size that fills the entire screen of the HD TV. • You cannot view movies output in [HD (1080i)] signal format. Set [COMPONENT] to [16:9], you set the image size to [SD] when shooting movies. 20 To the multi connector To audio/video input jacks Cable for multi-use terminal (supplied) To view on TV Connect the camera to the TV with the cable for multi-use terminal (supplied).
[ To view images on HD (High Definition) TV, an HD Output Adaptor Cable (not supplied) is needed. • If you can record images in the size that fills the entire screen of the HD TV. • You cannot view movies output in [HD (1080i)] signal format. Set [COMPONENT] to [16:9], you set the image size to [SD] when shooting movies. 20 To the multi connector To audio/video input jacks Cable for multi-use terminal (supplied) To view on TV Connect the camera to the TV with the cable for multi-use terminal (supplied).
Instruction Manual
Page 21
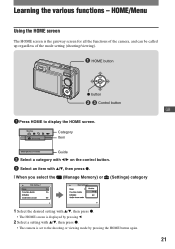
... HOME screen is displayed by pressing b. 2 Select a setting with v/V, then press z. • The camera is the gateway screen for all the functions of the camera, and can be called up regardless of the mode setting (shooting/viewing). HOME/Menu Using the HOME screen The HOME screen is set to display the HOME screen...
... HOME screen is displayed by pressing b. 2 Select a setting with v/V, then press z. • The camera is the gateway screen for all the functions of the camera, and can be called up regardless of the mode setting (shooting/viewing). HOME/Menu Using the HOME screen The HOME screen is set to display the HOME screen...

Instruction Manual
Page 23
... hidden, keep pressing b/B until the item appears on the screen. • Select an item in playback mode, then press z. 4 Press MENU to display the menu. Using menu items MENU button z button ɟ ɠ Control button GB 1 Press MENU to turn off the menu. 23
... hidden, keep pressing b/B until the item appears on the screen. • Select an item in playback mode, then press z. 4 Press MENU to display the menu. Using menu items MENU button z button ɟ ɠ Control button GB 1 Press MENU to turn off the menu. 23

Instruction Manual
Page 24
... Selects the settings pre-adjusted to reduce the red-eye phenomenon. Scene Recognition Automatically detects the shooting conditions and then takes the shot. Metering Mode Selects the metering mode. Red Eye Reduction Sets to match various scene conditions. SteadyShot Selects the anti-blur mode. Flash... Shooting mode. Image Size Selects the image size. Smile Detection Selects the priority subject for adjusting the focus when using face detection. DRO Optimizes the brightness and contrast. Color Mode Changes the vividness of the image or adds special effects.
... Selects the settings pre-adjusted to reduce the red-eye phenomenon. Scene Recognition Automatically detects the shooting conditions and then takes the shot. Metering Mode Selects the metering mode. Red Eye Reduction Sets to match various scene conditions. SteadyShot Selects the anti-blur mode. Flash... Shooting mode. Image Size Selects the image size. Smile Detection Selects the priority subject for adjusting the focus when using face detection. DRO Optimizes the brightness and contrast. Color Mode Changes the vividness of the image or adds special effects.


