Operating Instructions
Page 6
... Viewing still images Viewing images on the LCD screen of your camera 42 Viewing images on /off your camera... 50 Changing the menu settings 50 Changing the items in the SET UP screen 51 How to use the control button 17 Setting the date and time 18 Changing the language setting ...Read this first 4 Identifying the parts 9 Mode dial 12 Getting started Charging the battery pack 13 Using the AC adaptor 16 Using your camera abroad 16 Turning on a TV screen 44 Deleting still images Deleting images 46 Formatting a recording medium 48 Before advanced operations How to setup and ...
... Viewing still images Viewing images on the LCD screen of your camera 42 Viewing images on /off your camera... 50 Changing the menu settings 50 Changing the items in the SET UP screen 51 How to use the control button 17 Setting the date and time 18 Changing the language setting ...Read this first 4 Identifying the parts 9 Mode dial 12 Getting started Charging the battery pack 13 Using the AC adaptor 16 Using your camera abroad 16 Turning on a TV screen 44 Deleting still images Deleting images 46 Formatting a recording medium 48 Before advanced operations How to setup and ...

Operating Instructions
Page 9
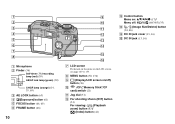
Identifying the parts See the pages in parentheses for details of operation. 1 2 3 4 5 6 7 POWER button (17) NIGHTFRAMING/NIGHTSHOT 8 button (77) POWER lamp (17) 9 Mode dial (12, 136) q; Shutter button (30) Finder window qa Lens Flash emitter (35) qs Advanced accessory shoe (72) qd Hologram AF...
Identifying the parts See the pages in parentheses for details of operation. 1 2 3 4 5 6 7 POWER button (17) NIGHTFRAMING/NIGHTSHOT 8 button (77) POWER lamp (17) 9 Mode dial (12, 136) q; Shutter button (30) Finder window qa Lens Flash emitter (35) qs Advanced accessory shoe (72) qd Hologram AF...
Operating Instructions
Page 10
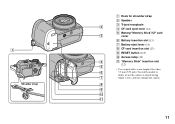
... Stick"/CF card) switch (21) Jog dial (51) For shooting: Zoom (W/T) button (31) For viewing: / (Playback zoom) button (83)/ (Index) button (42) Control button Menu on 17)/ Menu off: / // (69/34/31/33) (Image Size/Delete) button (24, 46) DC IN jack cover (13, 16) DC IN jack...
... Stick"/CF card) switch (21) Jog dial (51) For shooting: Zoom (W/T) button (31) For viewing: / (Playback zoom) button (83)/ (Index) button (42) Control button Menu on 17)/ Menu off: / // (69/34/31/33) (Image Size/Delete) button (24, 46) DC IN jack cover (13, 16) DC IN jack...
Operating Instructions
Page 11
You will be unable to firmly secure the camera to tripods having 7 longer screws, and may damage the camera. 8 9 q; qa 11 1 Shoulder strap Hook for shoulder strap Speaker Tripod receptacle 2 CF card ...eject lever (24) Battery/"Memory Stick"/CF card 3 cover Battery insertion slot (13) Battery eject lever (14) CF card insertion slot (23) RESET button...
You will be unable to firmly secure the camera to tripods having 7 longer screws, and may damage the camera. 8 9 q; qa 11 1 Shoulder strap Hook for shoulder strap Speaker Tripod receptacle 2 CF card ...eject lever (24) Battery/"Memory Stick"/CF card 3 cover Battery insertion slot (13) Battery eject lever (14) CF card insertion slot (23) RESET button...

Operating Instructions
Page 17
The POWER lamp (green) lights up the menu or the SET UP screen (page 51), and use the control button Camera 1 1 AF Mode: 2 Digital Zoom: Date/Time: Red Eye Reduction: 1 Hologram AF: 2 Auto Review: Single Smart Off Off Auto Off SELECT Setup 2 1 File Number: USB Connect: 2 Video Out... minutes during shooting or viewing or when performing SET UP, the camera turns off your camera for a long period of the camera, bring up and the power is operating using a battery pack. To set a menu item, press on the control button to select the desired item and setting, then press ...
The POWER lamp (green) lights up the menu or the SET UP screen (page 51), and use the control button Camera 1 1 AF Mode: 2 Digital Zoom: Date/Time: Red Eye Reduction: 1 Hologram AF: 2 Auto Review: Single Smart Off Off Auto Off SELECT Setup 2 1 File Number: USB Connect: 2 Video Out... minutes during shooting or viewing or when performing SET UP, the camera turns off your camera for a long period of the camera, bring up and the power is operating using a battery pack. To set a menu item, press on the control button to select the desired item and setting, then press ...

Operating Instructions
Page 18
... step above. 18 POWER Clock Set Y/M/D M/D/Y D/M/Y 2004 / 1 / 1 12 : 00 OK AM Cancel 2 Press POWER to turn on the control button, then press . Clock Set Y/M/D M/D/Y D/M/Y 2004 / 1 / 1 12 : 00 OK AM Cancel 3 Select the desired date display format with /... and time, by starting from [Y/M/D] (year/month/day), [M/D/Y] (month/day/year) or [D/M/Y] (day/month/year). • If the rechargeable button battery (page 144), which provides the power for saving the time data, ever becomes low, the Clock Set screen will appear again. The POWER ...
... step above. 18 POWER Clock Set Y/M/D M/D/Y D/M/Y 2004 / 1 / 1 12 : 00 OK AM Cancel 2 Press POWER to turn on the control button, then press . Clock Set Y/M/D M/D/Y D/M/Y 2004 / 1 / 1 12 : 00 OK AM Cancel 3 Select the desired date display format with /... and time, by starting from [Y/M/D] (year/month/day), [M/D/Y] (month/day/year) or [D/M/Y] (day/month/year). • If the rechargeable button battery (page 144), which provides the power for saving the time data, ever becomes low, the Clock Set screen will appear again. The POWER ...

Operating Instructions
Page 19
... to the next item. Clock Set Y/M/D M/D/Y D/M/Y 2005 / 1 / 1 10 : 30 OK AM Cancel 6 Select [OK] with / on the control button, then press to be set is indicated as 12:00 AM, and noon as 12:00 PM. Clock Set Y/M/D M/D/Y D/M/Y 2005 / 1 / 1 10 : 00 ... time setting, select [Cancel] with /. The date and time are set. • If you want to set with / on the control button. Getting started Clock Set Y/M/D M/D/Y D/M/Y 2004 / 1 / 1 12 : 00 OK AM Cancel 4 Select the year, month, day, hour or minute item you ...
... to the next item. Clock Set Y/M/D M/D/Y D/M/Y 2005 / 1 / 1 10 : 30 OK AM Cancel 6 Select [OK] with / on the control button, then press to be set is indicated as 12:00 AM, and noon as 12:00 PM. Clock Set Y/M/D M/D/Y D/M/Y 2005 / 1 / 1 10 : 00 ... time setting, select [Cancel] with /. The date and time are set. • If you want to set with / on the control button. Getting started Clock Set Y/M/D M/D/Y D/M/Y 2004 / 1 / 1 12 : 00 OK AM Cancel 4 Select the year, month, day, hour or minute item you ...

Operating Instructions
Page 25
Shooting still images 3:2 5M 3M 1M VGA(E-Mail) VGA Image Size 3 Select the desired image size with / on the control button. When the setting is complete, press (Image Size) so that the Image Size setup disappears from the LCD screen. • The image size selected here is maintained even when the power is set. The image size is turned off. 25
Shooting still images 3:2 5M 3M 1M VGA(E-Mail) VGA Image Size 3 Select the desired image size with / on the control button. When the setting is complete, press (Image Size) so that the Image Size setup disappears from the LCD screen. • The image size selected here is maintained even when the power is set. The image size is turned off. 25

Operating Instructions
Page 30
...in the recording medium. Auto Focus When you release the shutter button, shooting will be canceled. • You can shoot the next image. • When operating the camera using a battery pack, if you do not operate the camera for shooting. (The LCD screen may have difficulty working... VGA 101 94 S AF 4 Press the shutter button fully down. In such cases, release the shutter button, then recompose the shot and focus again. • The subject is ready for a while during recording or playback, the camera turns off automatically to prevent wearing down . The Auto Focus ...
...in the recording medium. Auto Focus When you release the shutter button, shooting will be canceled. • You can shoot the next image. • When operating the camera using a battery pack, if you do not operate the camera for shooting. (The LCD screen may have difficulty working... VGA 101 94 S AF 4 Press the shutter button fully down. In such cases, release the shutter button, then recompose the shot and focus again. • The subject is ready for a while during recording or playback, the camera turns off automatically to prevent wearing down . The Auto Focus ...

Operating Instructions
Page 31
... 60min Review VGA 101 8/8 101-0029 2005 1 1 10:30PM RETURN Press () on the control button, then press . Digital zoom The camera has the following zoom functions. The image is 4×. The minimum focal distance to match the shooting purpose. Smart zoom The image...101 W T 96 5.0 S AF S AF Press the zoom buttons to the image processing. Do not touch the lens portion while it is enlarged with the following two types of digital zoom. Zoom Your camera is made by the lens in the following table. 31 Optical zoom The telephoto...
... 60min Review VGA 101 8/8 101-0029 2005 1 1 10:30PM RETURN Press () on the control button, then press . Digital zoom The camera has the following zoom functions. The image is 4×. The minimum focal distance to match the shooting purpose. Smart zoom The image...101 W T 96 5.0 S AF S AF Press the zoom buttons to the image processing. Do not touch the lens portion while it is enlarged with the following two types of digital zoom. Zoom Your camera is made by the lens in the following table. 31 Optical zoom The telephoto...

Operating Instructions
Page 32
... All image sizes are enlarged up to [Smart].) When you press the zoom button, the zoom scaling indicator appears on the LCD screen as follows. Optical zoom Precision digital zoom Image size Maximum Maximum smart precision digital zoom scale zoom scale 7M -* 8× 3:2 -* 8× 5M Approx.4.7&#...the image with priority on subjects located near the center. • The digital zoom cannot be used when shooting in the SET UP settings (page 140). (When you purchase your camera, [Digital Zoom] is digital zoom • The zoom scaling indicator differs according to [Smart] or ...
... All image sizes are enlarged up to [Smart].) When you press the zoom button, the zoom scaling indicator appears on the LCD screen as follows. Optical zoom Precision digital zoom Image size Maximum Maximum smart precision digital zoom scale zoom scale 7M -* 8× 3:2 -* 8× 5M Approx.4.7&#...the image with priority on subjects located near the center. • The digital zoom cannot be used when shooting in the SET UP settings (page 140). (When you purchase your camera, [Digital Zoom] is digital zoom • The zoom scaling indicator differs according to [Smart] or ...

Operating Instructions
Page 33
... lens surface When the zoom is set all the way to the W side is set all the way to , and press ( ) on the control button. Shooting still images Shooting close -ups (Macro) mode, use Flexible Spot AF (page 66). • When shooting in the close -ups - Macro • We recommend...
... lens surface When the zoom is set all the way to the W side is set all the way to , and press ( ) on the control button. Shooting still images Shooting close -ups (Macro) mode, use Flexible Spot AF (page 66). • When shooting in the close -ups - Macro • We recommend...

Operating Instructions
Page 34
...cancel the self-timer in the middle of the camera, the focus and the exposure may not be correctly set to P, S, A, M, SCN or . 34 S AF 30 F3.5 0EV 2 Center the subject in the frame. Press and hold the shutter button halfway down to normal recording mode Press ...; ( ) on the control button. The indicator disappears from the LCD screen. • When shooting in close-ups (Macro) mode, the in-focus range...
...cancel the self-timer in the middle of the camera, the focus and the exposure may not be correctly set to P, S, A, M, SCN or . 34 S AF 30 F3.5 0EV 2 Center the subject in the frame. Press and hold the shutter button halfway down to normal recording mode Press ...; ( ) on the control button. The indicator disappears from the LCD screen. • When shooting in close-ups (Macro) mode, the in-focus range...

Operating Instructions
Page 35
... end conversion lens (not supplied), lens hood (not supplied) or ring light (not supplied) to the camera, the hologram AF light is dirty, the hologram AF light may be dimmed and focus may not be... is being charged, the CHG/ (flash) lamp flashes. When this case, wipe the hologram AF emitter with the Sony HVLF32X flash. • The hologram AF does not function when [SCN] (Scene) is approx. 0.4 m to 3 ...easily on the LCD screen and the hologram AF emits red light when the shutter button is pressed halfway until the focus is not displayed. Shooting images with the Hologram AF...
... end conversion lens (not supplied), lens hood (not supplied) or ring light (not supplied) to the camera, the hologram AF light is dirty, the hologram AF light may be dimmed and focus may not be... is being charged, the CHG/ (flash) lamp flashes. When this case, wipe the hologram AF emitter with the Sony HVLF32X flash. • The hologram AF does not function when [SCN] (Scene) is approx. 0.4 m to 3 ...easily on the LCD screen and the hologram AF emits red light when the shutter button is pressed halfway until the focus is not displayed. Shooting images with the Hologram AF...

Operating Instructions
Page 37
The actual date and time appear in Multi Burst mode. • The date and time do not appear on a still image Camera 1 1 AF Mode: 2 Digital Zoom: Date/Time: Red Eye Reduction: 1 Hologram AF: 2 Auto Review: Single Smart Off Off Auto Off SELECT 1 Set the mode dial to ...SET UP screen appears. • When images are not inserted in red on the lower-right corner during shooting, instead, indicator appears on 1 the control button, then press . Select [Date/Time] with the date and time superimposed, the date and time cannot be displayed on • For a detailed...
The actual date and time appear in Multi Burst mode. • The date and time do not appear on a still image Camera 1 1 AF Mode: 2 Digital Zoom: Date/Time: Red Eye Reduction: 1 Hologram AF: 2 Auto Review: Single Smart Off Off Auto Off SELECT 1 Set the mode dial to ...SET UP screen appears. • When images are not inserted in red on the lower-right corner during shooting, instead, indicator appears on 1 the control button, then press . Select [Date/Time] with the date and time superimposed, the date and time cannot be displayed on • For a detailed...

Operating Instructions
Page 38
... selected in "Setting the date and time" (page 18). • Date and time setting is maintained even when the power is turned off. 38 Camera 1 1 AF Mode: 2 Digital Zoom: Date/Time: Red Eye Reduction: 1 Hologram AF: 2 Auto Review: Single Smart Day&Time Off Auto Off PAGE SELECT 3 Select the date and...
... selected in "Setting the date and time" (page 18). • Date and time setting is maintained even when the power is turned off. 38 Camera 1 1 AF Mode: 2 Digital Zoom: Date/Time: Red Eye Reduction: 1 Hologram AF: 2 Auto Review: Single Smart Day&Time Off Auto Off PAGE SELECT 3 Select the date and...

Operating Instructions
Page 39
... prevent sunken colors and record clear images. 39 Scene Selection You can shoot more effectively by selecting the appropriate mode and then pressing the shutter button. Twilight portrait mode Suitable for shooting portraits in dark places without losing the dark atmosphere of the surroundings. Landscape mode Focuses only on a distant subject...
... prevent sunken colors and record clear images. 39 Scene Selection You can shoot more effectively by selecting the appropriate mode and then pressing the shutter button. Twilight portrait mode Suitable for shooting portraits in dark places without losing the dark atmosphere of the surroundings. Landscape mode Focuses only on a distant subject...

Operating Instructions
Page 40
... seaside or lakeside scenes, the blue of the water is turned off. 40 The menu appears. 2 Select [SCN] (Scene) with on the control button, then select the desired mode with /. To return to normal mode Set the mode dial to SCN, then press MENU. Scene SCN WB...
... seaside or lakeside scenes, the blue of the water is turned off. 40 The menu appears. 2 Select [SCN] (Scene) with on the control button, then select the desired mode with /. To return to normal mode Set the mode dial to SCN, then press MENU. Scene SCN WB...

Operating Instructions
Page 43
To display the next (previous) index screen Press on the control button. : To display the preceding image : To display the next image 1 Press (index) once. The display switches to the index (nineimage) screen. Viewing ...-image) screen 101-0003 2005 1 1 10:30PM BACK/NEXT VOLUME • SINGLE DISPLAY 2 Select the desired still image with / on the control button to move the yellow frame up /down /left /right. • SINGLE DISPLAY 2 Press (index) again. To display the next (previous) index screen Press on...
To display the next (previous) index screen Press on the control button. : To display the preceding image : To display the next image 1 Press (index) once. The display switches to the index (nineimage) screen. Viewing ...-image) screen 101-0003 2005 1 1 10:30PM BACK/NEXT VOLUME • SINGLE DISPLAY 2 Select the desired still image with / on the control button to move the yellow frame up /down /left /right. • SINGLE DISPLAY 2 Press (index) again. To display the next (previous) index screen Press on...

Operating Instructions
Page 44
... 3 Select the desired still image with on the TV and set the TV/Video switch to the A/V OUT (MONO) jack of the camera and the audio/video input jacks of the TV. For details, see the operating instructions supplied with the A/V connecting cable. 2 TV/Video switch &#...image screen Press the zoom T button or on the control button. 1 A/V connecting cable (supplied) Connect the A/V connecting cable (supplied) to "Video". • The name and location of this switch may differ depending on your camera and the TV before connecting the camera and the TV with the TV...
... 3 Select the desired still image with on the TV and set the TV/Video switch to the A/V OUT (MONO) jack of the camera and the audio/video input jacks of the TV. For details, see the operating instructions supplied with the A/V connecting cable. 2 TV/Video switch &#...image screen Press the zoom T button or on the control button. 1 A/V connecting cable (supplied) Connect the A/V connecting cable (supplied) to "Video". • The name and location of this switch may differ depending on your camera and the TV before connecting the camera and the TV with the TV...


