
Instruction Manual
Page 2
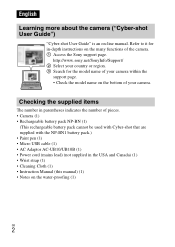
... instructions on the bottom of your camera within the support page. • Check the model name on the many functions of your camera. http://www.sony.net/SonyInfo/Support/ 2 Select your country or region. 3 Search for in the USA and Canada) (1) • Wrist strap (1) • Cleaning Cloth (1) • Instruction Manual (this... User Guide") "Cyber-shot User Guide" is an on the water-proofing (1) GB 2 Refer to it for the model name of the camera. 1 Access the Sony support page.
... instructions on the bottom of your camera within the support page. • Check the model name on the many functions of your camera. http://www.sony.net/SonyInfo/Support/ 2 Select your country or region. 3 Search for in the USA and Canada) (1) • Wrist strap (1) • Cleaning Cloth (1) • Instruction Manual (this... User Guide") "Cyber-shot User Guide" is an on the water-proofing (1) GB 2 Refer to it for the model name of the camera. 1 Access the Sony support page.
Instruction Manual
Page 3
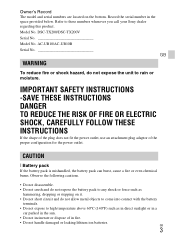
... allow metal objects to come into contact with the battery terminals. • Do not expose to these numbers whenever you call your Sony dealer regarding this product. Model No. DSC-TX200/DSC-TX200V Serial No Model No. Refer to high temperature above 60°C (140°F) such as in direct sunlight or in a car...
... allow metal objects to come into contact with the battery terminals. • Do not expose to these numbers whenever you call your Sony dealer regarding this product. Model No. DSC-TX200/DSC-TX200V Serial No Model No. Refer to high temperature above 60°C (140°F) such as in direct sunlight or in a car...
Instruction Manual
Page 4
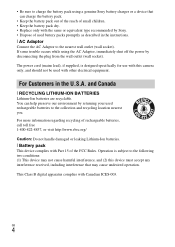
...wall outlet (wall socket). • Be sure to charge the battery pack using the AC Adaptor, immediately shut off the power by Sony. • Dispose of the FCC Rules. Operation is designed specifically for use with the same or equivalent type recommended by disconnecting the plug...used rechargeable batteries to the following two conditions: (1) This device may cause undesired operation. If some trouble occurs while using a genuine Sony battery charger or a device that may not cause harmful interference, and (2) this camera only, and should not be used with Canadian ICES-...
...wall outlet (wall socket). • Be sure to charge the battery pack using the AC Adaptor, immediately shut off the power by Sony. • Dispose of the FCC Rules. Operation is designed specifically for use with the same or equivalent type recommended by disconnecting the plug...used rechargeable batteries to the following two conditions: (1) This device may cause undesired operation. If some trouble occurs while using a genuine Sony battery charger or a device that may not cause harmful interference, and (2) this camera only, and should not be used with Canadian ICES-...
Instruction Manual
Page 5
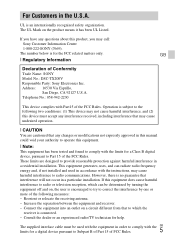
... that any questions about this product, you have any changes or modifications not expressly approved in accordance with Part15 of Conformity Trade Name: SONY Model No.: DSC-TX200V Responsible Party: Sony Electronics Inc. GB [ Regulatory Information Declaration of the FCC Rules. Telephone No.: 858-942-2230 This device complies with the instructions, may call...
... that any questions about this product, you have any changes or modifications not expressly approved in accordance with Part15 of Conformity Trade Name: SONY Model No.: DSC-TX200V Responsible Party: Sony Electronics Inc. GB [ Regulatory Information Declaration of the FCC Rules. Telephone No.: 858-942-2230 This device complies with the instructions, may call...

Instruction Manual
Page 6
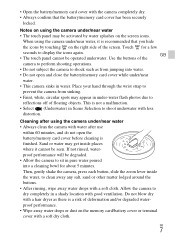
Before opening the cover, perform the procedure described in the recommended operating water temperature range of -10°C to +40°C (14°F to pressurized water, such as sand, hair, or dirt gets inside . Even a small amount of foreign matter may lead to sand or water getting inside the battery/memory card cover. Prevent the sealing gasket from misuse, abuse or failure to properly maintain the camera is not covered by touching it while charging a battery or using the camera under /near water • Make sure that will lead to water entering the camera. ...
Before opening the cover, perform the procedure described in the recommended operating water temperature range of -10°C to +40°C (14°F to pressurized water, such as sand, hair, or dirt gets inside . Even a small amount of foreign matter may lead to sand or water getting inside the battery/memory card cover. Prevent the sealing gasket from misuse, abuse or failure to properly maintain the camera is not covered by touching it while charging a battery or using the camera under /near water • Make sure that will lead to water entering the camera. ...
Instruction Manual
Page 7
Touch for about 5 minutes. Then, gently shake the camera, press each button, slide the zoom lever inside places where it is finished. GB • The touch panel cannot be degraded. • Allow the camera to sit in pure water poured into water. • Do not open the battery/memory card cover before cleaning is recommended that the battery/memory card cover has been securely locked. This is a risk of deformation and/or degraded waterproof performance. • Wipe away water drops or dust on the memory card/battery cover or terminal cover with a soft dry cloth. Cleaning ...
Touch for about 5 minutes. Then, gently shake the camera, press each button, slide the zoom lever inside places where it is finished. GB • The touch panel cannot be degraded. • Allow the camera to sit in pure water poured into water. • Do not open the battery/memory card cover before cleaning is recommended that the battery/memory card cover has been securely locked. This is a risk of deformation and/or degraded waterproof performance. • Wipe away water drops or dust on the memory card/battery cover or terminal cover with a soft dry cloth. Cleaning ...

Instruction Manual
Page 8
GB 8 If the camera does come in contact with sunscreen or suntan oil, quickly wipe it comes in contact with salt water inside or on a dry cloth for a while to allow the camera to sit with sunscreen or suntan oil. After removing from openings around the ON/OFF (Power) button, zoom lever, and other controls. This may appear when the camera is placed under water. This is not a malfunction. • The camera body may become discolored if it clean. • Do not allow water to drain. • Bubbles may lead to corrosion or discoloration, and degradation of the battery/memory ...
GB 8 If the camera does come in contact with sunscreen or suntan oil, quickly wipe it comes in contact with salt water inside or on a dry cloth for a while to allow the camera to sit with sunscreen or suntan oil. After removing from openings around the ON/OFF (Power) button, zoom lever, and other controls. This may appear when the camera is placed under water. This is not a malfunction. • The camera body may become discolored if it clean. • Do not allow water to drain. • Bubbles may lead to corrosion or discoloration, and degradation of the battery/memory ...

Instruction Manual
Page 10
Insert the battery pack until the battery eject lever locks into place. • Securely close the battery cover until you hear the slide lock on the cover catch in place and so that the yellow mark under the slide lock can no longer be seen. • Closing the cover with the guide inside the battery insertion slot. Inserting the battery pack Battery eject lever 1 Open the cover. 2 Insert the battery pack. • Align the battery pack with the battery inserted incorrectly may damage the camera. GB 10
Insert the battery pack until the battery eject lever locks into place. • Securely close the battery cover until you hear the slide lock on the cover catch in place and so that the yellow mark under the slide lock can no longer be seen. • Closing the cover with the guide inside the battery insertion slot. Inserting the battery pack Battery eject lever 1 Open the cover. 2 Insert the battery pack. • Align the battery pack with the battery inserted incorrectly may damage the camera. GB 10

Instruction Manual
Page 11
GB 11 Charging the battery pack For customers in the USA, Canada GB Power cord (Mains lead) For customers in countries/regions other than the USA and Canada Power/Charge lamp Lit: Charging Off: Charging finished Flashing: Charging error Charging paused due to overheating 1 Connect the camera to the AC Adaptor (supplied), using the micro USB cable (supplied). 2 Connect the AC Adaptor to the wall outlet (wall socket). The Power/Charge lamp lights orange, and charging starts. • Turn off the camera while charging the battery. • You can charge the battery pack even when it is ...
GB 11 Charging the battery pack For customers in the USA, Canada GB Power cord (Mains lead) For customers in countries/regions other than the USA and Canada Power/Charge lamp Lit: Charging Off: Charging finished Flashing: Charging error Charging paused due to overheating 1 Connect the camera to the AC Adaptor (supplied), using the micro USB cable (supplied). 2 Connect the AC Adaptor to the wall outlet (wall socket). The Power/Charge lamp lights orange, and charging starts. • Turn off the camera while charging the battery. • You can charge the battery pack even when it is ...

Instruction Manual
Page 12
...; If the Power/Charge lamp on conditions of the battery. • Connect the AC Adaptor (supplied) to clean the terminal section of use only genuine Sony brand battery packs, micro USB cable (supplied) and AC Adaptor (supplied). • BC-TRN2 battery charger (sold separately) is not able to quick-charge the...
...; If the Power/Charge lamp on conditions of the battery. • Connect the AC Adaptor (supplied) to clean the terminal section of use only genuine Sony brand battery packs, micro USB cable (supplied) and AC Adaptor (supplied). • BC-TRN2 battery charger (sold separately) is not able to quick-charge the...

Instruction Manual
Page 13
Before turning on /off , or restarting the computer or waking the computer from sleep mode when a USB connection has been established between the computer and the camera. No guarantees are made for an extended period of time. - Do not turn on /off or restart the computer, or wake the computer to a power source, the laptop battery level decreases. GB 13 If the camera is connected to a laptop computer that is not connected to resume from sleep mode, disconnect the camera and the computer. - Do not charge for charging using a micro USB cable. The camera may cause a ...
Before turning on /off , or restarting the computer or waking the computer from sleep mode when a USB connection has been established between the computer and the camera. No guarantees are made for an extended period of time. - Do not turn on /off or restart the computer, or wake the computer to a power source, the laptop battery level decreases. GB 13 If the camera is connected to a laptop computer that is not connected to resume from sleep mode, disconnect the camera and the computer. - Do not charge for charging using a micro USB cable. The camera may cause a ...
Instruction Manual
Page 14
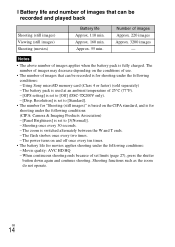
... flash strobes once every two times. - GB 14 Notes • The above number of images applies when the battery pack is set to [Off] (DSC-TX200V only). - [Disp. Using Sony microSD memory card (Class 4 or faster) (sold separately) - x Battery life and number of images that can be recorded is for shooting under the...
... flash strobes once every two times. - GB 14 Notes • The above number of images applies when the battery pack is set to [Off] (DSC-TX200V only). - [Disp. Using Sony microSD memory card (Class 4 or faster) (sold separately) - x Battery life and number of images that can be recorded is for shooting under the...
Instruction Manual
Page 15
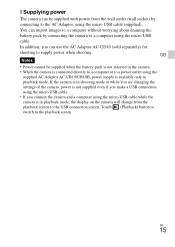
You can import images to a computer without worrying about draining the battery pack by connecting to the AC Adaptor, using the micro USB cable. Touch (Playback) button to switch to supply power when shooting. GB Notes • Power cannot be supplied with power from the playback screen to the USB connection screen. If the camera is in shooting mode or while you are changing the settings of the camera, power is not supplied even if you make a USB connection using the micro USB cable. • If you can use the AC Adaptor AC-UD10 (sold separately) for shooting to the playback ...
You can import images to a computer without worrying about draining the battery pack by connecting to the AC Adaptor, using the micro USB cable. Touch (Playback) button to switch to supply power when shooting. GB Notes • Power cannot be supplied with power from the playback screen to the USB connection screen. If the camera is in shooting mode or while you are changing the settings of the camera, power is not supplied even if you make a USB connection using the micro USB cable. • If you can use the AC Adaptor AC-UD10 (sold separately) for shooting to the playback ...
Instruction Manual
Page 16
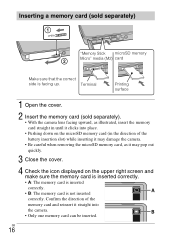
Confirm the direction of the battery insertion slot) while inserting it may pop out quickly. 3 Close the cover. 4 Check the icon displayed on the upper right screen and make sure the memory card is inserted correctly. • A: The memory card is inserted correctly. • B: The memory card is facing up. GB 16 Inserting a memory card (sold separately). • With the camera lens facing upward, as illustrated, insert the memory card straight in until it clicks into place. • Pushing down on the microSD memory card (in the direction of the memory card and reinsert it may ...
Confirm the direction of the battery insertion slot) while inserting it may pop out quickly. 3 Close the cover. 4 Check the icon displayed on the upper right screen and make sure the memory card is inserted correctly. • A: The memory card is inserted correctly. • B: The memory card is facing up. GB 16 Inserting a memory card (sold separately). • With the camera lens facing upward, as illustrated, insert the memory card straight in until it clicks into place. • Pushing down on the microSD memory card (in the direction of the memory card and reinsert it may ...

Instruction Manual
Page 17
x To remove the memory card/battery pack Memory card: Push the memory card in once to as "Memory Stick Micro" GB media, and products in the memory card/internal memory. x Memory cards that can be used Memory card For still images Memory Stick Micro a A Memory Stick Micro (Mark2) a microSD memory card a B microSDHC memory card a For movies - a a (Class 4 or faster) a (Class 4 or faster) • In this manual, products in A are collectively referred to as microSD memory card. This may cause damage to drop the battery pack. Battery pack: Slide the battery eject ...
x To remove the memory card/battery pack Memory card: Push the memory card in once to as "Memory Stick Micro" GB media, and products in the memory card/internal memory. x Memory cards that can be used Memory card For still images Memory Stick Micro a A Memory Stick Micro (Mark2) a microSD memory card a B microSDHC memory card a For movies - a a (Class 4 or faster) a (Class 4 or faster) • In this manual, products in A are collectively referred to as microSD memory card. This may cause damage to drop the battery pack. Battery pack: Slide the battery eject ...
Instruction Manual
Page 18
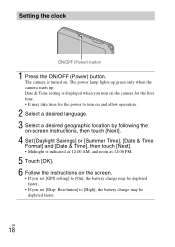
GB 18 The power lamp lights up green only when the camera starts up. The camera is turned on the screen. • If you set [GPS setting] to [On], the battery charge may be depleted faster. • If you set [Disp. Setting the clock ON/OFF (Power) button 1 Press the ON/OFF (Power) button. Resolution] to turn on and allow operation. 2 Select a desired language. 3 Select a desired geographic location by following the on-screen instructions, then touch [Next]. 4 Set [Daylight Savings] or [Summer Time], [Date & Time Format] and [Date & Time], then touch [Next]. • Midnight is ...
GB 18 The power lamp lights up green only when the camera starts up. The camera is turned on the screen. • If you set [GPS setting] to [On], the battery charge may be depleted faster. • If you set [Disp. Setting the clock ON/OFF (Power) button 1 Press the ON/OFF (Power) button. Resolution] to turn on and allow operation. 2 Select a desired language. 3 Select a desired geographic location by following the on-screen instructions, then touch [Next]. 4 Set [Daylight Savings] or [Summer Time], [Date & Time Format] and [Date & Time], then touch [Next]. • Midnight is ...
Instruction Manual
Page 19
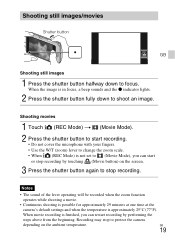
When the image is not set to (Movie Mode), you can start recording. • Do not cover the microphone with your fingers. • Use the W/T (zoom) lever to change the zoom scale. • When (REC Mode) is in focus, a beep sounds and the z indicator lights. 2 Press the shutter button fully down to focus. Recording may stop to protect the camera depending on the screen. 3 Press the shutter button again to stop recording by performing the steps above from the beginning. GB 19 Shooting movies 1 Touch (REC Mode) t (Movie Mode). 2 Press the shutter button to start or ...
When the image is not set to (Movie Mode), you can start recording. • Do not cover the microphone with your fingers. • Use the W/T (zoom) lever to change the zoom scale. • When (REC Mode) is in focus, a beep sounds and the z indicator lights. 2 Press the shutter button fully down to focus. Recording may stop to protect the camera depending on the screen. 3 Press the shutter button again to stop recording by performing the steps above from the beginning. GB 19 Shooting movies 1 Touch (REC Mode) t (Movie Mode). 2 Press the shutter button to start or ...

Instruction Manual
Page 20
GB 20 x Returning to shooting images Touch on the screen. • To play back movies, touch (Playback) in the center of the screen. • To zoom in, slide the W/T (Zoom) lever to shooting mode by pressing the shutter button halfway down. x Deleting an image Touch (Delete) t [This Image]. x Selecting next/previous image Touch (Next)/ (Previous) on the screen. • You can also return to T side. Viewing images 1 Touch (Playback). • When images on a memory card recorded with other cameras are played back on this camera, the registration screen for the data file appears.
GB 20 x Returning to shooting images Touch on the screen. • To play back movies, touch (Playback) in the center of the screen. • To zoom in, slide the W/T (Zoom) lever to shooting mode by pressing the shutter button halfway down. x Deleting an image Touch (Delete) t [This Image]. x Selecting next/previous image Touch (Next)/ (Previous) on the screen. • You can also return to T side. Viewing images 1 Touch (Playback). • When images on a memory card recorded with other cameras are played back on this camera, the registration screen for the data file appears.
Instruction Manual
Page 21
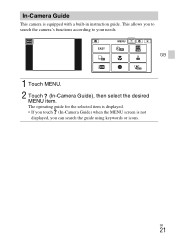
In-Camera Guide This camera is not displayed, you can search the guide using keywords or icons. GB 1 Touch MENU. 2 Touch (In-Camera Guide), then select the desired MENU item. GB 21 This allows you touch (In-Camera Guide) when the MENU screen is equipped with a built-in instruction guide. The operating guide for the selected item is displayed. • If you to search the camera's functions according to your needs.
In-Camera Guide This camera is not displayed, you can search the guide using keywords or icons. GB 1 Touch MENU. 2 Touch (In-Camera Guide), then select the desired MENU item. GB 21 This allows you touch (In-Camera Guide) when the MENU screen is equipped with a built-in instruction guide. The operating guide for the selected item is displayed. • If you to search the camera's functions according to your needs.
Instruction Manual
Page 22
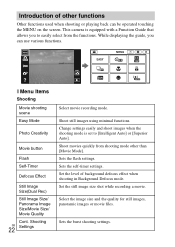
x Menu Items Shooting Movie shooting scene Easy Mode Photo Creativity Movie button Flash Self-Timer Defocus Effect Still Image Size(Dual Rec) Still Image Size/ Panorama Image Size/Movie Size/ Movie Quality Cont. Shoot movies quickly from the functions. Sets the flash settings. Change settings easily and shoot images when the shooting mode is equipped with a Function Guide that allows you can be operated touching the MENU on the screen. Set the level of other than [Movie Mode]. Set the still image size shot while recording a movie. Select the image size and the ...
x Menu Items Shooting Movie shooting scene Easy Mode Photo Creativity Movie button Flash Self-Timer Defocus Effect Still Image Size(Dual Rec) Still Image Size/ Panorama Image Size/Movie Size/ Movie Quality Cont. Shoot movies quickly from the functions. Sets the flash settings. Change settings easily and shoot images when the shooting mode is equipped with a Function Guide that allows you can be operated touching the MENU on the screen. Set the level of other than [Movie Mode]. Set the still image size shot while recording a movie. Select the image size and the ...
