
Instruction Manual
Page 4
...static electricity or electromagnetism causes data transfer to discontinue midway (fail), restart the application or disconnect and connect the communication cable (USB, etc.) again. [ Disposal of materials will help . For any service or guarantee matters please refer to provide reasonable protection ...manufacturer of this equipment does cause harmful interference to the applicable collection point for a Class B digital device, pursuant to Part 15 of FCC Rules. However, there is Sony Deutschland GmbH, Hedelfinger Strasse 61, 70327 Stuttgart, Germany. For Customers in Europe [ Notice ...
...static electricity or electromagnetism causes data transfer to discontinue midway (fail), restart the application or disconnect and connect the communication cable (USB, etc.) again. [ Disposal of materials will help . For any service or guarantee matters please refer to provide reasonable protection ...manufacturer of this equipment does cause harmful interference to the applicable collection point for a Class B digital device, pursuant to Part 15 of FCC Rules. However, there is Sony Deutschland GmbH, Hedelfinger Strasse 61, 70327 Stuttgart, Germany. For Customers in Europe [ Notice ...

Instruction Manual
Page 10
... pen is already attached to the wrist strap. • Paint pen (1) • USB, A/V Cable for multi-use terminal (1) Note • Do not carry the camera by being dropped. The camera may fall off. • Wrist strap (1) • CD-ROM (1) - "Cyber-shot Handbook" - "Cyber-shot Step-up Guide" • Instruction Manual (this manual) (1) 10GB Getting started Getting...Canada) x Using the wrist strap The wrist strap is used when operating the touch panel. Place your hand through the loop to prevent the camera from damage by holding the paint pen. Cyber-shot application software -
... pen is already attached to the wrist strap. • Paint pen (1) • USB, A/V Cable for multi-use terminal (1) Note • Do not carry the camera by being dropped. The camera may fall off. • Wrist strap (1) • CD-ROM (1) - "Cyber-shot Handbook" - "Cyber-shot Step-up Guide" • Instruction Manual (this manual) (1) 10GB Getting started Getting...Canada) x Using the wrist strap The wrist strap is used when operating the touch panel. Place your hand through the loop to prevent the camera from damage by holding the paint pen. Cyber-shot application software -

Instruction Manual
Page 38
... music file from your CDs or MP3 files to the camera to your computer (page 43), then follow the steps below. 1 Touch t (Settings) t (Main Settings) t [Download Music]. 2 Make a USB connection between the camera and your computer. 3 Start and operate "Music Transfer".... The slideshow starts. • To end the slideshow, touch the screen, and then touch [Exit Slideshow]. Viewing still images with music (Slideshow) 1 Touch (Slideshow) t (Slideshow ...
... music file from your CDs or MP3 files to the camera to your computer (page 43), then follow the steps below. 1 Touch t (Settings) t (Main Settings) t [Download Music]. 2 Make a USB connection between the camera and your computer. 3 Start and operate "Music Transfer".... The slideshow starts. • To end the slideshow, touch the screen, and then touch [Exit Slideshow]. Viewing still images with music (Slideshow) 1 Touch (Slideshow) t (Slideshow ...
Instruction Manual
Page 41
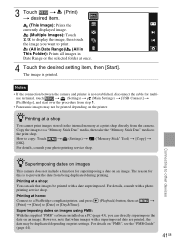
...to [Date] or [Day&Time]. The image is not established, disconnect the cable for multi- use terminal, touch t (Settings) t (Main Settings) t [USB Connect] t [PictBridge], and start over the procedure from step 1. • Panoramic images may be printed depending on the printer. How to the print shop. ...be duplicated depending on print settings. Connecting to other devices zSuperimposing dates on images This camera does not include a function for this is to prevent the date from the camera. However, note that images be printed with a photo printing service shop. Notes &#...
...to [Date] or [Day&Time]. The image is not established, disconnect the cable for multi- use terminal, touch t (Settings) t (Main Settings) t [USB Connect] t [PictBridge], and start over the procedure from step 1. • Panoramic images may be printed depending on the printer. How to the print shop. ...be duplicated depending on print settings. Connecting to other devices zSuperimposing dates on images This camera does not include a function for this is to prevent the date from the camera. However, note that images be printed with a photo printing service shop. Notes &#...

Instruction Manual
Page 44
.... Using the AC-LS5K/AC-LS5 AC Adaptor (sold separately) and the USB/ AV/DC IN Cable for multi-use terminal (sold separately) is displayed. appears on the screen of the camera. Notes 44GB • Do not disconnect the cable for multi-use terminal ... images to your computer using a battery with little remaining charge, you can start menu: Click [Start] t [All Programs] t [Sony Picture Utility] t [Help] t [PMB Guide]. appears on the screen of the camera. 1 To a USB jack Cable for multi-use terminal 2 To the multi connector • is operating or while "Accessing..."
.... Using the AC-LS5K/AC-LS5 AC Adaptor (sold separately) and the USB/ AV/DC IN Cable for multi-use terminal (sold separately) is displayed. appears on the screen of the camera. Notes 44GB • Do not disconnect the cable for multi-use terminal ... images to your computer using a battery with little remaining charge, you can start menu: Click [Start] t [All Programs] t [Sony Picture Utility] t [Help] t [PMB Guide]. appears on the screen of the camera. 1 To a USB jack Cable for multi-use terminal 2 To the multi connector • is operating or while "Accessing..."

Instruction Manual
Page 51
...used in the internal memory to images. COMPONENT Sets the video signal according to a computer or a printer. USB Connect Sets the mode used when connecting the camera to a connected TV terminal. Selects the method used to assign file number to a "Memory Stick Duo"... Formats the internal memory. Category Item Description Main Settings Beep Selects or turns off the sound produced when you operate the camera. Demo Mode Demonstrates the Smile Shutter and Scene Recognition function. Calibration Corrects misalignment of the response positions of the buttons on...
...used in the internal memory to images. COMPONENT Sets the video signal according to a computer or a printer. USB Connect Sets the mode used when connecting the camera to a connected TV terminal. Selects the method used to assign file number to a "Memory Stick Duo"... Formats the internal memory. Category Item Description Main Settings Beep Selects or turns off the sound produced when you operate the camera. Demo Mode Demonstrates the Smile Shutter and Scene Recognition function. Calibration Corrects misalignment of the response positions of the buttons on...

Instruction Manual
Page 56
...176;C (50°F to charge the battery. Delete the USB connection. • You may be inappropriate for playing back, on this camera, files containing images which were processed on a "Memory Stick ... images Cannot play back some images stored on the "Memory Stick Duo" media shot using other cameras. When the operating time per charge decreases markedly, the battery pack needs to ...the "Memory Stick Duo" media without using the AC Adaptor (sold separately). Shooting still images/movies...
...176;C (50°F to charge the battery. Delete the USB connection. • You may be inappropriate for playing back, on this camera, files containing images which were processed on a "Memory Stick ... images Cannot play back some images stored on the "Memory Stick Duo" media shot using other cameras. When the operating time per charge decreases markedly, the battery pack needs to ...the "Memory Stick Duo" media without using the AC Adaptor (sold separately). Shooting still images/movies...

Instruction Manual
Page 58
... balance: Automatic, Daylight, Cloudy, Fluorescent 1/2/3, Incandescent, Flash, One push Underwater White Balance: Auto, Underwater 1/2, One push Recording system: Still images: JPEG (DCF Ver. 2.0, Exif Ver. 2.21, MPF Baseline) compliant, DPOF compatible Movies: MPEG-4 Visual Recording media: Internal...Multi connector Type1a (AV-out (SD/HD Component)/USB/DC-in): Video output Audio output (Monaural) USB communication USB communication: Hi-Speed USB (USB 2.0 compliant) [LCD screen] LCD panel: Wide (16:9), 7.5 cm (3.0 type) TFT drive Total number of camera: Approx. 10.2 Megapixels Lens: Carl Zeiss ...
... balance: Automatic, Daylight, Cloudy, Fluorescent 1/2/3, Incandescent, Flash, One push Underwater White Balance: Auto, Underwater 1/2, One push Recording system: Still images: JPEG (DCF Ver. 2.0, Exif Ver. 2.21, MPF Baseline) compliant, DPOF compatible Movies: MPEG-4 Visual Recording media: Internal...Multi connector Type1a (AV-out (SD/HD Component)/USB/DC-in): Video output Audio output (Monaural) USB communication USB communication: Hi-Speed USB (USB 2.0 compliant) [LCD screen] LCD panel: Wide (16:9), 7.5 cm (3.0 type) TFT drive Total number of camera: Approx. 10.2 Megapixels Lens: Carl Zeiss ...

Cyber-shot® Handbook
Page 13
Guide Blink Alert Beep LCD Brightness Language Setting Demo Mode Initialize COMPONENT Video Out Housing USB Connect Download Music Format Music Calibration Format Create REC.Folder Change REC.Folder Delete REC.Folder Copy File Number Format File Number .../Settings Search Operation Search Table of contents Categories Shooting Settings Main Settings "Memory Stick" Tool Internal Memory Tool Clock Settings Items AF Illuminator Grid Line Digital Zoom Auto Orientation Scene Recog. Setting items You can change the settings on the (Settings) screen. 1 Touch to display the MENU screen. 2 Touch ...
Guide Blink Alert Beep LCD Brightness Language Setting Demo Mode Initialize COMPONENT Video Out Housing USB Connect Download Music Format Music Calibration Format Create REC.Folder Change REC.Folder Delete REC.Folder Copy File Number Format File Number .../Settings Search Operation Search Table of contents Categories Shooting Settings Main Settings "Memory Stick" Tool Internal Memory Tool Clock Settings Items AF Illuminator Grid Line Digital Zoom Auto Orientation Scene Recog. Setting items You can change the settings on the (Settings) screen. 1 Touch to display the MENU screen. 2 Touch ...

Cyber-shot® Handbook
Page 20
... up) data on a hard disk of your computer Perform the procedure on a "Memory Stick Duo" media to the internal memory. • By making a USB connection between the camera and a computer with sufficient free capacity, then perform the procedure explained in the internal memory to the internal memory. Notes • You cannot import... a cable, you copy (back up ) data on the "Memory Stick Duo" media. Table of contents Operation Search MENU/Settings Search Using the internal memory The camera has approximately 11 MB of the following methods. Even when there is not removable.
... up) data on a hard disk of your computer Perform the procedure on a "Memory Stick Duo" media to the internal memory. • By making a USB connection between the camera and a computer with sufficient free capacity, then perform the procedure explained in the internal memory to the internal memory. Notes • You cannot import... a cable, you copy (back up ) data on the "Memory Stick Duo" media. Table of contents Operation Search MENU/Settings Search Using the internal memory The camera has approximately 11 MB of the following methods. Even when there is not removable.

Cyber-shot® Handbook
Page 91
...of an image is incorrect, you use the AC Adaptor (sold separately) and the USB/AV/DC IN Cable for multi-use terminal (sold separately). Notes • Black is displayed to shoot a portrait (vertical) image, the camera records its position change and displays the image in the portrait position. 1 t ... movies. • Sometimes the Auto Orientation function does not operate when you can use the [Rotate] on the shooting angle of the camera, the orientation of the image may not be recorded correctly. • You cannot use Auto Orientation. MENU/Settings Search Index 91GB Table ...
...of an image is incorrect, you use the AC Adaptor (sold separately) and the USB/AV/DC IN Cable for multi-use terminal (sold separately). Notes • Black is displayed to shoot a portrait (vertical) image, the camera records its position change and displays the image in the portrait position. 1 t ... movies. • Sometimes the Auto Orientation function does not operate when you can use the [Rotate] on the shooting angle of the camera, the orientation of the image may not be recorded correctly. • You cannot use Auto Orientation. MENU/Settings Search Index 91GB Table ...

Cyber-shot® Handbook
Page 102
...] setting, select [PictBridge]. • If you connect the camera to a computer, the AutoPlay Wizard appears, and the still images in the recording folder on the camera are imported to a computer or a PictBridge-compliant printer using the cable for multi-use terminal. 1 t (Settings) t (Main Settings) t [USB Connect] t desired mode Auto PictBridge PTP/MTP Mass Storage...
...] setting, select [PictBridge]. • If you connect the camera to a computer, the AutoPlay Wizard appears, and the still images in the recording folder on the camera are imported to a computer or a PictBridge-compliant printer using the cable for multi-use terminal. 1 t (Settings) t (Main Settings) t [USB Connect] t desired mode Auto PictBridge PTP/MTP Mass Storage...

Cyber-shot® Handbook
Page 103
Table of contents Download Music You can use "Music Transfer" in the CD-ROM (supplied) to change background music tracks. 1 t (Settings) t (Main Settings) t [Download Music] The message "Change slideshow music Connect to PC" is displayed. 2 Make a USB connection between the camera and a computer, then start "Music Transfer". 3 Follow the instructions on the screen to change music files. Operation Search MENU/Settings Search Index 103GB
Table of contents Download Music You can use "Music Transfer" in the CD-ROM (supplied) to change background music tracks. 1 t (Settings) t (Main Settings) t [Download Music] The message "Change slideshow music Connect to PC" is displayed. 2 Make a USB connection between the camera and a computer, then start "Music Transfer". 3 Follow the instructions on the screen to change music files. Operation Search MENU/Settings Search Index 103GB

Cyber-shot® Handbook
Page 104
...and cannot be played. 1 t (Settings) t (Main Settings) t [Format Music] t [OK] zRestoring the music preset at the factory to the camera You can delete all the background music files stored in "Music Transfer". MENU/Settings Search Index 104GB Table of contents Operation Search Format Music You...use "Music Transfer" in the CD-ROM (supplied) to reset music files to the preset ones. 1Execute [Download Music], then make a USB connection between the camera and a computer. 2Start "Music Transfer", then restore the default music. • For details on using "Music Transfer", see the help...
...and cannot be played. 1 t (Settings) t (Main Settings) t [Format Music] t [OK] zRestoring the music preset at the factory to the camera You can delete all the background music files stored in "Music Transfer". MENU/Settings Search Index 104GB Table of contents Operation Search Format Music You...use "Music Transfer" in the CD-ROM (supplied) to reset music files to the preset ones. 1Execute [Download Music], then make a USB connection between the camera and a computer. 2Start "Music Transfer", then restore the default music. • For details on using "Music Transfer", see the help...
Cyber-shot® Handbook
Page 117
... may not recover at the same time, some devices, including the camera, may not operate, depending on the types of USB devices you connect two or more USB devices to a single computer at the same time. 117GB Table of images shot with your Cyber-shot camera. Windows Image Mastering API (IMAPI) Ver.2.0 or later is required to...
... may not recover at the same time, some devices, including the camera, may not operate, depending on the types of USB devices you connect two or more USB devices to a single computer at the same time. 117GB Table of images shot with your Cyber-shot camera. Windows Image Mastering API (IMAPI) Ver.2.0 or later is required to...

Cyber-shot® Handbook
Page 119
...the software starts. zIntroduction to "Music Transfer" "Music Transfer" allows you to import images shot with your favorite tracks, and to delete and add Music files. Notes • "PMB...For other details, see the help in "Music Transfer". Index 119GB Continued r Make a USB connection between the camera and your computer, and click [Import]. • Images on a computer can be exported...still images, and change the shooting date and time. • You can create discs with CD or DVD disc-writing drive. • You can also restore the tracks stored at the factory with the camera...
...the software starts. zIntroduction to "Music Transfer" "Music Transfer" allows you to import images shot with your favorite tracks, and to delete and add Music files. Notes • "PMB...For other details, see the help in "Music Transfer". Index 119GB Continued r Make a USB connection between the camera and your computer, and click [Import]. • Images on a computer can be exported...still images, and change the shooting date and time. • You can create discs with CD or DVD disc-writing drive. • You can also restore the tracks stored at the factory with the camera...

Cyber-shot® Handbook
Page 121
...PMB" allows you to easily import images. For details on the computer, then press (Playback) button. 3 Connect the camera to your computer. • When a USB connection is established for the first time, your computer automatically runs a program to the computer. 121GB Table of the computer... see the "PMB Guide". Wait for a while. 1 To a USB jack of contents Operation Search MENU/Settings Search Index Connecting the camera to the computer 1 Insert a sufficiently charged battery pack into the camera, or connect the camera to a wall outlet (wall socket) using "PMB" When the AutoPlay...
...PMB" allows you to easily import images. For details on the computer, then press (Playback) button. 3 Connect the camera to your computer. • When a USB connection is established for the first time, your computer automatically runs a program to the computer. 121GB Table of the computer... see the "PMB Guide". Wait for a while. 1 To a USB jack of contents Operation Search MENU/Settings Search Index Connecting the camera to the computer 1 Insert a sufficiently charged battery pack into the camera, or connect the camera to a wall outlet (wall socket) using "PMB" When the AutoPlay...

Cyber-shot® Handbook
Page 122
...t the desired image file in the folder containing the copied files. The image is disconnected from the internal memory. • Turning off the camera. 1 Double-click the disconnect icon on the confirmation window, then click [OK]. Double-click the newly recognized icon on the desktop t ...use terminal. • Removing a "Memory Stick Duo" media. • Inserting a "Memory Stick Duo" media into the camera after copying images from the computer. Windows Vista 2 Click (USB Mass Storage Device) t [Stop]. 3 Confirm the device on the tasktray. The image files are stored. 2 Drag and ...
...t the desired image file in the folder containing the copied files. The image is disconnected from the internal memory. • Turning off the camera. 1 Double-click the disconnect icon on the confirmation window, then click [OK]. Double-click the newly recognized icon on the desktop t ...use terminal. • Removing a "Memory Stick Duo" media. • Inserting a "Memory Stick Duo" media into the camera after copying images from the computer. Windows Vista 2 Click (USB Mass Storage Device) t [Stop]. 3 Confirm the device on the tasktray. The image files are stored. 2 Drag and ...

Cyber-shot® Handbook
Page 124
... instructions supplied with the printer. • Printing using a computer You can import images to a computer using the camera by connecting the camera directly to the printer. 1 To a USB jack of the printer 2 To the multi connector Cable for multi-use terminal (supplied) 3 Turn on the screen...a computer, you print images shot in 16:9 mode, both edges may be cut off. • You cannot print panoramic images depending on the image and print it. Table of contents Operation Search MENU/Settings Search Printing still images You can print still images using the following methods...
... instructions supplied with the printer. • Printing using a computer You can import images to a computer using the camera by connecting the camera directly to the printer. 1 To a USB jack of the printer 2 To the multi connector Cable for multi-use terminal (supplied) 3 Turn on the screen...a computer, you print images shot in 16:9 mode, both edges may be cut off. • You cannot print panoramic images depending on the image and print it. Table of contents Operation Search MENU/Settings Search Printing still images You can print still images using the following methods...

Cyber-shot® Handbook
Page 125
... be inserted in the selected folder and date range at once. Notes • Movies cannot be printed. • If the camera could not be connected to the printer, be sure to set [USB Connect] under [Main Settings] to [PictBridge]. • Do not disconnect the cable for multi-use terminal while the (PictBridge... by side on the screen. This function may not all images in the order you choose [Date], the date will be available depending on the camera. Quantity Layout Size Date Selects the number of copies of the specified image to release the mark. 2Touch [OK] t [OK].
... be inserted in the selected folder and date range at once. Notes • Movies cannot be printed. • If the camera could not be connected to the printer, be sure to set [USB Connect] under [Main Settings] to [PictBridge]. • Do not disconnect the cable for multi-use terminal while the (PictBridge... by side on the screen. This function may not all images in the order you choose [Date], the date will be available depending on the camera. Quantity Layout Size Date Selects the number of copies of the specified image to release the mark. 2Touch [OK] t [OK].


