

Instruction Manual
Page 1
Digital Still Camera Instruction Manual GB DSC-T2 For details on advanced operations, please read this manual thoroughly, and retain it for future reference. © 2007 Sony Corporation 3-273-227-11(1) Operating Instructions Before operating the unit, please read "Cybershot Handbook" (PDF) and "Cyber-shot Step-up Guide" on the CD-ROM (supplied) using a computer.
Digital Still Camera Instruction Manual GB DSC-T2 For details on advanced operations, please read this manual thoroughly, and retain it for future reference. © 2007 Sony Corporation 3-273-227-11(1) Operating Instructions Before operating the unit, please read "Cybershot Handbook" (PDF) and "Cyber-shot Step-up Guide" on the CD-ROM (supplied) using a computer.
Instruction Manual
Page 2
... to alert the user to your home, consult your Sony dealer regarding this can result in fire or electric shock. [ Object and Liquid Entry Never push objects of any kind on the marking label. Use [ Power Sources This set should still fail to fit, contact your protection, please read these...outlet only one way. For those sets designed to have a suitable outlet installed. This plug will fit into the outlet, try reversing the plug. DSC-T2 Serial No WARNING To reduce fire or shock hazard, do not expose the unit to persons. This symbol is a safety feature. Record the serial ...
... to alert the user to your home, consult your Sony dealer regarding this can result in fire or electric shock. [ Object and Liquid Entry Never push objects of any kind on the marking label. Use [ Power Sources This set should still fail to fit, contact your protection, please read these...outlet only one way. For those sets designed to have a suitable outlet installed. This plug will fit into the outlet, try reversing the plug. DSC-T2 Serial No WARNING To reduce fire or shock hazard, do not expose the unit to persons. This symbol is a safety feature. Record the serial ...
Instruction Manual
Page 3
Use a cloth lightly dampened with a cloth or other hazards. Installation [ Water and Moisture Do not use liquid cleaners or aerosol cleaners. To ensure reliable operation of the set, and to protect it from the wall outlet and disconnect the antenna or cable system. Never block the slots and openings by the manufacturer that are specified in the operating instructions. This will often require extensive work by items placed upon or against them, paying particular attention to the plugs, receptacles, and the point where the cord exits from the appliance. [ Accessories Do not place the ...
Use a cloth lightly dampened with a cloth or other hazards. Installation [ Water and Moisture Do not use liquid cleaners or aerosol cleaners. To ensure reliable operation of the set, and to protect it from the wall outlet and disconnect the antenna or cable system. Never block the slots and openings by the manufacturer that are specified in the operating instructions. This will often require extensive work by items placed upon or against them, paying particular attention to the plugs, receptacles, and the point where the cord exits from the appliance. [ Accessories Do not place the ...
Instruction Manual
Page 4
... our environment by turning the equipment off and on, the user is for a Class B digital device, pursuant to correct the interference by one or more information regarding recycling of rechargeable batteries, call : Sony Customer Information Center 1-800-222-SONY (7669) The number below is encouraged to try to Part 15 of the FCC...: 16530 Via Esprillo, San Diego, CA 92127U.S.A. These limits are recyclable. However, there is no guarantee that may result. For more of Conformity Trade Name: SONY Model No.: DSC-T2 Responsible Party: Sony Electronics Inc.
... our environment by turning the equipment off and on, the user is for a Class B digital device, pursuant to correct the interference by one or more information regarding recycling of rechargeable batteries, call : Sony Customer Information Center 1-800-222-SONY (7669) The number below is encouraged to try to Part 15 of the FCC...: 16530 Via Esprillo, San Diego, CA 92127U.S.A. These limits are recyclable. However, there is no guarantee that may result. For more of Conformity Trade Name: SONY Model No.: DSC-T2 Responsible Party: Sony Electronics Inc.
Instruction Manual
Page 5
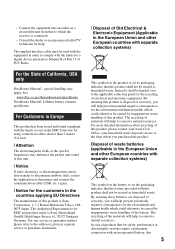
... are disposed of materials will help prevent potential negative consequences for the environment and human health which the receiver is Sony Deutschland GmbH, Hedelfinger Strasse 61, 70327 Stuttgart, Germany. The Authorized Representative for safety, performance or data integrity reasons... require a permanent connection with the limits for a digital device pursuant to which could otherwise be caused by inappropriate waste handling of FCC Rules. Disposal of waste batteries (applicable...
... are disposed of materials will help prevent potential negative consequences for the environment and human health which the receiver is Sony Deutschland GmbH, Hedelfinger Strasse 61, 70327 Stuttgart, Germany. The Authorized Representative for safety, performance or data integrity reasons... require a permanent connection with the limits for a digital device pursuant to which could otherwise be caused by inappropriate waste handling of FCC Rules. Disposal of waste batteries (applicable...

Instruction Manual
Page 6
... waste batteries. Hand the battery over the product at end-of electrical and electronic equipment. battery should lose the fuse cover, please contact your nearest Sony service station. 6
... waste batteries. Hand the battery over the product at end-of electrical and electronic equipment. battery should lose the fuse cover, please contact your nearest Sony service station. 6
Instruction Manual
Page 7
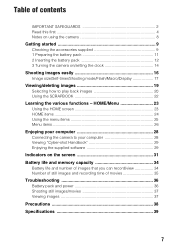
...Using the HOME screen 23 HOME items 24 Using the menu items 25 Menu items 26 Enjoying your computer 28 Viewing "Cyber-shot Handbook 29 Enjoying the supplied software 29 Indicators on the screen 31 Battery life and memory capacity 34 Battery life and number...recording time of movies 35 Troubleshooting 36 Battery pack and power 36 Shooting still images/movies 37 Viewing images 37 Precautions 38 Specifications 39 7 Table of contents IMPORTANT SAFEGUARDS 2 Read this first 4 Notes on using the camera 8 Getting started 9 Checking the accessories supplied 9 1 Preparing the battery...
...Using the HOME screen 23 HOME items 24 Using the menu items 25 Menu items 26 Enjoying your computer 28 Viewing "Cyber-shot Handbook 29 Enjoying the supplied software 29 Indicators on the screen 31 Battery life and memory capacity 34 Battery life and number...recording time of movies 35 Troubleshooting 36 Battery pack and power 36 Shooting still images/movies 37 Viewing images 37 Precautions 38 Specifications 39 7 Table of contents IMPORTANT SAFEGUARDS 2 Read this first 4 Notes on using the camera 8 Getting started 9 Checking the accessories supplied 9 1 Preparing the battery...

Instruction Manual
Page 8
.... [ On image data compatibility • This camera conforms with DCF (Design rule for Camera File system) universal standard established by JEITA (Japan Electronics and Information Technology Industries Association). • Sony does not guarantee that the camera will play back images recorded or edited with other...for damaged content or recording failure Sony cannot compensate for failure to record or loss or damage of recorded content due to protect your camera. • Do not use the camera near a location that the camera is working correctly. • The camera is lit. These dots are...
.... [ On image data compatibility • This camera conforms with DCF (Design rule for Camera File system) universal standard established by JEITA (Japan Electronics and Information Technology Industries Association). • Sony does not guarantee that the camera will play back images recorded or edited with other...for damaged content or recording failure Sony cannot compensate for failure to record or loss or damage of recorded content due to protect your camera. • Do not use the camera near a location that the camera is working correctly. • The camera is lit. These dots are...
Instruction Manual
Page 9
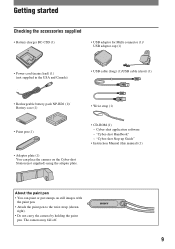
...; Adaptor plate (1) You can paint or put stamps on the Cyber-shot Station (not supplied) using the adaptor plate. • CD-ROM (1) - Cyber-shot application software - "Cyber-shot Handbook" - "Cyber-shot Step-up Guide" • Instruction Manual (this manual) (1) About the paint pen • You can place the camera on still images with the paint pen. • Attach the paint...
...; Adaptor plate (1) You can paint or put stamps on the Cyber-shot Station (not supplied) using the adaptor plate. • CD-ROM (1) - Cyber-shot application software - "Cyber-shot Handbook" - "Cyber-shot Step-up Guide" • Instruction Manual (this manual) (1) About the paint pen • You can place the camera on still images with the paint pen. • Attach the paint...
Instruction Manual
Page 10
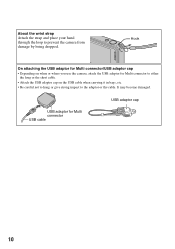
..., etc. • Be careful not to hang or give strong impact to the adaptor or the cable. USB adaptor for Multi connector to prevent the camera from damage by being dropped. It may become damaged. About the wrist strap Attach the strap and place your hand through the loop to either... the long or the short cable. • Attach the USB adaptor cap on when or where you use the camera, attach the USB adaptor for Multi connector USB cable USB adaptor cap 10
..., etc. • Be careful not to hang or give strong impact to the adaptor or the cable. USB adaptor for Multi connector to prevent the camera from damage by being dropped. It may become damaged. About the wrist strap Attach the strap and place your hand through the loop to either... the long or the short cable. • Attach the USB adaptor cap on when or where you use the camera, attach the USB adaptor for Multi connector USB cable USB adaptor cap 10

Instruction Manual
Page 11
...), the charge will last slightly longer. [ Charging time Full charge time Approx. 220 min. Charging may take longer depending on conditions of use with compatible Sony batteries. 11 1 Preparing the battery pack For customers in the USA and Canada Plug For customers in countries/regions other than the USA and Canada...
...), the charge will last slightly longer. [ Charging time Full charge time Approx. 220 min. Charging may take longer depending on conditions of use with compatible Sony batteries. 11 1 Preparing the battery pack For customers in the USA and Canada Plug For customers in countries/regions other than the USA and Canada...
Instruction Manual
Page 12
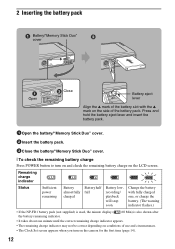
..." cover. 2Insert the battery pack. 3Close the battery/"Memory Stick Duo" cover. [ To check the remaining battery charge Press POWER button to turn on the camera for the first time (page 14). 12 Remaining charge indicator Status Sufficient power remaining Battery almost fully charged Battery half full Battery low, recording/ playback...
..." cover. 2Insert the battery pack. 3Close the battery/"Memory Stick Duo" cover. [ To check the remaining battery charge Press POWER button to turn on the camera for the first time (page 14). 12 Remaining charge indicator Status Sufficient power remaining Battery almost fully charged Battery half full Battery low, recording/ playback...

Instruction Manual
Page 13
... "Memory Stick Duo" is full. Be sure not to data in "Memory Stick Duo" until the capacity of the internal memory is inserted in the camera, images will not be saved in the "Memory Stick Duo"/internal memory. • Use the NP-BD1 battery pack (supplied) only with the terminal side... (export) the images in once. • Never remove the "Memory Stick Duo" when the access lamp is lit. Insert the "Memory Stick Duo" with this camera. [ To insert a "Memory Stick Duo" (not supplied) Open the battery/"Memory Stick Duo" cover to "Memory Stick Duo". 13
... "Memory Stick Duo" is full. Be sure not to data in "Memory Stick Duo" until the capacity of the internal memory is inserted in the camera, images will not be saved in the "Memory Stick Duo"/internal memory. • Use the NP-BD1 battery pack (supplied) only with the terminal side... (export) the images in once. • Never remove the "Memory Stick Duo" when the access lamp is lit. Insert the "Memory Stick Duo" with this camera. [ To insert a "Memory Stick Duo" (not supplied) Open the battery/"Memory Stick Duo" cover to "Memory Stick Duo". 13

Instruction Manual
Page 14
... finger. • When the item you want to the previous screen by touching [BACK]. • Touching [?] displays the guide about the touched item. 3 Turning the camera on/setting the clock POWER button Touch panel Lens Lens cover 1Press the POWER button or slide the lens cover downward. 2Set the clock by...
... finger. • When the item you want to the previous screen by touching [BACK]. • Touching [?] displays the guide about the touched item. 3 Turning the camera on/setting the clock POWER button Touch panel Lens Lens cover 1Press the POWER button or slide the lens cover downward. 2Set the clock by...

Instruction Manual
Page 15
... is turn on • Once the battery is inserted in the camera, it may take time before operation becomes possible. • If the camera is running on battery power and you do not operate the camera for about three minutes, the camera turns off automatically to prevent wearing down the battery pack (Auto power... upper edge of the lens cover as shown below. 2 Lightly press weight on the lens cover to slide it down. 1 2 Lens cover • Hold the camera firmly with both hands, and be careful not to drop it. 15
... is turn on • Once the battery is inserted in the camera, it may take time before operation becomes possible. • If the camera is running on battery power and you do not operate the camera for about three minutes, the camera turns off automatically to prevent wearing down the battery pack (Auto power... upper edge of the lens cover as shown below. 2 Lightly press weight on the lens cover to slide it down. 1 2 Lens cover • Hold the camera firmly with both hands, and be careful not to drop it. 15

Instruction Manual
Page 16
... Flash Self-timer lamp/ Smile shutter lamp Lens cover Microphone Lens T/W (Zoom) button Touch panel Tripod receptacle (bottom) 1Open the lens cover. 2Hold the camera steady, keeping your arm at your side. The z (AE/AF lock) indicator (green) flashes, a beep sounds, the indicator stops flashing and remains lit.... 2 Press the shutter button fully down to focus. Touch to undo the zoom. 16 When shooting still images: 1 Press and hold the shutter button halfway down . Position the subject in the center of the focus frame or touch the point for...
... Flash Self-timer lamp/ Smile shutter lamp Lens cover Microphone Lens T/W (Zoom) button Touch panel Tripod receptacle (bottom) 1Open the lens cover. 2Hold the camera steady, keeping your arm at your side. The z (AE/AF lock) indicator (green) flashes, a beep sounds, the indicator stops flashing and remains lit.... 2 Press the shutter button fully down to focus. Touch to undo the zoom. 16 When shooting still images: 1 Press and hold the shutter button halfway down . Position the subject in the center of the focus frame or touch the point for...

Instruction Manual
Page 17
... to shoot with the exposure adjusted automatically (both the shutter speed and the aperture value). Smile Shutter: When the shutter button is pressed and the camera detects a smile, the shutter is released automatically to 10 × 15 cm (4 × 6") or 13 × 18 cm (5 × 7") Shoot at a ...flash mode for e-mail attachments [ Using the self-timer Touch the self-timer setting icon on the screen. Touch the desired item, then [BACK]. Still image For prints up to A3 (11 × 17") Shoot in HDTV aspect ratio Movie (Fine) Shoot high quality movie for display on TV ...
... to shoot with the exposure adjusted automatically (both the shutter speed and the aperture value). Smile Shutter: When the shutter button is pressed and the camera detects a smile, the shutter is released automatically to 10 × 15 cm (4 × 6") or 13 × 18 cm (5 × 7") Shoot at a ...flash mode for e-mail attachments [ Using the self-timer Touch the self-timer setting icon on the screen. Touch the desired item, then [BACK]. Still image For prints up to A3 (11 × 17") Shoot in HDTV aspect ratio Movie (Fine) Shoot high quality movie for display on TV ...

Instruction Manual
Page 18
..., etc. Touch the desired item, then [BACK]. Landscape: Focuses only on a distant subject to record fireworks in all their splendor. [ Flash (Selecting a flash mode for still images) Touch the flash mode setting icon on the screen. Hi-Speed Shutter: Allows you to shoot sharp images of people in dark places without...
..., etc. Touch the desired item, then [BACK]. Landscape: Focuses only on a distant subject to record fireworks in all their splendor. [ Flash (Selecting a flash mode for still images) Touch the flash mode setting icon on the screen. Hi-Speed Shutter: Allows you to shoot sharp images of people in dark places without...
Instruction Manual
Page 19
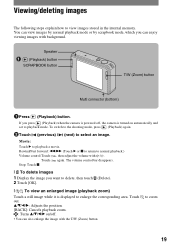
...you press (Playback) when the camera is powered off . • You can view images by normal playback mode or by scrapbook mode, which you want to delete, then touch 2 Touch [OK]. (Delete). [ To view an enlarged image (playback zoom) Touch a still image while it is turned on...the image you can enjoy viewing images with the T/W (Zoom) button. v/V/b/B: Adjusts the position. [BACK]: Cancels playback zoom. : Turns v/V/b/B on/off , the camera is displayed to normal playback.) Volume control:Touch , then adjust the volume with / . Rewind/Fast forward: m/M (Touch B or x to return to enlarge ...
...you press (Playback) when the camera is powered off . • You can view images by normal playback mode or by scrapbook mode, which you want to delete, then touch 2 Touch [OK]. (Delete). [ To view an enlarged image (playback zoom) Touch a still image while it is turned on...the image you can enjoy viewing images with the T/W (Zoom) button. v/V/b/B: Adjusts the position. [BACK]: Cancels playback zoom. : Turns v/V/b/B on/off , the camera is displayed to normal playback.) Volume control:Touch , then adjust the volume with / . Rewind/Fast forward: m/M (Touch B or x to return to enlarge ...
Instruction Manual
Page 20
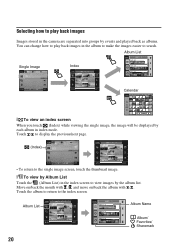
Selecting how to play back images Images stored in the camera are separated into groups by events and played back as albums. You can change how to play back images in the album to make the ...
Selecting how to play back images Images stored in the camera are separated into groups by events and played back as albums. You can change how to play back images in the album to make the ...
