Instruction Manual
Page 2
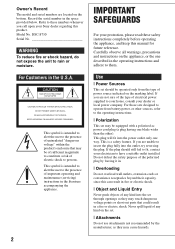
... power source indicated on the set may touch dangerous voltage points or short out parts that may cause hazards. Refer to these safety instructions completely before operating the appliance, and keep this can result in fire or electric shock. [ Object and Liquid Entry Never push objects of any kind on the marking label. Owner's Record The model and serial numbers...
... power source indicated on the set may touch dangerous voltage points or short out parts that may cause hazards. Refer to these safety instructions completely before operating the appliance, and keep this can result in fire or electric shock. [ Object and Liquid Entry Never push objects of any kind on the marking label. Owner's Record The model and serial numbers...
Instruction Manual
Page 3
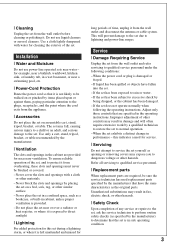
... the service technician has used replacement parts specified by items placed upon or against them, paying particular attention to direct sunlight. [ Lightning For added protection for this indicates a need for example, near a bathtub, washbowl, kitchen sink, or laundry tub, in a wet basement, or near a swimming pool, etc. [ Power-Cord Protection Route the power cord so that the set is in the operating instructions. Improper adjustment of the set...
... the service technician has used replacement parts specified by items placed upon or against them, paying particular attention to direct sunlight. [ Lightning For added protection for this indicates a need for example, near a bathtub, washbowl, kitchen sink, or laundry tub, in a wet basement, or near a swimming pool, etc. [ Power-Cord Protection Route the power cord so that the set is in the operating instructions. Improper adjustment of the set...

Instruction Manual
Page 5
... over the product at the specific frequencies may influence the picture and sound of this product or battery, please contact your local Civic Office, your household waste disposal service or the shop where you will be treated properly, hand over to discontinue midway (fail), restart the application or disconnect and connect the communication cable (USB, etc.) again. [ Disposal of...
... over the product at the specific frequencies may influence the picture and sound of this product or battery, please contact your local Civic Office, your household waste disposal service or the shop where you will be treated properly, hand over to discontinue midway (fail), restart the application or disconnect and connect the communication cable (USB, etc.) again. [ Disposal of...
Instruction Manual
Page 6
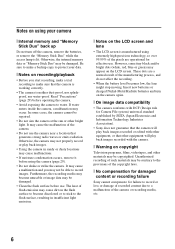
... start recording, make a trial recording to make a backup copy to a malfunction of recorded content due to protect your camera [ Internal memory and "Memory Stick Duo" back up Do not turn on the camera again. [ On image data compatibility • The camera conforms with DCF (Design rule for Camera File system) universal standard established by JEITA (Japan Electronics and Information Technology Industries Association). • Sony does not guarantee that the camera will play back images recorded...
... start recording, make a trial recording to make a backup copy to a malfunction of recorded content due to protect your camera [ Internal memory and "Memory Stick Duo" back up Do not turn on the camera again. [ On image data compatibility • The camera conforms with DCF (Design rule for Camera File system) universal standard established by JEITA (Japan Electronics and Information Technology Industries Association). • Sony does not guarantee that the camera will play back images recorded...
Instruction Manual
Page 7
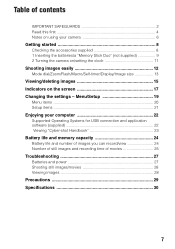
... 22 Supported Operating Systems for USB connection and application software (supplied 22 Viewing "Cyber-shot Handbook 23 Battery life and memory capacity 24 Battery life and number of images you can record/view 24 Number of still images and recording time of contents IMPORTANT SAFEGUARDS 2 Read this first 4 Notes on using your camera 6 Getting started 8 Checking the accessories supplied 8 1 Inserting the batteries/a "Memory Stick Duo" (not supplied 9 2 Turning the camera on/setting the clock 11 Shooting images easily 12 Mode dial/Zoom/Flash/Macro/Self-timer/Display/Image size 13...
... 22 Supported Operating Systems for USB connection and application software (supplied 22 Viewing "Cyber-shot Handbook 23 Battery life and memory capacity 24 Battery life and number of images you can record/view 24 Number of still images and recording time of contents IMPORTANT SAFEGUARDS 2 Read this first 4 Notes on using your camera 6 Getting started 8 Checking the accessories supplied 8 1 Inserting the batteries/a "Memory Stick Duo" (not supplied 9 2 Turning the camera on/setting the clock 11 Shooting images easily 12 Mode dial/Zoom/Flash/Macro/Self-timer/Display/Image size 13...
Instruction Manual
Page 10
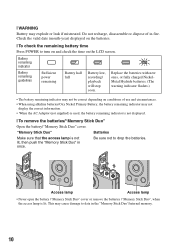
... AC Adaptor (not supplied) is used, the battery remaining indicator is lit. Replace the batteries with new ones, or fully charged NickelMetal Hydride batteries. (The warning indicator flashes.) • The battery remaining indicator may explode or leak if mistreated. Check the valid date (month-year) displayed on the batteries. [ To check the remaining battery time Press POWER to turn on and check the time on conditions of in once.
... AC Adaptor (not supplied) is used, the battery remaining indicator is lit. Replace the batteries with new ones, or fully charged NickelMetal Hydride batteries. (The warning indicator flashes.) • The battery remaining indicator may explode or leak if mistreated. Check the valid date (month-year) displayed on the batteries. [ To check the remaining battery time Press POWER to turn on and check the time on conditions of in once.
Instruction Manual
Page 11
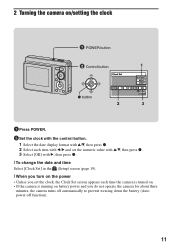
... z. [ To change the date and time Select [Clock Set] in the (Setup) screen (page 19). [ When you turn on the power • Unless you set the clock, the Clock Set screen appears each time the camera is turned on. • If the camera is running on battery power and you do not operate the camera for about three minutes, the camera turns off automatically to prevent wearing down the battery (Auto power-off function). 11
... z. [ To change the date and time Select [Clock Set] in the (Setup) screen (page 19). [ When you turn on the power • Unless you set the clock, the Clock Set screen appears each time the camera is turned on. • If the camera is running on battery power and you do not operate the camera for about three minutes, the camera turns off automatically to prevent wearing down the battery (Auto power-off function). 11
Instruction Manual
Page 14
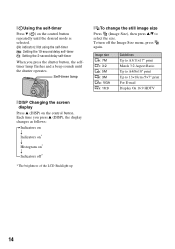
To turn off * * The brightness of the LCD Backlight up 14 Each time you press the shutter button, the selftimer lamp flashes and a beep sounds until the desired mode is selected. (No indicator): Not using the self-timer : Setting the 10-second delay self-timer : Setting the 2-second delay self-timer When you press v (DISP), the display changes as follows: Indicators on r Indicators on* r Histogram on the control button. Image size 7M : 7M 3:2: 3:2 5M : 5M 3M : 3M...
To turn off * * The brightness of the LCD Backlight up 14 Each time you press the shutter button, the selftimer lamp flashes and a beep sounds until the desired mode is selected. (No indicator): Not using the self-timer : Setting the 10-second delay self-timer : Setting the 2-second delay self-timer When you press v (DISP), the display changes as follows: Indicators on r Indicators on* r Histogram on the control button. Image size 7M : 7M 3:2: 3:2 5M : 5M 3M : 3M...
Instruction Manual
Page 15
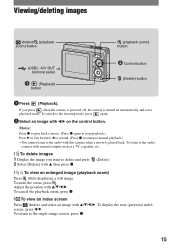
...delete and press 2 Select [Delete] with this camera when a movie is turned on the control button. To switch to the shooting mode, press again. 2 Select an image with b/B on automatically and set to the audio with v, then press z. (Delete). [ To view an enlarged image (playback zoom) Press while displaying a still image. To undo the zoom, press . Viewing/deleting images (Index)/ (playback zoom) button (playback zoom) button (USB) · A/V OUT terminal (side) (Playback) button ɟ Control button (Delete) button 1 Press (Playback). To display the next (previous) index screen...
...delete and press 2 Select [Delete] with this camera when a movie is turned on the control button. To switch to the shooting mode, press again. 2 Select an image with b/B on automatically and set to the audio with v, then press z. (Delete). [ To view an enlarged image (playback zoom) Press while displaying a still image. To undo the zoom, press . Viewing/deleting images (Index)/ (playback zoom) button (playback zoom) button (USB) · A/V OUT terminal (side) (Playback) button ɟ Control button (Delete) button 1 Press (Playback). To display the next (previous) index screen...
Instruction Manual
Page 18
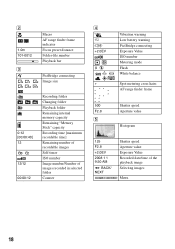
...finder frame indicator Focus preset distance Folder-file number Playback bar C PictBridge connecting 7M 3:2 5M Image size 3M VGA 16:9 101 0:12 [00:00:40] 12 12/12 00:00:12 Recording folder Changing folder Playback folder Remaining internal memory capacity Remaining "Memory Stick" capacity Recording time [maximum recordable time] Remaining number of recordable images Self-timer ISO number Image number/Number of images recorded in selected folder Counter D E +2.0EV + Vibration warning Low battery warning PictBridge connecting Exposure Value ISO number Metering mode Flash White balance Spot...
...finder frame indicator Focus preset distance Folder-file number Playback bar C PictBridge connecting 7M 3:2 5M Image size 3M VGA 16:9 101 0:12 [00:00:40] 12 12/12 00:00:12 Recording folder Changing folder Playback folder Remaining internal memory capacity Remaining "Memory Stick" capacity Recording time [maximum recordable time] Remaining number of recordable images Self-timer ISO number Image number/Number of images recorded in selected folder Counter D E +2.0EV + Vibration warning Low battery warning PictBridge connecting Exposure Value ISO number Metering mode Flash White balance Spot...
Instruction Manual
Page 20
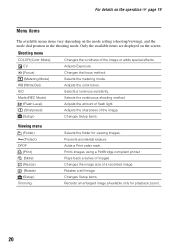
... shooting mode. WB (White Bal) Adjusts the color tones. Prints images using a PictBridge compliant printer. Shooting menu COLOR (Color Mode) Changes the vividness of a recorded image. EV Adjusts Exposure. 9 (Focus) Changes the focus method. (Metering Mode) Selects the metering mode. Mode (REC Mode) Selects the continuous shooting method. (Flash Level) Adjusts the amount of flash light. (Sharpness) Adjusts the sharpness of images. Prevents accidental erasure. Plays back a series of the image. (Setup) Changes Setup items. Viewing menu (Folder) - (Protect...
... shooting mode. WB (White Bal) Adjusts the color tones. Prints images using a PictBridge compliant printer. Shooting menu COLOR (Color Mode) Changes the vividness of a recorded image. EV Adjusts Exposure. 9 (Focus) Changes the focus method. (Metering Mode) Selects the metering mode. Mode (REC Mode) Selects the continuous shooting method. (Flash Level) Adjusts the amount of flash light. (Sharpness) Adjusts the sharpness of images. Prevents accidental erasure. Plays back a series of the image. (Setup) Changes Setup items. Viewing menu (Folder) - (Protect...
Instruction Manual
Page 21
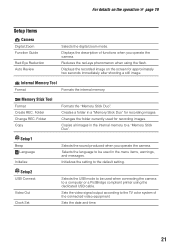
..., and messages. Copies all images in the internal memory to be used for recording images. Setup2 USB Connect Video Out Clock Set Selects the USB mode to a computer or a PictBridge compliant printer using the flash. Sets the date and time. 21 Changes the folder currently used when connecting the camera to be used in a "Memory Stick Duo" for approximately two seconds immediately after shooting a still image. Displays the recorded image on the operation 1 page 19 Setup items Camera Digital Zoom Function Guide Red Eye Reduction Auto Review Selects the digital zoom mode...
..., and messages. Copies all images in the internal memory to be used for recording images. Setup2 USB Connect Video Out Clock Set Selects the USB mode to a computer or a PictBridge compliant printer using the flash. Sets the date and time. 21 Changes the folder currently used when connecting the camera to be used in a "Memory Stick Duo" for approximately two seconds immediately after shooting a still image. Displays the recorded image on the operation 1 page 19 Setup items Camera Digital Zoom Function Guide Red Eye Reduction Auto Review Selects the digital zoom mode...
Instruction Manual
Page 22
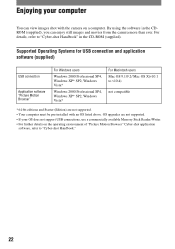
... still images and movies from the camera more than ever. OS upgrades are not supported. • Your computer must be pre-installed with the camera on the operating environment of "Picture Motion Browser" Cyber-shot application software, refer to "Cyber-shot Handbook" in the CDROM (supplied), you can view images shot with an OS listed above. For details, refer to "Cyber-shot Handbook." 22 Enjoying your OS does not support USB connections, use a commercially available Memory...
... still images and movies from the camera more than ever. OS upgrades are not supported. • Your computer must be pre-installed with the camera on the operating environment of "Picture Motion Browser" Cyber-shot application software, refer to "Cyber-shot Handbook" in the CDROM (supplied), you can view images shot with an OS listed above. For details, refer to "Cyber-shot Handbook." 22 Enjoying your OS does not support USB connections, use a commercially available Memory...

Instruction Manual
Page 24
... times. - The camera has been turned on the battery manufacturer/type, environmental conditions, product setting, etc. • The supplied alkaline battery is switched alternately between the W and T ends. - The values may be less than those indicated in the table depending on commercial norms, and do not change, regardless of image size. [ When viewing still images Battery Battery life (min.) No. The numbers shown for images you can record/view...
... times. - The camera has been turned on the battery manufacturer/type, environmental conditions, product setting, etc. • The supplied alkaline battery is switched alternately between the W and T ends. - The values may be less than those indicated in the table depending on commercial norms, and do not change, regardless of image size. [ When viewing still images Battery Battery life (min.) No. The numbers shown for images you can record/view...
Instruction Manual
Page 27
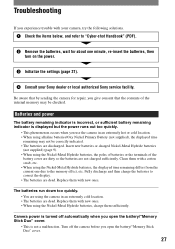
... "Cyber-shot Handbook" (PDF). 2 Remove the batteries, wait for repair, you give consent that the contents of the battery cover are dirty so the batteries are discharged. Batteries and power The battery remaining indicator is incorrect, or sufficient battery remaining indicator is not a malfunction. Troubleshooting If you experience trouble with your Sony dealer or local authorized Sony service facility. Clean them with new ones. Replace them with new ones. • When using...
... "Cyber-shot Handbook" (PDF). 2 Remove the batteries, wait for repair, you give consent that the contents of the battery cover are dirty so the batteries are discharged. Batteries and power The battery remaining indicator is incorrect, or sufficient battery remaining indicator is not a malfunction. Troubleshooting If you experience trouble with your Sony dealer or local authorized Sony service facility. Clean them with new ones. Replace them with new ones. • When using...
Instruction Manual
Page 28
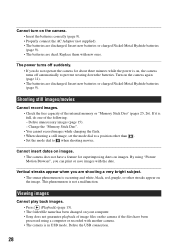
... can print or save images with new ones. Change the "Memory Stick Duo". • You cannot record images while charging the flash. • When shooting a still image, set the mode dial to prevent wearing down the batteries. Replace them with the date. Delete the USB connection. 28 Viewing images Cannot play back images. • Press (Playback) (page 15). • The folder/file name has been changed on your computer. • Sony does not guarantee playback of image files on , the camera turns off...
... can print or save images with new ones. Change the "Memory Stick Duo". • You cannot record images while charging the flash. • When shooting a still image, set the mode dial to prevent wearing down the batteries. Replace them with the date. Delete the USB connection. 28 Viewing images Cannot play back images. • Press (Playback) (page 15). • The folder/file name has been changed on your computer. • Sony does not guarantee playback of image files on , the camera turns off...
Instruction Manual
Page 30
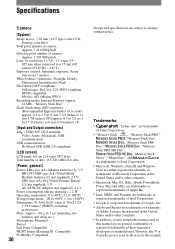
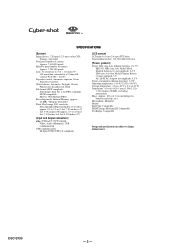
... pixel number of camera: Approx. 7 201 000 pixels Lens: 3× zoom lens f = 5.8 - 17.4 mm (35 - 105 mm when converted to a 35 mm still camera) F2.8 (W) - 4.8 (T) Exposure control: Automatic exposure, Scene Selection (7 modes) White balance: Automatic, Daylight, Cloudy, Fluorescent, Incandescent, Flash File format (DCF compliant): Still images: Exif Ver. 2.21 JPEG compliant, DPOF compatible Movies: AVI (Motion JPEG) Recording media: Internal Memory (approx. 22 MB), "Memory Stick Duo" Flash: Flash range (ISO sensitivity (Recommended Exposure Index) set to Auto...
... pixel number of camera: Approx. 7 201 000 pixels Lens: 3× zoom lens f = 5.8 - 17.4 mm (35 - 105 mm when converted to a 35 mm still camera) F2.8 (W) - 4.8 (T) Exposure control: Automatic exposure, Scene Selection (7 modes) White balance: Automatic, Daylight, Cloudy, Fluorescent, Incandescent, Flash File format (DCF compliant): Still images: Exif Ver. 2.21 JPEG compliant, DPOF compatible Movies: AVI (Motion JPEG) Recording media: Internal Memory (approx. 22 MB), "Memory Stick Duo" Flash: Flash range (ISO sensitivity (Recommended Exposure Index) set to Auto...
Service Manual
Page 2
..., Flash File format (DCF compliant): Still images: Exif Ver. 2.21 JPEG compliant, DPOF compatible Movies: AVI (Motion JPEG) Recording media: Internal Memory (approx. 22 MB), "Memory Stick Duo" Flash: Flash range (ISO sensitivity (Recommended Exposure Index) set to Auto): approx. 0.5 to 3.5 m (1 feet 7 3/4 inches to 11 feet 5 7/8 inches) (W)/approx. 0.5 to 2.0 m (1 feet 7 3/4 inches to 6 feet 6 3/4 inches) (T) [Input and Output connectors] (USB) A/V OUT terminal: Video, Audio (Monaural), USB communication USB communication: Hi-Speed USB (USB 2.0 compliant) [LCD screen] LCD...
..., Flash File format (DCF compliant): Still images: Exif Ver. 2.21 JPEG compliant, DPOF compatible Movies: AVI (Motion JPEG) Recording media: Internal Memory (approx. 22 MB), "Memory Stick Duo" Flash: Flash range (ISO sensitivity (Recommended Exposure Index) set to Auto): approx. 0.5 to 3.5 m (1 feet 7 3/4 inches to 11 feet 5 7/8 inches) (W)/approx. 0.5 to 2.0 m (1 feet 7 3/4 inches to 6 feet 6 3/4 inches) (T) [Input and Output connectors] (USB) A/V OUT terminal: Video, Audio (Monaural), USB communication USB communication: Hi-Speed USB (USB 2.0 compliant) [LCD screen] LCD...
Service Manual
Page 3
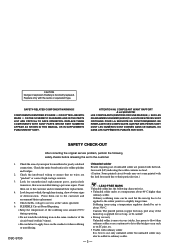
... installed during repairing. : LEAD FREE MARK Unleaded solder has the following safety checks before releasing the set to about 40 C higher than ordinary solder so use caution not to the customer. 1. SAFETY-RELATED COMPONENT WARNING!! SAFETY CHECK-OUT After correcting the original service problem, perform the following characteristics. REPLACE THESE COMPONENTS WITH SONY PARTS WHOSE PART NUMBERS APPEAR AS SHOWN IN THIS MANUAL...
... installed during repairing. : LEAD FREE MARK Unleaded solder has the following safety checks before releasing the set to about 40 C higher than ordinary solder so use caution not to the customer. 1. SAFETY-RELATED COMPONENT WARNING!! SAFETY CHECK-OUT After correcting the original service problem, perform the following characteristics. REPLACE THESE COMPONENTS WITH SONY PARTS WHOSE PART NUMBERS APPEAR AS SHOWN IN THIS MANUAL...
Service Manual
Page 5
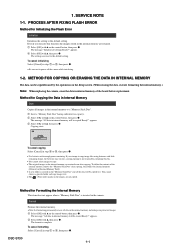
... Format Formats the internal memory. Note that formatting permanently erases all settings Ready?" DSC-S730 1-1 SERVICE NOTE 1-1. To delete the contents of the board before replacement. Method for Copying the Data in the internal memory, including even protected images. 1 Select [OK] with v on the Setup screen. (When erasing the data, execute formatting the internal memory.) Note: When replacing the camera, erase the data in the camera. The message "Initialize all data in Internal Memory Copy Copies all the data will be copied/erased by the operations on the control button, then...
... Format Formats the internal memory. Note that formatting permanently erases all settings Ready?" DSC-S730 1-1 SERVICE NOTE 1-1. To delete the contents of the board before replacement. Method for Copying the Data in the internal memory, including even protected images. 1 Select [OK] with v on the Setup screen. (When erasing the data, execute formatting the internal memory.) Note: When replacing the camera, erase the data in the camera. The message "Initialize all data in Internal Memory Copy Copies all the data will be copied/erased by the operations on the control button, then...


