Instruction Manual
Page 5
... this unit. [ Notice If static electricity or electromagnetism causes data transfer to discontinue midway (fail), restart the application or disconnect and connect the communication cable (USB, etc.) again. [ Disposal of Old Electrical & Electronic Equipment (Applicable in the EMC Directive for the recycling of electrical and electronic equipment. GB 5 By ensuring this...
... this unit. [ Notice If static electricity or electromagnetism causes data transfer to discontinue midway (fail), restart the application or disconnect and connect the communication cable (USB, etc.) again. [ Disposal of Old Electrical & Electronic Equipment (Applicable in the EMC Directive for the recycling of electrical and electronic equipment. GB 5 By ensuring this...
Instruction Manual
Page 7
... the camera on/setting the clock 11 Shooting images easily 12 Viewing/deleting images 15 Indicators on the screen 17 Changing the settings - Table of contents IMPORTANT SAFEGUARDS 2 Read this first 4 Notes on using your computer 22 GB Supported Operating Systems for USB connection and application software (supplied 22 Viewing "Cyber-shot Handbook 22...
... the camera on/setting the clock 11 Shooting images easily 12 Viewing/deleting images 15 Indicators on the screen 17 Changing the settings - Table of contents IMPORTANT SAFEGUARDS 2 Read this first 4 Notes on using your computer 22 GB Supported Operating Systems for USB connection and application software (supplied 22 Viewing "Cyber-shot Handbook 22...
Instruction Manual
Page 8
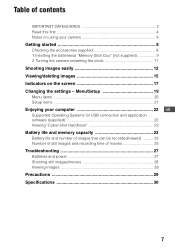
Getting started Checking the accessories supplied • LR6 (size AA) alkaline batteries (2) • Dedicated USB cable (1) • Wrist strap (1) • Dedicated A/V cable (1) • CD-ROM (Cyber-shot application software/ "Cyber-shot Handbook") (1) • Instruction Manual (this manual) (1) Attach the strap to prevent the camera from damage by being dropped, etc. Hook 8
Getting started Checking the accessories supplied • LR6 (size AA) alkaline batteries (2) • Dedicated USB cable (1) • Wrist strap (1) • Dedicated A/V cable (1) • CD-ROM (Cyber-shot application software/ "Cyber-shot Handbook") (1) • Instruction Manual (this manual) (1) Attach the strap to prevent the camera from damage by being dropped, etc. Hook 8
Instruction Manual
Page 15
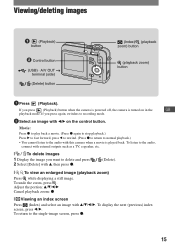
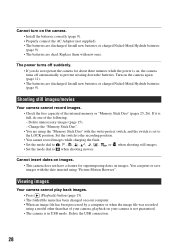
...to recording mode. 2 Select an image with b/B on in the GB playback mode. If you press (Playback) button when the camera is powered off, the camera is played back. To undo the zoom, press . Adjust the portion: v/V/b/B Cancel playback zoom: z [ Viewing an index screen... to normal playback.) • You cannot listen to delete and press 2 Select [Delete] with this camera when a movie is turned on the control button. Viewing/deleting images (Playback) button ɟ Control button (USB) · A/V OUT terminal (side) (Delete) button (Index)/ (playback zoom) button (playback zoom...
...to recording mode. 2 Select an image with b/B on in the GB playback mode. If you press (Playback) button when the camera is powered off, the camera is played back. To undo the zoom, press . Adjust the portion: v/V/b/B Cancel playback zoom: z [ Viewing an index screen... to normal playback.) • You cannot listen to delete and press 2 Select [Delete] with this camera when a movie is turned on the control button. Viewing/deleting images (Playback) button ɟ Control button (USB) · A/V OUT terminal (side) (Delete) button (Index)/ (playback zoom) button (playback zoom...
Instruction Manual
Page 16
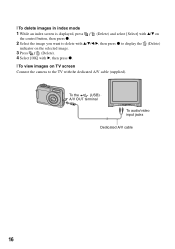
To the (USB) · A/V OUT terminal To audio/video input jacks Dedicated A/V cable 16 [ To delete images in index mode 1 While an index screen is displayed, press (Delete) and select [Select] with v/V on the control button, then press z. 2 Select the image you want to delete with v/V/b/B, then press z to display the (Delete) indicator on the selected image. 3 Press (Delete). 4 Select [OK] with B, then press z. [ To view images on TV screen Connect the camera to the TV with the dedicated A/V cable (supplied).
To the (USB) · A/V OUT terminal To audio/video input jacks Dedicated A/V cable 16 [ To delete images in index mode 1 While an index screen is displayed, press (Delete) and select [Select] with v/V on the control button, then press z. 2 Select the image you want to delete with v/V/b/B, then press z to display the (Delete) indicator on the selected image. 3 Press (Delete). 4 Select [OK] with B, then press z. [ To view images on TV screen Connect the camera to the TV with the dedicated A/V cable (supplied).
Instruction Manual
Page 21
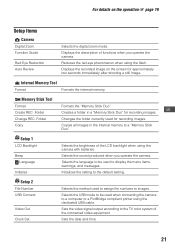
...operation 1 page 19 Setup items Camera Digital Zoom Function Guide Red Eye Reduction Auto Review Selects the digital zoom mode. Folder Changes the folder currently used to assign file numbers to a computer or a PictBridge compliant printer using the dedicated USB cable. Initializes the setting to ... Internal Memory Tool Format Formats the internal memory. Memory Stick Tool Format Create REC. Change REC. Selects the USB mode to be used when connecting the camera to images. Setup 1 LCD Backlight Beep Language Initialize Selects the brightness of functions when you operate the...
...operation 1 page 19 Setup items Camera Digital Zoom Function Guide Red Eye Reduction Auto Review Selects the digital zoom mode. Folder Changes the folder currently used to assign file numbers to a computer or a PictBridge compliant printer using the dedicated USB cable. Initializes the setting to ... Internal Memory Tool Format Formats the internal memory. Memory Stick Tool Format Create REC. Change REC. Selects the USB mode to be used when connecting the camera to images. Setup 1 LCD Backlight Beep Language Initialize Selects the brightness of functions when you operate the...
Instruction Manual
Page 22
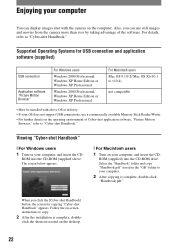
... OS X(v10.1 to v10.4) not compatible • Must be installed with the camera on your computer, and insert the CD- ROM into the CD-ROM drive. Supported Operating Systems for copying "Cyber-shot Handbook" appears. Follow the on the operating environment of the software. click the ...Turn on the desktop. 22 When you can display images shot with above OS at delivery. • If your OS does not support USB connections, use still images and movies from the camera more than ever by taking advantage of Cyber-shot application software, "Picture Motion Browser," refer to copy....
... OS X(v10.1 to v10.4) not compatible • Must be installed with the camera on your computer, and insert the CD- ROM into the CD-ROM drive. Supported Operating Systems for copying "Cyber-shot Handbook" appears. Follow the on the operating environment of the software. click the ...Turn on the desktop. 22 When you can display images shot with above OS at delivery. • If your OS does not support USB connections, use still images and movies from the camera more than ever by taking advantage of Cyber-shot application software, "Picture Motion Browser," refer to copy....
Instruction Manual
Page 28
..."Memory Stick Duo" (pages 25, 26). If it is in USB mode. Change the "Memory Stick Duo". • You are discharged. You can print or save images with the date inserted using a model other than that of your camera, playback on your computer. • When an image file has been... the mode dial to or when shooting still images. • Set the mode dial to prevent wearing down the batteries. Delete the USB connection. 28 Cannot turn on the camera. • Install the batteries correctly (page 9). • Properly connect the AC Adaptor (not supplied). • The batteries are dead. ...
..."Memory Stick Duo" (pages 25, 26). If it is in USB mode. Change the "Memory Stick Duo". • You are discharged. You can print or save images with the date inserted using a model other than that of your camera, playback on your computer. • When an image file has been... the mode dial to or when shooting still images. • Set the mode dial to prevent wearing down the batteries. Delete the USB connection. 28 Cannot turn on the camera. • Install the batteries correctly (page 9). • Properly connect the AC Adaptor (not supplied). • The batteries are dead. ...
Instruction Manual
Page 30
... 5.8 - 17.4 mm (35 - 105 mm when converted to a 35 mm still camera) F2.8 ~ 4.8 Exposure control: Automatic exposure, Scene Selection (7 modes) White balance: ... 0.5 to 2.0 m (19 3/4 inches to change without notice. Trademarks • is a trademark of Sony Corporation. • "Memory Stick", , "Memory Stick PRO", , "Memory Stick Duo", Duo", , "Memory Stick PRO ...inches) (T) [Input and Output connectors] (USB)•A/V OUT terminal: Video, Audio (Monaural), USB communication USB communication: Full-Speed USB (USB 2.0 compliant) [LCD screen] DSC-S650 LCD panel: 5.1 cm (2.0 type) TFT...
... 5.8 - 17.4 mm (35 - 105 mm when converted to a 35 mm still camera) F2.8 ~ 4.8 Exposure control: Automatic exposure, Scene Selection (7 modes) White balance: ... 0.5 to 2.0 m (19 3/4 inches to change without notice. Trademarks • is a trademark of Sony Corporation. • "Memory Stick", , "Memory Stick PRO", , "Memory Stick Duo", Duo", , "Memory Stick PRO ...inches) (T) [Input and Output connectors] (USB)•A/V OUT terminal: Video, Audio (Monaural), USB communication USB communication: Full-Speed USB (USB 2.0 compliant) [LCD screen] DSC-S650 LCD panel: 5.1 cm (2.0 type) TFT...


