
Operating Instructions
Page 3
...31/EEC This equipment complies with the EMC regulations when used under the following measures: - Never use the plug without the fuse cover. These limits are designed to correct the interference by ASTA or BSI to your nearest Sony service station. DISPOSE OF PROPERLY. If this equipment does... Center nearest you call 416-499-SONY (Canada only) Caution: Do not handle damaged or leaking lithium ion battery. Note: This equipment has been tested and found to comply with the limits for a Class B digital device, pursuant to which can be used with this equipment in this manual...
...31/EEC This equipment complies with the EMC regulations when used under the following measures: - Never use the plug without the fuse cover. These limits are designed to correct the interference by ASTA or BSI to your nearest Sony service station. DISPOSE OF PROPERLY. If this equipment does... Center nearest you call 416-499-SONY (Canada only) Caution: Do not handle damaged or leaking lithium ion battery. Note: This equipment has been tested and found to comply with the limits for a Class B digital device, pursuant to which can be used with this equipment in this manual...
Operating Instructions
Page 4
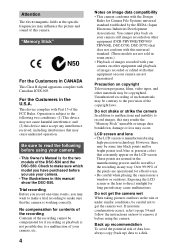
... one-time events, you have purchased before using your camera. • The illustrations in this universal standard. (These models are operational for Camera File Systems universal standard established by the JEIDA...camera, etc. 4 Notes on image data compatibility • This camera conforms with other equipment on copyright Television programs, films, video tapes, and other equipment and playback of the DSC-S30 and the DSC-S50....in CANADA This Class B digital apparatus complies with Part 15 of your camera on how to get the camera wet. "Memory Stick" N50 For the Customers in...
... one-time events, you have purchased before using your camera. • The illustrations in this universal standard. (These models are operational for Camera File Systems universal standard established by the JEIDA...camera, etc. 4 Notes on image data compatibility • This camera conforms with other equipment on copyright Television programs, films, video tapes, and other equipment and playback of the DSC-S30 and the DSC-S50....in CANADA This Class B digital apparatus complies with Part 15 of your camera on how to get the camera wet. "Memory Stick" N50 For the Customers in...

Operating Instructions
Page 5
... the "Memory Stick 15 Basic operations B Recording Recording still images 16 Recording moving images (DSC-S50 only 20 B Playback Playing back still images 21 Playing back moving images 22 Viewing images using a personal computer 24 Image file storage destinations and image files 28 Advanced operations Before performing ... control button 29 How to print (PRINT MARK 53 Additional information Precautions 54 On "Memory Sticks 55 Using your camera abroad 56 Troubleshooting 57 Warning and notice messages 61 Self-diagnosis display 62 Specifications 63 LCD screen indicators 64 Index ...
... the "Memory Stick 15 Basic operations B Recording Recording still images 16 Recording moving images (DSC-S50 only 20 B Playback Playing back still images 21 Playing back moving images 22 Viewing images using a personal computer 24 Image file storage destinations and image files 28 Advanced operations Before performing ... control button 29 How to print (PRINT MARK 53 Additional information Precautions 54 On "Memory Sticks 55 Using your camera abroad 56 Troubleshooting 57 Warning and notice messages 61 Self-diagnosis display 62 Specifications 63 LCD screen indicators 64 Index ...
Operating Instructions
Page 6
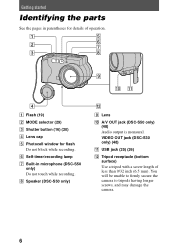
... block while recording. H Speaker (DSC-S50 only) qs I Lens J A/V OUT jack (DSC-S50 only) (48) Audio output is monaural. You will be unable to firmly secure the camera to tripods having longer screws, and may damage the camera. 6 VIDEO OUT jack (DSC-S30 only) (48) K USB jack (25) (26) L Tripod receptacle (bottom surface) Use a tripod with a screw length...
... block while recording. H Speaker (DSC-S50 only) qs I Lens J A/V OUT jack (DSC-S50 only) (48) Audio output is monaural. You will be unable to firmly secure the camera to tripods having longer screws, and may damage the camera. 6 VIDEO OUT jack (DSC-S30 only) (48) K USB jack (25) (26) L Tripod receptacle (bottom surface) Use a tripod with a screw length...
Operating Instructions
Page 7
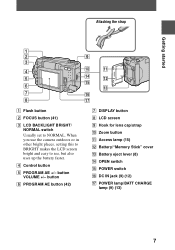
... (15) L Battery/"Memory Stick" cover M Battery eject lever (8) N OPEN switch O POWER switch P DC IN jack (9) (12) Q POWER lamp/BATT CHARGE lamp (9) (13) 7 When you use the camera outdoors or in other bright places, setting this to BRIGHT makes the LCD screen bright and easy to NORMAL. Getting started Attaching the strap 1 2 9 3 0 qa...
... (15) L Battery/"Memory Stick" cover M Battery eject lever (8) N OPEN switch O POWER switch P DC IN jack (9) (12) Q POWER lamp/BATT CHARGE lamp (9) (13) 7 When you use the camera outdoors or in other bright places, setting this to BRIGHT makes the LCD screen bright and easy to NORMAL. Getting started Attaching the strap 1 2 9 3 0 qa...
Operating Instructions
Page 8
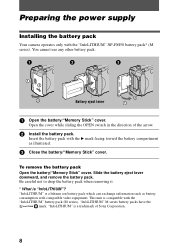
... battery pack. Preparing the power supply Installing the battery pack Your camera operates only with the "InfoLITHIUM" battery pack (M series). "InfoLITHIUM" is "InfoLITHIUM"? You cannot use any other battery pack. Open the cover while sliding the OPEN switch in the direction of Sony Corporation. 8 This unit is a lithium ion battery pack which can...
... battery pack. Preparing the power supply Installing the battery pack Your camera operates only with the "InfoLITHIUM" battery pack (M series). "InfoLITHIUM" is "InfoLITHIUM"? You cannot use any other battery pack. Open the cover while sliding the OPEN switch in the direction of Sony Corporation. 8 This unit is a lithium ion battery pack which can...
Operating Instructions
Page 9
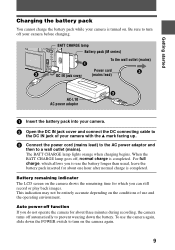
...AC power adaptor 1 Insert the battery pack into your camera. 2 Open the DC IN jack cover and connect the DC connecting cable to the DC IN jack of use and the operating environment. Battery remaining indicator The LCD screen on the camera again. 9 The BATT CHARGE lamp lights orange when ...charging begins. For full charge, which you to use the camera again, slide down the POWER switch to prevent wearing...
...AC power adaptor 1 Insert the battery pack into your camera. 2 Open the DC IN jack cover and connect the DC connecting cable to the DC IN jack of use and the operating environment. Battery remaining indicator The LCD screen on the camera again. 9 The BATT CHARGE lamp lights orange when ...charging begins. For full charge, which you to use the camera again, slide down the POWER switch to prevent wearing...
Operating Instructions
Page 10
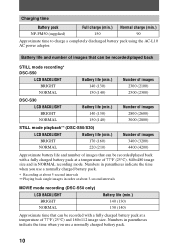
... (supplied) 150 90 Approximate time to charge a completely discharged battery pack using the AC-L10 AC power adaptor. Battery life and number of images that can be recorded/played back STILL mode recording* DSC-S50 LCD BACKLIGHT BRIGHT NORMAL Battery life (min.) 140 (130) 150 (140...image size and in parentheses indicate the time when you use a normally charged battery pack. ∗ Recording at about 5-second intervals ∗∗ Playing back single images in order at about 3-second intervals MOVIE mode recording (DSC-S50 only) LCD BACKLIGHT BRIGHT NORMAL Battery life (min.) 140...
... (supplied) 150 90 Approximate time to charge a completely discharged battery pack using the AC-L10 AC power adaptor. Battery life and number of images that can be recorded/played back STILL mode recording* DSC-S50 LCD BACKLIGHT BRIGHT NORMAL Battery life (min.) 140 (130) 150 (140...image size and in parentheses indicate the time when you use a normally charged battery pack. ∗ Recording at about 5-second intervals ∗∗ Playing back single images in order at about 3-second intervals MOVIE mode recording (DSC-S50 only) LCD BACKLIGHT BRIGHT NORMAL Battery life (min.) 140...

Operating Instructions
Page 11
...; Do not short the DC plug of the "Memory Stick" is limited. The above figures are a guide when you use your camera at low temperatures, use the flash, repeatedly turn the power on/off or use the zoom. • The capacity of the AC power adaptor with a metallic object, as this may cause malfunction...
...; Do not short the DC plug of the "Memory Stick" is limited. The above figures are a guide when you use your camera at low temperatures, use the flash, repeatedly turn the power on/off or use the zoom. • The capacity of the AC power adaptor with a metallic object, as this may cause malfunction...

Operating Instructions
Page 12
Using a car battery Use Sony DC adaptor/charger. 12 Using the AC power adaptor DC IN jack cover To the wall outlet (mains) Power cord (mains lead) AC-L10 AC power adaptor 1 Open the DC IN jack cover and connect the DC connecting cable to the DC IN jack of your camera with the v mark facing up. 2 Connect the power cord (mains lead) to the AC power adaptor and then to a wall outlet (mains).
Using a car battery Use Sony DC adaptor/charger. 12 Using the AC power adaptor DC IN jack cover To the wall outlet (mains) Power cord (mains lead) AC-L10 AC power adaptor 1 Open the DC IN jack cover and connect the DC connecting cable to the DC IN jack of your camera with the v mark facing up. 2 Connect the power cord (mains lead) to the AC power adaptor and then to a wall outlet (mains).

Operating Instructions
Page 13
The menu bar appears on the LCD screen. 3 Select [SETUP] with B on the control button, then press the center z. 4 Select [CLOCK SET] with v/V on the control button. The POWER lamp lights up. 2 Press v on the control button, then press the center z. 13 Control button POWER lamp 1 Slide down the POWER switch to turn on the power. Getting started Setting the date and time When you turn on your camera, set the date and time. If these are not set, the CLOCK SET screen appears whenever you first use your camera for recording.
The menu bar appears on the LCD screen. 3 Select [SETUP] with B on the control button, then press the center z. 4 Select [CLOCK SET] with v/V on the control button. The POWER lamp lights up. 2 Press v on the control button, then press the center z. 13 Control button POWER lamp 1 Slide down the POWER switch to turn on the power. Getting started Setting the date and time When you turn on your camera, set the date and time. If these are not set, the CLOCK SET screen appears whenever you first use your camera for recording.
Operating Instructions
Page 17
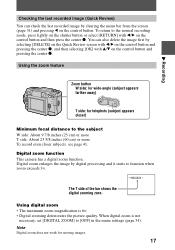
...zoom feature Zoom button W side: for wide-angle (subject appears farther away) T side: for moving images. 17 Using digital zoom • The maximum zoom magnification is not necessary, set [DIGITAL ZOOM] to the subject W side: About 9 7/8 inches (25 cm) or more T side: About 23 ... button or select [RETURN] with v/V on the control button and then press the center z. Digital zoom function This camera has a digital zoom function. When digital zoom is 6×. • Digital zooming deteriorates the picture quality. B Recording Checking the last recorded image (Quick Review) You can...
...zoom feature Zoom button W side: for wide-angle (subject appears farther away) T side: for moving images. 17 Using digital zoom • The maximum zoom magnification is not necessary, set [DIGITAL ZOOM] to the subject W side: About 9 7/8 inches (25 cm) or more T side: About 23 ... button or select [RETURN] with v/V on the control button and then press the center z. Digital zoom function This camera has a digital zoom function. When digital zoom is 6×. • Digital zooming deteriorates the picture quality. B Recording Checking the last recorded image (Quick Review) You can...
Operating Instructions
Page 18
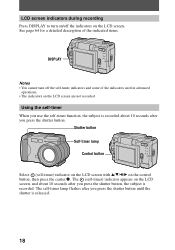
...-timer When you use the self-timer function, the subject is recorded about 10 seconds after you press the shutter button. Shutter button Self-timer lamp Control button Select (.... DISPLAY Notes • You cannot turn off the indicators on the LCD screen are not recorded. See page 64 for a detailed description of the indicators used in advanced operations. • The indicators on the LCD screen.
...-timer When you use the self-timer function, the subject is recorded about 10 seconds after you press the shutter button. Shutter button Self-timer lamp Control button Select (.... DISPLAY Notes • You cannot turn off the indicators on the LCD screen are not recorded. See page 64 for a detailed description of the indicators used in advanced operations. • The indicators on the LCD screen.
Operating Instructions
Page 19
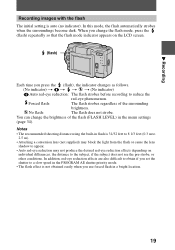
When you change the brightness of the surrounding brightness. No flash: The flash does not strobe. Notes • The recommended shooting distance using the built-in flash is 31/32 feet to 8 1/3 feet (0.3 m to 2.5 m). • Attaching a conversion lens (not supplied) may block the light from the flash or ... you set the shutter to reduce the red-eye phenomenon. B Recording Recording images with the flash The initial setting is not obtained easily when you use forced flash in a bright location. 19
When you change the brightness of the surrounding brightness. No flash: The flash does not strobe. Notes • The recommended shooting distance using the built-in flash is 31/32 feet to 8 1/3 feet (0.3 m to 2.5 m). • Attaching a conversion lens (not supplied) may block the light from the flash or ... you set the shutter to reduce the red-eye phenomenon. B Recording Recording images with the flash The initial setting is not obtained easily when you use forced flash in a bright location. 19

Operating Instructions
Page 20
... and sound are recorded in MPEG format. Recording moving images, slide the POWER switch down . These indicators are recorded on the "Memory Stick." Zooming or using the self-timer, etc. See page 64 for five seconds. You can change the recording time to [320×240], the maximum recording time is...
... and sound are recorded in MPEG format. Recording moving images, slide the POWER switch down . These indicators are recorded on the "Memory Stick." Zooming or using the self-timer, etc. See page 64 for five seconds. You can change the recording time to [320×240], the maximum recording time is...
Operating Instructions
Page 24
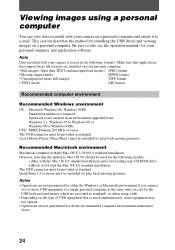
... are provided as standard. CPU: MMX Pentium 200 MHz or faster The USB connector must be provided as standard), or when using a personal computer You can view data recorded with your camera on a personal computer. This section describes the method for your personal computer and application software. Operation is stored in an...
... are provided as standard. CPU: MMX Pentium 200 MHz or faster The USB connector must be provided as standard), or when using a personal computer You can view data recorded with your camera on a personal computer. This section describes the method for your personal computer and application software. Operation is stored in an...
Operating Instructions
Page 25
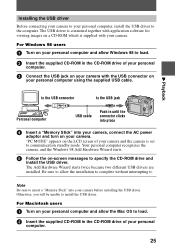
...Insert the supplied CD-ROM in the CD-ROM drive of your camera. For Windows 98 users 1 Turn on your camera with your camera before installing the USB driver. For Macintosh users 1 Turn on your personal computer using the supplied USB cable. The USB driver is contained together with ...application software for viewing images on a CD-ROM which is set to communication standby mode. Your personal computer recognizes the camera, and the Windows 98 Add Hardware Wizard ...
...Insert the supplied CD-ROM in the CD-ROM drive of your camera. For Windows 98 users 1 Turn on your camera with your camera before installing the USB driver. For Macintosh users 1 Turn on your personal computer using the supplied USB cable. The USB driver is contained together with ...application software for viewing images on a CD-ROM which is set to communication standby mode. Your personal computer recognizes the camera, and the Windows 98 Add Hardware Wizard ...
Operating Instructions
Page 27
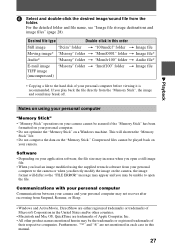
...appear and you may not recover after recovering from your camera. Communications with your personal computer Communications between your camera and your personal computer may be unable to the camera or when you load an image modified using your personal computer "Memory Stick" • "Memory... Stick" operations on your camera cannot be the trademarks or registered trademarks...
...appear and you may not recover after recovering from your camera. Communications with your personal computer Communications between your camera and your personal computer may be unable to the camera or when you load an image modified using your personal computer "Memory Stick" • "Memory... Stick" operations on your camera cannot be the trademarks or registered trademarks...
Operating Instructions
Page 29
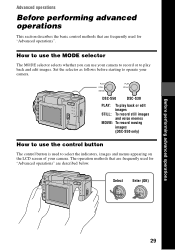
... screen of your camera. How to use the MODE selector The MODE selector selects whether you can use your camera to record or to play back or edit images STILL: To record still images and voice memos MOVIE: To record moving images (DSC-S50 only) How to use the control button... The control button is used to operate your camera. Advanced operations Before performing advanced operations This section describes the basic control methods that are described ...
... screen of your camera. How to use the MODE selector The MODE selector selects whether you can use your camera to record or to play back or edit images STILL: To record still images and voice memos MOVIE: To record moving images (DSC-S50 only) How to use the control button... The control button is used to operate your camera. Advanced operations Before performing advanced operations This section describes the basic control methods that are described ...
Operating Instructions
Page 34
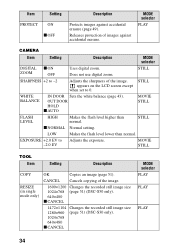
...DSC-S50 only). 640×480 x CANCEL 1472×1104 Changes the recorded still image size 1280×960 (page 51) (DSC-S30 only). 1024×768 640×480 x CANCEL MODE selector PLAY PLAY PLAY 34 WHITE BALANCE IN DOOR Sets the white balance (page 43). Does not use digital... images against accidental erasure. STILL LOW Makes the flash level lower than normal. MODE selector PLAY CAMERA Item Setting Description MODE selector DIGITAL x ON ZOOM OFF Uses digital zoom. EXPOSURE +2.0 EV to 0. Releases protection of images against accidental erasure (page 49). STILL...
...DSC-S50 only). 640×480 x CANCEL 1472×1104 Changes the recorded still image size 1280×960 (page 51) (DSC-S30 only). 1024×768 640×480 x CANCEL MODE selector PLAY PLAY PLAY 34 WHITE BALANCE IN DOOR Sets the white balance (page 43). Does not use digital... images against accidental erasure. STILL LOW Makes the flash level lower than normal. MODE selector PLAY CAMERA Item Setting Description MODE selector DIGITAL x ON ZOOM OFF Uses digital zoom. EXPOSURE +2.0 EV to 0. Releases protection of images against accidental erasure (page 49). STILL...

