Cyber-shot® Handbook
Page 3
..., see page 88. Note that you use (sold separately). These dots are not actual images shot using this manual, the term "Memory Stick Duo" media is brought directly from a cold to a warm location, moisture may condense ...camera: "Memory Stick PRO Duo" media, "Memory Stick PRO-HG Duo" media, "Memory Stick Duo" media, SD memory card and SDHC memory card. "Memory Stick Duo" media Adaptor Notes on the LCD screen and lens • The LCD screen is manufactured using extremely high-precision technology so over 99.99% of the pixels are of the DSC-S2100 unless noted otherwise. "Memory...
..., see page 88. Note that you use (sold separately). These dots are not actual images shot using this manual, the term "Memory Stick Duo" media is brought directly from a cold to a warm location, moisture may condense ...camera: "Memory Stick PRO Duo" media, "Memory Stick PRO-HG Duo" media, "Memory Stick Duo" media, SD memory card and SDHC memory card. "Memory Stick Duo" media Adaptor Notes on the LCD screen and lens • The LCD screen is manufactured using extremely high-precision technology so over 99.99% of the pixels are of the DSC-S2100 unless noted otherwise. "Memory...
Cyber-shot® Handbook
Page 9
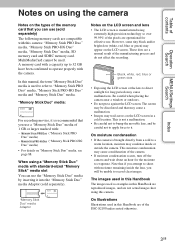
... z on the screen. Index 9GB Control button (Playback) MENU button button Menu items (Easy Mode) (Slideshow) (Retouch) (Delete) (Protect) DPOF (Print) (Rotate) (Select Folder) (Settings) Memory card Internal Memory - -
... z on the screen. Index 9GB Control button (Playback) MENU button button Menu items (Easy Mode) (Slideshow) (Retouch) (Delete) (Protect) DPOF (Print) (Rotate) (Select Folder) (Settings) Memory card Internal Memory - -
Cyber-shot® Handbook
Page 10
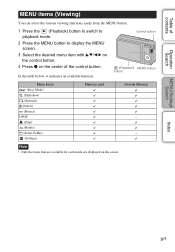
... z. 4 Select the desired setting, then press z. Control button MENU button Categories Shooting Settings Main Settings Memory Card Tool Internal Memory Tool Clock Settings Items Grid Line Digital Zoom Red Eye Reduction Beep Language Setting Function Guide Power Save Initialize USB Connect LUN Settings Format Create REC... Setting Notes • [Shooting Settings] appears only when settings have been entered from shooting mode. • [Memory Card Tool] appears only when a memory card is inserted in the camera, while [Internal Memory Tool] appears only when a memory card is not inserted.
... z. 4 Select the desired setting, then press z. Control button MENU button Categories Shooting Settings Main Settings Memory Card Tool Internal Memory Tool Clock Settings Items Grid Line Digital Zoom Red Eye Reduction Beep Language Setting Function Guide Power Save Initialize USB Connect LUN Settings Format Create REC... Setting Notes • [Shooting Settings] appears only when settings have been entered from shooting mode. • [Memory Card Tool] appears only when a memory card is inserted in the camera, while [Internal Memory Tool] appears only when a memory card is not inserted.
Cyber-shot® Handbook
Page 11
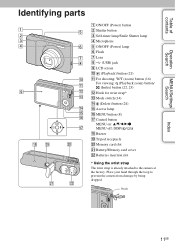
...O Access lamp P MENU button (8) Q Control button MENU on: v/V/b/B/z MENU off: DISP/ / / R Buzzer S Tripod receptacle T Memory card slot U Battery/Memory card cover V Batteries insertion slot * Using the wrist strap The wrist strap is already attached to prevent the camera from damage by being dropped. Place your hand through the loop to the... camera at the factory. qa qs qd qf qg qh qj w;...
...O Access lamp P MENU button (8) Q Control button MENU on: v/V/b/B/z MENU off: DISP/ / / R Buzzer S Tripod receptacle T Memory card slot U Battery/Memory card cover V Batteries insertion slot * Using the wrist strap The wrist strap is already attached to prevent the camera from damage by being dropped. Place your hand through the loop to the... camera at the factory. qa qs qd qf qg qh qj w;...
Cyber-shot® Handbook
Page 13
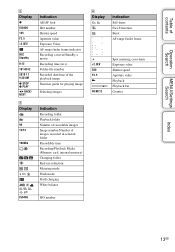
... Selecting images Indication Recording folder Playback folder Number of recordable images Image number/Number of images recorded in selected folder Recordable time Recording/Playback Media (Memory card, internal memory) Changing folder Red-eye reduction Metering mode Flash mode Flash charging White balance D Display +2.0EV 500 F3.5 N 00:00:12 Indication Self-timer Face...
... Selecting images Indication Recording folder Playback folder Number of recordable images Image number/Number of images recorded in selected folder Recordable time Recording/Playback Media (Memory card, internal memory) Changing folder Red-eye reduction Metering mode Flash mode Flash charging White balance D Display +2.0EV 500 F3.5 N 00:00:12 Indication Self-timer Face...
Cyber-shot® Handbook
Page 15
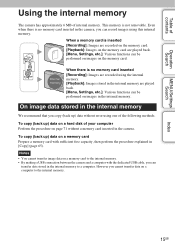
...can be performed on images on the memory card. memory [Playback]: Images stored in the camera. This memory is inserted [Recording]: Images are recorded using the internal B Internal memory. Notes • You cannot transfer image data on a memory card Prepare a memory card with the dedicated USB cable, you...back up ) data on a hard disk of internal memory. When a memory card is not removable. To copy (back up ) data on a memory card to the internal memory. • By making a USB connection between the camera and a computer with sufficient free capacity, then perform ...
...can be performed on images on the memory card. memory [Playback]: Images stored in the camera. This memory is inserted [Recording]: Images are recorded using the internal B Internal memory. Notes • You cannot transfer image data on a memory card Prepare a memory card with the dedicated USB cable, you...back up ) data on a hard disk of internal memory. When a memory card is not removable. To copy (back up ) data on a memory card to the internal memory. • By making a USB connection between the camera and a computer with sufficient free capacity, then perform ...
Cyber-shot® Handbook
Page 19
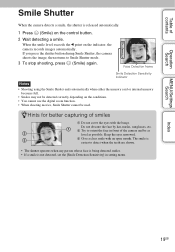
... • Shooting using the Smile Shutter ends automatically when either the memory card or internal memory becomes full. • Smiles may not be detected correctly depending on the conditions. • You cannot use the digital zoom function. • When shooting movies, Smile Shutter cannot be as... when any person whose face is being detected smiles. • If a smile is released automatically. 1 Press (Smile) on the indicator, the camera records images automatically. Keep the eyes narrowed. 3 Give a clear smile with the bangs. The smile is easier to Smile Shutter mode. 3 To...
... • Shooting using the Smile Shutter ends automatically when either the memory card or internal memory becomes full. • Smiles may not be detected correctly depending on the conditions. • You cannot use the digital zoom function. • When shooting movies, Smile Shutter cannot be as... when any person whose face is being detected smiles. • If a smile is released automatically. 1 Press (Smile) on the indicator, the camera records images automatically. Keep the eyes narrowed. 3 Give a clear smile with the bangs. The smile is easier to Smile Shutter mode. 3 To...

Cyber-shot® Handbook
Page 35
...; The recording interval becomes longer, depending on the setting for the image size. • When the battery level is low, or when the internal memory or the memory card is set to 100 images in Movie Mode, Smile Shutter or Easy Mode. • The flash is full, the Burst stops. • The focus...
...; The recording interval becomes longer, depending on the setting for the image size. • When the battery level is low, or when the internal memory or the memory card is set to 100 images in Movie Mode, Smile Shutter or Easy Mode. • The flash is full, the Burst stops. • The focus...

Cyber-shot® Handbook
Page 48
... for registered images. 1 Press the 2 MENU t (Playback) button to switch to be added to movies or to images in the internal memory. • You can select and order printing multiple images. Repeat the above steps until there are no more images to playback mode. You can...1Select an image then press z. MENU/Settings Search Index 48GB Table of contents Operation Search DPOF DPOF (Digital Print Order Format) is a function that allows you to specify the images of the memory card that you want to a maximum 999 images. Do as when making a mark. The mark disappears ...
... for registered images. 1 Press the 2 MENU t (Playback) button to switch to be added to movies or to images in the internal memory. • You can select and order printing multiple images. Repeat the above steps until there are no more images to playback mode. You can...1Select an image then press z. MENU/Settings Search Index 48GB Table of contents Operation Search DPOF DPOF (Digital Print Order Format) is a function that allows you to specify the images of the memory card that you want to a maximum 999 images. Do as when making a mark. The mark disappears ...
Cyber-shot® Handbook
Page 50
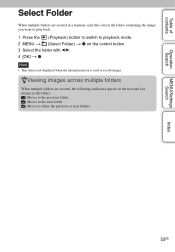
zViewing images across multiple folders When multiple folders are created in a memory card, this selects the folder containing the image you want to play back. 1 Press the (Playback) button to switch to playback mode. 2 MENU t (Select Folder) t z on ... are created, the following indicators appear on the control button 3 Select the folder with b/B. 4 [OK] t z Note • This item is not displayed when the internal memory is used to either the previous or next folders 50GB
zViewing images across multiple folders When multiple folders are created in a memory card, this selects the folder containing the image you want to play back. 1 Press the (Playback) button to switch to playback mode. 2 MENU t (Select Folder) t z on ... are created, the following indicators appear on the control button 3 Select the folder with b/B. 4 [OK] t z Note • This item is not displayed when the internal memory is used to either the previous or next folders 50GB
Cyber-shot® Handbook
Page 60
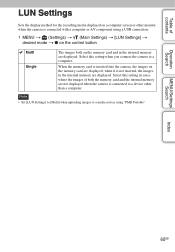
.... 1 MENU t (Settings) t (Main Settings) t [LUN Settings] t desired mode t z on the control button Multi Single The images both on the memory card are displayed; when it is inserted into the camera, the images on the memory card and in cases where the images of contents Operation Search LUN Settings Sets the display method for the recording...
.... 1 MENU t (Settings) t (Main Settings) t [LUN Settings] t desired mode t z on the control button Multi Single The images both on the memory card are displayed; when it is inserted into the camera, the images on the memory card and in cases where the images of contents Operation Search LUN Settings Sets the display method for the recording...
Cyber-shot® Handbook
Page 61
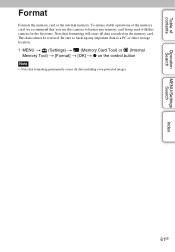
... MENU/Settings Search Index Format Formats the memory card or the internal memory. Be sure to back-up any memory card being used with this camera to format any important data to a PC or other storage location. 1 MENU t (Settings) t (Memory Card Tool) or (Internal Memory Tool) t [Format] t [OK] t z on the memory card. Table of the memory card, we recommend that you use this...
... MENU/Settings Search Index Format Formats the memory card or the internal memory. Be sure to back-up any memory card being used with this camera to format any important data to a PC or other storage location. 1 MENU t (Settings) t (Memory Card Tool) or (Internal Memory Tool) t [Format] t [OK] t z on the memory card. Table of the memory card, we recommend that you use this...
Cyber-shot® Handbook
Page 62
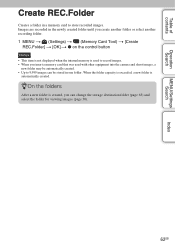
...folder or select another recording folder. 1 MENU t (Settings) t (Memory Card Tool) t [Create REC.Folder] t [OK] t z on the control button Notes • This item is not displayed when the internal memory is used with other equipment into the camera and shoot images, a new folder may be automatically created. •... Up to 9,999 images can be stored in a memory card to record images. • When you can change the...
...folder or select another recording folder. 1 MENU t (Settings) t (Memory Card Tool) t [Create REC.Folder] t [OK] t z on the control button Notes • This item is not displayed when the internal memory is used with other equipment into the camera and shoot images, a new folder may be automatically created. •... Up to 9,999 images can be stored in a memory card to record images. • When you can change the...

Cyber-shot® Handbook
Page 63
Table of contents Change REC.Folder Changes the folder in the memory card that is currently used to store recorded images. 1 MENU t (Settings) t REC.Folder] (Memory Card Tool) t [Change 2 Select a folder with b/B on the control button. 3 [OK] t z Notes • This item is not displayed when the internal memory is used to record images. • You cannot select the "100" folder as a recording folder. • You cannot move recorded images to another folder. Operation Search MENU/Settings Search Index 63GB
Table of contents Change REC.Folder Changes the folder in the memory card that is currently used to store recorded images. 1 MENU t (Settings) t REC.Folder] (Memory Card Tool) t [Change 2 Select a folder with b/B on the control button. 3 [OK] t z Notes • This item is not displayed when the internal memory is used to record images. • You cannot select the "100" folder as a recording folder. • You cannot move recorded images to another folder. Operation Search MENU/Settings Search Index 63GB
Cyber-shot® Handbook
Page 64
... images. 1 MENU t (Settings) t REC.Folder] (Memory Card Tool) t [Delete 2 Select a folder with b/B on the control button. 3 [OK] t z Notes • This item is not displayed when the internal memory is selected as the recording folder using [Delete REC.Folder], the folder that cannot be played back by the camera, first delete these images and files...
... images. 1 MENU t (Settings) t REC.Folder] (Memory Card Tool) t [Delete 2 Select a folder with b/B on the control button. 3 [OK] t z Notes • This item is not displayed when the internal memory is selected as the recording folder using [Delete REC.Folder], the folder that cannot be played back by the camera, first delete these images and files...
Cyber-shot® Handbook
Page 65
.... Table of the internal memory, remove the memory card after copying, then format the internal memory ([Format] in [Internal Memory Tool]). • A new folder is created on the memory card and all images in the internal memory to a memory card. 1 Insert a memory card with sufficient free capacity into the camera. 2 MENU t (Settings) t t z on the control button (Memory Card Tool) t [Copy] ... contents of contents Copy Copies all the data will be copied individually. • The original images in the internal memory are retained even after copying. If you attempt to it .
.... Table of the internal memory, remove the memory card after copying, then format the internal memory ([Format] in [Internal Memory Tool]). • A new folder is created on the memory card and all images in the internal memory to a memory card. 1 Insert a memory card with sufficient free capacity into the camera. 2 MENU t (Settings) t t z on the control button (Memory Card Tool) t [Copy] ... contents of contents Copy Copies all the data will be copied individually. • The original images in the internal memory are retained even after copying. If you attempt to it .
Cyber-shot® Handbook
Page 66
... Number] t desired mode t z on the control button Series Reset Assigns numbers to files in sequence even if the recording folder or the memory card is changed. (When the replaced memory card contains a file with a number higher than the last assigned number, a number one higher than the largest number is assigned.) Starts from 0001 each...
... Number] t desired mode t z on the control button Series Reset Assigns numbers to files in sequence even if the recording folder or the memory card is changed. (When the replaced memory card contains a file with a number higher than the last assigned number, a number one higher than the largest number is assigned.) Starts from 0001 each...
Cyber-shot® Handbook
Page 70
Table of contents Operation Search MENU/Settings Search Index zIntroduction to "PMB" • "PMB" allows you to import images shot with CD or DVD disc-writing drive. • You can upload images to media services. (An internet connection environment is required.) ...Red Eye Reduction, etc.) still images, and change the shooting date and time. • You can be exported to a computer for display. Make a USB connection between the camera and your computer, and click [Import]. • Images on a computer can create discs with the camera to a memory card, and displayed on a computer...
Table of contents Operation Search MENU/Settings Search Index zIntroduction to "PMB" • "PMB" allows you to import images shot with CD or DVD disc-writing drive. • You can upload images to media services. (An internet connection environment is required.) ...Red Eye Reduction, etc.) still images, and change the shooting date and time. • You can be exported to a computer for display. Make a USB connection between the camera and your computer, and click [Import]. • Images on a computer can create discs with the camera to a memory card, and displayed on a computer...
Cyber-shot® Handbook
Page 72
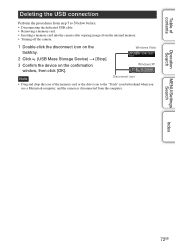
..., then click [OK]. MENU/Settings Search Index 72GB Windows Vista 2 Click (USB Mass Storage Device) t [Stop]. 3 Confirm the device on the tasktray. Table of the memory card or the drive icon to 3 below before: • Disconnecting the dedicated USB cable. • Removing a memory card. • Inserting a memory card into the camera after copying images from the computer.
..., then click [OK]. MENU/Settings Search Index 72GB Windows Vista 2 Click (USB Mass Storage Device) t [Stop]. 3 Confirm the device on the tasktray. Table of the memory card or the drive icon to 3 below before: • Disconnecting the dedicated USB cable. • Removing a memory card. • Inserting a memory card into the camera after copying images from the computer.
Cyber-shot® Handbook
Page 75
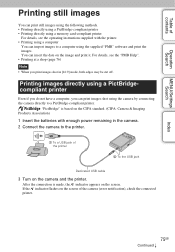
...screen. Printing images directly using a PictBridgecompliant printer Even if you do not have a computer, you print images shot in the camera. 2 Connect the camera to the printer. 1 To a USB jack of the printer 2 To the USB jack Dedicated USB cable 3 Turn on ... be cut off. Table of contents Operation Search MENU/Settings Search Printing still images You can print still images using the following methods. • Printing directly using a PictBridge-compliant printer • Printing directly using a memory card-compliant printer For details, see the "PMB Help". • Printing at...
...screen. Printing images directly using a PictBridgecompliant printer Even if you do not have a computer, you print images shot in the camera. 2 Connect the camera to the printer. 1 To a USB jack of the printer 2 To the USB jack Dedicated USB cable 3 Turn on ... be cut off. Table of contents Operation Search MENU/Settings Search Printing still images You can print still images using the following methods. • Printing directly using a PictBridge-compliant printer • Printing directly using a memory card-compliant printer For details, see the "PMB Help". • Printing at...


