Cyber-shot® Handbook
Page 1
Table of contents Operation Search MENU/Settings Search Index Cyber-shot Handbook DSC-S2000/S2100 © 2010 Sony Corporation GB 4-166-207-11(1)
Table of contents Operation Search MENU/Settings Search Index Cyber-shot Handbook DSC-S2000/S2100 © 2010 Sony Corporation GB 4-166-207-11(1)
Cyber-shot® Handbook
Page 2
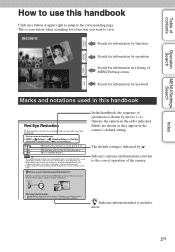
... to the correct operation of operations is useful to the corresponding page. Indicates cautions and limitations relevant to use this handbook, the sequence of the camera. Table of contents Table of MENU/Settings items. Search for information by function. This is indicated by . Search for information by operation. Marks ...order indicated. Search for information in this handbook In this handbook Click on a button at upper right to jump to know. 2GB Operate the camera in the camera's default setting. The default setting is convenient when searching for information by keyword.
... to the correct operation of operations is useful to the corresponding page. Indicates cautions and limitations relevant to use this handbook, the sequence of the camera. Table of contents Table of MENU/Settings items. Search for information by function. This is indicated by . Search for information by operation. Marks ...order indicated. Search for information in this handbook In this handbook Click on a button at upper right to jump to know. 2GB Operate the camera in the camera's default setting. The default setting is convenient when searching for information by keyword.
Cyber-shot® Handbook
Page 3
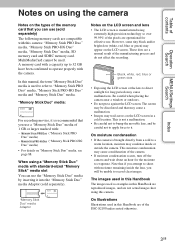
..." media by inserting it . "Memory Stick Duo" media: For recording movies, it is manufactured using a "Memory Stick Duo" media with the camera. Black, white, red, blue or green dots • Exposing the LCD screen or the lens to record clear images. Index 3GB This moisture ... separately). When using extremely high-precision technology so over 99.99% of the pixels are not actual images shot using this Handbook are a normal result of the DSC-S2100 unless noted otherwise. The images used in this Handbook The images used in this Handbook are reproduced images, and...
..." media by inserting it . "Memory Stick Duo" media: For recording movies, it is manufactured using a "Memory Stick Duo" media with the camera. Black, white, red, blue or green dots • Exposing the LCD screen or the lens to record clear images. Index 3GB This moisture ... separately). When using extremely high-precision technology so over 99.99% of the pixels are not actual images shot using this Handbook are a normal result of the DSC-S2100 unless noted otherwise. The images used in this Handbook The images used in this Handbook are reproduced images, and...

Cyber-shot® Handbook
Page 4
Table of contents Table of contents Operation Search MENU/Settings Search Index Notes on using the camera How to use this handbook 2 Notes on using the camera 3 Operation Search 6 MENU/Settings Search 8 Identifying parts 11 List of icons displayed on the screen 12 Using the mode switch 14 Using the internal memory 15 Shooting Zoom 16 DISP (Screen Display Settings 17 Flash 18 Smile Shutter 19 Self-Timer 20 Viewing Viewing still images 21 Playback zoom 22 Image Index 23 Delete 24 Viewing movies 25 MENU (Shooting) MENU items (Shooting 8 4GB
Table of contents Table of contents Operation Search MENU/Settings Search Index Notes on using the camera How to use this handbook 2 Notes on using the camera 3 Operation Search 6 MENU/Settings Search 8 Identifying parts 11 List of icons displayed on the screen 12 Using the mode switch 14 Using the internal memory 15 Shooting Zoom 16 DISP (Screen Display Settings 17 Flash 18 Smile Shutter 19 Self-Timer 20 Viewing Viewing still images 21 Playback zoom 22 Image Index 23 Delete 24 Viewing movies 25 MENU (Shooting) MENU items (Shooting 8 4GB
Cyber-shot® Handbook
Page 5
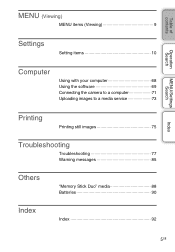
Table of contents Operation Search MENU/Settings Search MENU (Viewing) MENU items (Viewing 9 Settings Setting items 10 Computer Using with your computer 68 Using the software 69 Connecting the camera to a computer 71 Uploading images to a media service 73 Printing Printing still images 75 Troubleshooting Troubleshooting 77 Warning messages 85 Others "Memory Stick Duo" media 88 Batteries 90 Index Index 92 Index 5GB
Table of contents Operation Search MENU/Settings Search MENU (Viewing) MENU items (Viewing 9 Settings Setting items 10 Computer Using with your computer 68 Using the software 69 Connecting the camera to a computer 71 Uploading images to a media service 73 Printing Printing still images 75 Troubleshooting Troubleshooting 77 Warning messages 85 Others "Memory Stick Duo" media 88 Batteries 90 Index Index 92 Index 5GB
Cyber-shot® Handbook
Page 6
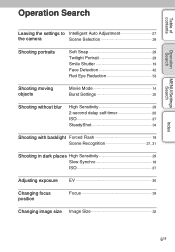
Table of contents Operation Search MENU/Settings Search Operation Search Leaving the settings to Intelligent Auto Adjustment 27 the camera Scene Selection 29 Shooting portraits Soft Snap 29 Twilight Portrait 29 Smile Shutter 19 Face Detection 42 Red Eye Reduction 53 Shooting moving objects Movie ...
Table of contents Operation Search MENU/Settings Search Operation Search Leaving the settings to Intelligent Auto Adjustment 27 the camera Scene Selection 29 Shooting portraits Soft Snap 29 Twilight Portrait 29 Smile Shutter 19 Face Detection 42 Red Eye Reduction 53 Shooting moving objects Movie ...
Cyber-shot® Handbook
Page 7
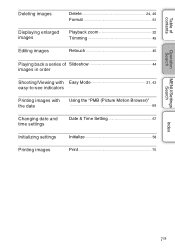
Table of contents Operation Search MENU/Settings Search Deleting images Delete 24, 46 Format 61 Displaying enlarged images Playback zoom 22 Trimming 45 Editing images Retouch 45 Playing back a series of Slideshow 44 images in order Shooting/Viewing with Easy Mode 31, 43 easy-to-see indicators Printing images with the date Using the "PMB (Picture Motion Browser)" 69 Changing date and time settings Date & Time Setting 67 Initializing settings Printing images Initialize 58 Print 75 Index 7GB
Table of contents Operation Search MENU/Settings Search Deleting images Delete 24, 46 Format 61 Displaying enlarged images Playback zoom 22 Trimming 45 Editing images Retouch 45 Playing back a series of Slideshow 44 images in order Shooting/Viewing with Easy Mode 31, 43 easy-to-see indicators Printing images with the date Using the "PMB (Picture Motion Browser)" 69 Changing date and time settings Date & Time Setting 67 Initializing settings Printing images Initialize 58 Print 75 Index 7GB

Cyber-shot® Handbook
Page 8
In the table below [ available modes. White Balance - Table of contents Operation Search MENU/Settings Search MENU/Settings Search MENU items (Shooting) You can select the various shooting functions easily from the MENU button. 1 Press the ON/OFF (Power) button to set to shooting mode. 2 Press the MENU button to turn off the MENU screen. Metering Mode - - Index 8GB Focus - - Smile Detection Sensitivity Face Detection (Settings) MENU button ] indicate the Note • Only the items that are available for each mode are displayed on the control button. 4 Press...
In the table below [ available modes. White Balance - Table of contents Operation Search MENU/Settings Search MENU/Settings Search MENU items (Shooting) You can select the various shooting functions easily from the MENU button. 1 Press the ON/OFF (Power) button to set to shooting mode. 2 Press the MENU button to turn off the MENU screen. Metering Mode - - Index 8GB Focus - - Smile Detection Sensitivity Face Detection (Settings) MENU button ] indicate the Note • Only the items that are available for each mode are displayed on the control button. 4 Press...
Cyber-shot® Handbook
Page 9
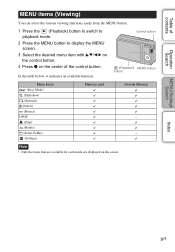
Note • Only the items that are available for each mode are displayed on the center of the control button. Index 9GB In the table below, indicates an available function. Control button (Playback) MENU button button Menu items (Easy Mode) (Slideshow) (Retouch) (Delete) (Protect) DPOF (Print) (Rotate) (Select Folder) (Settings) Memory card Internal Memory - - Table of contents Operation Search MENU/Settings Search MENU items (Viewing) You can select the various viewing functions easily from the MENU button. 1 Press the (Playback) button to switch to playback mode. 2 ...
Note • Only the items that are available for each mode are displayed on the center of the control button. Index 9GB In the table below, indicates an available function. Control button (Playback) MENU button button Menu items (Easy Mode) (Slideshow) (Retouch) (Delete) (Protect) DPOF (Print) (Rotate) (Select Folder) (Settings) Memory card Internal Memory - - Table of contents Operation Search MENU/Settings Search MENU items (Viewing) You can select the various viewing functions easily from the MENU button. 1 Press the (Playback) button to switch to playback mode. 2 ...
Cyber-shot® Handbook
Page 10
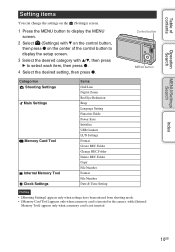
...10GB Control button MENU button Categories Shooting Settings Main Settings Memory Card Tool Internal Memory Tool Clock Settings Items Grid Line Digital Zoom Red Eye Reduction Beep Language Setting Function Guide Power Save Initialize USB Connect LUN Settings Format Create REC.Folder ...appears only when settings have been entered from shooting mode. • [Memory Card Tool] appears only when a memory card is inserted in the camera, while [Internal Memory Tool] appears only when a memory card is not inserted. Table of contents Operation Search MENU/Settings Search Setting items You ...
...10GB Control button MENU button Categories Shooting Settings Main Settings Memory Card Tool Internal Memory Tool Clock Settings Items Grid Line Digital Zoom Red Eye Reduction Beep Language Setting Function Guide Power Save Initialize USB Connect LUN Settings Format Create REC.Folder ...appears only when settings have been entered from shooting mode. • [Memory Card Tool] appears only when a memory card is inserted in the camera, while [Internal Memory Tool] appears only when a memory card is not inserted. Table of contents Operation Search MENU/Settings Search Setting items You ...
Cyber-shot® Handbook
Page 11
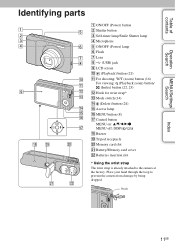
... S Tripod receptacle T Memory card slot U Battery/Memory card cover V Batteries insertion slot * Using the wrist strap The wrist strap is already attached to prevent the camera from damage by being dropped. Table of contents Operation Search MENU/Settings Search Identifying parts 9 qk ql wa q; qa qs qd qf qg qh qj...
... S Tripod receptacle T Memory card slot U Battery/Memory card cover V Batteries insertion slot * Using the wrist strap The wrist strap is already attached to prevent the camera from damage by being dropped. Table of contents Operation Search MENU/Settings Search Identifying parts 9 qk ql wa q; qa qs qd qf qg qh qj...
Cyber-shot® Handbook
Page 12
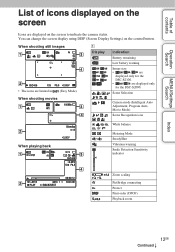
When shooting still images • The icons are displayed only for the DSC-S2000. When shooting movies A Display Indication Battery remaining Low battery warning Image size • / / are displayed only for the DSC-S2100. • / are limited in (Easy Mode). Scene Selection Camera mode (Intelligent Auto Adjustment, Program Auto, Movie Mode) Scene Recognition icon White balance... screen Icons are displayed on the control button. You can change the screen display using DISP (Screen Display Settings) on the screen to indicate the camera status.
When shooting still images • The icons are displayed only for the DSC-S2000. When shooting movies A Display Indication Battery remaining Low battery warning Image size • / / are displayed only for the DSC-S2100. • / are limited in (Easy Mode). Scene Selection Camera mode (Intelligent Auto Adjustment, Program Auto, Movie Mode) Scene Recognition icon White balance... screen Icons are displayed on the control button. You can change the screen display using DISP (Screen Display Settings) on the screen to indicate the camera status.
Cyber-shot® Handbook
Page 13
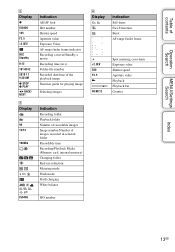
Table of contents Operation Search MENU/Settings Search B Display z ISO400 125 F3.5 +2.0EV REC Standby 0:12 101-0012 2010 1 1 9:30 AM z STOP z PLAY bB BACK/ NEXT C Display 96 12/12 100Min Indication AE/AF lock ISO number Shutter speed Aperture value Exposure Value AF range finder frame indicator Recording a movie/Standby a movie Recording time (m:s) Folder-file number Recorded date/time of the playback image Function guide for playing image Selecting images Indication Recording folder Playback folder Number of recordable images Image number/Number of images recorded in selected folder ...
Table of contents Operation Search MENU/Settings Search B Display z ISO400 125 F3.5 +2.0EV REC Standby 0:12 101-0012 2010 1 1 9:30 AM z STOP z PLAY bB BACK/ NEXT C Display 96 12/12 100Min Indication AE/AF lock ISO number Shutter speed Aperture value Exposure Value AF range finder frame indicator Recording a movie/Standby a movie Recording time (m:s) Folder-file number Recorded date/time of the playback image Function guide for playing image Selecting images Indication Recording folder Playback folder Number of recordable images Image number/Number of images recorded in selected folder ...
Cyber-shot® Handbook
Page 14
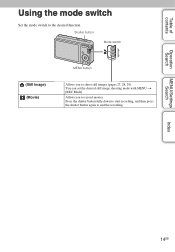
You can set the desired still image shooting mode with MENU t [REC Mode]. Press the shutter button fully down to start recording, and then press the shutter button again to the desired function. MENU/Settings Search Index 14GB Shutter button Mode switch (Still Image) (Movie) MENU button Allows you to shoot still images (pages 27, 28, 29). Allows you to record movies. Table of contents Operation Search Using the mode switch Set the mode switch to end the recording.
You can set the desired still image shooting mode with MENU t [REC Mode]. Press the shutter button fully down to start recording, and then press the shutter button again to the desired function. MENU/Settings Search Index 14GB Shutter button Mode switch (Still Image) (Movie) MENU button Allows you to shoot still images (pages 27, 28, 29). Allows you to record movies. Table of contents Operation Search Using the mode switch Set the mode switch to end the recording.
Cyber-shot® Handbook
Page 15
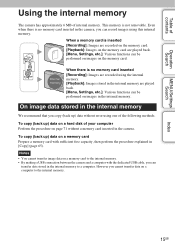
...using one of the following methods. On image data stored in the internal memory We recommend that you can be performed on images in the camera. To copy (back up ) data without a memory card inserted in the internal memory. When there is inserted [Recording]: Images are ...images on the memory card. B [Playback]: Images on a memory card to the internal memory. • By making a USB connection between the camera and a computer with sufficient free capacity, then perform the procedure explained in the internal memory to the internal memory. Notes • You cannot transfer...
...using one of the following methods. On image data stored in the internal memory We recommend that you can be performed on images in the camera. To copy (back up ) data without a memory card inserted in the internal memory. When there is inserted [Recording]: Images are ...images on the memory card. B [Playback]: Images on a memory card to the internal memory. • By making a USB connection between the camera and a computer with sufficient free capacity, then perform the procedure explained in the internal memory to the internal memory. Notes • You cannot transfer...
Cyber-shot® Handbook
Page 16
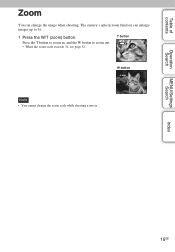
Table of contents Operation Search Zoom You can enlarge images up to zoom out. • When the zoom scale exceeds 3×, see page 52. The camera's optical zoom function can enlarge the image when shooting. Press the T button to zoom in, and the W button to 3×. 1 Press the W/T (zoom) button. MENU/Settings Search Index 16GB T button W button Note • You cannot change the zoom scale while shooting a movie.
Table of contents Operation Search Zoom You can enlarge images up to zoom out. • When the zoom scale exceeds 3×, see page 52. The camera's optical zoom function can enlarge the image when shooting. Press the T button to zoom in, and the W button to 3×. 1 Press the W/T (zoom) button. MENU/Settings Search Index 16GB T button W button Note • You cannot change the zoom scale while shooting a movie.
Cyber-shot® Handbook
Page 17
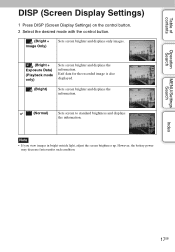
However, the battery power may decrease faster under such condition. Index 17GB Table of contents Operation Search MENU/Settings Search DISP (Screen Display Settings) 1 Press DISP (Screen Display Settings) on the control button. 2 Select the desired mode with the control button. (Bright + Image Only) Sets screen brighter and displays only images. (Bright + Exposure Data) (Playback mode only) Sets screen brighter and displays the information. Exif data for the recorded image is also displayed. (Bright) Sets screen brighter and displays the information. (Normal) Sets screen to ...
However, the battery power may decrease faster under such condition. Index 17GB Table of contents Operation Search MENU/Settings Search DISP (Screen Display Settings) 1 Press DISP (Screen Display Settings) on the control button. 2 Select the desired mode with the control button. (Bright + Image Only) Sets screen brighter and displays only images. (Bright + Exposure Data) (Playback mode only) Sets screen brighter and displays the information. Exif data for the recorded image is also displayed. (Bright) Sets screen brighter and displays the information. (Normal) Sets screen to ...
Cyber-shot® Handbook
Page 18
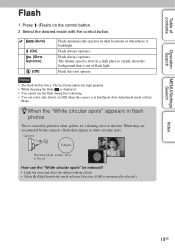
... appear as white circular spots. Flash always operates. zWhen the "White circular spots" appears in flash photos This is caused by the camera's flash, they are accentuated by particles (dust, pollen, etc.) floating close to clearly shoot the background that is out of contents .... • Select (High Sensitivity) mode in Intelligent Auto Adjustment mode or Easy Mode. Camera Subject Particles (dust, pollen, etc.) in the air How can select only [Auto] or [Off] when the camera is in Scene Selection. ([Off] is backlight. Flash always operates. The shutter speed is...
... appear as white circular spots. Flash always operates. zWhen the "White circular spots" appears in flash photos This is caused by the camera's flash, they are accentuated by particles (dust, pollen, etc.) floating close to clearly shoot the background that is out of contents .... • Select (High Sensitivity) mode in Intelligent Auto Adjustment mode or Easy Mode. Camera Subject Particles (dust, pollen, etc.) in the air How can select only [Auto] or [Off] when the camera is in Scene Selection. ([Off] is backlight. Flash always operates. The shutter speed is...
Cyber-shot® Handbook
Page 19
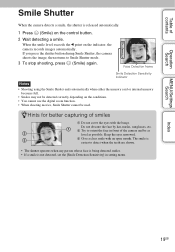
...set the [Smile Detection Sensitivity] in front of the camera and be detected correctly depending on the indicator, the camera records images automatically. When the smile level exceeds the b point on the conditions. • You cannot use the digital zoom function. • When shooting movies, Smile Shutter... cannot be used. Keep the eyes narrowed. 3 Give a clear smile with the bangs. Index 19GB If you press the shutter button during Smile Shutter, the camera shoots the image, then returns to...
...set the [Smile Detection Sensitivity] in front of the camera and be detected correctly depending on the indicator, the camera records images automatically. When the smile level exceeds the b point on the conditions. • You cannot use the digital zoom function. • When shooting movies, Smile Shutter... cannot be used. Keep the eyes narrowed. 3 Give a clear smile with the bangs. Index 19GB If you press the shutter button during Smile Shutter, the camera shoots the image, then returns to...
Cyber-shot® Handbook
Page 20
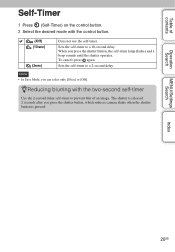
... self-timer to a 2-second delay. The shutter is pressed. To cancel, press again. Note • In Easy Mode, you press the shutter button, which reduces camera shake when the shutter button is released 2 seconds after you can select only [10sec] or [Off]. zReducing blurring with the control button. (Off) (10sec) (2sec...
... self-timer to a 2-second delay. The shutter is pressed. To cancel, press again. Note • In Easy Mode, you press the shutter button, which reduces camera shake when the shutter button is released 2 seconds after you can select only [10sec] or [Off]. zReducing blurring with the control button. (Off) (10sec) (2sec...
