Operating Instructions
Page 8
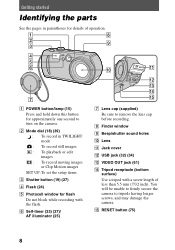
...32) (34) M VIDEO OUT jack (61) N Tripod receptacle (bottom surface) Use a tripod with the flash. You will be unable to firmly secure the camera to remove the lens cap before recording. B Mode dial (18) (39) : To record in parentheses for details of less than 5.5 mm (7/32 inch). ... Photocell window for flash Do not block while recording with a screw length of operation. F Self-timer (23) (27)/ AF illuminator (25) G Lens cap (supplied) Be sure to tripods having longer screws, and may damage the camera. O RESET button (75) 8 A POWER button/lamp (15) Press and hold down this ...
...32) (34) M VIDEO OUT jack (61) N Tripod receptacle (bottom surface) Use a tripod with the flash. You will be unable to firmly secure the camera to remove the lens cap before recording. B Mode dial (18) (39) : To record in parentheses for details of less than 5.5 mm (7/32 inch). ... Photocell window for flash Do not block while recording with a screw length of operation. F Self-timer (23) (27)/ AF illuminator (25) G Lens cap (supplied) Be sure to tripods having longer screws, and may damage the camera. O RESET button (75) 8 A POWER button/lamp (15) Press and hold down this ...
Operating Instructions
Page 9
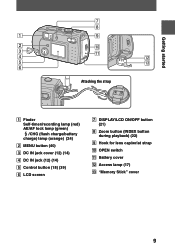
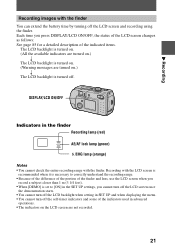
Getting started Attaching the strap A Finder Self-timer/recording lamp (red) AE/AF lock lamp (green) /CHG (flash charge/battery charge) lamp (orange) (24) B MENU button (40) C DC IN jack cover (12) (14) D DC IN jack (12) (14) E Control button (18) (39) F LCD screen G DISPLAY/LCD ON/OFF button (21) H Zoom button (INDEX button during playback) (22) I Hook for lens cap/wrist strap J OPEN switch K Battery cover L Access lamp (17) M "Memory Stick" cover 9
Getting started Attaching the strap A Finder Self-timer/recording lamp (red) AE/AF lock lamp (green) /CHG (flash charge/battery charge) lamp (orange) (24) B MENU button (40) C DC IN jack cover (12) (14) D DC IN jack (12) (14) E Control button (18) (39) F LCD screen G DISPLAY/LCD ON/OFF button (21) H Zoom button (INDEX button during playback) (22) I Hook for lens cap/wrist strap J OPEN switch K Battery cover L Access lamp (17) M "Memory Stick" cover 9
Operating Instructions
Page 18
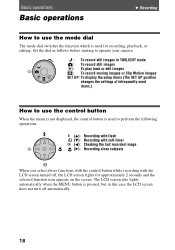
... button When the menu is not displayed, the control button is used to perform the following operations. (v): Recording with flash (V): Recording with self-timer 7 (b): Checking the last recorded image (B): Recording close subjects When you select above functions with the control button while recording with the LCD screen ...turned off automatically. 18 Set the dial as follows before starting to operate your camera. : To record still images in this case the LCD screen does not turn off , the LCD screen lights for recording, playback, or...
... button When the menu is not displayed, the control button is used to perform the following operations. (v): Recording with flash (V): Recording with self-timer 7 (b): Checking the last recorded image (B): Recording close subjects When you select above functions with the control button while recording with the LCD screen ...turned off automatically. 18 Set the dial as follows before starting to operate your camera. : To record still images in this case the LCD screen does not turn off , the LCD screen lights for recording, playback, or...
Operating Instructions
Page 21
.... • You cannot turn off the LCD backlight when setting in SET UP and when displaying the menu. • You cannot turn off the self-timer indicators and some of the indicated items. The LCD backlight is turned on. (All the available indicators are turned on.) r The LCD backlight is turned...
.... • You cannot turn off the LCD backlight when setting in SET UP and when displaying the menu. • You cannot turn off the self-timer indicators and some of the indicated items. The LCD backlight is turned on. (All the available indicators are turned on.) r The LCD backlight is turned...
Operating Instructions
Page 23
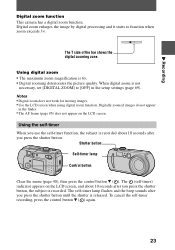
... the beep sounds after you use the self-timer function, the subject is recorded. Using the self-timer When you press the shutter button. The (self-timer) indicator appears on the LCD screen. B Recording Digital zoom function This camera has a digital zoom function. Digital zoom enlarges the image by digital processing and it starts to [OFF] in the...
... the beep sounds after you use the self-timer function, the subject is recorded. Using the self-timer When you press the shutter button. The (self-timer) indicator appears on the LCD screen. B Recording Digital zoom function This camera has a digital zoom function. Digital zoom enlarges the image by digital processing and it starts to [OFF] in the...
Operating Instructions
Page 27
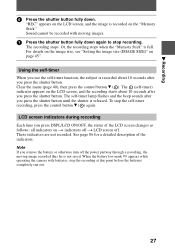
.... For details on the image size, see "Setting the image size (IMAGE SIZE)" on the "Memory Stick." Using the self-timer When you use the self-timer function, the subject is recorded about 10 seconds after you press the shutter button. LCD screen indicators during recording Each time you remove...recording starts about 10 seconds after you press the shutter button until the shutter is full. When the battery low mark E appears while operating the camera with moving image recorded thus far is recorded on page 45". "REC" appears on the LCD screen, and the image is not saved. Note...
.... For details on the image size, see "Setting the image size (IMAGE SIZE)" on the "Memory Stick." Using the self-timer When you use the self-timer function, the subject is recorded about 10 seconds after you press the shutter button. LCD screen indicators during recording Each time you remove...recording starts about 10 seconds after you press the shutter button until the shutter is full. When the battery low mark E appears while operating the camera with moving image recorded thus far is recorded on page 45". "REC" appears on the LCD screen, and the image is not saved. Note...

Operating Instructions
Page 85
... recordable images indicator/ Self-diagnosis function indicator N Remaining memory capacity indicator O Macro /focus mode 9 indicator P EV level indicator Q Aperture value indicator R Shutter speed indicator S Self-timer indicator T Light amount warning indicator U Menu and guide menu Pressing MENU switches the menu on/off.
... recordable images indicator/ Self-diagnosis function indicator N Remaining memory capacity indicator O Macro /focus mode 9 indicator P EV level indicator Q Aperture value indicator R Shutter speed indicator S Self-timer indicator T Light amount warning indicator U Menu and guide menu Pressing MENU switches the menu on/off.

Operating Instructions
Page 86
The indicators during recording moving images 1 45 6 7 2 min STANDBY 8 3 SOLARIZE 9 + 0 EV WB qa A Battery remaining indicator B White balance indicator C Picture effect indicator D Recording mode indicator E Image size indicator F Recording time (maximum recordable time) indicator/ Self-diagnosis function indicator G Remaining memory capacity indicator H Macro /focus mode 9 indicator I Self-timer indicator J Spot light-metering cross hair K Menu and guide menu Pressing MENU switches the menu on/off. 86
The indicators during recording moving images 1 45 6 7 2 min STANDBY 8 3 SOLARIZE 9 + 0 EV WB qa A Battery remaining indicator B White balance indicator C Picture effect indicator D Recording mode indicator E Image size indicator F Recording time (maximum recordable time) indicator/ Self-diagnosis function indicator G Remaining memory capacity indicator H Macro /focus mode 9 indicator I Self-timer indicator J Spot light-metering cross hair K Menu and guide menu Pressing MENU switches the menu on/off. 86
Operating Instructions
Page 89
...70 C Charging the battery pack12 Cleaning 71 Clip Motion 51 Control button........... 18, 39 D DELETE 62 Digital zoom 23 DPOF 66 E Editing DELETE 62 PROTECT 63 E-MAIL 48 Enlarging a part of the still ...with the flash 24 RESIZE 65 ROTATE 61 S SECAM system 74 Self-diagnosis display ..... 83 Self-timer 23, 27 SET UP 69 Setting date and time ...... 15 SHARPNESS 42 Single display 58 SLIDE... 19 T TEXT 49 TIFF 38, 50 TV color system 74 TWILIGHT 47 U USB 32 Using your camera abroad74 V Viewing images on a TV screen 61 using a personal computer 30 W Warning and notice messages 81...
...70 C Charging the battery pack12 Cleaning 71 Clip Motion 51 Control button........... 18, 39 D DELETE 62 Digital zoom 23 DPOF 66 E Editing DELETE 62 PROTECT 63 E-MAIL 48 Enlarging a part of the still ...with the flash 24 RESIZE 65 ROTATE 61 S SECAM system 74 Self-diagnosis display ..... 83 Self-timer 23, 27 SET UP 69 Setting date and time ...... 15 SHARPNESS 42 Single display 58 SLIDE... 19 T TEXT 49 TIFF 38, 50 TV color system 74 TWILIGHT 47 U USB 32 Using your camera abroad74 V Viewing images on a TV screen 61 using a personal computer 30 W Warning and notice messages 81...
