
Operating Instructions
Page 8
...of still images that can be recorded 25 Basic still image shooting - AF range finder 50 Choosing a focus operation - Slide Show 62 Quick Review 29 Indicators on the LCD screen during shooting 29 Using the zoom feature 30 Using the self-timer 31 Selecting a flash mode 32 8 ...Inserting the date and time on a still image 34 Shooting according to setup and operate your camera... 46 Changing the menu settings 46 Changing the items in the Setup screen 47 Deciding the still image quality 47 Creating or selecting a folder ...
...of still images that can be recorded 25 Basic still image shooting - AF range finder 50 Choosing a focus operation - Slide Show 62 Quick Review 29 Indicators on the LCD screen during shooting 29 Using the zoom feature 30 Using the self-timer 31 Selecting a flash mode 32 8 ...Inserting the date and time on a still image 34 Shooting according to setup and operate your camera... 46 Changing the menu settings 46 Changing the items in the Setup screen 47 Deciding the still image quality 47 Creating or selecting a folder ...
Operating Instructions
Page 17
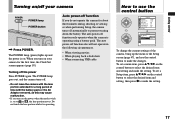
... changes. The POWER lamp (green) lights up the menu or the Setup screen (page 47), and use the control button Camera 1 1 AF Mode: 2 Digital Zoom: Date/Time: Red Eye Reduction: 1 AF Illuminator: 2 Auto Review: Single Smart Off Off Auto Off MENU SELECT Setup 2 1 File Number: USB Connect: 2 Clock Set: OK Cancel 1 2 To change...
... changes. The POWER lamp (green) lights up the menu or the Setup screen (page 47), and use the control button Camera 1 1 AF Mode: 2 Digital Zoom: Date/Time: Red Eye Reduction: 1 AF Illuminator: 2 Auto Review: Single Smart Off Off Auto Off MENU SELECT Setup 2 1 File Number: USB Connect: 2 Clock Set: OK Cancel 1 2 To change...
Operating Instructions
Page 27
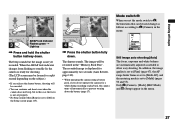
...set properly. • No beep sounds when [Beep] is displayed for approximately two seconds (Auto Review, page 112). • When operating the camera using a battery pack, if you do not operate the camera for a split second depending on the subject.) • If you set the mode switch to ,... F3.5 AE/AF lock indicator 3 Flashes green Light up Press and hold the shutter button halfway down . Program Auto Camera Mode Still image auto shooting [Auto] The focus, exposure and white balance are automatically adjusted as follows according to allow easy shooting. The image...
...set properly. • No beep sounds when [Beep] is displayed for approximately two seconds (Auto Review, page 112). • When operating the camera using a battery pack, if you do not operate the camera for a split second depending on the subject.) • If you set the mode switch to ,... F3.5 AE/AF lock indicator 3 Flashes green Light up Press and hold the shutter button halfway down . Program Auto Camera Mode Still image auto shooting [Auto] The focus, exposure and white balance are automatically adjusted as follows according to allow easy shooting. The image...

Operating Instructions
Page 29
... may appear rough right after playback starts due to the normal shooting mode, press lightly on the shutter button or press () again. Quick Review 60min Review VGA 101 8/8 101-0029 2005 1 1 10:30PM RETURN Press () on the control button, then press . To delete the image displayed...
... may appear rough right after playback starts due to the normal shooting mode, press lightly on the shutter button or press () again. Quick Review 60min Review VGA 101 8/8 101-0029 2005 1 1 10:30PM RETURN Press () on the control button, then press . To delete the image displayed...
Operating Instructions
Page 34
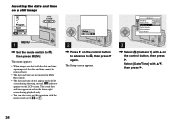
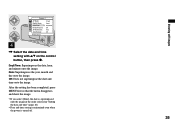
Setup t Mode Camera 1 1 AF Mode: 2 Digital Zoom: Date/Time: Red Eye Reduction: 1 AF Illuminator: 2 Auto Review: Day&Time Date Off 2 Press on the ...not appear on 1 the control button, then press . The Setup screen appears. 3 Select (Camera 1) with the date and time superimposed, the date and time cannot be removed later. • The date ... in red on the lower-right corner during shooting, instead, indicator appears on a still image Program Auto Camera Mode MENU 1 Set the mode switch to , then press MENU. Inserting the date and time...
Setup t Mode Camera 1 1 AF Mode: 2 Digital Zoom: Date/Time: Red Eye Reduction: 1 AF Illuminator: 2 Auto Review: Day&Time Date Off 2 Press on the ...not appear on 1 the control button, then press . The Setup screen appears. 3 Select (Camera 1) with the date and time superimposed, the date and time cannot be removed later. • The date ... in red on the lower-right corner during shooting, instead, indicator appears on a still image Program Auto Camera Mode MENU 1 Set the mode switch to , then press MENU. Inserting the date and time...
Operating Instructions
Page 35
..." (page 18). • Date and time setting is maintained even when the power is turned off. 35 Shooting still images Camera 1 1 AF Mode: 2 Digital Zoom: Date/Time: Red Eye Reduction: 1 AF Illuminator: 2 Auto Review: Single Smart Day&Time Off Auto Off PAGE SELECT 4 Select the date and time setting with /...
..." (page 18). • Date and time setting is maintained even when the power is turned off. 35 Shooting still images Camera 1 1 AF Mode: 2 Digital Zoom: Date/Time: Red Eye Reduction: 1 AF Illuminator: 2 Auto Review: Single Smart Day&Time Off Auto Off PAGE SELECT 4 Select the date and time setting with /...
Operating Instructions
Page 54
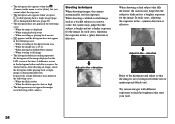
... playing back movies • appears and the histogram does not appear in the following cases: - Shooting techniques When shooting images, the camera automatically sets the exposure. When the shutter speed is slow or high • The histogram may appear in the following cases: - ...in the - In particular a large difference may not appear for the image. Adjust in the digital zoom area - After shooting an image, check the histogram while playing back a singleimage or during Quick Review (page 29). • The histogram does not appear in the + direction When shooting a...
... playing back movies • appears and the histogram does not appear in the following cases: - Shooting techniques When shooting images, the camera automatically sets the exposure. When the shutter speed is slow or high • The histogram may appear in the following cases: - ...in the - In particular a large difference may not appear for the image. Adjust in the digital zoom area - After shooting an image, check the histogram while playing back a singleimage or during Quick Review (page 29). • The histogram does not appear in the + direction When shooting a...

Operating Instructions
Page 61
... still image viewing Mode switch / MENU Control button Enlarging an image - Enlarging a portion of a still image You can enlarge the images displayed with the Quick Review function (page 29) by performing steps to zoom in on the image. Select the desired portion of the image with Press Press...
... still image viewing Mode switch / MENU Control button Enlarging an image - Enlarging a portion of a still image You can enlarge the images displayed with the Quick Review function (page 29) by performing steps to zoom in on the image. Select the desired portion of the image with Press Press...

Operating Instructions
Page 112
... mode (page 30). Selects whether to in the menu and press again. The date and time are indicated with . (Camera 1) 1 Item AF Mode Digital Zoom Date/time Setting Single / Monitor Smart / Precision / Off Day&Time / Date / Off Red Eye Reduction... On / Off AF Illuminator Auto / Off Auto Review On / Off (Camera 2) 2 Item Enlarged Icon Setting On / Off 112 Description ...
... mode (page 30). Selects whether to in the menu and press again. The date and time are indicated with . (Camera 1) 1 Item AF Mode Digital Zoom Date/time Setting Single / Monitor Smart / Precision / Off Day&Time / Date / Off Red Eye Reduction... On / Off AF Illuminator Auto / Off Auto Review On / Off (Camera 2) 2 Item Enlarged Icon Setting On / Off 112 Description ...

Operating Instructions
Page 125
...64257;nder frame 50 Auto adjustment mode 26 Auto Focus 28 Auto power-off function 17 Auto Review 112 Auto shooting mode 27 B B&W 59 Battery 13 Battery life 15, 119 Battery remaining ...indicator 14, 118 Beach mode 37 Beep/shutter sound 113 Burst 57 C Camera 27 Candle mode 37 CD-ROM 81, 88, 93 Center AF 50 Charging battery pack 13 Charging ...92 Cutting movies 78 D Daylight 56 DC plug 13, 16 Deleting movies 77 Deleting still images 42 Digital zoom 30 Divide 78 DPOF 73 E Enlarged Icon 112 Enlarging an image 61 EV adjustment 52 Extension ...
...64257;nder frame 50 Auto adjustment mode 26 Auto Focus 28 Auto power-off function 17 Auto Review 112 Auto shooting mode 27 B B&W 59 Battery 13 Battery life 15, 119 Battery remaining ...indicator 14, 118 Beach mode 37 Beep/shutter sound 113 Burst 57 C Camera 27 Candle mode 37 CD-ROM 81, 88, 93 Center AF 50 Charging battery pack 13 Charging ...92 Cutting movies 78 D Daylight 56 DC plug 13, 16 Deleting movies 77 Deleting still images 42 Digital zoom 30 Divide 78 DPOF 73 E Enlarged Icon 112 Enlarging an image 61 EV adjustment 52 Extension ...

Operating Instructions
Page 126
...68 Picture effect 59 Picture Package 87 Playback zoom 61 Power on/off 17 Precautions 115 Precision digital zoom 30 Print (DPOF) mark 73 Program shooting mode 28 126 Protect 64 PTP 80, 92 Q Quick Review 29 R Rechargeable button battery 116 Recommended computer environment ..... 80, 92 Red Eye Reduction 33 Remaining...Twilight mode 36 Twilight portrait mode 36 U USB cable 82 USB connection 82, 93 USB driver 81 USB jack 82 USB mode 80 Using your camera abroad 16 V VGA 23 Video CD 90, 94 Viewing images on your computer 85, 93 Viewing movies on the LCD screen 76 Viewing still...
...68 Picture effect 59 Picture Package 87 Playback zoom 61 Power on/off 17 Precautions 115 Precision digital zoom 30 Print (DPOF) mark 73 Program shooting mode 28 126 Protect 64 PTP 80, 92 Q Quick Review 29 R Rechargeable button battery 116 Recommended computer environment ..... 80, 92 Red Eye Reduction 33 Remaining...Twilight mode 36 Twilight portrait mode 36 U USB cable 82 USB connection 82, 93 USB driver 81 USB jack 82 USB mode 80 Using your camera abroad 16 V VGA 23 Video CD 90, 94 Viewing images on your computer 85, 93 Viewing movies on the LCD screen 76 Viewing still...
