
Instruction Manual
Page 2
...power outlet. Model No. Refer to high temperature above 60°C (140°F) such as hammering, dropping or stepping on the bottom. DSC-HX9/DSC-HX9V Serial No Model No. IMPORTANT SAFETY INSTRUCTIONS -SAVE THESE INSTRUCTIONS DANGER TO REDUCE THE RISK OF FIRE OR ELECTRIC SHOCK, CAREFULLY FOLLOW THESE ...do not allow metal objects to come into contact with the battery terminals. • Do not expose to these numbers whenever you call your Sony dealer regarding this product. English Owner's Record The model and serial numbers are located on it. • Do not short circuit and do...
...power outlet. Model No. Refer to high temperature above 60°C (140°F) such as hammering, dropping or stepping on the bottom. DSC-HX9/DSC-HX9V Serial No Model No. IMPORTANT SAFETY INSTRUCTIONS -SAVE THESE INSTRUCTIONS DANGER TO REDUCE THE RISK OF FIRE OR ELECTRIC SHOCK, CAREFULLY FOLLOW THESE ...do not allow metal objects to come into contact with the battery terminals. • Do not expose to these numbers whenever you call your Sony dealer regarding this product. English Owner's Record The model and serial numbers are located on it. • Do not short circuit and do...

Instruction Manual
Page 3
... interference, and (2) this device must accept any questions about this camera only, and should not be used with the same or equivalent type recommended by Sony. • Dispose of small children. • Keep the battery pack dry. • Replace only with other electrical equipment. The power cord (mains..., immediately shut off the power by GB disconnecting the plug from the wall outlet (wall socket). If some trouble occurs while using a genuine Sony battery charger or a device that may call toll free 1-800-822-8837, or visit http://www.rbrc.org/ Caution: Do not handle damaged...
... interference, and (2) this device must accept any questions about this camera only, and should not be used with the same or equivalent type recommended by Sony. • Dispose of small children. • Keep the battery pack dry. • Replace only with other electrical equipment. The power cord (mains..., immediately shut off the power by GB disconnecting the plug from the wall outlet (wall socket). If some trouble occurs while using a genuine Sony battery charger or a device that may call toll free 1-800-822-8837, or visit http://www.rbrc.org/ Caution: Do not handle damaged...

Instruction Manual
Page 4
.... These limits are cautioned that interference will not occur in this manual could void your authority to Part 15 of Conformity Trade Name: SONY Model No.: DSC-HX9V Responsible Party: Sony Electronics Inc. However, there is connected. - Increase the separation between the equipment and receiver. - Consult the dealer or an experienced radio/TV technician...
.... These limits are cautioned that interference will not occur in this manual could void your authority to Part 15 of Conformity Trade Name: SONY Model No.: DSC-HX9V Responsible Party: Sony Electronics Inc. However, there is connected. - Increase the separation between the equipment and receiver. - Consult the dealer or an experienced radio/TV technician...

Instruction Manual
Page 5
... of this product is disposed of correctly, you purchased the product. For more detailed information about recycling of this product is Sony Deutschland GmbH, Hedelfinger Strasse 61, 70327 Stuttgart, Germany. The recycling of materials will help to the addresses given in separate ... its packaging indicates that this product shall not be treated as household waste. For Customers in Europe Hereby, Sony Corporation, declares that this DSC-HX9V Digital Still Camera is in compliance with the essential requirements and other European countries with the limits set out ...
... of this product is disposed of correctly, you purchased the product. For more detailed information about recycling of this product is Sony Deutschland GmbH, Hedelfinger Strasse 61, 70327 Stuttgart, Germany. The recycling of materials will help to the addresses given in separate ... its packaging indicates that this product shall not be treated as household waste. For Customers in Europe Hereby, Sony Corporation, declares that this DSC-HX9V Digital Still Camera is in compliance with the essential requirements and other European countries with the limits set out ...

Instruction Manual
Page 6
... for safety, performance or data integrity reasons require a permanent connection with an incorporated battery, this battery should lose the fuse cover, please contact your nearest Sony service station. By ensuring these batteries are added if the battery contains more detailed information about recycling of waste batteries (applicable in combination with this...
... for safety, performance or data integrity reasons require a permanent connection with an incorporated battery, this battery should lose the fuse cover, please contact your nearest Sony service station. By ensuring these batteries are added if the battery contains more detailed information about recycling of waste batteries (applicable in combination with this...

Instruction Manual
Page 7
Cyber-shot application software - "Cyber-shot User Guide" • Instruction Manual (this manual) (1) GB 7 Insert the CD-ROM into the CD-ROM drive. Checking the supplied items • Camera (1) • Rechargeable battery pack NP-BG1 (1)/Battery case (1) • Multi-use terminal USB cable (1) • AC Adaptor AC-UB10/UB10B (1) • Power cord (mains lead) (not supplied in the USA and Canada) (1) • Wrist strap (1) • CD-ROM (1) - GB For Windows users: 1 Click [User Guide] t [Install]. 2 Start "User Guide" from the shortcut on the CD-ROM (supplied) using a ...
Cyber-shot application software - "Cyber-shot User Guide" • Instruction Manual (this manual) (1) GB 7 Insert the CD-ROM into the CD-ROM drive. Checking the supplied items • Camera (1) • Rechargeable battery pack NP-BG1 (1)/Battery case (1) • Multi-use terminal USB cable (1) • AC Adaptor AC-UB10/UB10B (1) • Power cord (mains lead) (not supplied in the USA and Canada) (1) • Wrist strap (1) • CD-ROM (1) - GB For Windows users: 1 Click [User Guide] t [Install]. 2 Start "User Guide" from the shortcut on the CD-ROM (supplied) using a ...

Instruction Manual
Page 8
...; The flash goes down automatically when the power is turned On/Off, the camera is switched to playback mode or the shooting mode is changed. HX9V only) O MOVIE (Movie) button P Speaker Q HDMI connector R Hook for wrist strap S / (In-Camera Guide/Delete) button T MENU button U Battery insertion slot I Microphone J Lens K LCD screen...
...; The flash goes down automatically when the power is turned On/Off, the camera is switched to playback mode or the shooting mode is changed. HX9V only) O MOVIE (Movie) button P Speaker Q HDMI connector R Hook for wrist strap S / (In-Camera Guide/Delete) button T MENU button U Battery insertion slot I Microphone J Lens K LCD screen...

Instruction Manual
Page 9
V Tripod receptacle • Use a tripod with a screw less than 5.5 mm (7/32 inches) long. W Battery eject lever X Access lamp Y Memory card slot GB Z Battery/memory card cover wj (TransferJet™) mark wk Multi connector (Type3b) GB 9 Otherwise, you cannot firmly secure the camera, and damage to the camera may occur.
V Tripod receptacle • Use a tripod with a screw less than 5.5 mm (7/32 inches) long. W Battery eject lever X Access lamp Y Memory card slot GB Z Battery/memory card cover wj (TransferJet™) mark wk Multi connector (Type3b) GB 9 Otherwise, you cannot firmly secure the camera, and damage to the camera may occur.

Instruction Manual
Page 10
Charging the battery pack For customers in the USA, Canada Power cord (Mains lead) For customers in countries/regions other than the USA and Canada GB 10 Power/Charge lamp Lit: Charging Off: Charging finished Make sure that the battery eject lever locks after insertion. Inserting the battery pack Eject lever 1 Open the cover. 2 Insert the battery pack. • While pressing the battery eject lever, insert the battery pack as illustrated.
Charging the battery pack For customers in the USA, Canada Power cord (Mains lead) For customers in countries/regions other than the USA and Canada GB 10 Power/Charge lamp Lit: Charging Off: Charging finished Make sure that the battery eject lever locks after insertion. Inserting the battery pack Eject lever 1 Open the cover. 2 Insert the battery pack. • While pressing the battery eject lever, insert the battery pack as illustrated.

Instruction Manual
Page 11
... the power source. • When charging is finished, disconnect the AC Adaptor from the wall outlet (wall socket). • Be sure to use only genuine Sony brand battery packs, multi-use terminal USB cable (supplied). 2 Connect the AC Adaptor to the wall outlet (wall socket). The Power/Charge lamp lights orange...
... the power source. • When charging is finished, disconnect the AC Adaptor from the wall outlet (wall socket). • Be sure to use only genuine Sony brand battery packs, multi-use terminal USB cable (supplied). 2 Connect the AC Adaptor to the wall outlet (wall socket). The Power/Charge lamp lights orange...

Instruction Manual
Page 12
No guarantees are made for an extended period of time. - x Charging time The charging time is not connected to a computer using a multi-use and circumstances. Charging may cause a malfunction. x Charging by connecting to a computer The battery pack can be charged by connecting the camera to a power source, the laptop battery level decreases. Note • Note the following points when charging via a computer: - Note • The above charging time applies when charging a fully depleted battery pack at a temperature of use terminal USB cable. Before turning on /off , or ...
No guarantees are made for an extended period of time. - x Charging time The charging time is not connected to a computer using a multi-use and circumstances. Charging may cause a malfunction. x Charging by connecting to a computer The battery pack can be charged by connecting the camera to a power source, the laptop battery level decreases. Note • Note the following points when charging via a computer: - Note • The above charging time applies when charging a fully depleted battery pack at a temperature of use terminal USB cable. Before turning on /off , or ...

Instruction Manual
Page 13
...movies) Notes Approx. 70 min. - GB • The above number of images applies when the battery pack is set to [Off] (DSC-HX9V only). • The number for shooting under the following conditions: - DISP (Display Setting) is fully charged. The power turns on the ...• The battery life for shooting under the following conditions: (CIPA: Camera & Imaging Products Association) - Shooting once every 30 seconds. - Using Sony "Memory Stick PRO Duo" (Mark2) media (sold separately) - The flash strobes once every two times. - Approx. 300 images Viewing (still images...
...movies) Notes Approx. 70 min. - GB • The above number of images applies when the battery pack is set to [Off] (DSC-HX9V only). • The number for shooting under the following conditions: - DISP (Display Setting) is fully charged. The power turns on the ...• The battery life for shooting under the following conditions: (CIPA: Camera & Imaging Products Association) - Shooting once every 30 seconds. - Using Sony "Memory Stick PRO Duo" (Mark2) media (sold separately) - The flash strobes once every two times. - Approx. 300 images Viewing (still images...

Instruction Manual
Page 14
Notes • Power cannot be supplied with the battery inserted incorrectly may damage the GB camera. 14 Press (Playback) button to switch to a computer using the multi-use terminal USB cable. Inserting a memory card (sold separately) Ensure the notched corner faces correctly. 1 Open the cover. 2 Insert the memory card (sold separately). • With the notched corner facing as illustrated, insert the memory card until it clicks into place. 3 Close the cover. • Closing the cover with power from the wall outlet (wall socket) by connecting the camera to the playback ...
Notes • Power cannot be supplied with the battery inserted incorrectly may damage the GB camera. 14 Press (Playback) button to switch to a computer using the multi-use terminal USB cable. Inserting a memory card (sold separately) Ensure the notched corner faces correctly. 1 Open the cover. 2 Insert the memory card (sold separately). • With the notched corner facing as illustrated, insert the memory card until it clicks into place. 3 Close the cover. • Closing the cover with power from the wall outlet (wall socket) by connecting the camera to the playback ...

Instruction Manual
Page 15
x To remove the memory card/battery pack Memory card: Push the memory card in the memory card/internal memory. This may cause damage to as SD card. x Memory cards that you can use Memory card For still images Memory Stick PRO Duo a A Memory Stick PRO-HG Duo a Memory Stick Duo a SD memory card a B SDHC memory card a SDXC memory card a For movies a (Mark2 only) a - Battery pack: Slide the battery eject lever. Note • Never remove the memory card/battery pack when the access lamp (page 8) is lit. GB 15 a (Class 4 or faster) a (Class 4 or faster) GB a (Class 4...
x To remove the memory card/battery pack Memory card: Push the memory card in the memory card/internal memory. This may cause damage to as SD card. x Memory cards that you can use Memory card For still images Memory Stick PRO Duo a A Memory Stick PRO-HG Duo a Memory Stick Duo a SD memory card a B SDHC memory card a SDXC memory card a For movies a (Mark2 only) a - Battery pack: Slide the battery eject lever. Note • Never remove the memory card/battery pack when the access lamp (page 8) is lit. GB 15 a (Class 4 or faster) a (Class 4 or faster) GB a (Class 4...

Instruction Manual
Page 16
... [OK] t [OK]. • Midnight is indicated as 12:00 AM, and noon as 12:00 PM. 5 Select the desired display color and the GPS setting (DSC-HX9V only), following the instructions on the screen. • The battery pack will run out quickly if you set [GPS setting] to [On...] (DSC-HX9V only). 6 When an [In-Camera Guide] introductory message is appeared on the screen, select [OK]. GB 16 Setting the clock ON/OFF (Power) Power/Charge ...
... [OK] t [OK]. • Midnight is indicated as 12:00 AM, and noon as 12:00 PM. 5 Select the desired display color and the GPS setting (DSC-HX9V only), following the instructions on the screen. • The battery pack will run out quickly if you set [GPS setting] to [On...] (DSC-HX9V only). 6 When an [In-Camera Guide] introductory message is appeared on the screen, select [OK]. GB 16 Setting the clock ON/OFF (Power) Power/Charge ...

Instruction Manual
Page 17
GB 17 When the image is finished, you can restart recording by pressing the MOVIE button again. When movie recording is in Do not cover the flash (A). Notes • The sound of the MOVIE button operating may stop recording. Recording may also be recorded when the zoom function operates while shooting a movie. Shooting movies 1 Press the MOVIE (Movie) button to start recording. • Use the W/T (zoom) lever to change the zoom scale. 2 Press the MOVIE button again to stop to focus. Shooting still images 1 Press the shutter button halfway down . The sound of the lens ...
GB 17 When the image is finished, you can restart recording by pressing the MOVIE button again. When movie recording is in Do not cover the flash (A). Notes • The sound of the MOVIE button operating may stop recording. Recording may also be recorded when the zoom function operates while shooting a movie. Shooting movies 1 Press the MOVIE (Movie) button to start recording. • Use the W/T (zoom) lever to change the zoom scale. 2 Press the MOVIE button again to stop to focus. Shooting still images 1 Press the shutter button halfway down . The sound of the lens ...

Instruction Manual
Page 18
x Returning to view movies. x Selecting next/previous image Select an image by pressing B (next)/b (previous) on the control wheel or by turning the control wheel. x Deleting an image 1 Press / (Delete) button. 2 Select [This Image] with other cameras are played back on this camera, the registration screen for the data file appears. GB 18 Viewing images W: zoom out T: zoom in the center of the control wheel to shooting images Press the shutter button halfway down. Press z in Control wheel (Playback) / (Delete) Select images: B (next)/b (previous) or turn the control wheel Set...
x Returning to view movies. x Selecting next/previous image Select an image by pressing B (next)/b (previous) on the control wheel or by turning the control wheel. x Deleting an image 1 Press / (Delete) button. 2 Select [This Image] with other cameras are played back on this camera, the registration screen for the data file appears. GB 18 Viewing images W: zoom out T: zoom in the center of the control wheel to shooting images Press the shutter button halfway down. Press z in Control wheel (Playback) / (Delete) Select images: B (next)/b (previous) or turn the control wheel Set...

Instruction Manual
Page 19
Select [In-Camera Guide]. 2 Select a search method from [In-Camera Guide]. Objective guide: Search functions according to your needs. GB 19 Troubleshooting: Search common problems and their solution. Keyword: Search functions by key words. Shoot/ playback guide: Search for various operation functions in [In-Camera Guide]. In-Camera Guide This camera contains an internal function guide. Icon guide: Search the function and meaning of displayed icons. This allows you to search the camera's functions according to your needs. GB / (In-Camera Guide) 1 Press the / (In-Camera Guide) ...
Select [In-Camera Guide]. 2 Select a search method from [In-Camera Guide]. Objective guide: Search functions according to your needs. GB 19 Troubleshooting: Search common problems and their solution. Keyword: Search functions by key words. Shoot/ playback guide: Search for various operation functions in [In-Camera Guide]. In-Camera Guide This camera contains an internal function guide. Icon guide: Search the function and meaning of displayed icons. This allows you to search the camera's functions according to your needs. GB / (In-Camera Guide) 1 Press the / (In-Camera Guide) ...

Instruction Manual
Page 20
x Menu Items Shooting Movie shooting scene 3D Shooting Scene Selection Memory recall mode Easy Mode Defocus Effect Select movie recording mode. Select a setting you to [Memory recall mode]. Set the level of other functions. Shoot still images using the control wheel or MENU button on the camera. GB 20 Select pre-set to easily select from the functions. While displaying the guide, try the other functions Other functions used when shooting or playing back can be operated using minimal functions. This camera is equipped with a Function Guide that allows you want to ...
x Menu Items Shooting Movie shooting scene 3D Shooting Scene Selection Memory recall mode Easy Mode Defocus Effect Select movie recording mode. Select a setting you to [Memory recall mode]. Set the level of other functions. Shoot still images using the control wheel or MENU button on the camera. GB 20 Select pre-set to easily select from the functions. While displaying the guide, try the other functions Other functions used when shooting or playing back can be operated using minimal functions. This camera is equipped with a Function Guide that allows you want to ...
Instruction Manual
Page 21
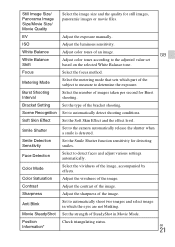
GB Adjust color tones according to the camera automatically release the shutter when a smile is detected. Burst Shooting Interval Select the number of SteadyShot in which part of an image. Smile Shutter Set to the adjusted value set based on the selected White Balance tone. Movie SteadyShot Set the strength of images taken per second for Burst shooting. ISO Adjust the luminous sensitivity. White Balance White Balance Shift Adjust color tones of the subject to measure to automatically shoot two images and select image in Movie Mode. Focus Select the focus method. Metering...
GB Adjust color tones according to the camera automatically release the shutter when a smile is detected. Burst Shooting Interval Select the number of SteadyShot in which part of an image. Smile Shutter Set to the adjusted value set based on the selected White Balance tone. Movie SteadyShot Set the strength of images taken per second for Burst shooting. ISO Adjust the luminous sensitivity. White Balance White Balance Shift Adjust color tones of the subject to measure to automatically shoot two images and select image in Movie Mode. Focus Select the focus method. Metering...
