
User's Guide
Page 13
...This section describes the basics so you can stabilize the camera by leaning against a tree or a building beside you. Remember to press the shutter button only halfway down straight away. Press the shutter button fully down . Then press the shutter button fully down . Hints for preventing blur" (as the...), the menus (page 43), and so on a subject successfully When you press the shutter button halfway down, the camera adjusts the focus automatically (Auto Focus). Press the shutter AE/AF lock indicator button halfway Flashing , lit/beeps down . Also, you how to focus on the anti-blur ...
...This section describes the basics so you can stabilize the camera by leaning against a tree or a building beside you. Remember to press the shutter button only halfway down straight away. Press the shutter button fully down . Then press the shutter button fully down . Hints for preventing blur" (as the...), the menus (page 43), and so on a subject successfully When you press the shutter button halfway down, the camera adjusts the focus automatically (Auto Focus). Press the shutter AE/AF lock indicator button halfway Flashing , lit/beeps down . Also, you how to focus on the anti-blur ...

User's Guide
Page 18
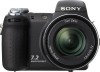
...in "Read This First") 18 A POWER lamp (t step 2 in "Read This First") B Mode dial (33) C /BRK button (41) D Shutter button (t step 5 in "Read This First") E Jog dial (32) F FOCUS button (38) G Microphone H Self-timer lamp (t step 5 in "Read This First")/AF illuminator (59) I Lens J Flash ...5 in "Read This First") K Hook for shoulder strap (20) L A/V OUT jack (91) M (USB) jack (73) N Jack cover A (Playback) button (t step 6 in "Read This First") B FINDER/LCD button (t step 5 in "Read This First") C Finder (t step 5 in "Read This First") D Finder adjustment dial (t step 5 in "Read This First") ...
...in "Read This First") 18 A POWER lamp (t step 2 in "Read This First") B Mode dial (33) C /BRK button (41) D Shutter button (t step 5 in "Read This First") E Jog dial (32) F FOCUS button (38) G Microphone H Self-timer lamp (t step 5 in "Read This First")/AF illuminator (59) I Lens J Flash ...5 in "Read This First") K Hook for shoulder strap (20) L A/V OUT jack (91) M (USB) jack (73) N Jack cover A (Playback) button (t step 6 in "Read This First") B FINDER/LCD button (t step 5 in "Read This First") C Finder (t step 5 in "Read This First") D Finder adjustment dial (t step 5 in "Read This First") ...

User's Guide
Page 19
...a screw length of less than 5.5 mm (7/32 inch), and may damage the camera. • Do not pinch the cord when you close the cover. P Speaker (bottom) Q "Memory Stick Duo" cover (bottom) (t step 3 in "Read This First") R OPEN button (bottom) (t step 1 in "Read This First") S Battery cover (bottom) ... screws longer than 5.5 mm (7/32 inch). T Tripod receptacle (bottom) • Use a tripod with the AC adaptor. Enjoying the camera K For shooting: Zoom (W/T) button (t step 5 in "Read This First") For viewing: / (Playback zoom) button/ (Index) button (t step 6 in "Read This First") 19
...a screw length of less than 5.5 mm (7/32 inch), and may damage the camera. • Do not pinch the cord when you close the cover. P Speaker (bottom) Q "Memory Stick Duo" cover (bottom) (t step 3 in "Read This First") R OPEN button (bottom) (t step 1 in "Read This First") S Battery cover (bottom) ... screws longer than 5.5 mm (7/32 inch). T Tripod receptacle (bottom) • Use a tripod with the AC adaptor. Enjoying the camera K For shooting: Zoom (W/T) button (t step 5 in "Read This First") For viewing: / (Playback zoom) button/ (Index) button (t step 6 in "Read This First") 19

User's Guide
Page 27
In index mode - The flash strobes. - When recording movies During playback - When you are using other cameras. When you are rotating still images. - Indicators on , image information is displayed. - During playback of movies • A large... Enjoying the camera Changing the screen display Each time you press the (Screen display switch) button, the display changes as follows. (Screen display switch) button Histogram on Histogram display Indicators off • By pressing the (Screen display switch) button longer, you can brighten the LCD backlight (DSC-H5 only)/finder ...
In index mode - The flash strobes. - When recording movies During playback - When you are using other cameras. When you are rotating still images. - Indicators on , image information is displayed. - During playback of movies • A large... Enjoying the camera Changing the screen display Each time you press the (Screen display switch) button, the display changes as follows. (Screen display switch) button Histogram on Histogram display Indicators off • By pressing the (Screen display switch) button longer, you can brighten the LCD backlight (DSC-H5 only)/finder ...
User's Guide
Page 33
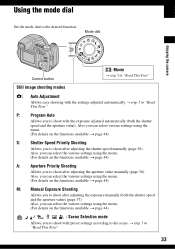
... settings using the menu. (For details on the functions available t page 44) : Scene Selection mode Allows you to the desired function. Mode dial Enjoying the camera Control button : Movie t step 5 in "Read This First" 33
... settings using the menu. (For details on the functions available t page 44) : Scene Selection mode Allows you to the desired function. Mode dial Enjoying the camera Control button : Movie t step 5 in "Read This First" 33

User's Guide
Page 35
Shooting with manual adjustment The camera automatically adjusts the focus and the exposure, however, you can change while maintaining the shift amount. 35 Open In-focus range narrows, both backward and forward. Mode dial FOCUS button Jog dial Aperture value Exposure value Shutter speed Characteristics of...while keeping the brightness fixed. 1 Select the aperture value and shutter speed combination using the jog dial (page 32). Enjoying the camera Shooting with Program Shift P S AM You can manually adjust these settings. Slower Moving objects appear to . • You ...
Shooting with manual adjustment The camera automatically adjusts the focus and the exposure, however, you can change while maintaining the shift amount. 35 Open In-focus range narrows, both backward and forward. Mode dial FOCUS button Jog dial Aperture value Exposure value Shutter speed Characteristics of...while keeping the brightness fixed. 1 Select the aperture value and shutter speed combination using the jog dial (page 32). Enjoying the camera Shooting with Program Shift P S AM You can manually adjust these settings. Slower Moving objects appear to . • You ...

User's Guide
Page 36
...the flash mode setting is changed, Program Shift is canceled. • Setting the mode dial to (Flash forced on the screen flash when the shutter button is set to other than P or turning off the power cancels Program Shift. You can adjust the shutter speed manually. 1 Select a shutter speed using... S AM You can select an aperture from F2.8 to change the aperture value and shutter speed combination depending on the screen flash when the shutter button is set fully to the W side, you can manually adjust the amount of flash light may not be insufficient even if you fire the flash....
...the flash mode setting is changed, Program Shift is canceled. • Setting the mode dial to (Flash forced on the screen flash when the shutter button is set to other than P or turning off the power cancels Program Shift. You can adjust the shutter speed manually. 1 Select a shutter speed using... S AM You can select an aperture from F2.8 to change the aperture value and shutter speed combination depending on the screen flash when the shutter button is set fully to the W side, you can manually adjust the amount of flash light may not be insufficient even if you fire the flash....

User's Guide
Page 37
...the settings, the setting value indicators on the exposure t page 14 • The compensation value can reproduce the same exposure by the camera. You can shoot in extremely bright or dark conditions, or the flash is being shot in this condition, but we recommend that ... adjustment may not be effective. 37 The exposure value turns yellow. Toward -: Darkens an image. • For details on the screen flash when the shutter button is turned off ). Adjusting the exposure manually - Image Brightness (EV) P S AM Toward - Toward + 1 Press b ( ) on ) or (Flash forced off . Once ...
...the settings, the setting value indicators on the exposure t page 14 • The compensation value can reproduce the same exposure by the camera. You can shoot in extremely bright or dark conditions, or the flash is being shot in this condition, but we recommend that ... adjustment may not be effective. 37 The exposure value turns yellow. Toward -: Darkens an image. • For details on the screen flash when the shutter button is turned off ). Adjusting the exposure manually - Image Brightness (EV) P S AM Toward - Toward + 1 Press b ( ) on ) or (Flash forced off . Once ...

User's Guide
Page 38
Choosing a focus method P S AM You can change the focus method. Press the FOCUS button repeatedly when it with the AF lock function lets you cannot adjust the exposure. Adjust the exposure while checking it is difficult to M, or playing ...
Choosing a focus method P S AM You can change the focus method. Press the FOCUS button repeatedly when it with the AF lock function lets you cannot adjust the exposure. Adjust the exposure while checking it is difficult to M, or playing ...

User's Guide
Page 39
... the AF range finder frame changes from white to get the proper focus in or near the center of vibration. • When you use Digital Zoom or AF Illuminator, priority AF movement is cleared. 39 The color of the center area. • When shooting a moving subject, take... care that the subject does not deviate from yellow. Enjoying the camera Flexible Spot AF () Manual Focus Focuses on the control button, then press z. To set distance, see the following procedure. • This is useful when you set the Flexible ...
... the AF range finder frame changes from white to get the proper focus in or near the center of vibration. • When you use Digital Zoom or AF Illuminator, priority AF movement is cleared. 39 The color of the center area. • When shooting a moving subject, take... care that the subject does not deviate from yellow. Enjoying the camera Flexible Spot AF () Manual Focus Focuses on the control button, then press z. To set distance, see the following procedure. • This is useful when you set the Flexible ...
User's Guide
Page 40
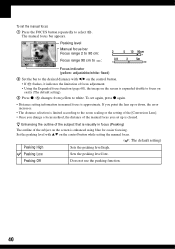
...is approximate. z Enhancing the outline of the subject that is enhanced using blue for easier focusing. To set the manual focus 1 Press the FOCUS button repeatedly to select 9. Sets the peaking level low. To set again, press z again. • Distance setting information in focus (Peaking) The ...8226; Using the Expanded focus function (page 60), the image on the screen is expanded double to the desired distance with v/V on the control button while setting the manual focus. ( : The default setting) Peaking High Peaking Low Peaking Off Sets the peaking level high. Does not use ...
...is approximate. z Enhancing the outline of the subject that is enhanced using blue for easier focusing. To set the manual focus 1 Press the FOCUS button repeatedly to select 9. Sets the peaking level low. To set again, press z again. • Distance setting information in focus (Peaking) The ...8226; Using the Expanded focus function (page 60), the image on the screen is expanded double to the desired distance with v/V on the control button while setting the manual focus. ( : The default setting) Peaking High Peaking Low Peaking Off Sets the peaking level high. Does not use ...

User's Guide
Page 41
...the shutter button. • This is [400] to (Flash forced off). • When recording with the self timer, a series of a maximum of three images with the exposure values automatically shifted. direction • When the mode dial is approximately 0.9 second (DSC-H5) or 0.8 second (DSC-H2).... 41 On the Burst • The flash is set to [1000]: 1/25 second or slower • When the battery level is low, or when the internal memory or "Memory Stick Duo" is full, the Burst stops. • The recording interval is set to the following shutter speeds. Enjoying the camera...
...the shutter button. • This is [400] to (Flash forced off). • When recording with the self timer, a series of a maximum of three images with the exposure values automatically shifted. direction • When the mode dial is approximately 0.9 second (DSC-H5) or 0.8 second (DSC-H2).... 41 On the Burst • The flash is set to [1000]: 1/25 second or slower • When the battery level is low, or when the internal memory or "Memory Stick Duo" is full, the Burst stops. • The recording interval is set to the following shutter speeds. Enjoying the camera...

User's Guide
Page 42
...slower • You may be able to shoot images in the Multi Burst mode depending on the control button. - On the Multi Burst • You can play back frame-by-frame: Press b/B in pause ...mode (page 34). 42 Dividing a series of images shot with Multi Burst using a computer or a camera not equipped with the Multi Burst function, the image is displayed as a single image with 16 frames....shifted based on the adjusted brightness. • The recording interval is approximately 0.9 second (DSC-H5) or 0.8 second (DSC-H2). • If the subject is set to resume playback in series. • ...
...slower • You may be able to shoot images in the Multi Burst mode depending on the control button. - On the Multi Burst • You can play back frame-by-frame: Press b/B in pause ...mode (page 34). 42 Dividing a series of images shot with Multi Burst using a computer or a camera not equipped with the Multi Burst function, the image is displayed as a single image with 16 frames....shifted based on the adjusted brightness. • The recording interval is approximately 0.9 second (DSC-H5) or 0.8 second (DSC-H2). • If the subject is set to resume playback in series. • ...

User's Guide
Page 43
...Press . To turn off the menu. To display an item that are available depending on the camera, then set the mode dial. Different items are not available to the shooting mode Press the shutter button halfway down so that the menu disappear. • If there is an item that is invisible,...pressing b/B until the item appears on the screen. • Press z after selecting an item in the Playback mode. 4 Select the setting with the control button. • You cannot set items that is not displayed, select the mark with v/V. The setting you select is zoomed and is set. 5 Press MENU ...
...Press . To turn off the menu. To display an item that are available depending on the camera, then set the mode dial. Different items are not available to the shooting mode Press the shutter button halfway down so that the menu disappear. • If there is an item that is invisible,...pressing b/B until the item appears on the screen. • Press z after selecting an item in the Playback mode. 4 Select the setting with the control button. • You cannot set items that is not displayed, select the mark with v/V. The setting you select is zoomed and is set. 5 Press MENU ...

User's Guide
Page 47
...ISO] is set the desired setting for [Bracket Step]. When you select a function other than Exposure Bracket, this function is selected with the /BRK button (page 41). ± 1.0EV Shifts the exposure value by plus or minus 1.0EV. ± 0.7EV Shifts the exposure value by plus or ...; [ISO] is set to [Auto] in the Scene mode. • When shooting under blighter conditions, the camera automatically increases its tone reproduction and helps prevent images to [80] or [100].) (DSC-H5 only) (P.Quality) P S AM Selects the still image quality. Using the menu For details on the operation 1...
...ISO] is set the desired setting for [Bracket Step]. When you select a function other than Exposure Bracket, this function is selected with the /BRK button (page 41). ± 1.0EV Shifts the exposure value by plus or minus 1.0EV. ± 0.7EV Shifts the exposure value by plus or ...; [ISO] is set to [Auto] in the Scene mode. • When shooting under blighter conditions, the camera automatically increases its tone reproduction and helps prevent images to [80] or [100].) (DSC-H5 only) (P.Quality) P S AM Selects the still image quality. Using the menu For details on the operation 1...

User's Guide
Page 48
...is set the desired setting for [Interval]. Normal -( ) Toward -: Reduces the contrast. (Sharpness) P S AM Adjusts the sharpness of flash light that the camera adjusts automatically. For details on the operation 1 page 43 M (Interval) P S AM Selects the frame interval in 1/3 EV increments. • The value ... be set in the Multi Burst mode (page 41). 1/7.5 (1/7.5") 1/15 (1/15") 1/30 (1/30") • Select Multi Burst with the /BRK button first, set to (Flash forced off), you select a function other than Multi Burst, this adjustment may have no effect. • When the flash ...
...is set the desired setting for [Interval]. Normal -( ) Toward -: Reduces the contrast. (Sharpness) P S AM Adjusts the sharpness of flash light that the camera adjusts automatically. For details on the operation 1 page 43 M (Interval) P S AM Selects the frame interval in 1/3 EV increments. • The value ... be set in the Multi Burst mode (page 41). 1/7.5 (1/7.5") 1/15 (1/15") 1/30 (1/30") • Select Multi Burst with the /BRK button first, set to (Flash forced off), you select a function other than Multi Burst, this adjustment may have no effect. • When the flash ...

User's Guide
Page 49
...last image in a specified folder of a "Memory Stick Duo" (page 63). Using the menu Viewing menu For details on the control button. z On the folder The camera stores images in the folder is displayed, the following procedure. You can change the folder for recording images t [Change REC. OK See... the following indicators appear. : Moves to the previous folder. : Moves to the next folder. : Moves to play back when using the camera with "Memory Stick Duo". Folder] (page 63) • To change the folder or create a new one. • To create a new folder t [Create ...
...last image in a specified folder of a "Memory Stick Duo" (page 63). Using the menu Viewing menu For details on the control button. z On the folder The camera stores images in the folder is displayed, the following procedure. You can change the folder for recording images t [Change REC. OK See... the following indicators appear. : Moves to the previous folder. : Moves to the next folder. : Moves to play back when using the camera with "Memory Stick Duo". Folder] (page 63) • To change the folder or create a new one. • To create a new folder t [Create ...

User's Guide
Page 50
Protect Exit BACK/NEXT 4 To protect other images. 7 Press MENU. 8 Select [OK] with b/B on the control button, then press z. To protect images in single-image mode 1 Display the image you want to protect. 2 Press MENU to protect with ...v/V/b/B, then press z. Select [On] with b/B, then press z. Protect (-) See the following procedure. To protect images in step 4, and press z. indicator appears on the control button, then press z. 4 Select [Select] with v/V, then press z. 5 Select the image you want to display the menu. 3 Select [-] (Protect) with B, then press z....
Protect Exit BACK/NEXT 4 To protect other images. 7 Press MENU. 8 Select [OK] with b/B on the control button, then press z. To protect images in single-image mode 1 Display the image you want to protect. 2 Press MENU to protect with ...v/V/b/B, then press z. Select [On] with b/B, then press z. Protect (-) See the following procedure. To protect images in step 4, and press z. indicator appears on the control button, then press z. 4 Select [Select] with v/V, then press z. 5 Select the image you want to display the menu. 3 Select [-] (Protect) with B, then press z....

User's Guide
Page 52
...Stick Duo". Start Cancel See the following procedure. Cancels the slide show starts. The original image is retained even after resizing. 7M (DSC-H5 only) 6M (DSC-H2 only) The setting size is just a guideline, so it may vary depending on the image size, etc. (Resize) You can... . 1 Select [Interval], [Repeat] and [Image] with v/V/b/B on the control button. 2 Select [Start] with V/B, then press z. For details on the operation 1 page 43 Repeat On Off Plays back images in "Read This First" 5M (DSC-H5 only) 3M 2M VGA Cancel Cancels resizing. 1 Display the image you can change the...
...Stick Duo". Start Cancel See the following procedure. Cancels the slide show starts. The original image is retained even after resizing. 7M (DSC-H5 only) 6M (DSC-H2 only) The setting size is just a guideline, so it may vary depending on the image size, etc. (Resize) You can... . 1 Select [Interval], [Repeat] and [Image] with v/V/b/B on the control button. 2 Select [Start] with V/B, then press z. For details on the operation 1 page 43 Repeat On Off Plays back images in "Read This First" 5M (DSC-H5 only) 3M 2M VGA Cancel Cancels resizing. 1 Display the image you can change the...

User's Guide
Page 53
... the rotation. Cancels rotation. 1 Display the image to be rotated. 2 Press MENU to display the menu. 3 Select [ ] (Rotate) with b/B on the control button, then press z. 4 Select [ ] with v, then rotate the image with b/B. 5 Select [OK] with v/V, then press z. • You cannot rotate protected images..., movies, or Multi Burst images. • You may not be able to rotate images shot with other cameras. • When viewing images on a computer, the image rotation information may not be reflected depending on the software. (Divide) Cuts movies...
... the rotation. Cancels rotation. 1 Display the image to be rotated. 2 Press MENU to display the menu. 3 Select [ ] (Rotate) with b/B on the control button, then press z. 4 Select [ ] with v, then rotate the image with b/B. 5 Select [OK] with v/V, then press z. • You cannot rotate protected images..., movies, or Multi Burst images. • You may not be able to rotate images shot with other cameras. • When viewing images on a computer, the image rotation information may not be reflected depending on the software. (Divide) Cuts movies...


