
Operating Instructions
Page 12
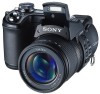
Shoulder strap 12 1 2 3 4 Attaching the lens cap and the shoulder strap Lens cap A Hook for shoulder strap 5 B Tripod receptacle C Microphone D Lens 6 E ACC (Accessory) jack F Battery/"Memory Stick" cover (14) 7 G RESET button (119) H Battery eject lever (15) 8 I Hook for shoulder strap 9 • Use the ACC (accessory) jack to tripods having longer screws, and may damage the camera. You will be unable to firmly secure the camera to connect an external flash or the remote control tripod. • Use a tripod with a screw length of less than 5.5 mm (7/32 inch).
Shoulder strap 12 1 2 3 4 Attaching the lens cap and the shoulder strap Lens cap A Hook for shoulder strap 5 B Tripod receptacle C Microphone D Lens 6 E ACC (Accessory) jack F Battery/"Memory Stick" cover (14) 7 G RESET button (119) H Battery eject lever (15) 8 I Hook for shoulder strap 9 • Use the ACC (accessory) jack to tripods having longer screws, and may damage the camera. You will be unable to firmly secure the camera to connect an external flash or the remote control tripod. • Use a tripod with a screw length of less than 5.5 mm (7/32 inch).

Operating Instructions
Page 19
... from Step 3 above. 19 The POWER lamp lights in the direction of the arrow to v/V, then press the center. You can carry out this happens, reset the date and time by starting from Step 3. 2 , Slide the POWER switch in green and the Clock Set screen appears on the screen. 3 , Select the...
... from Step 3 above. 19 The POWER lamp lights in the direction of the arrow to v/V, then press the center. You can carry out this happens, reset the date and time by starting from Step 3. 2 , Slide the POWER switch in green and the Clock Set screen appears on the screen. 3 , Select the...

Operating Instructions
Page 119
... pack (page 14). p Install the battery pack correctly (page 14). - 119 Please see page 133. 2 Should your Sony dealer or local authorized Sony service facility. Troubleshooting Battery and power Symptom You cannot charge the battery pack. p Install the battery pack correctly (page 14).... The battery pack is working. The e on the camera again. (This will clear the date and time settings, etc.) RESET Troubleshooting 3 Should your camera still not work properly, consult your camera still not work properly, press the RESET button located inside the battery/"Memory Stick" cover, then...
... pack (page 14). p Install the battery pack correctly (page 14). - 119 Please see page 133. 2 Should your Sony dealer or local authorized Sony service facility. Troubleshooting Battery and power Symptom You cannot charge the battery pack. p Install the battery pack correctly (page 14).... The battery pack is working. The e on the camera again. (This will clear the date and time settings, etc.) RESET Troubleshooting 3 Should your camera still not work properly, consult your camera still not work properly, press the RESET button located inside the battery/"Memory Stick" cover, then...

Operating Instructions
Page 128
... not work, no operations can be printed with a pointed object, then turn on , but the camera does not work. 128 Cause • You are properly connected using other than this does not work, press the RESET button located inside the battery/"Memory Stick" cover with the date inserted. p Connect it . - - - - p Remove, and...
... not work, no operations can be printed with a pointed object, then turn on , but the camera does not work. 128 Cause • You are properly connected using other than this does not work, press the RESET button located inside the battery/"Memory Stick" cover with the date inserted. p Connect it . - - - - p Remove, and...

Operating Instructions
Page 133
...If this occurs, check the following code chart and take the corresponding countermeasure. A camera malfunction that you cannot reverse has occurred. or the data is inserted. Press the RESET button (page 119) located inside the battery/"Memory Stick" cover, then turn on ...alphabet letter appears Your camera has a self-diagnosis display. Self-diagnosis display Troubleshooting 133 times. Contact your Sony dealer or local authorized Sony service facility and inform them of the camera. An unformatted recording medium is damaged. The last two digits (indicated by ss...
...If this occurs, check the following code chart and take the corresponding countermeasure. A camera malfunction that you cannot reverse has occurred. or the data is inserted. Press the RESET button (page 119) located inside the battery/"Memory Stick" cover, then turn on ...alphabet letter appears Your camera has a self-diagnosis display. Self-diagnosis display Troubleshooting 133 times. Contact your Sony dealer or local authorized Sony service facility and inform them of the camera. An unformatted recording medium is damaged. The last two digits (indicated by ss...

Operating Instructions
Page 142
Resets the file numbering and starts from 0001 each time the folder is changed. (When the recording folder contains a file, a number one higher than the largest ... cable. - Item Language (Setup 2) Item File Number USB Connect Video Out Clock Set Setting - Sets the date and time (pages 19, 48). 142 Setting x Series Reset PictBridge/PTP/ xNormal NTSC PAL OK / Cancel Description Displays the menu items, warnings and messages in sequence even if the recording medium is changed . - Assigns...
Resets the file numbering and starts from 0001 each time the folder is changed. (When the recording folder contains a file, a number one higher than the largest ... cable. - Item Language (Setup 2) Item File Number USB Connect Video Out Clock Set Setting - Sets the date and time (pages 19, 48). 142 Setting x Series Reset PictBridge/PTP/ xNormal NTSC PAL OK / Cancel Description Displays the menu items, warnings and messages in sequence even if the recording medium is changed . - Assigns...
Operating Instructions
Page 159
... 93 Picture effect 79 Playback zoom 84 Pop-up Flash 69 Power on/off 18 Precautions 143 Precision digital zoom 31 Print (DPOF) mark 91 Program auto shooting 28, 54 Program shift 54 Protect 89 Q... Quick reference chart 155 Quick Review 29 R RAW 79 Red Eye Reduction 69 RESET button 119 Resize 90 Rotate 86 S Saturation 138 Scene Selection 37 Self-diagnosis display 133 Self-timer...Speed burst 75 T TIFF 80 Trimming 85 U USB 109, 117 USB driver 106 Using your camera abroad 17 V VGA 25 Viewing images on TV 41 Viewing movies on the LCD screen 101 Viewing...
... 93 Picture effect 79 Playback zoom 84 Pop-up Flash 69 Power on/off 18 Precautions 143 Precision digital zoom 31 Print (DPOF) mark 91 Program auto shooting 28, 54 Program shift 54 Protect 89 Q... Quick reference chart 155 Quick Review 29 R RAW 79 Red Eye Reduction 69 RESET button 119 Resize 90 Rotate 86 S Saturation 138 Scene Selection 37 Self-diagnosis display 133 Self-timer...Speed burst 75 T TIFF 80 Trimming 85 U USB 109, 117 USB driver 106 Using your camera abroad 17 V VGA 25 Viewing images on TV 41 Viewing movies on the LCD screen 101 Viewing...


