
Operating Instructions
Page 1
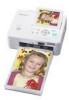
...the space provided below. Owner's Record The model and serial numbers are located on the bottom. DPP-FP65/FP75 Serial No Before you call upon your Sony dealer regarding this product. Refer to these numbers whenever you begin Preparations Direct printing Printing from a ... Additional information © 2008 Sony Corporation Please read "Read This First" and "About the Print Packs" supplied and this manual, "Operating Instructions", thoroughly and retain them for future reference. 3-285-375-11 (1) Digital Photo Printer DPP-FP65/FP75 Operating Instructions Before operating this unit...
...the space provided below. Owner's Record The model and serial numbers are located on the bottom. DPP-FP65/FP75 Serial No Before you call upon your Sony dealer regarding this product. Refer to these numbers whenever you begin Preparations Direct printing Printing from a ... Additional information © 2008 Sony Corporation Please read "Read This First" and "About the Print Packs" supplied and this manual, "Operating Instructions", thoroughly and retain them for future reference. 3-285-375-11 (1) Digital Photo Printer DPP-FP65/FP75 Operating Instructions Before operating this unit...
Operating Instructions
Page 2
...(2) this device must accept any interference received, including interference that to correct the interference by one or more of this digital photo printer. Reorient or relocate the receiving antenna. - Regulatory Information Declaration of the FCC Rules. However, there is encouraged to try to which...FCC related matters only. Note: This equipment has been tested and found compliant with part 15 of Conformity Trade Name: SONY Model No.: DPP-FP75 Responsible Party: Sony Electronics Inc. Connect the equipment into an outlet on , the 2 GB user is no guarantee that any changes ...
...(2) this device must accept any interference received, including interference that to correct the interference by one or more of this digital photo printer. Reorient or relocate the receiving antenna. - Regulatory Information Declaration of the FCC Rules. However, there is encouraged to try to which...FCC related matters only. Note: This equipment has been tested and found compliant with part 15 of Conformity Trade Name: SONY Model No.: DPP-FP75 Responsible Party: Sony Electronics Inc. Connect the equipment into an outlet on , the 2 GB user is no guarantee that any changes ...

Operating Instructions
Page 3
... recorded content which could otherwise be caused by accidental operation or malfunction of the printer, we recommend that this product shall not be treated as the supplied one and approved by use . Sony shall assume no responsibility for damages. Disposal of Old Electrical & Electronic Equipment ... fuse cover, please contact your data. Backup recommendations To avoid potential risk of data loss caused by inappropriate waste handling of the printer or memory card. Please regard the displayed image as pictures or publications, or any way. • Images may be handed over...
... recorded content which could otherwise be caused by accidental operation or malfunction of the printer, we recommend that this product shall not be treated as the supplied one and approved by use . Sony shall assume no responsibility for damages. Disposal of Old Electrical & Electronic Equipment ... fuse cover, please contact your data. Backup recommendations To avoid potential risk of data loss caused by inappropriate waste handling of the printer or memory card. Please regard the displayed image as pictures or publications, or any way. • Images may be handed over...
Operating Instructions
Page 5
... Print 26 Setting the print finish (Borders/ Borderless print 26 Setting the On-screen Display ....... 27 Changing the Color Setting 28 Hiding or showing the Printer information display 29 Resetting to the Default Setting ..... 29 Printing from a USB memory .......30 Printing from a PictBridge camera Printing from a PictBridge camera 31 Continued 5 GB
... Print 26 Setting the print finish (Borders/ Borderless print 26 Setting the On-screen Display ....... 27 Changing the Color Setting 28 Hiding or showing the Printer information display 29 Resetting to the Default Setting ..... 29 Printing from a USB memory .......30 Printing from a PictBridge camera Printing from a PictBridge camera 31 Continued 5 GB
Operating Instructions
Page 6
... for Bluetooth communication 32 Printing procedures 32 Printing from a PC Printing from a PC 34 Installing the software 34 System requirements 34 Installing the printer driver 35 Uninstalling the printer driver ........ 37 Installing the Picture Motion Browser 38 Uninstalling the Picture Motion Browser 39 Printing photos from the Picture Motion Browser 39 Registering...
... for Bluetooth communication 32 Printing procedures 32 Printing from a PC Printing from a PC 34 Installing the software 34 System requirements 34 Installing the printer driver 35 Uninstalling the printer driver ........ 37 Installing the Picture Motion Browser 38 Uninstalling the Picture Motion Browser 39 Printing photos from the Picture Motion Browser 39 Registering...

Operating Instructions
Page 7
..., see the pages indicated in the parentheses. Illustrations are of the DPP-FP65 are identical, although the LCD screen size is different. Printer front panel A 1 (on/standby) button/(standby) indicator B CANCEL/ (Index View) button C MENU button D LCD screen 2.4 type DPP-FP65 3.5 type DPP-FP75 E ENTER button F Direction (g/G/f/F) buttons G (Red-eye Correction) button (.page 20) H PRINT..., 62) N Ink ribbon eject lever (.page 9) O Ink ribbon (not supplied) (.page 9) P Ink ribbon compartment door (.page 9) Continued 7 GB The button locations and names of the DPP-FP75.
..., see the pages indicated in the parentheses. Illustrations are of the DPP-FP65 are identical, although the LCD screen size is different. Printer front panel A 1 (on/standby) button/(standby) indicator B CANCEL/ (Index View) button C MENU button D LCD screen 2.4 type DPP-FP65 3.5 type DPP-FP75 E ENTER button F Direction (g/G/f/F) buttons G (Red-eye Correction) button (.page 20) H PRINT..., 62) N Ink ribbon eject lever (.page 9) O Ink ribbon (not supplied) (.page 9) P Ink ribbon compartment door (.page 9) Continued 7 GB The button locations and names of the DPP-FP75.

Operating Instructions
Page 8
...computer, connect it to this connector. (*In some regions, the DPPA-BT1 Bluetooth USB adaptor is not sold.) Notes • When you carry the printer. Otherwise malfunctions may occur. • When using a PictBridge-compliant digital camera, a USB memory, a Bluetooth USB adaptor (DPPA-BT1*), or other...As illustrated below, raise the handle when you carry the printer, make sure to remove memory cards, USB memory, the paper tray, AC adaptor, and other cables. F PictBridge/EXT INTERFACE connector (.pages 31 to 32) When using the DPP-FP75, set the LCD panel to its original position. B ...
...computer, connect it to this connector. (*In some regions, the DPPA-BT1 Bluetooth USB adaptor is not sold.) Notes • When you carry the printer. Otherwise malfunctions may occur. • When using a PictBridge-compliant digital camera, a USB memory, a Bluetooth USB adaptor (DPPA-BT1*), or other...As illustrated below, raise the handle when you carry the printer, make sure to remove memory cards, USB memory, the paper tray, AC adaptor, and other cables. F PictBridge/EXT INTERFACE connector (.pages 31 to 32) When using the DPP-FP75, set the LCD panel to its original position. B ...

Operating Instructions
Page 9
...• Operating Instructions (this booklet) • Read This First (1) • About the Print Packs (1) • Warranty (In some regions, the warranty is not supplied.) • Sony End User Software License Agreement *1 The plug shape and specifications of the arrow until it clicks into place. 3 Close the ink ribbon compartment door. Setting... compartment door. 2 Insert the ink ribbon in the direction of the AC power cord differ depending on the region in which you purchased the printer. About Sony Print Packs (not supplied) Please use a Sony optional color print pack designed for the...
...• Operating Instructions (this booklet) • Read This First (1) • About the Print Packs (1) • Warranty (In some regions, the warranty is not supplied.) • Sony End User Software License Agreement *1 The plug shape and specifications of the arrow until it clicks into place. 3 Close the ink ribbon compartment door. Setting... compartment door. 2 Insert the ink ribbon in the direction of the AC power cord differ depending on the region in which you purchased the printer. About Sony Print Packs (not supplied) Please use a Sony optional color print pack designed for the...

Operating Instructions
Page 11
...deterioration of the printed image may result in imperfect printing. • Do not bend the print paper, or cut the print paper from the printer and close the slide door of the paper tray. • Avoid storing the paper with the printed faces touching each other or in its ...printing surface (the side with rubber or plastic products, including vinyl chloride or plasticizer for this printer only. - Riffle the print paper thoroughly. Then remove the protective sheet. • Insert the print paper with the protective sheet facing up to ...
...deterioration of the printed image may result in imperfect printing. • Do not bend the print paper, or cut the print paper from the printer and close the slide door of the paper tray. • Avoid storing the paper with the printed faces touching each other or in its ...printing surface (the side with rubber or plastic products, including vinyl chloride or plasticizer for this printer only. - Riffle the print paper thoroughly. Then remove the protective sheet. • Insert the print paper with the protective sheet facing up to ...

Operating Instructions
Page 12
... the power supply is connected to 240 V AC, 50/60 Hz. Keep 10 cm (13/32 inch) or more space at the rear of the printer. • Connect the AC adaptor to the wall outlet. Use a commercially available AC plug adaptor [a], if necessary, depending on a wobbly table. • Leave enough room... printing. Connecting to the AC power source 1 Insert the plug of the AC adaptor into the DC IN 24 V jack on the back of the printer. 2 Connect one plug of the AC power cord to the connector of the AC adaptor and the other plug to an easily accessible wall outlet...
... the power supply is connected to 240 V AC, 50/60 Hz. Keep 10 cm (13/32 inch) or more space at the rear of the printer. • Connect the AC adaptor to the wall outlet. Use a commercially available AC plug adaptor [a], if necessary, depending on a wobbly table. • Leave enough room... printing. Connecting to the AC power source 1 Insert the plug of the AC adaptor into the DC IN 24 V jack on the back of the printer. 2 Connect one plug of the AC power cord to the connector of the AC adaptor and the other plug to an easily accessible wall outlet...

Operating Instructions
Page 13
... Display: Off You can change the image preview view by setting the "On-screen Display" from the menu. (page 27) A Access indication Appears while the printer is displayed, do not remove a memory card or a USB memory, or do not turn off the power. Icons Meaning "Memory Stick" input SD Memory Card...
... Display: Off You can change the image preview view by setting the "On-screen Display" from the menu. (page 27) A Access indication Appears while the printer is displayed, do not remove a memory card or a USB memory, or do not turn off the power. Icons Meaning "Memory Stick" input SD Memory Card...

Operating Instructions
Page 15
....) Adjusting the picture quality of icons The following are displayed.) Print setup Date Print (26) Borders/Borderless (26) On-screen Display (27) Color Setting (28) Printer information display (29) Default Setting (29) (Resets the settings to the factorypreset default settings.) 15 GB You can proceed with operations by selecting a desired icon...
....) Adjusting the picture quality of icons The following are displayed.) Print setup Date Print (26) Borders/Borderless (26) On-screen Display (27) Color Setting (28) Printer information display (29) Default Setting (29) (Resets the settings to the factorypreset default settings.) 15 GB You can proceed with operations by selecting a desired icon...

Operating Instructions
Page 16
...next step. The standby indicator turns off. To print one copy of memory cards you can use a memory card, follow the notes described on the printer. A "Memory Stick Duo" adaptor is displayed on the LCD screen. 2 Press g/G to display the image that you want to use for printing: ...label side facing up into place. When multiple memory cards are inserted, the memory card inserted first will have the first priority. • The printer supports both standard and small sizes. Basic printing Inserting a memory card Prepare a memory card that you want to print. 3 Set the print ...
...next step. The standby indicator turns off. To print one copy of memory cards you can use a memory card, follow the notes described on the printer. A "Memory Stick Duo" adaptor is displayed on the LCD screen. 2 Press g/G to display the image that you want to use for printing: ...label side facing up into place. When multiple memory cards are inserted, the memory card inserted first will have the first priority. • The printer supports both standard and small sizes. Basic printing Inserting a memory card Prepare a memory card that you want to print. 3 Set the print ...

Operating Instructions
Page 17
...select switch. Even if you want to display the image preview for printing. If paper being displayed is printing; On selecting input The printer is ready for printing. To change the print quantity Display the image whose print quantity you have set a print quantity for other images...repeatedly until the image is canceled. If multiple memory cards or a USB memory are displayed automatically. The image being printed remains in the printer, remove the paper that emerges automatically and resume printing. • Do not remove the paper tray during printing. You can enlarge an image...
...select switch. Even if you want to display the image preview for printing. If paper being displayed is printing; On selecting input The printer is ready for printing. To change the print quantity Display the image whose print quantity you have set a print quantity for other images...repeatedly until the image is canceled. If multiple memory cards or a USB memory are displayed automatically. The image being printed remains in the printer, remove the paper that emerges automatically and resume printing. • Do not remove the paper tray during printing. You can enlarge an image...

Operating Instructions
Page 18
A variety of printing Press MENU and then select an icon of the desired operation. • Press g/G/f/F to correct the red-eye phenomenon of an image automatically. Enjoying various printing z Operation using the printer buttons Red-eye Correction MENU Red-eye Correction .page 20 Press the (Red-eye Correction) button to select the desired icon and press ENTER. 1 Edit 2 Layout Print 3 ID Photo Print 4 Batch Print 5 Print setup • To exit the menu, press MENU again. 18 GB
A variety of printing Press MENU and then select an icon of the desired operation. • Press g/G/f/F to correct the red-eye phenomenon of an image automatically. Enjoying various printing z Operation using the printer buttons Red-eye Correction MENU Red-eye Correction .page 20 Press the (Red-eye Correction) button to select the desired icon and press ENTER. 1 Edit 2 Layout Print 3 ID Photo Print 4 Batch Print 5 Print setup • To exit the menu, press MENU again. 18 GB

Operating Instructions
Page 19
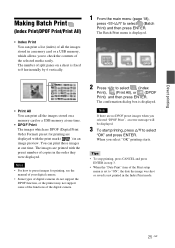
... for an identification card such as "Print All", "Index Print", and "DPOF Print". 5 Print setup .page 26 You can change the settings during printing, the printer settings, and on split screens to make a print You can make a print with 2-split, 4-split, 9-split, 13-split or 16-split images. 3 ID Photo Print...
... for an identification card such as "Print All", "Index Print", and "DPOF Print". 5 Print setup .page 26 You can change the settings during printing, the printer settings, and on split screens to make a print You can make a print with 2-split, 4-split, 9-split, 13-split or 16-split images. 3 ID Photo Print...

Operating Instructions
Page 20
... Correction). Notes • Depending on the image, the red-eye phenomenon may not be displayed on the screen. The automatic red-eye correction of this printer uses the technology of the selected image starts. in the Edit menu, the Red-eye Correction will also be cancelled. • During the Red-eye...
... Correction). Notes • Depending on the image, the red-eye phenomenon may not be displayed on the screen. The automatic red-eye correction of this printer uses the technology of the selected image starts. in the Edit menu, the Red-eye Correction will also be cancelled. • During the Red-eye...
Operating Instructions
Page 25
... Format) preset for printing, see the manual of your digital camera. • Some types of digital cameras do not support the DPOF function, or the printer may not support some of the functions of the digital camera. 2 Press g/G to select "OK" and press ENTER. The confirmation dialog box is fixed to...
... Format) preset for printing, see the manual of your digital camera. • Some types of digital cameras do not support the DPOF function, or the printer may not support some of the functions of the digital camera. 2 Press g/G to select "OK" and press ENTER. The confirmation dialog box is fixed to...

Operating Instructions
Page 29
... display menu is closed. 29 GB The printer settings are reset to select (Printer information display) and then press ENTER. The Printer information display window is displayed. The setting is displayed again. The Print setup window is fixed. Resetting to the Default ...Setting You can check the version number and total print quantity of the printer. To redo the operations Press CANCEL. Hiding or showing the Printer information display 1 From the (Print setup) menu, press g/G/f/F to their default settings. 2 Press ENTER. The ...
... display menu is closed. 29 GB The printer settings are reset to select (Printer information display) and then press ENTER. The Printer information display window is displayed. The setting is displayed again. The Print setup window is fixed. Resetting to the Default ...Setting You can check the version number and total print quantity of the printer. To redo the operations Press CANCEL. Hiding or showing the Printer information display 1 From the (Print setup) menu, press g/G/f/F to their default settings. 2 Press ENTER. The ...
Operating Instructions
Page 30
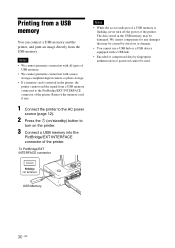
...a USB memory is inserted in the USB memory may be caused by fingerprint authentication or password cannot be damaged. The data stored in the printer, the printer cannot read the signal from the USB memory. Notes • We cannot guarantee connection with all types of USB memory. • We ... camera or photo storage. • If a memory card is flashing, never turn on /standby) button to the PictBridge/EXT INTERFACE connector of the printer. USB Memory 30 GB Remove the memory card, if any damages that may be used. Printing from a USB memory You can connect a USB memory...
...a USB memory is inserted in the USB memory may be caused by fingerprint authentication or password cannot be damaged. The data stored in the printer, the printer cannot read the signal from the USB memory. Notes • We cannot guarantee connection with all types of USB memory. • We ... camera or photo storage. • If a memory card is flashing, never turn on /standby) button to the PictBridge/EXT INTERFACE connector of the printer. USB Memory 30 GB Remove the memory card, if any damages that may be used. Printing from a USB memory You can connect a USB memory...


