Operating Guide
Page 2
... or moisture. Bernardo Dr, San Diego, CA 92127 U.S.A. Battery pack This device complies with Part 15 of rechargeable batteries, call : Sony Customer Information Center 1-800-222SONY (7669). Address: 16450 W. For customers in the U.S.A. and CANADA RECYCLING LITHIUM-ION BATTERIES 2 Lithium-Ion...maintenance (servicing) instructions in the literature accompanying the appliance. Read this first Before operating the unit, please read this manual thoroughly, and retain it for the FCC related matters only. Operation is intended to alert the user to persons. This ...
... or moisture. Bernardo Dr, San Diego, CA 92127 U.S.A. Battery pack This device complies with Part 15 of rechargeable batteries, call : Sony Customer Information Center 1-800-222SONY (7669). Address: 16450 W. For customers in the U.S.A. and CANADA RECYCLING LITHIUM-ION BATTERIES 2 Lithium-Ion...maintenance (servicing) instructions in the literature accompanying the appliance. Read this first Before operating the unit, please read this manual thoroughly, and retain it for the FCC related matters only. Operation is intended to alert the user to persons. This ...
Operating Guide
Page 3
...- CAUTION You are cautioned that any changes or modifications not expressly approved in this manual could void your authority to operate this may cause a malfunction of your camcorder. DCR-HC21 Serial No. Model No. Viewfinder LCD Panel Battery pack •... a residential installation. This equipment generates, uses, and can use Your camcorder is connected. - Reorient or relocate the receiving antenna. - On using the supplied software (stored on use in your Sony dealer regarding this equipment does cause harmful interference to provide reasonable protection against...
...- CAUTION You are cautioned that any changes or modifications not expressly approved in this manual could void your authority to operate this may cause a malfunction of your camcorder. DCR-HC21 Serial No. Model No. Viewfinder LCD Panel Battery pack •... a residential installation. This equipment generates, uses, and can use Your camcorder is connected. - Reorient or relocate the receiving antenna. - On using the supplied software (stored on use in your Sony dealer regarding this equipment does cause harmful interference to provide reasonable protection against...
Operating Guide
Page 4
...in any problems. • Compensation for effective use. On this manual • The images of such materials may be copyrighted. The number value indicates the amount of the pixels are used in Germany, and Sony Corporation, and produces superior images. Unauthorized recording of the LCD ...color) that is grayed out is equipped with a Carl Zeiss lens, which was developed jointly by Carl Zeiss, in this manual for long periods of the camcorder, storage media, etc. • TV color systems differ depending on the countries/regions. Change the screen language before using ...
...in any problems. • Compensation for effective use. On this manual • The images of such materials may be copyrighted. The number value indicates the amount of the pixels are used in Germany, and Sony Corporation, and produces superior images. Unauthorized recording of the LCD ...color) that is grayed out is equipped with a Carl Zeiss lens, which was developed jointly by Carl Zeiss, in this manual for long periods of the camcorder, storage media, etc. • TV color systems differ depending on the countries/regions. Change the screen language before using ...
Operating Guide
Page 6
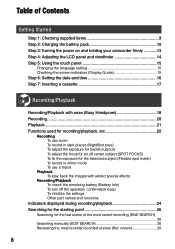
... supplied items 9 Step 2: Charging the battery pack 10 Step 3: Turning the power on and holding your camcorder firmly ...........13 Step 4: Adjusting the LCD panel and viewfinder 14 Step 5: Using the ... Setting the date and time 16 Step 7: Inserting a cassette 17 Recording/Playback Recording/Playback with ease (Easy Handycam 18 Recording 20 Playback 21 Functions used for recording/playback, etc 22 Recording To use zoom To record in ...of the most recent recording (END SEARCH) ...26 Searching manually (EDIT SEARCH 26 Reviewing the most recently recorded scenes (Rec review 26 6
... supplied items 9 Step 2: Charging the battery pack 10 Step 3: Turning the power on and holding your camcorder firmly ...........13 Step 4: Adjusting the LCD panel and viewfinder 14 Step 5: Using the ... Setting the date and time 16 Step 7: Inserting a cassette 17 Recording/Playback Recording/Playback with ease (Easy Handycam 18 Recording 20 Playback 21 Functions used for recording/playback, etc 22 Recording To use zoom To record in ...of the most recent recording (END SEARCH) ...26 Searching manually (EDIT SEARCH 26 Reviewing the most recently recorded scenes (Rec review 26 6
Operating Guide
Page 7
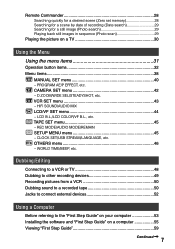
... Installing the software and "First Step Guide" on a TV 30 Using the Menu Using the menu items 31 Operation button items 32 Menu items 38 MANUAL SET menu 40 - VCR SET menu 43 - Remote Commander 28 Searching quickly for a desired scene (Zero set memory 28 Searching for a scene by date of...
... Installing the software and "First Step Guide" on a TV 30 Using the Menu Using the menu items 31 Operation button items 32 Menu items 38 MANUAL SET menu 40 - VCR SET menu 43 - Remote Commander 28 Searching quickly for a desired scene (Zero set memory 28 Searching for a scene by date of...
Operating Guide
Page 9
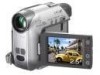
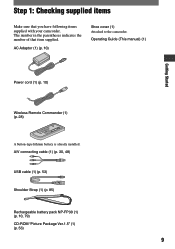
Operating Guide (This manual) (1) Getting Started Power cord (1) (p. 10) Wireless Remote Commander (1) (p. 28) A button-type lithium battery is already installed. Step 1: Checking supplied items Make sure that item supplied. A/V ... (1) (p. 53) Shoulder Strap (1) (p. 85) Rechargeable battery pack NP-FP30 (1) (p. 10, 79) CD-ROM "Picture Package Ver.1.5" (1) (p. 53) 9 AC Adaptor (1) (p. 10) Shoe cover (1) Attached to the camcorder. The number in the parentheses indicates the number of that you have following items supplied with your...
Operating Guide (This manual) (1) Getting Started Power cord (1) (p. 10) Wireless Remote Commander (1) (p. 28) A button-type lithium battery is already installed. Step 1: Checking supplied items Make sure that item supplied. A/V ... (1) (p. 53) Shoulder Strap (1) (p. 85) Rechargeable battery pack NP-FP30 (1) (p. 10, 79) CD-ROM "Picture Package Ver.1.5" (1) (p. 53) 9 AC Adaptor (1) (p. 10) Shoe cover (1) Attached to the camcorder. The number in the parentheses indicates the number of that you have following items supplied with your...
Operating Guide
Page 15
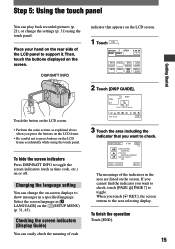
... the screen indicators (such as explained above when you touch [ RET.], the screen returns to the area selecting display. DISP GUIDE STBY END 1/3 EXPOSURE: MANUAL FOCUS: MANUAL(NEAR) BACK LIGHT: ON PAGE PAGE RET. Then, touch the buttons displayed on the screen. Checking the screen indicators (Display Guide) You can change the...
... the screen indicators (such as explained above when you touch [ RET.], the screen returns to the area selecting display. DISP GUIDE STBY END 1/3 EXPOSURE: MANUAL FOCUS: MANUAL(NEAR) BACK LIGHT: ON PAGE PAGE RET. Then, touch the buttons displayed on the screen. Checking the screen indicators (Display Guide) You can change the...

Operating Guide
Page 16
...]. In that case, charge the rechargeable battery and then set the date and time, the CLOCK SET screen appears every time you turn on your camcorder for the first time. SETUP MENU CLOCK SET USB STREAM LANGUAGE DEMO MODE --:--:-- EXEC RET. 16 If you do not use your... camcorder. • If you do not set the date and time again (p. 83). MANUAL SET PROGRAM AE P EFFECT FLASH MODE FLASH LVL AUTO SHTR EXEC RET. 3 Select [CLOCK SET] with , then touch [EXEC...
...]. In that case, charge the rechargeable battery and then set the date and time, the CLOCK SET screen appears every time you turn on your camcorder for the first time. SETUP MENU CLOCK SET USB STREAM LANGUAGE DEMO MODE --:--:-- EXEC RET. 16 If you do not use your... camcorder. • If you do not set the date and time again (p. 83). MANUAL SET PROGRAM AE P EFFECT FLASH MODE FLASH LVL AUTO SHTR EXEC RET. 3 Select [CLOCK SET] with , then touch [EXEC...
Operating Guide
Page 22
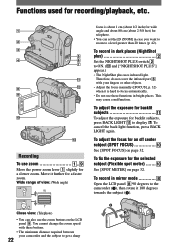
Wide range of view: (Wide angle) focus is hard to the camcorder (), then rotate it 180 degrees towards the subject (). To adjust the exposure for backlit subjects To adjust the exposure for telephoto. • You... to focus automatically. • Do not use these buttons. • The minimum distance required between your fingers or other objects. • Adjust the focus manually ([FOCUS], p. 32) when it further for a slower zoom. Functions used for recording/playback, etc. 1 2 3 5 4 6 7 qa 8 qs 9 0 qd Recording To use zoom Move the power zoom...
Wide range of view: (Wide angle) focus is hard to the camcorder (), then rotate it 180 degrees towards the subject (). To adjust the exposure for backlit subjects To adjust the exposure for telephoto. • You... to focus automatically. • Do not use these buttons. • The minimum distance required between your fingers or other objects. • Adjust the focus manually ([FOCUS], p. 32) when it further for a slower zoom. Functions used for recording/playback, etc. 1 2 3 5 4 6 7 qa 8 qs 9 0 qd Recording To use zoom Move the power zoom...

Operating Guide
Page 25
... (41) Meaning DV input (50) Zero set memory (28) Meaning Self-timer recording (34) NightShot plus (22) Warning (74) Meaning Flexible spot meter (32)/ Manual exposure (33) Manual focus (32) Backlight (22) Indicator Meaning PROGRAM AE (40) Picture effect (40) White balance (33) Wide select (42) SteadyShot off (42) • You...
... (41) Meaning DV input (50) Zero set memory (28) Meaning Self-timer recording (34) NightShot plus (22) Warning (74) Meaning Flexible spot meter (32)/ Manual exposure (33) Manual focus (32) Backlight (22) Indicator Meaning PROGRAM AE (40) Picture effect (40) White balance (33) Wide select (42) SteadyShot off (42) • You...
Operating Guide
Page 26
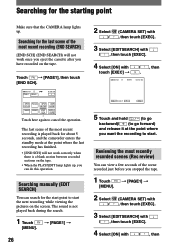
... work correctly when there is a blank section between recorded sections on the screen. The sound is played back for about 5 seconds, and the camcorder enters the standby mode at the point where you want the recording to cancel the operation. Searching for the start point to start . Reviewing the...Touch here again to start the next recording while viewing the pictures on the tape. • When the PLAY/EDIT lamp lights up . Searching manually (EDIT SEARCH) You can search for the last scene of the most recently recorded scenes (Rec review) You can view a few seconds of the...
... work correctly when there is a blank section between recorded sections on the screen. The sound is played back for about 5 seconds, and the camcorder enters the standby mode at the point where you want the recording to cancel the operation. Searching for the start point to start . Reviewing the...Touch here again to start the next recording while viewing the pictures on the tape. • When the PLAY/EDIT lamp lights up . Searching manually (EDIT SEARCH) You can search for the last scene of the most recently recorded scenes (Rec review) You can view a few seconds of the...
Operating Guide
Page 30
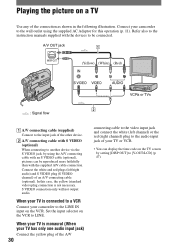
... connect the white (left /right audio) and S VIDEO plug (S VIDEO channel) of your camcorder to the LINE IN input on the TV screen by setting [DISP OUT] to the instruction manuals supplied with the supplied A/V cable connection. Connect your camcorder to the wall outlet using the A/V connecting cable with an S VIDEO cable (optional...
... connect the white (left /right audio) and S VIDEO plug (S VIDEO channel) of your camcorder to the LINE IN input on the TV screen by setting [DISP OUT] to the instruction manuals supplied with the supplied A/V cable connection. Connect your camcorder to the wall outlet using the A/V connecting cable with an S VIDEO cable (optional...

Operating Guide
Page 31
... OUT REC LAMP STBY OFF EXEC RET. Touch [MENU] on PAGE1/PAGE2/PAGE3 For details of the button items, see page 40. MANUAL SET PROGRAM AE P EFFECT FLASH MODE FLASH LVL AUTO SHTR STBY OTHERS WORLD TIME BEEP A.SHUT OFF COMMANDER DISP OUT REC LAMP STBY 0 HR...
... OUT REC LAMP STBY OFF EXEC RET. Touch [MENU] on PAGE1/PAGE2/PAGE3 For details of the button items, see page 40. MANUAL SET PROGRAM AE P EFFECT FLASH MODE FLASH LVL AUTO SHTR STBY OTHERS WORLD TIME BEEP A.SHUT OFF COMMANDER DISP OUT REC LAMP STBY 0 HR...
Operating Guide
Page 32
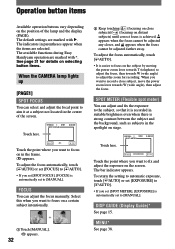
... focal point to focus on in parentheses appear when the items are selected. The bar indicator appears. FOCUS You can adjust the focus manually. When you want to the subject, so that it at a subject not located in the spotlight on stage. The indicators in the... Keep touching (focusing on close subject, move the power zoom lever towards W (wide angle) to [MANUAL]. MENU* See page 38. The available functions during Easy Handycam operation are marked with *. Operation button items Available operation buttons vary depending on the position of the screen. The ...
... focal point to focus on in parentheses appear when the items are selected. The bar indicator appears. FOCUS You can adjust the focus manually. When you want to the subject, so that it at a subject not located in the spotlight on stage. The indicators in the... Keep touching (focusing on close subject, move the power zoom lever towards W (wide angle) to [MANUAL]. MENU* See page 38. The available functions during Easy Handycam operation are marked with *. Operation button items Available operation buttons vary depending on the position of the screen. The ...
Operating Guide
Page 33
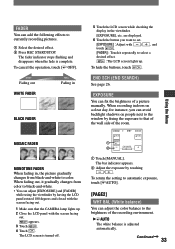
...you want to set. [EXPOSURE] : Adjust with the screen facing out. END SCH (END SEARCH) See page 26. AL 2 EXPOSURE Touch [MANUAL]. To return the setting to color. When fading out, it gradually changes from black-and-white to automatic exposure, touch [ AUTO]. [PAGE2] WHT BAL ...(White balance) You can fix the brightness of a picture manually. The bar indicator appears. Adjust the exposure by fixing the exposure to that the CAMERA lamp lights up. 2 Close the LCD panel...
...you want to set. [EXPOSURE] : Adjust with the screen facing out. END SCH (END SEARCH) See page 26. AL 2 EXPOSURE Touch [MANUAL]. To return the setting to color. When fading out, it gradually changes from black-and-white to automatic exposure, touch [ AUTO]. [PAGE2] WHT BAL ...(White balance) You can fix the brightness of a picture manually. The bar indicator appears. Adjust the exposure by fixing the exposure to that the CAMERA lamp lights up. 2 Close the LCD panel...

Operating Guide
Page 38
...; × × 38 Menu items MANUAL SET menu (p. 40) PROGRAM AE P EFFECT FLASH MODE FLASH LVL AUTO SHTR CAMERA SET menu (p. 42) D ZOOM WIDE SEL STEADYSHOT EDITSEARCH N.S.LIGHT VCR SET menu...
...; × × 38 Menu items MANUAL SET menu (p. 40) PROGRAM AE P EFFECT FLASH MODE FLASH LVL AUTO SHTR CAMERA SET menu (p. 42) D ZOOM WIDE SEL STEADYSHOT EDITSEARCH N.S.LIGHT VCR SET menu...

Operating Guide
Page 40
...SKI*( ) Select to automatically record pictures effectively without the [PROGRAM AE] function. B&W Pictures appear in sepia. This setting also prevents your camcorder from 40 The color and brightness are marked with . The default settings are reversed. SUNSETMOON**( ) Select to minimize shake when shooting ... or playback. LANDSCAPE**( ) Select to bring out the subject such as sunsets, general night views or fireworks. MANUAL SET menu - PORTRAIT (Soft portrait) ( ) Select to shoot distant subjects clearly. SEPIA Pictures appear in black and white.
...SKI*( ) Select to automatically record pictures effectively without the [PROGRAM AE] function. B&W Pictures appear in sepia. This setting also prevents your camcorder from 40 The color and brightness are marked with . The default settings are reversed. SUNSETMOON**( ) Select to minimize shake when shooting ... or playback. LANDSCAPE**( ) Select to bring out the subject such as sunsets, general night views or fireworks. MANUAL SET menu - PORTRAIT (Soft portrait) ( ) Select to shoot distant subjects clearly. SEPIA Pictures appear in black and white.
Operating Guide
Page 48
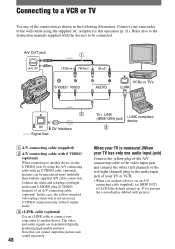
In this operation (p. 11). Connect your camcorder to another device. LINK (IEEE1394) jack 3 i.LINK compliant device A/V connecting cable (supplied) ...(right channel) plug to the audio input jack of an A/V connecting cable (optional). Refer also to the instruction manuals supplied with the devices to prevent the screen display dubbed with the supplied A/V cable connection. Note that you cannot ... the white (left /right audio) and S VIDEO plug (S VIDEO channel) of your camcorder to a VCR or TV Use any of the connection as shown in the following illustration.
In this operation (p. 11). Connect your camcorder to another device. LINK (IEEE1394) jack 3 i.LINK compliant device A/V connecting cable (supplied) ...(right channel) plug to the audio input jack of an A/V connecting cable (optional). Refer also to the instruction manuals supplied with the devices to prevent the screen display dubbed with the supplied A/V cable connection. Note that you cannot ... the white (left /right audio) and S VIDEO plug (S VIDEO channel) of your camcorder to a VCR or TV Use any of the connection as shown in the following illustration.
Operating Guide
Page 54
...Hard disk: Available memory required for installation 250 MB or more Available free hard disk space recommended: 4 GB or more (depending on your camcorder and computer and making settings, to general operation the first time you can refer to on the size of the image fi... a computer" (p. 55), start the "First Step Guide," then follow the instructions. About "First Step Guide" "First Step Guide" is an instruction manual you use the software stored on the CDROM (supplied). This "First Step Guide" describes basic operations, from initial hookup of all the software applications.
...Hard disk: Available memory required for installation 250 MB or more Available free hard disk space recommended: 4 GB or more (depending on your camcorder and computer and making settings, to general operation the first time you can refer to on the size of the image fi... a computer" (p. 55), start the "First Step Guide," then follow the instructions. About "First Step Guide" "First Step Guide" is an instruction manual you use the software stored on the CDROM (supplied). This "First Step Guide" describes basic operations, from initial hookup of all the software applications.
Operating Guide
Page 56
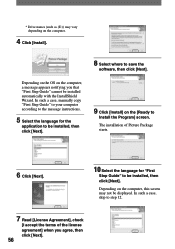
... depending on the [Ready to Install the Program] screen. * Drive names (such as (E:)) may not be installed automatically with the InstallShield Wizard. In such a case, manually copy "First Step Guide" to your computer according to the message instructions. 5 Select the language for "First Step Guide" to be installed, then click [Next...
... depending on the [Ready to Install the Program] screen. * Drive names (such as (E:)) may not be installed automatically with the InstallShield Wizard. In such a case, manually copy "First Step Guide" to your computer according to the message instructions. 5 Select the language for "First Step Guide" to be installed, then click [Next...


