Operating Guide
Page 3
... guides. - These limits are designed to correct the interference by the following measures: - Connect the equipment into an outlet on use in your camcorder A mini DV cassette marked with (mini DV cassettes with a USB or i.LINK cable, be damaged, or this may cause a malfunction of ... can use Your camcorder is supplied with the instructions, may be sure to operate this equipment. Model No. Model No. "First Step Guide" for help. CAUTION You are cautioned that any changes or modifications not expressly approved in this manual could void your Sony dealer regarding this ...
... guides. - These limits are designed to correct the interference by the following measures: - Connect the equipment into an outlet on use in your camcorder A mini DV cassette marked with (mini DV cassettes with a USB or i.LINK cable, be damaged, or this may cause a malfunction of ... can use Your camcorder is supplied with the instructions, may be sure to operate this equipment. Model No. Model No. "First Step Guide" for help. CAUTION You are cautioned that any changes or modifications not expressly approved in this manual could void your Sony dealer regarding this ...
Operating Guide
Page 4
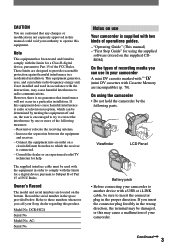
...way. • Exposing the LCD screen, the viewfinder, or the lens to a malfunction of the camcorder, storage media, etc. • TV color systems differ depending on the countries/regions. On this manual • The images of time may cause malfunctions. • Do not aim at dusk. On the menu... may be provided, even if recording or playback is not possible due to direct sunlight for the contents of the sun only in Germany, and Sony Corporation, and produces superior images. Take pictures of recordings cannot be some tiny black points and/or bright points (white, red, blue, or...
...way. • Exposing the LCD screen, the viewfinder, or the lens to a malfunction of the camcorder, storage media, etc. • TV color systems differ depending on the countries/regions. On this manual • The images of time may cause malfunctions. • Do not aim at dusk. On the menu... may be provided, even if recording or playback is not possible due to direct sunlight for the contents of the sun only in Germany, and Sony Corporation, and produces superior images. Take pictures of recordings cannot be some tiny black points and/or bright points (white, red, blue, or...
Operating Guide
Page 6
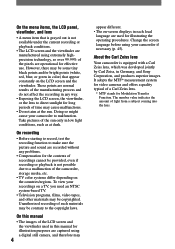
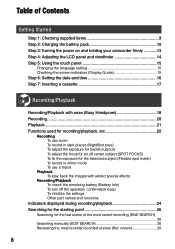
... supplied items 9 Step 2: Charging the battery pack 10 Step 3: Turning the power on and holding your camcorder firmly ...........13 Step 4: Adjusting the LCD panel and viewfinder 14 Step 5: Using the ... Setting the date and time 16 Step 7: Inserting a cassette 17 Recording/Playback Recording/Playback with ease (Easy Handycam 18 Recording 20 Playback 21 Functions used for recording/playback, etc 22 Recording To use zoom To record in ...of the most recent recording (END SEARCH) ...26 Searching manually (EDIT SEARCH 26 Reviewing the most recently recorded scenes (Rec review 26 6
... supplied items 9 Step 2: Charging the battery pack 10 Step 3: Turning the power on and holding your camcorder firmly ...........13 Step 4: Adjusting the LCD panel and viewfinder 14 Step 5: Using the ... Setting the date and time 16 Step 7: Inserting a cassette 17 Recording/Playback Recording/Playback with ease (Easy Handycam 18 Recording 20 Playback 21 Functions used for recording/playback, etc 22 Recording To use zoom To record in ...of the most recent recording (END SEARCH) ...26 Searching manually (EDIT SEARCH 26 Reviewing the most recently recorded scenes (Rec review 26 6
Operating Guide
Page 9
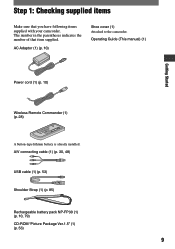
... (This manual) (1) Getting Started Power cord (1) (p. 10) Wireless Remote Commander (1) (p. 28) A button-type lithium battery is already installed. Step 1: Checking supplied items Make sure that item supplied. AC Adaptor (1) (p. 10) Shoe cover (1) Attached to the camcorder. The ...number in the parentheses indicates the number of that you have following items supplied with your camcorder. A/V connecting cable (1) (p. 30, 48) USB cable (1) (p. 53) Shoulder Strap (1) ...
... (This manual) (1) Getting Started Power cord (1) (p. 10) Wireless Remote Commander (1) (p. 28) A button-type lithium battery is already installed. Step 1: Checking supplied items Make sure that item supplied. AC Adaptor (1) (p. 10) Shoe cover (1) Attached to the camcorder. The ...number in the parentheses indicates the number of that you have following items supplied with your camcorder. A/V connecting cable (1) (p. 30, 48) USB cable (1) (p. 53) Shoulder Strap (1) ...

Operating Guide
Page 16
...; If you do not use your camcorder for about 3 months, the built-in rechargeable battery gets discharged and the date and time settings may be cleared from the memory. MANUAL SET PROGRAM AE P EFFECT FLASH MODE FLASH LVL AUTO SHTR EXEC RET. 3 Select [CLOCK SET] with , then touch [EXEC]. CLOCK SET...minute), then touch . For midday, set it to the year 2079. Step 6: Setting the date and time Set the date and time when using this camcorder for the first time. 1 Touch [MENU]. If you set the date and time again (p. 83). SETUP MENU CLOCK SET USB STREAM LANGUAGE ...
...; If you do not use your camcorder for about 3 months, the built-in rechargeable battery gets discharged and the date and time settings may be cleared from the memory. MANUAL SET PROGRAM AE P EFFECT FLASH MODE FLASH LVL AUTO SHTR EXEC RET. 3 Select [CLOCK SET] with , then touch [EXEC]. CLOCK SET...minute), then touch . For midday, set it to the year 2079. Step 6: Setting the date and time Set the date and time when using this camcorder for the first time. 1 Touch [MENU]. If you set the date and time again (p. 83). SETUP MENU CLOCK SET USB STREAM LANGUAGE ...
Operating Guide
Page 22
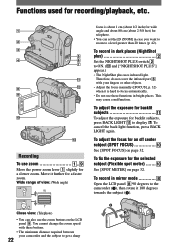
...may cause a malfunction. Wide range of view: (Wide angle) focus is hard to display . You cannot change the zoom speed with your camcorder and the subject to ON. ( and ["NIGHTSHOT PLUS"] appear.) • The NightShot plus uses infrared light. To adjust the exposure for backlit subjects...• You can also use these buttons. • The minimum distance required between your fingers or other objects. • Adjust the focus manually ([FOCUS], p. 32) when it further for the selected subject (Flexible spot meter See [SPOT METER] on the LCD panel . To record in...
...may cause a malfunction. Wide range of view: (Wide angle) focus is hard to display . You cannot change the zoom speed with your camcorder and the subject to ON. ( and ["NIGHTSHOT PLUS"] appear.) • The NightShot plus uses infrared light. To adjust the exposure for backlit subjects...• You can also use these buttons. • The minimum distance required between your fingers or other objects. • Adjust the focus manually ([FOCUS], p. 32) when it further for the selected subject (Flexible spot meter See [SPOT METER] on the LCD panel . To record in...
Operating Guide
Page 26
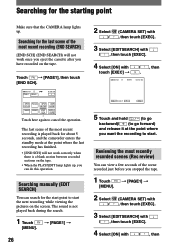
... / , then touch [EXEC]. 4 Select [ON] with / touch [EXEC] . 60min STBY 0:00:00 , then EDIT FN 5 Touch and hold (to go backward)/ (to start . Searching manually (EDIT SEARCH) You can view a few seconds of the most recent recording (END SEARCH) [END SCH] (END SEARCH) will not work once you eject the... cassette after you want the recording to cancel the operation. Searching for about 5 seconds, and the camcorder enters the standby mode at the point where you have recorded on the screen.
... / , then touch [EXEC]. 4 Select [ON] with / touch [EXEC] . 60min STBY 0:00:00 , then EDIT FN 5 Touch and hold (to go backward)/ (to start . Searching manually (EDIT SEARCH) You can view a few seconds of the most recent recording (END SEARCH) [END SCH] (END SEARCH) will not work once you eject the... cassette after you want the recording to cancel the operation. Searching for about 5 seconds, and the camcorder enters the standby mode at the point where you have recorded on the screen.
Operating Guide
Page 30
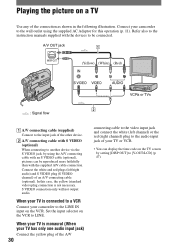
S VIDEO connection only will not output audio. Connect your camcorder to be reproduced more faithfully than with the devices to the LINE IN input on the VCR. Refer also to the instruction manuals supplied with the supplied A/V cable connection. A/V OUT jack 1 (Yellow) (White) (Red) IN VCRs or TVs 2 : Signal flow A/V connecting...
S VIDEO connection only will not output audio. Connect your camcorder to be reproduced more faithfully than with the devices to the LINE IN input on the VCR. Refer also to the instruction manuals supplied with the supplied A/V cable connection. A/V OUT jack 1 (Yellow) (White) (Red) IN VCRs or TVs 2 : Signal flow A/V connecting...

Operating Guide
Page 40
...Select to automatically record pictures effectively without the [PROGRAM AE] function. P EFFECT (Picture effect) You can record pictures effectively in between the camcorder and the subject. • Items with . SEPIA Pictures appear in black and white. B&W Pictures appear in sepia. SOLARIZE PORTRAIT (... AUTO Select to maintain the atmosphere of situations such as people or flowers while creating a soft background. MANUAL SET menu - LANDSCAPE**( ) Select to prevent people's faces from appearing excessively white when subjects are reversed. See page 31...
...Select to automatically record pictures effectively without the [PROGRAM AE] function. P EFFECT (Picture effect) You can record pictures effectively in between the camcorder and the subject. • Items with . SEPIA Pictures appear in black and white. B&W Pictures appear in sepia. SOLARIZE PORTRAIT (... AUTO Select to maintain the atmosphere of situations such as people or flowers while creating a soft background. MANUAL SET menu - LANDSCAPE**( ) Select to prevent people's faces from appearing excessively white when subjects are reversed. See page 31...
Operating Guide
Page 48
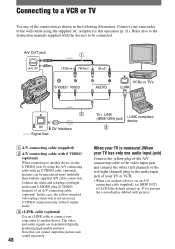
Refer also to the instruction manuals supplied with the devices to another device. In this operation (p. 11). The video and audio signals are transmitted digitally, producing high quality pictures. A/V OUT jack 1 (... i.LINK cable to connect your TV or VCR. • When you cannot output the picture and sound separately. 48 When your camcorder to a VCR or TV Use any of your camcorder to prevent the screen display dubbed with pictures. Connect the white and red plugs (left channel) or the red (right channel...
Refer also to the instruction manuals supplied with the devices to another device. In this operation (p. 11). The video and audio signals are transmitted digitally, producing high quality pictures. A/V OUT jack 1 (... i.LINK cable to connect your TV or VCR. • When you cannot output the picture and sound separately. 48 When your camcorder to a VCR or TV Use any of your camcorder to prevent the screen display dubbed with pictures. Connect the white and red plugs (left channel) or the red (right channel...
Operating Guide
Page 54
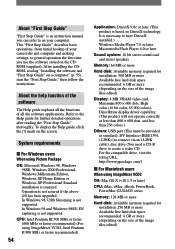
... function of the software The Help guide explains all the software applications. About "First Step Guide" "First Step Guide" is an instruction manual you use the software stored on your camcorder and computer and making settings, to create a video CD. System requirements For Windows users When using ImageMixer VCD2 OS: Mac...
... function of the software The Help guide explains all the software applications. About "First Step Guide" "First Step Guide" is an instruction manual you use the software stored on your camcorder and computer and making settings, to create a video CD. System requirements For Windows users When using ImageMixer VCD2 OS: Mac...

Operating Guide
Page 66
... Refer also to "Adjusting the image during recording Refer also to "Menu" (p. 69). You cannot record a smooth transition on the same tape. - Adjust the focus manually (p. 32). 66 Rewind it, or insert a new cassette. • Set the write-protect tab to REC or insert a new cassette (p. 78). • The tape is.... • Two or more flashes are not suitable for at least 1 hour, then re-insert the cassette (p. 82). Remove the cassette and leave your camcorder for auto focus. Perform END SEARCH (p. 26). -
... Refer also to "Adjusting the image during recording Refer also to "Menu" (p. 69). You cannot record a smooth transition on the same tape. - Adjust the focus manually (p. 32). 66 Rewind it, or insert a new cassette. • Set the write-protect tab to REC or insert a new cassette (p. 78). • The tape is.... • Two or more flashes are not suitable for at least 1 hour, then re-insert the cassette (p. 82). Remove the cassette and leave your camcorder for auto focus. Perform END SEARCH (p. 26). -


