Operating Guide
Page 6
...99) Types of the FCC Rules. This product has received UL Listing. Operation is supplied with a computer connected (stored on use Your camcorder is subject to the following two conditions: (1) This device may not cause harmful interference, and (2) this device must accept any interference ... call: Sony Customer Information Center 1-800-222-SONY (7669). Connect the equipment into an outlet on , the user is for the FCC related matters only. Read this before operating your camcorder You can use the following discs only. - 8cm DVD-RW - 8cm DVD+RW - 8cm DVD-R - 8cm DVD+R DL Reorient...
...99) Types of the FCC Rules. This product has received UL Listing. Operation is supplied with a computer connected (stored on use Your camcorder is subject to the following two conditions: (1) This device may not cause harmful interference, and (2) this device must accept any interference ... call: Sony Customer Information Center 1-800-222-SONY (7669). Connect the equipment into an outlet on , the user is for the FCC related matters only. Read this before operating your camcorder You can use the following discs only. - 8cm DVD-RW - 8cm DVD+RW - 8cm DVD-R - 8cm DVD+R DL Reorient...

Operating Guide
Page 8
..., when you dispose of the camcorder, it is equipped with a Carl Zeiss lens, which was developed jointly by Carl Zeiss, in Germany, and Sony Corporation, and produces superior images. About disposal/transfer (DCRDVD850) Even if you perform [MEDIA... FORMAT] (p. 73) or delete all the images recorded on -screen displays in color) that appear constantly on the LCD screen and the viewfinder. Unauthorized recording of such materials may be saved or recorded. DCR-DVD650 Use a DVD-RW/DVD...
..., when you dispose of the camcorder, it is equipped with a Carl Zeiss lens, which was developed jointly by Carl Zeiss, in Germany, and Sony Corporation, and produces superior images. About disposal/transfer (DCRDVD850) Even if you perform [MEDIA... FORMAT] (p. 73) or delete all the images recorded on -screen displays in color) that appear constantly on the LCD screen and the viewfinder. Unauthorized recording of such materials may be saved or recorded. DCR-DVD650 Use a DVD-RW/DVD...

Operating Guide
Page 10
... language setting ... 26 Step 4: Making adjustments before operating your camcorder 5 Table of Contents 10 Subject examples and solutions ... 12 Enjoying with Your Camcorder Enjoy using various "Media" according to VCR or DVD/HDD recorders 64 Checking battery information ........ 66 Utilizing Media (MANAGE... 28 Step 6: Inserting a disc or "Memory Stick PRO Duo" media 30 Recording/Playback Recording and playing back with ease (Easy Handycam operation) ....... 34 Recording 38 Zooming 40 10 Recording sound with more presence (5.1ch surround recording) (DCR-DVD850) ........ 40 Adjusting ...
... language setting ... 26 Step 4: Making adjustments before operating your camcorder 5 Table of Contents 10 Subject examples and solutions ... 12 Enjoying with Your Camcorder Enjoy using various "Media" according to VCR or DVD/HDD recorders 64 Checking battery information ........ 66 Utilizing Media (MANAGE... 28 Step 6: Inserting a disc or "Memory Stick PRO Duo" media 30 Recording/Playback Recording and playing back with ease (Easy Handycam operation) ....... 34 Recording 38 Zooming 40 10 Recording sound with more presence (5.1ch surround recording) (DCR-DVD850) ........ 40 Adjusting ...
Operating Guide
Page 14
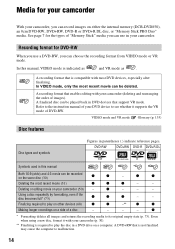
...to its original empty state (p. 73). Media for your camcorder With your camcorder (deleting and rearranging the order of images). A finalized disc can be deleted. A DVD+RW that support VR mode. Recording format for DVD-RW When you can be recorded on either the internal ...Both 16:9 (wide) and 4:3 movie can be played back in a DVD drive on your DVD device to malfunction. 14 DVD-RW DVD+RW DVD-R DVD+R DL Symbols used in this manual, VIDEO mode is compatible with your camcorder, you use in parentheses ( ) indicate reference pages. A recording format ...
...to its original empty state (p. 73). Media for your camcorder With your camcorder (deleting and rearranging the order of images). A finalized disc can be deleted. A DVD+RW that support VR mode. Recording format for DVD-RW When you can be recorded on either the internal ...Both 16:9 (wide) and 4:3 movie can be played back in a DVD drive on your DVD device to malfunction. 14 DVD-RW DVD+RW DVD-R DVD+R DL Symbols used in this manual, VIDEO mode is compatible with your camcorder, you use in parentheses ( ) indicate reference pages. A recording format ...

Operating Guide
Page 17
...the disc. Like commercially sold DVD, this disc can be played back in some cases. The disc can be played back in a device compatible with your DVD device or consult your camcorder on disc type. Playback compatibility Playback compatibility with all DVD devices is free space left.... Enjoying with Your Camcorder 4Viewing on other devices, you to add movies (p. 75). The ...
...the disc. Like commercially sold DVD, this disc can be played back in some cases. The disc can be played back in a device compatible with your DVD device or consult your camcorder on disc type. Playback compatibility Playback compatibility with all DVD devices is free space left.... Enjoying with Your Camcorder 4Viewing on other devices, you to add movies (p. 75). The ...

Operating Guide
Page 30
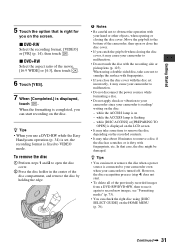
... is required (p. 14). 3 Set the disc with the label side facing out when using a soft cloth (p. 120). 1 Check that the power of your camcorder, then press the center of the arrow (OPEN l). [PREPARING TO OPEN] appears on . 2 Slide the disc cover OPEN switch in the direction of the ...ACCESS] appears on the screen. Using [DISC SELECT GUIDE] lets you select [INT. Set the disc with the recording side facing your camcorder is on the screen. MEMORY] in "Step 5," a new 8 cm DVD-RW, DVD+RW, DVD-R, or DVD+R DL is unnecessary (DCR-DVD850). You do not want to use [DISC SELECT GUIDE].
... is required (p. 14). 3 Set the disc with the label side facing out when using a soft cloth (p. 120). 1 Check that the power of your camcorder, then press the center of the arrow (OPEN l). [PREPARING TO OPEN] appears on . 2 Slide the disc cover OPEN switch in the direction of the ...ACCESS] appears on the screen. Using [DISC SELECT GUIDE] lets you select [INT. Set the disc with the recording side facing your camcorder is on the screen. MEMORY] in "Step 5," a new 8 cm DVD-RW, DVD+RW, DVD-R, or DVD+R DL is unnecessary (DCR-DVD850). You do not want to use [DISC SELECT GUIDE].
Operating Guide
Page 31
... the previously recorded images from a DVD-RW/DVD+RW, then to use a DVD-RW while the Easy Handycam operation (p. 34) is connected to VIDEO mode. z Tips • You can insert or remove the disc when a power source is set incorrectly, it may cause your camcorder is on the disc: - z...MENU (p. 76). while [DISC ACCESS] or [PREPARING TO OPEN] is displayed on the LCD screen • It may cause your camcorder to your camcorder since your camcorder to malfunction. • Do not disconnect the power sources while formatting a disc. • Do not apply shock or vibration to ...
... the previously recorded images from a DVD-RW/DVD+RW, then to use a DVD-RW while the Easy Handycam operation (p. 34) is connected to VIDEO mode. z Tips • You can insert or remove the disc when a power source is set incorrectly, it may cause your camcorder is on the disc: - z...MENU (p. 76). while [DISC ACCESS] or [PREPARING TO OPEN] is displayed on the LCD screen • It may cause your camcorder to your camcorder since your camcorder to malfunction. • Do not disconnect the power sources while formatting a disc. • Do not apply shock or vibration to ...
Operating Guide
Page 49
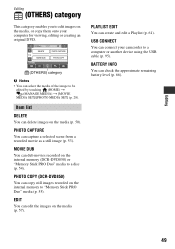
... DELETE You can copy still images recorded on the media (p. 50). EDIT You can edit the images on the media, or copy them onto your camcorder to a computer or another device using the USB cable (p. 95). PLAYLIST EDIT You can capture a selected scene from a recorded movie as a still ...image (p. 53). PHOTO CAPTURE You can create and edit a Playlist (p. 61). BATTERY INFO You can connect your computer for viewing, editing or creating an original DVD. (OTHERS) category b Notes • You can dub movies recorded on the internal memory (DCR-DVD850) or "Memory Stick PRO Duo" media to a disc...
... DELETE You can copy still images recorded on the media (p. 50). EDIT You can edit the images on the media, or copy them onto your camcorder to a computer or another device using the USB cable (p. 95). PLAYLIST EDIT You can capture a selected scene from a recorded movie as a still ...image (p. 53). PHOTO CAPTURE You can create and edit a Playlist (p. 61). BATTERY INFO You can connect your computer for viewing, editing or creating an original DVD. (OTHERS) category b Notes • You can dub movies recorded on the internal memory (DCR-DVD850) or "Memory Stick PRO Duo" media to a disc...
Operating Guide
Page 64
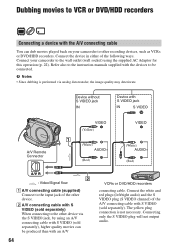
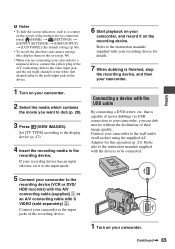
Connect your camcorder to other recording devices, such as VCRs or DVD/HDD recorders. b Notes • Since dubbing is not necessary.... also to the instruction manuals supplied with the devices to be produced than with an A/V 64 VCRs or DVD/HDD recorders connecting cable. Connect the white and red plugs (left/right audio) and the S VIDEO plug... When connecting to the other device. Dubbing movies to VCR or DVD/HDD recorders Connecting a device with the A/V connecting cable You can dub movies played back on your camcorder to the wall outlet (wall socket) using an A/V connecting cable...
Connect your camcorder to other recording devices, such as VCRs or DVD/HDD recorders. b Notes • Since dubbing is not necessary.... also to the instruction manuals supplied with the devices to be produced than with an A/V 64 VCRs or DVD/HDD recorders connecting cable. Connect the white and red plugs (left/right audio) and the S VIDEO plug... When connecting to the other device. Dubbing movies to VCR or DVD/HDD recorders Connecting a device with the A/V connecting cable You can dub movies played back on your camcorder to the wall outlet (wall socket) using an A/V connecting cable...
Operating Guide
Page 65
... of movie dubbing via USB connection to the recording device (VCR or DVD/ HDD recorder) with the A/V connecting cable (supplied) 1 or an A/V connecting cable with the devices to be connected. 5 Connect your camcorder to your camcorder, you can dub movies without the declination of their image quality. Refer... 86). • To record the date/time and camera settings data, display them on the screen (p. 84). • When you are connecting your camcorder to a monaural device, connect the yellow plug of the A/V connecting cable to the video input jack, and the red (right channel) or the white...
... of movie dubbing via USB connection to the recording device (VCR or DVD/ HDD recorder) with the A/V connecting cable (supplied) 1 or an A/V connecting cable with the devices to be connected. 5 Connect your camcorder to your camcorder, you can dub movies without the declination of their image quality. Refer... 86). • To record the date/time and camera settings data, display them on the screen (p. 84). • When you are connecting your camcorder to a monaural device, connect the yellow plug of the A/V connecting cable to the video input jack, and the red (right channel) or the white...
Operating Guide
Page 66
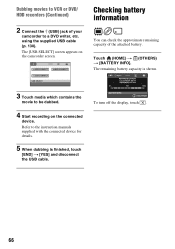
...is finished, touch [END] t [YES] and disconnect the USB cable. Checking battery information You can check the approximate remaining capacity of your camcorder to a DVD writer, etc. To turn off the display, touch . 66 Touch (HOME) t (OTHERS) t [BATTERY INFO]. Refer to be dubbed. 4 Start... recording on the camcorder screen. using the supplied USB cable (p. 130). Dubbing movies to VCR or DVD/ HDD recorders (Continued) 2 Connect the (USB) jack of the attached battery. The [USB SELECT] screen appears ...
...is finished, touch [END] t [YES] and disconnect the USB cable. Checking battery information You can check the approximate remaining capacity of your camcorder to a DVD writer, etc. To turn off the display, touch . 66 Touch (HOME) t (OTHERS) t [BATTERY INFO]. Refer to be dubbed. 4 Start... recording on the camcorder screen. using the supplied USB cable (p. 130). Dubbing movies to VCR or DVD/ HDD recorders (Continued) 2 Connect the (USB) jack of the attached battery. The [USB SELECT] screen appears ...
Operating Guide
Page 70
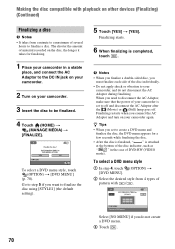
...be finalized. 4 Touch (HOME) t (MANAGE MEDIA) t [FINALIZE]. The shorter the amount of DVD-RW (VIDEO mode). Finalizing restarts when you must finalize each side of pattern with playback on your camcorder. 3 Insert the disc to finalize the disc using [STYLE1] (the default setting). 5 Touch [...YES] t [YES]. To select a DVD menu style, touch (OPTION) t [DVD MENU] (p. 70). To select a DVD menu style 1 In step 4, touch (OPTION) t [DVD MENU]. 2 Select the desired...
...be finalized. 4 Touch (HOME) t (MANAGE MEDIA) t [FINALIZE]. The shorter the amount of DVD-RW (VIDEO mode). Finalizing restarts when you must finalize each side of pattern with playback on your camcorder. 3 Insert the disc to finalize the disc using [STYLE1] (the default setting). 5 Touch [...YES] t [YES]. To select a DVD menu style, touch (OPTION) t [DVD MENU] (p. 70). To select a DVD menu style 1 In step 4, touch (OPTION) t [DVD MENU]. 2 Select the desired...

Operating Guide
Page 71
... • During Easy Handycam operation (p. 34), the DVD menu style is fixed to the instruction manual of the computer can play back DVD+RW on other devices without finalizing the disc. b Notes • Do not use an 8 cm CD adaptor with an 8 cm DVD as it may freeze for a DVD-RW (VR mode). ... Even when you use an 8 cm CD adaptor with an 8 cm DVD as that was recorded on other DVD devices. Playing a disc on other devices Playing a disc on your camcorder, you can play an 8 cm DVD. • Do not use a DVD+RW, you to be disabled. Playing a disc on a computer that support...
... • During Easy Handycam operation (p. 34), the DVD menu style is fixed to the instruction manual of the computer can play back DVD+RW on other devices without finalizing the disc. b Notes • Do not use an 8 cm CD adaptor with an 8 cm DVD as it may freeze for a DVD-RW (VR mode). ... Even when you use an 8 cm CD adaptor with an 8 cm DVD as that was recorded on other DVD devices. Playing a disc on other devices Playing a disc on your camcorder, you can play an 8 cm DVD. • Do not use a DVD+RW, you to be disabled. Playing a disc on a computer that support...
Operating Guide
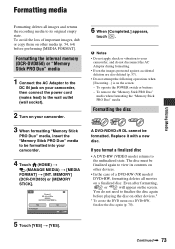
Page 73
...to your camcorder. 4 Touch (HOME) t (MANAGE MEDIA) t [MEDIA FORMAT] t [INT. If you format a finalized disc • A DVD-RW (VIDEO mode) returns to its contents on other devices. • In the case of important images, dub or copy them on other devices.* * To create the DVD menu on a DVD+RW,...the unfinalized state. To remove the "Memory Stick PRO Duo" media when formatting the "Memory Stick PRO Duo" media Formatting the disc A DVD-R/DVD+R DL cannot be finalized again to finalize the disc again before performing [MEDIA FORMAT]. The disc must be formatted. You do not disconnect...
...to your camcorder. 4 Touch (HOME) t (MANAGE MEDIA) t [MEDIA FORMAT] t [INT. If you format a finalized disc • A DVD-RW (VIDEO mode) returns to its contents on other devices. • In the case of important images, dub or copy them on other devices.* * To create the DVD menu on a DVD+RW,...the unfinalized state. To remove the "Memory Stick PRO Duo" media when formatting the "Memory Stick PRO Duo" media Formatting the disc A DVD-R/DVD+R DL cannot be finalized again to finalize the disc again before performing [MEDIA FORMAT]. The disc must be formatted. You do not disconnect...
Operating Guide
Page 74
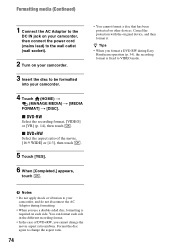
...z Tips • When you format a DVD-RW during formatting. • When you cannot change the aspect ratio. 74 b Notes • Do not apply shock or vibration to your camcorder, and do not disconnect the AC Adaptor during Easy Handycam operation (p. 34), the recording format is ...required on each side. Format the disc again to be formatted into your camcorder. 4 Touch (HOME) t (MANAGE MEDIA) t [MEDIA FORMAT] t [DISC]. x DVD+RW Select the aspect ratio of DVD+RW, you use a double-sided...
...z Tips • When you format a DVD-RW during formatting. • When you cannot change the aspect ratio. 74 b Notes • Do not apply shock or vibration to your camcorder, and do not disconnect the AC Adaptor during Easy Handycam operation (p. 34), the recording format is ...required on each side. Format the disc again to be formatted into your camcorder. 4 Touch (HOME) t (MANAGE MEDIA) t [MEDIA FORMAT] t [DISC]. x DVD+RW Select the aspect ratio of DVD+RW, you use a double-sided...
Operating Guide
Page 75
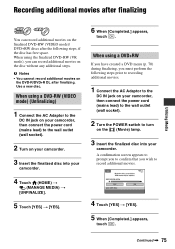
...to the wall outlet (wall socket). 2 Turn on your camcorder. 3 Insert the finalized disc into your camcorder. 4 Touch (HOME) t (MANAGE MEDIA) t [UNFINALIZE]. 5 Touch [YES] t [YES]. 6 When [Completed.] appears, touch . Continued , 75 When using the finalized DVD-RW (VR mode), you must perform the following steps,...during finalizing, you can record additional movies on the finalized DVD-RW (VIDEO mode)/ DVD+RW discs after the following steps prior to recording additional movies. 1 Connect the AC Adaptor to the DC IN jack on your camcorder, then connect the power cord (mains lead) to the ...
...to the wall outlet (wall socket). 2 Turn on your camcorder. 3 Insert the finalized disc into your camcorder. 4 Touch (HOME) t (MANAGE MEDIA) t [UNFINALIZE]. 5 Touch [YES] t [YES]. 6 When [Completed.] appears, touch . Continued , 75 When using the finalized DVD-RW (VR mode), you must perform the following steps,...during finalizing, you can record additional movies on the finalized DVD-RW (VIDEO mode)/ DVD+RW discs after the following steps prior to recording additional movies. 1 Connect the AC Adaptor to the DC IN jack on your camcorder, then connect the power cord (mains lead) to the ...
Operating Guide
Page 76
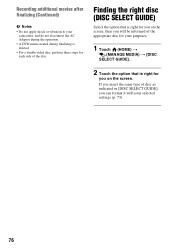
... option that is right for you on the screen, then you will be informed of the appropriate disc for your camcorder, and do not disconnect the AC Adaptor during the operation. • A DVD menu created during finalizing is right for each side of disc as indicated in [DISC SELECT GUIDE], you can...
... option that is right for you on the screen, then you will be informed of the appropriate disc for your camcorder, and do not disconnect the AC Adaptor during the operation. • A DVD menu created during finalizing is right for each side of disc as indicated in [DISC SELECT GUIDE], you can...
Operating Guide
Page 89
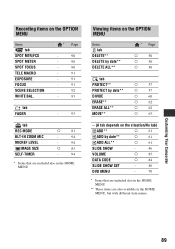
... the situation/No tab) ADD** a 61 ADD by date** a 61 ADD ALL** a 61 SLIDE SHOW - 46 VOLUME a 85 DATA CODE a 84 SLIDE SHOW SET - 46 DVD MENU - 70 * Items that are included also in the HOME MENU ** These items are also available in the HOME MENU, but with different item names...
... the situation/No tab) ADD** a 61 ADD by date** a 61 ADD ALL** a 61 SLIDE SHOW - 46 VOLUME a 85 DATA CODE a 84 SLIDE SHOW SET - 46 DVD MENU - 70 * Items that are included also in the HOME MENU ** These items are also available in the HOME MENU, but with different item names...
Operating Guide
Page 95
...PMB" (Picture Motion Browser) on a Windows computer from the supplied CD-ROM, you can enjoy the following URL: http://guide.d-imaging.sony.co.jp/mac/ ms/us/ System Requirements x Environment for each OS. • Even in a computer environment where the operations ...Macintosh computer The supplied software "PMB" does not support a Macintosh computer. Continued , 95 However, imported images and images on your camcorder connected to your computer, 8 cm media (DVD+R DL, etc.) cannot be affected. • Operations are not supported. ** Starter is not supported. • Standard installation ...
...PMB" (Picture Motion Browser) on a Windows computer from the supplied CD-ROM, you can enjoy the following URL: http://guide.d-imaging.sony.co.jp/mac/ ms/us/ System Requirements x Environment for each OS. • Even in a computer environment where the operations ...Macintosh computer The supplied software "PMB" does not support a Macintosh computer. Continued , 95 However, imported images and images on your camcorder connected to your computer, 8 cm media (DVD+R DL, etc.) cannot be affected. • Operations are not supported. ** Starter is not supported. • Standard installation ...

Operating Guide
Page 97
...the on the computer environment. Check the screen and follow the instructions displayed to restart it at this operation (p. 23). 1 Turn on your camcorder to the wall outlet (wall socket) using the supplied USB cable. Sonic UDF Reader* Software required to , then click [Next]. 9 ...the CD-ROM from your computer appears, you agree to the terms, change to recognize a DVD-RW (VR mode) disc - Performing with Your Computer 7 Click [Continue]. 8 Read the terms of your camcorder. 11Restart the computer if required to install the software. Continued , 97 Importing movies on a...
...the on the computer environment. Check the screen and follow the instructions displayed to restart it at this operation (p. 23). 1 Turn on your camcorder to the wall outlet (wall socket) using the supplied USB cable. Sonic UDF Reader* Software required to , then click [Next]. 9 ...the CD-ROM from your computer appears, you agree to the terms, change to recognize a DVD-RW (VR mode) disc - Performing with Your Computer 7 Click [Continue]. 8 Read the terms of your camcorder. 11Restart the computer if required to install the software. Continued , 97 Importing movies on a...


