Operating Instructions
Page 4
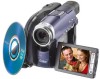
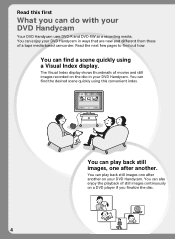
...of still images continuously on the disc in ways that are new and different from those of a tape media-based camcorder. You can do with your DVD Handycam Your DVD Handycam uses DVD-R and DVD-RW as a recording media. You can play back still images one after another . You can find a scene ...Read the next few pages to find the desired scene quickly using a Visual Index display. You can enjoy your DVD Handycam in your DVD Handycam. You can also enjoy the playback of movies and still images recorded on a DVD player if you can play back still images, one after another on your...
...of still images continuously on the disc in ways that are new and different from those of a tape media-based camcorder. You can do with your DVD Handycam Your DVD Handycam uses DVD-R and DVD-RW as a recording media. You can play back still images one after another . You can find a scene ...Read the next few pages to find the desired scene quickly using a Visual Index display. You can enjoy your DVD Handycam in your DVD Handycam. You can also enjoy the playback of movies and still images recorded on a DVD player if you can play back still images, one after another on your...
Operating Instructions
Page 7
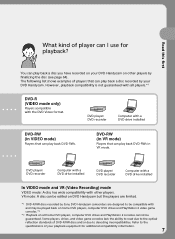
... recorded by Sony DVD Handycam camcorders are limited. *1 DVD-R/RW discs recorded by your DVD Handycam. The following list shows examples of DVD-R/RW discs and/or due to the optical reflection standards of players that can play back DVD-RWs in VIDEO mode) Players that can play back DVD-RWs. DVD player/ DVD recorder Computer with a DVD drive installed DVD player/ DVD recorder Computer...
... recorded by Sony DVD Handycam camcorders are limited. *1 DVD-R/RW discs recorded by your DVD Handycam. The following list shows examples of DVD-R/RW discs and/or due to the optical reflection standards of players that can play back DVD-RWs in VIDEO mode) Players that can play back DVD-RWs. DVD player/ DVD recorder Computer with a DVD drive installed DVD player/ DVD recorder Computer...
Operating Instructions
Page 10
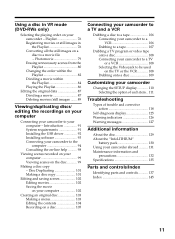
... disc for other players Finalizing a disc 64 Changing the disc title 67 Playing back a disc on a DVD player, etc 69 Playing back a disc on a computer with a DVD drive installed .... 70 Recording on the power 19 Step 3 Adjusting the LCD screen and the viewfinder 20 Adjusting...the white balance manually 50 Shooting techniques to prepare and use your DVD Handycam 8 Getting Started Using this first What you can do with your DVD Handycam 4 What is the difference between DVD-R and DVD-RW 6 How to match your camcorder ...... 56 Choosing and viewing a recording - Visual Index 56 Various...
... disc for other players Finalizing a disc 64 Changing the disc title 67 Playing back a disc on a DVD player, etc 69 Playing back a disc on a computer with a DVD drive installed .... 70 Recording on the power 19 Step 3 Adjusting the LCD screen and the viewfinder 20 Adjusting...the white balance manually 50 Shooting techniques to prepare and use your DVD Handycam 8 Getting Started Using this first What you can do with your DVD Handycam 4 What is the difference between DVD-R and DVD-RW 6 How to match your camcorder ...... 56 Choosing and viewing a recording - Visual Index 56 Various...
Operating Instructions
Page 11
...Self-diagnosis display 125 Warning indicators 126 Warning messages 127 Additional information About the disc 129 About the "InfoLITHIUM" battery pack 130 Using your camcorder abroad .......... 131 Maintenance information and precautions 132 Specifications 135 Parts and controls/Index Identifying parts and controls 137 Index 145 11 Disc Duplicating ...recordings on your computer Connecting your computer 99 Viewing scenes on your computer - Playlist 76 Registering movies or still images in VR mode (DVD-RWs only) Selecting the playing order on the disc 99 Making a disc copy -
...Self-diagnosis display 125 Warning indicators 126 Warning messages 127 Additional information About the disc 129 About the "InfoLITHIUM" battery pack 130 Using your camcorder abroad .......... 131 Maintenance information and precautions 132 Specifications 135 Parts and controls/Index Identifying parts and controls 137 Index 145 11 Disc Duplicating ...recordings on your computer Connecting your computer 99 Viewing scenes on your computer - Playlist 76 Registering movies or still images in VR mode (DVD-RWs only) Selecting the playing order on the disc 99 Making a disc copy -
Operating Instructions
Page 12
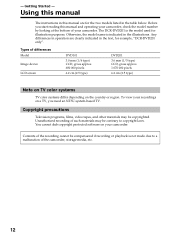
... clearly indicated in the illustrations. Any differences in operation are for illustration purposes. Using this manual The instructions in this manual and operating your camcorder, check the model number by looking at the bottom of such materials may be copyrighted. Unauthorized recording of your... camcorder. Copyright precautions Television programs, films, video tapes, and other materials may be compensated if recording or playback is the model used for the two ...
... clearly indicated in the illustrations. Any differences in operation are for illustration purposes. Using this manual The instructions in this manual and operating your camcorder, check the model number by looking at the bottom of such materials may be copyrighted. Unauthorized recording of your... camcorder. Copyright precautions Television programs, films, video tapes, and other materials may be compensated if recording or playback is the model used for the two ...
Operating Instructions
Page 13
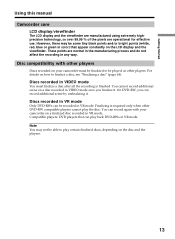
...other players Discs recorded on your camcorder on a finalized disc recorded in color) that appear constantly on other players. You can play back DVD-RWs in any way. Compatible players: DVD players that can record again with other DVD-RW compatible players cannot play certain ...64). However, there may not be recorded in VR mode Only DVD-RWs can record additional scene by unfinalizing it . On DVD-RW, you finalize it . Finalizing is finished. Getting Started Using this manual Camcorder care LCD display/viewfinder The LCD display and the viewfinder are manufactured...
...other players Discs recorded on your camcorder on a finalized disc recorded in color) that appear constantly on other players. You can play back DVD-RWs in any way. Compatible players: DVD players that can record again with other DVD-RW compatible players cannot play certain ...64). However, there may not be recorded in VR mode Only DVD-RWs can record additional scene by unfinalizing it . On DVD-RW, you finalize it . Finalizing is finished. Getting Started Using this manual Camcorder care LCD display/viewfinder The LCD display and the viewfinder are manufactured...
Operating Instructions
Page 14
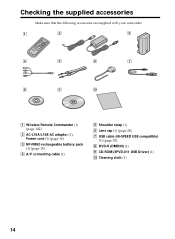
Checking the supplied accessories Make sure that the following accessories are supplied with your camcorder. 1 2 3 4 5 6 7 8 9 0 1 Wireless Remote Commander (1) (page 142) 2 AC-L15A/L15B AC adaptor (1), Power cord (1) (page 16) 3 NP-FM50 rechargeable battery pack (1) (page 15) 4 A/V connecting cable (1) 5 Shoulder strap (1) 6 Lens cap (1) (page 28) 7 USB cable (Hi-SPEED USB compatible) (1) (page 92) 8 DVD-R (DMR30) (1) 9 CD-ROM (SPVD-011 USB Driver) (1) q; Cleaning cloth (1) 14
Checking the supplied accessories Make sure that the following accessories are supplied with your camcorder. 1 2 3 4 5 6 7 8 9 0 1 Wireless Remote Commander (1) (page 142) 2 AC-L15A/L15B AC adaptor (1), Power cord (1) (page 16) 3 NP-FM50 rechargeable battery pack (1) (page 15) 4 A/V connecting cable (1) 5 Shoulder strap (1) 6 Lens cap (1) (page 28) 7 USB cable (Hi-SPEED USB compatible) (1) (page 92) 8 DVD-R (DMR30) (1) 9 CD-ROM (SPVD-011 USB Driver) (1) q; Cleaning cloth (1) 14
Operating Instructions
Page 16
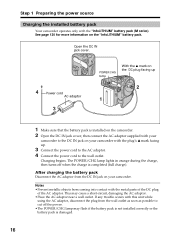
... adaptor. 4 Connect the power cord to cut off when the charge is damaged. 16 Step 1 Preparing the power source Charging the installed battery pack Your camcorder operates only with the metal parts of the DC plug of the AC adaptor. This may flash if the battery pack is not installed correctly... or the battery pack is completed (full charge). See page 130 for more information on your camcorder with this unit while using the AC adaptor, disconnect the plug from the DC IN jack on the "InfoLITHIUM" battery pack.
... adaptor. 4 Connect the power cord to cut off when the charge is damaged. 16 Step 1 Preparing the power source Charging the installed battery pack Your camcorder operates only with the metal parts of the DC plug of the AC adaptor. This may flash if the battery pack is not installed correctly... or the battery pack is completed (full charge). See page 130 for more information on your camcorder with this unit while using the AC adaptor, disconnect the plug from the DC IN jack on the "InfoLITHIUM" battery pack.
Operating Instructions
Page 17
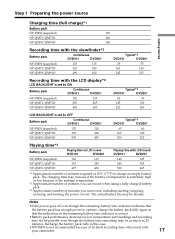
... 465 *1 Approximate number of minutes you can record, including starting/stopping, zooming, and turning the power on LCD screen DVD101 DVD201 Playing time with your camcorder. 17 Recharge the battery pack fully in low-temperature surroundings and recording may not be possible even though the battery time remaining may be as...
... 465 *1 Approximate number of minutes you can record, including starting/stopping, zooming, and turning the power on LCD screen DVD101 DVD201 Playing time with your camcorder. 17 Recharge the battery pack fully in low-temperature surroundings and recording may not be possible even though the battery time remaining may be as...
Operating Instructions
Page 18
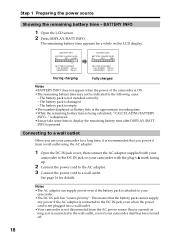
... TIME AVAILABLE LCD SCREEN : 120 min VIEWFINDER : 135 min During charging Fully charged Notes •BATTERY INFO does not appear when the power of the camcorder is displayed. •It may not be indicated in the following cases: - is ON. •The remaining battery time may take some time to your... it is not disconnected from a wall outlet using the AC adaptor. 1 Open the DC IN jack cover, then connect the AC adaptor supplied with your camcorder with the plug's v mark facing up. 2 Connect the power cord to the AC adaptor. 3 Connect the power cord to a wall outlet When you use ...
... TIME AVAILABLE LCD SCREEN : 120 min VIEWFINDER : 135 min During charging Fully charged Notes •BATTERY INFO does not appear when the power of the camcorder is displayed. •It may not be indicated in the following cases: - is ON. •The remaining battery time may take some time to your... it is not disconnected from a wall outlet using the AC adaptor. 1 Open the DC IN jack cover, then connect the AC adaptor supplied with your camcorder with the plug's v mark facing up. 2 Connect the power cord to the AC adaptor. 3 Connect the power cord to a wall outlet When you use ...

Operating Instructions
Page 19
Getting Started Step 2 Turning on the power Press the POWER button for a few seconds again. Your camcorder turns on your camcorder. : Movies Select this when you shoot the movies. : Still images Select this when you turn the power off . When the POWER/CHG lamp turns off, ... operation you want to perform, such as shooting or playback. : Playback/edit Select this when you play back or edit the recorded scenes on your camcorder for a few seconds. POWER/CHG lamp To turn on and the POWER/ CHG lamp lights up in green. When you shoot the still images. 19...
Getting Started Step 2 Turning on the power Press the POWER button for a few seconds again. Your camcorder turns on your camcorder. : Movies Select this when you shoot the movies. : Still images Select this when you turn the power off . When the POWER/CHG lamp turns off, ... operation you want to perform, such as shooting or playback. : Playback/edit Select this when you play back or edit the recorded scenes on your camcorder for a few seconds. POWER/CHG lamp To turn on and the POWER/ CHG lamp lights up in green. When you shoot the still images. 19...
Operating Instructions
Page 20
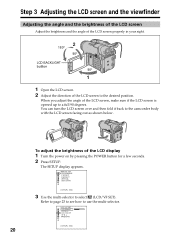
... in your sight. 2 180° 90° LCD BACKLIGHT button 90° 1 1 Open the LCD screen. 2 Adjust the direction of the LCD screen to the camcorder body with the LCD screen facing out as shown below. LCD / VF SET LCD BRIGHT LCD B. LCD COLOR VF B. You can turn the LCD screen...
... in your sight. 2 180° 90° LCD BACKLIGHT button 90° 1 1 Open the LCD screen. 2 Adjust the direction of the LCD screen to the camcorder body with the LCD screen facing out as shown below. LCD / VF SET LCD BRIGHT LCD B. LCD COLOR VF B. You can turn the LCD screen...

Operating Instructions
Page 21
Note [LCD B.L.] is adjusted. 6 Press SETUP. Tips •You can change the brightness of the image when you use the camcorder outdoors, set to ON normally. Getting Started Step 3 Adjusting the LCD screen and the viewfinder 4 Use the multi-selector to [BRT NORMAL] when you close ...
Note [LCD B.L.] is adjusted. 6 Press SETUP. Tips •You can change the brightness of the image when you use the camcorder outdoors, set to ON normally. Getting Started Step 3 Adjusting the LCD screen and the viewfinder 4 Use the multi-selector to [BRT NORMAL] when you close ...
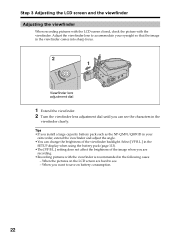
Operating Instructions
Page 22
... the viewfinder comes into sharp focus. 2 1 Viewfinder lens adjustment dial 1 Extend the viewfinder. 2 Turn the viewfinder lens adjustment dial until you want to accommodate your camcorder, extend the viewfinder and adjust the angle. •You can see . - Adjust the viewfinder lens to save on the LCD screen are recording. •Recording...
... the viewfinder comes into sharp focus. 2 1 Viewfinder lens adjustment dial 1 Extend the viewfinder. 2 Turn the viewfinder lens adjustment dial until you want to accommodate your camcorder, extend the viewfinder and adjust the angle. •You can see . - Adjust the viewfinder lens to save on the LCD screen are recording. •Recording...
Operating Instructions
Page 23
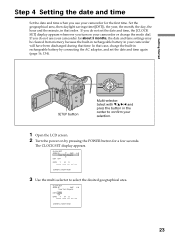
... In that time. CLOCK SET AREA 26 GMT -5.0 New Yor k,Bogota DST OFF DATE Y M D : [ ENTER ] : NEXT ITEM 3 Use the multi-selector to confirm your camcorder will have been discharged during that case, charge the built-in your selection. 1 Open the LCD screen. 2 Turn the power on your...you turn on by connecting the AC adaptor, and set the date and time, the [CLOCK SET] display appears whenever you do not use your camcorder for about 3 months, the date and time settings may be cleared from memory because the built-in rechargeable battery in rechargeable battery by pressing the...
... In that time. CLOCK SET AREA 26 GMT -5.0 New Yor k,Bogota DST OFF DATE Y M D : [ ENTER ] : NEXT ITEM 3 Use the multi-selector to confirm your camcorder will have been discharged during that case, charge the built-in your selection. 1 Open the LCD screen. 2 Turn the power on your...you turn on by connecting the AC adaptor, and set the date and time, the [CLOCK SET] display appears whenever you do not use your camcorder for about 3 months, the date and time settings may be cleared from memory because the built-in rechargeable battery in rechargeable battery by pressing the...
Operating Instructions
Page 24
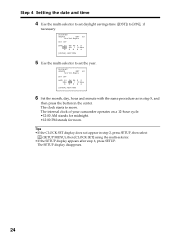
... DATE Y M D 2004 JAN 1 12 : 00AM [ ENTER ] : NEXT ITEM 5 Use the multi-selector to set daylight savings time ([DST]) to move. The internal clock of your camcorder operates on a 12-hour cycle. •12:00 AM stands for midnight. •12:00 PM stands for noon. Tips •If the CLOCK SET...
... DATE Y M D 2004 JAN 1 12 : 00AM [ ENTER ] : NEXT ITEM 5 Use the multi-selector to set daylight savings time ([DST]) to move. The internal clock of your camcorder operates on a 12-hour cycle. •12:00 AM stands for midnight. •12:00 PM stands for noon. Tips •If the CLOCK SET...
Operating Instructions
Page 26
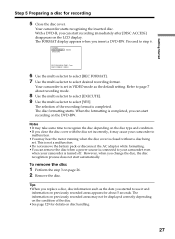
...the beep sound stops, the disc cover opens automatically. Opening melody rings once, then the camcorder beeps intermittently. [PREPARING TO OPEN COVER] appears on the LCD display. You cannot overwrite or delete data recorded on a DVD-R, but you insert or remove a disc, move the grip belt to the bottom of ...the camcorder so as not to obstruct the operation with the label side facing out, then press firmly to (...
...the beep sound stops, the disc cover opens automatically. Opening melody rings once, then the camcorder beeps intermittently. [PREPARING TO OPEN COVER] appears on the LCD display. You cannot overwrite or delete data recorded on a DVD-R, but you insert or remove a disc, move the grip belt to the bottom of ...the camcorder so as not to obstruct the operation with the label side facing out, then press firmly to (...
Operating Instructions
Page 27
... recognizing the inserted disc. The FORMAT display appears when you can start automatically. Your camcorder is turned off. The disc formatting starts. To remove the disc 1 Perform the step 3 on the DVD-RW. PROCESS TIME : 7sec REC FORMAT : VIDEO 6 Use the multi-selector to select [REC FORMAT]. 7 Use the ...be displayed correctly depending on the disc type and condition. •If you can start recording on page 26. 2 Remove the disc. With a DVD-R, you close the disc cover with the disc set . When the formatting is completed. Notes •It may take some time to recognize the ...
... recognizing the inserted disc. The FORMAT display appears when you can start automatically. Your camcorder is turned off. The disc formatting starts. To remove the disc 1 Perform the step 3 on the DVD-RW. PROCESS TIME : 7sec REC FORMAT : VIDEO 6 Use the multi-selector to select [REC FORMAT]. 7 Use the ...be displayed correctly depending on the disc type and condition. •If you can start recording on page 26. 2 Remove the disc. With a DVD-R, you close the disc cover with the disc set . When the formatting is completed. Notes •It may take some time to recognize the ...
Operating Instructions
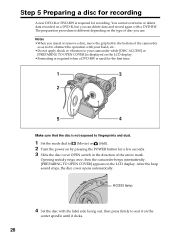
Page 28
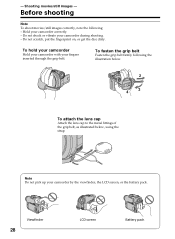
... shock or vibrate your fingers inserted through the grip belt. To hold your camcorder Hold your camcorder with your camcorder during shooting. - - Viewfinder 28 LCD screen Battery pack Note Do not pick up your camcorder correctly. - Shooting movies/still images - Hold your camcorder by the viewfinder, the LCD screen, or the battery pack. Do not...
... shock or vibrate your fingers inserted through the grip belt. To hold your camcorder Hold your camcorder with your camcorder during shooting. - - Viewfinder 28 LCD screen Battery pack Note Do not pick up your camcorder correctly. - Shooting movies/still images - Hold your camcorder by the viewfinder, the LCD screen, or the battery pack. Do not...
Operating Instructions
Page 29
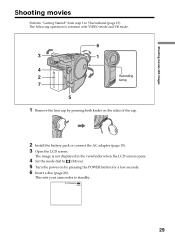
... mode and VR mode. 6 3 1 4 2 Recording lamp 7 5 1 Remove the lens cap by pressing the POWER button for a few seconds. 6 Insert a disc (page 26). This sets your camcorder to 5 beforehand (page 15). The following operation is not displayed in the viewfinder when the LCD screen opens. 4 Set the mode dial to (Movie). 5 Turn...
... mode and VR mode. 6 3 1 4 2 Recording lamp 7 5 1 Remove the lens cap by pressing the POWER button for a few seconds. 6 Insert a disc (page 26). This sets your camcorder to 5 beforehand (page 15). The following operation is not displayed in the viewfinder when the LCD screen opens. 4 Set the mode dial to (Movie). 5 Turn...


