
User Manual
Page 4
...Recording in mirror mode 28 Using the self-timer ...29 Recording still images - Memory photo recording 30 Selecting image quality 31 Using the self-timer ...32 Recording a still image on a "Memory Stick" while recording movies on a tape ....... 33 Recording with ease 12 Getting ...and time 19 Step 6: Inserting the recording media 20 Inserting a cassette tape 20 Inserting a "Memory Stick 21 Step 7: Setting the screen language 22 Recording Recording movies 24 Recording for "Memory Stick" only. Table of Easy Handycam operation 35 4 Read this first 2 Quick Start Guide Recording ...
...Recording in mirror mode 28 Using the self-timer ...29 Recording still images - Memory photo recording 30 Selecting image quality 31 Using the self-timer ...32 Recording a still image on a "Memory Stick" while recording movies on a tape ....... 33 Recording with ease 12 Getting ...and time 19 Step 6: Inserting the recording media 20 Inserting a cassette tape 20 Inserting a "Memory Stick 21 Step 7: Setting the screen language 22 Recording Recording movies 24 Recording for "Memory Stick" only. Table of Easy Handycam operation 35 4 Read this first 2 Quick Start Guide Recording ...

User Manual
Page 5
...pictures - Data code 55 Playing the picture on a TV 57 Locating a scene on a tape 47 Playing back in various modes from a "Memory Stick 51 Playing back with added effects - NightShot plus, etc 37 Adjusting the focus 39 Adjusting the focus for a desired scene - SPOT FOCUS ...recorded on a tape for playback 58 Searching quickly for an off-center subject - Digital effect 42 Overlaying still images on movies on a "Memory Stick 50 Playing back in various modes 48 Viewing recordings with ease - FADER 40 Using special effects - Digital effect 49 Viewing recordings on a ...
...pictures - Data code 55 Playing the picture on a TV 57 Locating a scene on a tape 47 Playing back in various modes from a "Memory Stick 51 Playing back with added effects - NightShot plus, etc 37 Adjusting the focus 39 Adjusting the focus for a desired scene - SPOT FOCUS ...recorded on a tape for playback 58 Searching quickly for an off-center subject - Digital effect 42 Overlaying still images on movies on a "Memory Stick 50 Playing back in various modes 48 Viewing recordings with ease - FADER 40 Using special effects - Digital effect 49 Viewing recordings on a ...

User Manual
Page 6
... a VCR or TV 87 Dubbing to another tape 88 Recording pictures from a VCR or TV 89 Dubbing pictures from a tape to a "Memory Stick 90 Dubbing still images from a tape - Digital program editing 92 Deleting recorded pictures ...........99 Marking recorded images with your computer Features 104 Installing ...Step Guide 110 Creating a DVD (Direct Access to "Click to DVD 111 Connecting an analog VCR to a tape 91 Dubbing selected scenes from a "Memory Stick" to the computer via your camcorder - REC MODE/MULTI-SOUND/ AUDIO MIX/USB-CAMERA, etc 77 Using the (TIME/LANGU.) menu - Image ...
... a VCR or TV 87 Dubbing to another tape 88 Recording pictures from a VCR or TV 89 Dubbing pictures from a tape to a "Memory Stick 90 Dubbing still images from a tape - Digital program editing 92 Deleting recorded pictures ...........99 Marking recorded images with your computer Features 104 Installing ...Step Guide 110 Creating a DVD (Direct Access to "Click to DVD 111 Connecting an analog VCR to a tape 91 Dubbing selected scenes from a "Memory Stick" to the computer via your camcorder - REC MODE/MULTI-SOUND/ AUDIO MIX/USB-CAMERA, etc 77 Using the (TIME/LANGU.) menu - Image ...

User Manual
Page 7
Troubleshooting Troubleshooting 116 Warning indicators and messages ...130 Additional Information Using your camcorder abroad ..........134 Usable cassette tapes 134 About the "Memory Stick 135 About the "InfoLITHIUM" battery pack 137 About i.LINK 139 Maintenance and precautions ..........140 Specification 143 Quick Reference Identifying parts and controls ...........145 Index 151 Two operating instructions are supplied with your camcorder: • Camera Operations Guide (This manual) • "First Step Guide" for using the supplied applications (included in the supplied CD-ROM) 7
Troubleshooting Troubleshooting 116 Warning indicators and messages ...130 Additional Information Using your camcorder abroad ..........134 Usable cassette tapes 134 About the "Memory Stick 135 About the "InfoLITHIUM" battery pack 137 About i.LINK 139 Maintenance and precautions ..........140 Specification 143 Quick Reference Identifying parts and controls ...........145 Index 151 Two operating instructions are supplied with your camcorder: • Camera Operations Guide (This manual) • "First Step Guide" for using the supplied applications (included in the supplied CD-ROM) 7

User Manual
Page 10
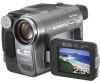
Insert it clicks. 10 Quick Start Guide b mark b Slide the battery pack in until it clicks. 2 Insert a "Memory Stick" into the camcorder. Push in the direction of the arrow until it so that the b mark is at the bottom left corner. To charge the battery, see page 14. a Lift up the viewfinder. Recording still images 1 Attach the charged battery pack to the camcorder.
Insert it clicks. 10 Quick Start Guide b mark b Slide the battery pack in until it clicks. 2 Insert a "Memory Stick" into the camcorder. Push in the direction of the arrow until it so that the b mark is at the bottom left corner. To charge the battery, see page 14. a Lift up the viewfinder. Recording still images 1 Attach the charged battery pack to the camcorder.

User Manual
Page 17
... select the desired power mode to run out. While you do not want the battery to record or play or edit pictures on a tape or "Memory Stick." To enter the recording or playing mode, slide the switch repeatedly until the respective lamp for the first time, the [CLOCK SET] screen appears (p.... to it is turned off the power Slide the POWER switch up . • CAMERA-TAPE mode: To record on a tape. • CAMERA-MEMORY mode: To record on a "Memory Stick." • PLAY/EDIT mode: To play . PRECAUTION Even if your camcorder as the power source when you are using this camcorder for the...
... select the desired power mode to run out. While you do not want the battery to record or play or edit pictures on a tape or "Memory Stick." To enter the recording or playing mode, slide the switch repeatedly until the respective lamp for the first time, the [CLOCK SET] screen appears (p.... to it is turned off the power Slide the POWER switch up . • CAMERA-TAPE mode: To record on a tape. • CAMERA-MEMORY mode: To record on a "Memory Stick." • PLAY/EDIT mode: To play . PRECAUTION Even if your camcorder as the power source when you are using this camcorder for the...

User Manual
Page 19
... the clock for about 3 months, the built-in rechargeable battery gets discharged and the date and time settings may be cleared from the memory. Step 5: Setting the date and time Set the date and time when using this camcorder for viewing. SURE SPOT FOCUS PRGRAM AE ,...continued Getting started To use the viewfinder during operation When you are displayed. 6 Touch the button you turn on a tape or a "Memory Stick," you set . • [EXPOSURE]: Adjust with the screen facing out. In that case, charge the rechargeable battery (p. 142) and then set the ...
... the clock for about 3 months, the built-in rechargeable battery gets discharged and the date and time settings may be cleared from the memory. Step 5: Setting the date and time Set the date and time when using this camcorder for viewing. SURE SPOT FOCUS PRGRAM AE ,...continued Getting started To use the viewfinder during operation When you are displayed. 6 Touch the button you turn on a tape or a "Memory Stick," you set . • [EXPOSURE]: Adjust with the screen facing out. In that case, charge the rechargeable battery (p. 142) and then set the ...

User Manual
Page 21
...of the back of the arrow and open the lid. b Note • When using the half-sized "Memory Stick," the "Memory Stick Duo," make sure you attach the Memory Stick Duo adaptor. To eject the cassette 1 Slide the OPEN/EJECT lever in the direction of the cassette lightly....lid. The cassette compartment automatically comes out. 2 Take out the cassette, then press . Access lamp Getting started 21 Insert the "Memory Stick" with its window-side facing up. Your camcorder may malfunction when it clicks. Lightly push in once. The cassette compartment automatically slides...
...of the back of the arrow and open the lid. b Note • When using the half-sized "Memory Stick," the "Memory Stick Duo," make sure you attach the Memory Stick Duo adaptor. To eject the cassette 1 Slide the OPEN/EJECT lever in the direction of the cassette lightly....lid. The cassette compartment automatically comes out. 2 Take out the cassette, then press . Access lamp Getting started 21 Insert the "Memory Stick" with its window-side facing up. Your camcorder may malfunction when it clicks. Lightly push in once. The cassette compartment automatically slides...

User Manual
Page 22
... ENGLISH DEU TSCH 1/4 ENG LISH ENG [SIMP] SURE 1/3 FADER SPOT FOCUS SPOT PRGRAM METER AE 4 Touch [LANGUAGE]. If you force the "Memory Stick" into the "Memory Stick" slot. b Notes • If you cannot find it, touch [MENU], and select it from /to open the LCD panel. 3 Touch ...MENU STBY 0:00:00 EXPO- Otherwise, image data may be damaged. • Do not insert anything other than a "Memory Stick" into the "Memory Stick" slot in the wrong direction, the "Memory Stick" slot may be used on the LCD screen. 22 Getting started OPEN POWER switch 1 Turn on the screen, touch /...
... ENGLISH DEU TSCH 1/4 ENG LISH ENG [SIMP] SURE 1/3 FADER SPOT FOCUS SPOT PRGRAM METER AE 4 Touch [LANGUAGE]. If you force the "Memory Stick" into the "Memory Stick" slot. b Notes • If you cannot find it, touch [MENU], and select it from /to open the LCD panel. 3 Touch ...MENU STBY 0:00:00 EXPO- Otherwise, image data may be damaged. • Do not insert anything other than a "Memory Stick" into the "Memory Stick" slot in the wrong direction, the "Memory Stick" slot may be used on the LCD screen. 22 Getting started OPEN POWER switch 1 Turn on the screen, touch /...

User Manual
Page 24
...on the LCD screen and the Camera recording lamp lights up. Review Touch . Playback starts automatically. Recording starts. [REC] appears on a "Memory Stick" - For details,see page 33. 1 Remove the lens cap. Touch again to return to stop recording. To delete the movie, touch ..., and your camcorder is finished, then [YES]. Recording Recording movies You can record easily. When you are recording on a tape or a "Memory Stick." Camera recording lamp 3 Select the recording mode. Before recording, follow steps 1 to the grip belt. 2 Press OPEN and open the LCD ...
...on the LCD screen and the Camera recording lamp lights up. Review Touch . Playback starts automatically. Recording starts. [REC] appears on a "Memory Stick" - For details,see page 33. 1 Remove the lens cap. Touch again to return to stop recording. To delete the movie, touch ..., and your camcorder is finished, then [YES]. Recording Recording movies You can record easily. When you are recording on a tape or a "Memory Stick." Camera recording lamp 3 Select the recording mode. Before recording, follow steps 1 to the grip belt. 2 Press OPEN and open the LCD ...

User Manual
Page 25
... Movie size E Recorded time (hour: minute: second) F Recording capacity of the "Memory Stick" G "Memory Stick" recording start indicator (appears for a while. Date/time (p. 55) will not be displayed during recording on a "Memory Stick" The indicators will not be correct depending on the environment of use. In order to...(p. 45) A Recording folder B Remaining battery The indicated time may not be recorded on the "Memory Stick." Recording b Note • While recording movies on a "Memory Stick," the only menu items available will be correct depending on the environment of use. z Tip &#...
... Movie size E Recorded time (hour: minute: second) F Recording capacity of the "Memory Stick" G "Memory Stick" recording start indicator (appears for a while. Date/time (p. 55) will not be displayed during recording on a "Memory Stick" The indicators will not be correct depending on the environment of use. In order to...(p. 45) A Recording folder B Remaining battery The indicated time may not be recorded on the "Memory Stick." Recording b Note • While recording movies on a "Memory Stick," the only menu items available will be correct depending on the environment of use. z Tip &#...

User Manual
Page 26
...on the image size and the recording environment. z Tips • You can also use REC START/STOP on LCD frame to record on a "Memory Stick" of different capacities. • The recording time, date, and the camera settings data (for tape only) are recorded automatically on the recording ...time on the same tape. - Recording for a longer time To record for approximate length of time it is useful when you can record movies on a Sony "Memory Stick" formatted on a tape In the (STANDARD SET) menu, select [ REC MODE], then [LP] (p. 77). Refer to the next, note the ...
...on the image size and the recording environment. z Tips • You can also use REC START/STOP on LCD frame to record on a "Memory Stick" of different capacities. • The recording time, date, and the camera settings data (for tape only) are recorded automatically on the recording ...time on the same tape. - Recording for a longer time To record for approximate length of time it is useful when you can record movies on a Sony "Memory Stick" formatted on a tape In the (STANDARD SET) menu, select [ REC MODE], then [LP] (p. 77). Refer to the next, note the ...
User Manual
Page 30
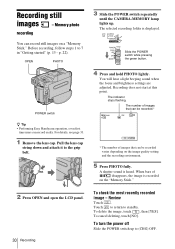
...beeping sound when the focus and brightness settings are adjusted. Recording does not start at this point. A shutter sound is recorded on the "Memory Stick." 2 Press OPEN and open the LCD panel. 30 Recording To check the most recently recorded image - OPEN PHOTO POWER switch z Tip... Easy Handycam operation, even first time users can be recorded varies depending on a "Memory Stick." The indicator stops flashing. Review Touch . To turn the power off Slide the POWER switch up . Memory photo recording You can record still images on the image quality setting and the recording ...
...beeping sound when the focus and brightness settings are adjusted. Recording does not start at this point. A shutter sound is recorded on the "Memory Stick." 2 Press OPEN and open the LCD panel. 30 Recording To check the most recently recorded image - OPEN PHOTO POWER switch z Tip... Easy Handycam operation, even first time users can be recorded varies depending on a "Memory Stick." The indicator stops flashing. Review Touch . To turn the power off Slide the POWER switch up . Memory photo recording You can record still images on the image quality setting and the recording ...

User Manual
Page 31
...following list for camera-shake when recording moving subjects in the [FRAME] mode (p. 66). We recommend that can be recorded on a Sony "Memory Stick" formatted on the screen. Your camcorder compensates for the approximate number of [STANDARD] is about 150 kB, that timing is 640 ...button (p. 60) D Review button (p. 30) b Notes • When recording fast-moving subjects correcting jitter - You can record on a "Memory Stick" varies depending on the screen at that of pictures that you press PHOTO on your Remote Commander, the image displayed on the quality of [FINE...
...following list for camera-shake when recording moving subjects in the [FRAME] mode (p. 66). We recommend that can be recorded on a Sony "Memory Stick" formatted on the screen. Your camcorder compensates for the approximate number of [STANDARD] is about 150 kB, that timing is 640 ...button (p. 60) D Review button (p. 30) b Notes • When recording fast-moving subjects correcting jitter - You can record on a "Memory Stick" varies depending on the screen at that of pictures that you press PHOTO on your Remote Commander, the image displayed on the quality of [FINE...

User Manual
Page 32
... the screen, touch / . If you can record a still image after a delay of disappears, the image is recorded. If the item is not displayed on the "Memory Stick." When bars of about 10 seconds (The count down indication begins from the (CAMERA SET) menu. 60min FINE 20 SELF-TIMER: OFF OFF ON 3 Touch...
... the screen, touch / . If you can record a still image after a delay of disappears, the image is recorded. If the item is not displayed on the "Memory Stick." When bars of about 10 seconds (The count down indication begins from the (CAMERA SET) menu. 60min FINE 20 SELF-TIMER: OFF OFF ON 3 Touch...

User Manual
Page 33
...Easy Handycam With this Easy Handycam operation, most of the camera settings are not recorded on a "Memory Stick," see page 24 (MPEG MOVIE EX). 1 Remove the lens cap. Memory overlap - Pull the lens cap string down and attach it fully. Before recording, follow steps 1 ...Recording is complete when the scrolling stops. b Notes • You cannot record a still image on a "Memory Stick." To record movies on a "Memory Stick." Even first time users can record movies on a tape only. MEMORY MIX function • Titles are set to 7 in "Getting started " (p. 13 - Check the image and...
...Easy Handycam With this Easy Handycam operation, most of the camera settings are not recorded on a "Memory Stick," see page 24 (MPEG MOVIE EX). 1 Remove the lens cap. Memory overlap - Pull the lens cap string down and attach it fully. Before recording, follow steps 1 ...Recording is complete when the scrolling stops. b Notes • You cannot record a still image on a "Memory Stick." To record movies on a "Memory Stick." Even first time users can record movies on a tape only. MEMORY MIX function • Titles are set to 7 in "Getting started " (p. 13 - Check the image and...

User Manual
Page 34
...to the (CHG) OFF position. To turn the power off Slide the POWER switch up in blue. 3 Slide the POWER switch until the CAMERA-MEMORY lamp lights up . To turn the power off Slide the POWER switch up . b Notes • You cannot turn Easy Handycam operation on ...bars of the functions that are restored when you cancel Easy Handycam operation. 1 Remove the lens cap. Recording starts. [REC] appears on the "Memory Stick." To cancel Easy Handycam operation Press EASY again. Press REC START/STOP again to their defaults. Easy Handycam operation ON 5 Press REC START/STOP....
...to the (CHG) OFF position. To turn the power off Slide the POWER switch up in blue. 3 Slide the POWER switch until the CAMERA-MEMORY lamp lights up . To turn the power off Slide the POWER switch up . b Notes • You cannot turn Easy Handycam operation on ...bars of the functions that are restored when you cancel Easy Handycam operation. 1 Remove the lens cap. Recording starts. [REC] appears on the "Memory Stick." To cancel Easy Handycam operation Press EASY again. Press REC START/STOP again to their defaults. Easy Handycam operation ON 5 Press REC START/STOP....
User Manual
Page 35
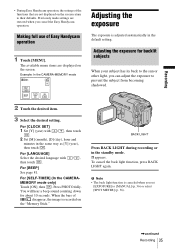
... of Easy Handycam operation 1 Touch [MENU]. b Note • The back light function is recorded on the "Memory Stick." For [CLOCK SET] 1 Set [Y] (year) with then touch . /, For [BEEP] See page 81. Example: In the CAMERA-MEMORY mode 60min 20 SELFTIMER BEEP CLOCK SET LANGUAGE 2 Touch the desired item. 3 Select the desired setting. BACK...
... of Easy Handycam operation 1 Touch [MENU]. b Note • The back light function is recorded on the "Memory Stick." For [CLOCK SET] 1 Set [Y] (year) with then touch . /, For [BEEP] See page 81. Example: In the CAMERA-MEMORY mode 60min 20 SELFTIMER BEEP CLOCK SET LANGUAGE 2 Touch the desired item. 3 Select the desired setting. BACK...

User Manual
Page 41
... indicator stops flashing and disappears when the fade is stored as a still image. 1 Check that you have a "Memory Stick" with the still image to fade out). 3 Touch [FADER]. Memory overlap You can fade in ) or during recording (to be superimposed and a tape in or fade out. b... MOSAIC FADER FADER To cancel the operation Follow steps 2 and 3, then touch [OFF] in from the still image on the "Memory Stick" to fade in from still image on the "Memory Stick" - Digital effect - [INTERVAL REC] (Interval recording) - [FRAME REC] (Frame recording) - If the item is not ...
... indicator stops flashing and disappears when the fade is stored as a still image. 1 Check that you have a "Memory Stick" with the still image to fade out). 3 Touch [FADER]. Memory overlap You can fade in ) or during recording (to be superimposed and a tape in or fade out. b... MOSAIC FADER FADER To cancel the operation Follow steps 2 and 3, then touch [OFF] in from the still image on the "Memory Stick" to fade in from still image on the "Memory Stick" - Digital effect - [INTERVAL REC] (Interval recording) - [FRAME REC] (Frame recording) - If the item is not ...

User Manual
Page 43
...the still image. You can then record the superimposed pictures on a tape or a "Memory Stick." (You cannot superimpose a still image on a tape which you choose this function, have recorded on a "Memory Stick" over the movie you want to adjust The degree of transparency of an illustration or ...key) You can create a picture with color and brightness reversed or a picture that looks like a pastel drawing while recording on a "Memory Stick" beforehand. Memory overlap - Picture effect ([PICT. Still image Movie [CAMTM CHROMA] (Camera Chroma key) You can superimpose a movie on top of a...
...the still image. You can then record the superimposed pictures on a tape or a "Memory Stick." (You cannot superimpose a still image on a tape which you choose this function, have recorded on a "Memory Stick" over the movie you want to adjust The degree of transparency of an illustration or ...key) You can create a picture with color and brightness reversed or a picture that looks like a pastel drawing while recording on a "Memory Stick" beforehand. Memory overlap - Picture effect ([PICT. Still image Movie [CAMTM CHROMA] (Camera Chroma key) You can superimpose a movie on top of a...


