User Manual
Page 3
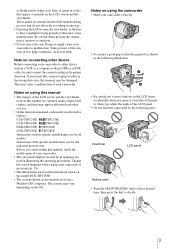
... of your camcorder. • The on connecting other device Before connecting your camcorder to other device such as follows. Viewfinder LCD panel Battery pack • Turn the SEL/PUSH EXEC dial to select desired item, then press the dial to decide. 3 Be careful when ...is indicated as a VCR or a computer with an USB or i.LINK cable, be damaged. CCD-TRV238E: TRV238E CCD-TRV438E: TRV438E DCR-TRV270E: TRV270E DCR-TRV285E: TRV285E Instructions with specific model names are from what you start reading this manual are captured using a digital still camera, and thus may ...
... of your camcorder. • The on connecting other device Before connecting your camcorder to other device such as follows. Viewfinder LCD panel Battery pack • Turn the SEL/PUSH EXEC dial to select desired item, then press the dial to decide. 3 Be careful when ...is indicated as a VCR or a computer with an USB or i.LINK cable, be damaged. CCD-TRV238E: TRV238E CCD-TRV438E: TRV438E DCR-TRV270E: TRV270E DCR-TRV285E: TRV285E Instructions with specific model names are from what you start reading this manual are captured using a digital still camera, and thus may ...
User Manual
Page 4
... photo recording ( TRV270E/285E 25 Recording with ease 10 Getting started Step 1: Checking supplied items 11 Step 2: Charging the battery pack 12 Using an outside power source 15 Step 3: Turning the power on 15 Step 4: Adjusting the LCD panel and... Superimposing the date and time on pictures ( TRV238E/438E 24 Recording still images - Table of Contents CCD-TRV238E: CCD-TRV438E: TRV238E DCR-TRV270E: TRV270E TRV438E DCR-TRV285E: TRV285E Read this first 2 Quick Start Guide Recording movies 8 Recording/Playing back with ease - NightShot plus 28 Adjusting the focus manually 29 ...
... photo recording ( TRV270E/285E 25 Recording with ease 10 Getting started Step 1: Checking supplied items 11 Step 2: Charging the battery pack 12 Using an outside power source 15 Step 3: Turning the power on 15 Step 4: Adjusting the LCD panel and... Superimposing the date and time on pictures ( TRV238E/438E 24 Recording still images - Table of Contents CCD-TRV238E: CCD-TRV438E: TRV238E DCR-TRV270E: TRV270E TRV438E DCR-TRV285E: TRV285E Read this first 2 Quick Start Guide Recording movies 8 Recording/Playing back with ease - NightShot plus 28 Adjusting the focus manually 29 ...
User Manual
Page 6
.../285E) .......79 Troubleshooting Troubleshooting 82 Warning indicators and messages .....92 Additional Information Using your camcorder abroad ...........94 Usable cassette tapes 95 About the "InfoLITHIUM" battery pack 96 About i.LINK 97 Maintenance and precautions 98 Specification 101 Quick Reference Identifying parts and controls ...........104 Index 111 For TRV270E/285E: Two operating... (LCD SET) menu - LCD B.L./LCD COLOR, etc. ...... 52 Using the (TAPE SET) menu - Easy Dubbing ( TRV238E/438E 63 Recording pictures from a VCR ( TRV285E 67 Dubbing selected scenes from a tape -
.../285E) .......79 Troubleshooting Troubleshooting 82 Warning indicators and messages .....92 Additional Information Using your camcorder abroad ...........94 Usable cassette tapes 95 About the "InfoLITHIUM" battery pack 96 About i.LINK 97 Maintenance and precautions 98 Specification 101 Quick Reference Identifying parts and controls ...........104 Index 111 For TRV270E/285E: Two operating... (LCD SET) menu - LCD B.L./LCD COLOR, etc. ...... 52 Using the (TAPE SET) menu - Easy Dubbing ( TRV238E/438E 63 Recording pictures from a VCR ( TRV285E 67 Dubbing selected scenes from a tape -
User Manual
Page 8
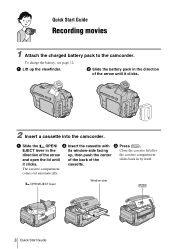
... up , then push the center of the back of the arrow until up the viewfinder. it clicks. 2 Insert a cassette into the camcorder. cassette. b Slide the battery pack in the direction of the the cassette compartment slides back in the its window-side facing Close the cassette lid after direction of the... arrow and open the lid until it clicks. Quick Start Guide Recording movies 1 Attach the charged battery pack to the camcorder. a Slide the OPEN/ b Insert the cassette with c Press .
... up , then push the center of the back of the arrow until up the viewfinder. it clicks. 2 Insert a cassette into the camcorder. cassette. b Slide the battery pack in the direction of the the cassette compartment slides back in the its window-side facing Close the cassette lid after direction of the... arrow and open the lid until it clicks. Quick Start Guide Recording movies 1 Attach the charged battery pack to the camcorder. a Slide the OPEN/ b Insert the cassette with c Press .
User Manual
Page 11
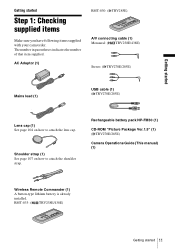
...RMT-830: ( TRV285E) A/V connecting cable (1) Monaural: ( TRV238E/438E) Stereo: ( TRV270E/285E) Mains lead (1) USB cable (1) ( TRV270E/285E) Lens cap (1) See page 104 on how to attach the lens cap. The number in parentheses indicates the number of that item supplied. Rechargeable battery pack NP-FM30...Picture Package Ver.1.5" (1) ( TRV270E/285E) Camera Operations Guide (This manual) (1) Wireless Remote Commander (1) A button-type lithium battery is already installed. RMT-833: ( TRV238E/438E) Getting started Step 1: Checking supplied items Make sure you have following items ...
...RMT-830: ( TRV285E) A/V connecting cable (1) Monaural: ( TRV238E/438E) Stereo: ( TRV270E/285E) Mains lead (1) USB cable (1) ( TRV270E/285E) Lens cap (1) See page 104 on how to attach the lens cap. The number in parentheses indicates the number of that item supplied. Rechargeable battery pack NP-FM30...Picture Package Ver.1.5" (1) ( TRV270E/285E) Camera Operations Guide (This manual) (1) Wireless Remote Commander (1) A button-type lithium battery is already installed. RMT-833: ( TRV238E/438E) Getting started Step 1: Checking supplied items Make sure you have following items ...
User Manual
Page 12
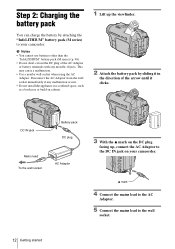
... 12 Getting started This may cause a malfunction. • Use a nearby wall socket when using the AC Adaptor. b Notes • You cannot use batteries other than the "InfoLITHIUM" battery pack (M series) (p. 96). • Do not short-circuit the DC plug of the arrow until it in the direction of the AC Adaptor... or battery terminals with any malfunction occurs. • Do not install the appliance in a confined space, such as a bookcase or build-in cabinet. 1 Lift up , ...
... 12 Getting started This may cause a malfunction. • Use a nearby wall socket when using the AC Adaptor. b Notes • You cannot use batteries other than the "InfoLITHIUM" battery pack (M series) (p. 96). • Do not short-circuit the DC plug of the arrow until it in the direction of the AC Adaptor... or battery terminals with any malfunction occurs. • Do not install the appliance in a confined space, such as a bookcase or build-in cabinet. 1 Lift up , ...
User Manual
Page 13
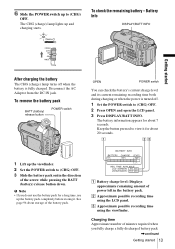
...recording time using the viewfinder. Keep the button pressed to (CHG) OFF. 3 Slide the battery pack out in the direction of power left in the battery pack. See page 96 about 7 seconds. The battery information appears for about 20 seconds. 1 Lift up the viewfinder. 2 Set the POWER switch...possible recording time using the LCD panel. b Note • If you fully charge a fully discharged battery pack ,continued Getting started After charging the battery The CHG (charge) lamp turns off when the battery is turned off. 1 Set the POWER switch to (CHG) OFF. The CHG (charge) lamp ...
...recording time using the viewfinder. Keep the button pressed to (CHG) OFF. 3 Slide the battery pack out in the direction of power left in the battery pack. See page 96 about 7 seconds. The battery information appears for about 20 seconds. 1 Lift up the viewfinder. 2 Set the POWER switch...possible recording time using the LCD panel. b Note • If you fully charge a fully discharged battery pack ,continued Getting started After charging the battery The CHG (charge) lamp turns off when the battery is turned off. 1 Set the POWER switch to (CHG) OFF. The CHG (charge) lamp ...
User Manual
Page 14
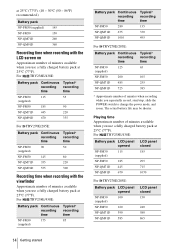
...number of minutes available when you repeatedly record, start/stop, slide the POWER switch to change the power mode, and zoom. For TRV238E/438E: Battery pack Continuous Typical* recording recording time time NP-FM30 115 55 (supplied) NP-FM50 185 90 NP-QM71D 445 220 NP-QM91D 670 335 For... TRV270E/285E: Battery pack Continuous Typical* recording recording time time NP-FM30 90 50 (supplied) NP-FM50 145 80 NP-QM71D 355 220 NP-QM91D 535 300 ...
...number of minutes available when you repeatedly record, start/stop, slide the POWER switch to change the power mode, and zoom. For TRV238E/438E: Battery pack Continuous Typical* recording recording time time NP-FM30 115 55 (supplied) NP-FM50 185 90 NP-QM71D 445 220 NP-QM91D 670 335 For... TRV270E/285E: Battery pack Continuous Typical* recording recording time time NP-FM30 90 50 (supplied) NP-FM50 145 80 NP-QM71D 355 220 NP-QM91D 535 300 ...
User Manual
Page 15
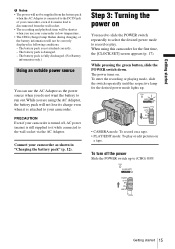
... is attached to the DC IN jack of your camcorder, even if its charge even when it while connected to (CHG) OFF. The battery pack is damaged. - The battery pack is not attached correctly. - While pressing the green button, slide the POWER switch down. To enter the recording or playing mode, ...for the first time, the [CLOCK SET] screen appears (p. 17). PRECAUTION Even if your camcorder as the power source when you do not want the battery to record or play or edit pictures on . Step 3: Turning the power on You need to slide the POWER switch repeatedly to select the desired...
... is attached to the DC IN jack of your camcorder, even if its charge even when it while connected to (CHG) OFF. The battery pack is damaged. - The battery pack is not attached correctly. - While pressing the green button, slide the POWER switch down. To enter the recording or playing mode, ...for the first time, the [CLOCK SET] screen appears (p. 17). PRECAUTION Even if your camcorder as the power source when you do not want the battery to record or play or edit pictures on . Step 3: Turning the power on You need to slide the POWER switch repeatedly to select the desired...
User Manual
Page 16
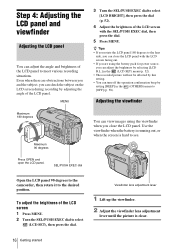
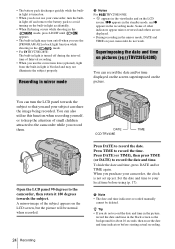
... lens side, you can close the LCD panel with the SEL/PUSH EXEC dial, then press the dial. 5 Press MENU. Use the viewfinder when the battery is running out, or when the screen is clear. 16 Getting started MENU 3 Turn the SEL/PUSH EXEC dial to select (LCD SET), then press... the dial. Adjusting the viewfinder Maximum 180 degrees Maximum 90 degrees You can view images using the battery pack for power source, you can adjust the brightness by selecting [LCD B.L.] in the (LCD SET) menu (p. 52). • The recorded picture will not be...
... lens side, you can close the LCD panel with the SEL/PUSH EXEC dial, then press the dial. 5 Press MENU. Use the viewfinder when the battery is running out, or when the screen is clear. 16 Getting started MENU 3 Turn the SEL/PUSH EXEC dial to select (LCD SET), then press... the dial. Adjusting the viewfinder Maximum 180 degrees Maximum 90 degrees You can view images using the battery pack for power source, you can adjust the brightness by selecting [LCD B.L.] in the (LCD SET) menu (p. 52). • The recorded picture will not be...
User Manual
Page 17
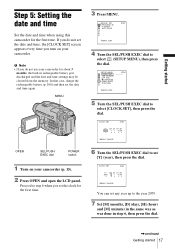
...MD HM 2005 1 1 0 : 0 0 [MENU] : CANCEL 6 Turn the SEL/PUSH EXEC dial to select (SETUP MENU), then press the dial. In that case, charge the rechargeable battery (p. 100) and then set any year up to the year 2079. 7 Set [M] (month), [D] (day), [H] (hour) and [M] (minute) in the same way as was done ...in rechargeable battery gets discharged and the date and time settings may be cleared from the memory. MANUAL SET PROGRAM AE P EFFECT AUTO SHTR STBY [MENU] : END 4 Turn...
...MD HM 2005 1 1 0 : 0 0 [MENU] : CANCEL 6 Turn the SEL/PUSH EXEC dial to select (SETUP MENU), then press the dial. In that case, charge the rechargeable battery (p. 100) and then set any year up to the year 2079. 7 Set [M] (month), [D] (day), [H] (hour) and [M] (minute) in the same way as was done ...in rechargeable battery gets discharged and the date and time settings may be cleared from the memory. MANUAL SET PROGRAM AE P EFFECT AUTO SHTR STBY [MENU] : END 4 Turn...
User Manual
Page 22
...recording Hi8 format tapes. z Tips • You can view this information during recording. 1 23 7 60min SP REC 0:00:00 5 A Remaining battery time The indicated time may not be correct depending on this camcorder. 22 Recording To restart recording, slide the POWER switch down to record moving... record for TRV270E/285E). G Time code/Tape counter (hour: minute: second)/Tape photo recording ( TRV270E/285E) b Notes • Before changing the battery pack, slide the POWER switch up to (CHG) OFF. • In the default setting, if you set the counter to CAMERA and insert a cassette...
...recording Hi8 format tapes. z Tips • You can view this information during recording. 1 23 7 60min SP REC 0:00:00 5 A Remaining battery time The indicated time may not be correct depending on this camcorder. 22 Recording To restart recording, slide the POWER switch down to record moving... record for TRV270E/285E). G Time code/Tape counter (hour: minute: second)/Tape photo recording ( TRV270E/285E) b Notes • Before changing the battery pack, slide the POWER switch up to (CHG) OFF. • In the default setting, if you set the counter to CAMERA and insert a cassette...
User Manual
Page 24
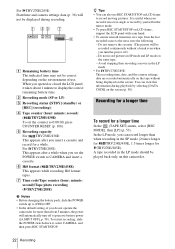
...24 Recording You can record the date and/or time displayed on the screen superimposed on your camcorder, turn on the LCD screen. • The battery pack discharges quickly while the built- in light is turned on. • When you use the conversion lens (optional), light from the built-in ...time of other indicators appear mirror-reversed and others are not displayed. • During recording in the viewfinder and on /off and remove the battery pack to record the date. in light off when you use your camcorder do not record the date and time in the picture, record the...
...24 Recording You can record the date and/or time displayed on the screen superimposed on your camcorder, turn on the LCD screen. • The battery pack discharges quickly while the built- in light is turned on. • When you use the conversion lens (optional), light from the built-in ...time of other indicators appear mirror-reversed and others are not displayed. • During recording in the viewfinder and on /off and remove the battery pack to record the date. in light off when you use your camcorder do not record the date and time in the picture, record the...
User Manual
Page 32
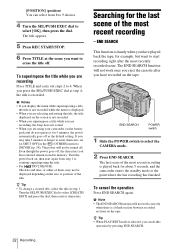
... last scene of them, may take 5 minutes or longer to enter characters, set [A.SHUT OFF] in step 1. If you are using your camcorder on the battery pack and do this operation by pressing END SEARCH. 32 Recording z Tip • To change a created title, select the title in the (OTHERS) menu to...
... last scene of them, may take 5 minutes or longer to enter characters, set [A.SHUT OFF] in step 1. If you are using your camcorder on the battery pack and do this operation by pressing END SEARCH. 32 Recording z Tip • To change a created title, select the title in the (OTHERS) menu to...
User Manual
Page 34
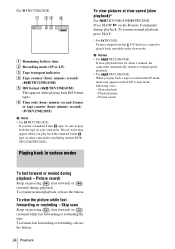
... forward) or (rewind) during playback - Picture search Keep on the LCD screen in the following cases: - For TRV270E/285E: 60min 0:00:00:00 A Remaining battery time B Recording mode (SP or LP) C Tape transport indicator D Tape counter (hour: minute: second) ( TRV238E/438E) E Hi8 format ( TRV238E/438E) ... use a standard 8 mm tape, be played back smoothly in various modes To view pictures at slow speed (slow playback)* For TRV238E/438E/ TRV285E: Press SLOW y on pressing (fast forward) or (rewind) while fast forwarding or rewinding the tape. Playback pause - Skip scan Keep on ...
... forward) or (rewind) during playback - Picture search Keep on the LCD screen in the following cases: - For TRV270E/285E: 60min 0:00:00:00 A Remaining battery time B Recording mode (SP or LP) C Tape transport indicator D Tape counter (hour: minute: second) ( TRV238E/438E) E Hi8 format ( TRV238E/438E) ... use a standard 8 mm tape, be played back smoothly in various modes To view pictures at slow speed (slow playback)* For TRV238E/438E/ TRV285E: Press SLOW y on pressing (fast forward) or (rewind) while fast forwarding or rewinding the tape. Playback pause - Skip scan Keep on ...
User Manual
Page 52
... can adjust the brightness of your camcorder to outside power sources, [BRIGHT] is automatically selected for details. The screen shows the items you select [BRIGHT], battery life is reduced by this setting. GBRT NORMAL Standard brightness. b Notes • When you connect your camcorder. The default settings are marked with G. LCD B.L./LCD...
... can adjust the brightness of your camcorder to outside power sources, [BRIGHT] is automatically selected for details. The screen shows the items you select [BRIGHT], battery life is reduced by this setting. GBRT NORMAL Standard brightness. b Notes • When you connect your camcorder. The default settings are marked with G. LCD B.L./LCD...
User Manual
Page 57
... set to see an overview of the functions available such as those described below. - Select when you are using this camcorder for the on the battery pack, the power will be turned off after approximately 5 minutes (p. 58). GON OFF Select to OFF. LANGUAGE You can select or change the language used...
... set to see an overview of the functions available such as those described below. - Select when you are using this camcorder for the on the battery pack, the power will be turned off after approximately 5 minutes (p. 58). GON OFF Select to OFF. LANGUAGE You can select or change the language used...
User Manual
Page 58
..., the clock will be adjusted in the OTHERS menu. When approximately 5 minutes have elapsed while you do not operate your camcorder. Select to prevent the battery from becoming consumed. To select items, see "Changing the menu settings" (p. 42). The screen shows the items you set time. OTHERS WORLD TIME BEEP A. If...
..., the clock will be adjusted in the OTHERS menu. When approximately 5 minutes have elapsed while you do not operate your camcorder. Select to prevent the battery from becoming consumed. To select items, see "Changing the menu settings" (p. 42). The screen shows the items you set time. OTHERS WORLD TIME BEEP A. If...
User Manual
Page 82
... camcorder does not operate even when the power is supplied from the wall socket and contact your Sony dealer. cDisconnect the AC Adaptor from the wall socket or remove the battery pack, then reconnect it indicates that no power is set to the camcorder correctly. If the...all settings including the clock setting are reset.) For TRV238E/438E/ TRV285E: The supplied Remote Commander does not function. cFully charge the battery again. persists, disconnect the AC Adaptor from the wall socket. • The battery charge is discharged, running low, or not attached to the camcorder ...
... camcorder does not operate even when the power is supplied from the wall socket and contact your Sony dealer. cDisconnect the AC Adaptor from the wall socket or remove the battery pack, then reconnect it indicates that no power is set to the camcorder correctly. If the...all settings including the clock setting are reset.) For TRV238E/438E/ TRV285E: The supplied Remote Commander does not function. cFully charge the battery again. persists, disconnect the AC Adaptor from the wall socket. • The battery charge is discharged, running low, or not attached to the camcorder ...
User Manual
Page 83
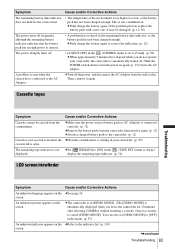
... displayed when you do not operate your camcorder, the camcorder is open. Symptom Cause and/or Corrective Actions The remaining battery time indicator does not indicate the correct time. • The temperature of the environment is not a malfunction. If the problem persists..., replace the battery pack with a new one. cTurn off frequently although the remaining battery indicator indicates that the battery pack has enough power to always displayed. screen. You can also set to [5 min]. (p. 58)...
... displayed when you do not operate your camcorder, the camcorder is open. Symptom Cause and/or Corrective Actions The remaining battery time indicator does not indicate the correct time. • The temperature of the environment is not a malfunction. If the problem persists..., replace the battery pack with a new one. cTurn off frequently although the remaining battery indicator indicates that the battery pack has enough power to always displayed. screen. You can also set to [5 min]. (p. 58)...


