
Camera Operations Guide
Page 2
...harmful interference, and (2) this product. Model No. -TRV Serial No. You can help preserve our environment by returning your Sony dealer regarding recycling of Conformity Trade Name: SONY Model No.: DCR-TRV280 Responsible Party: Sony Electronics Inc. and CANADA RECYCLING LITHIUM-ION BATTERIES Lithium-Ion batteries are located on the bottom. This symbol is subject.... Telephone No.: 858-942-2230 This device complies with Part 15 of electric shock to discontinue midway (fail), restart the application or disconnect and connect the communication cable (USB, etc.) again.
...harmful interference, and (2) this product. Model No. -TRV Serial No. You can help preserve our environment by returning your Sony dealer regarding recycling of Conformity Trade Name: SONY Model No.: DCR-TRV280 Responsible Party: Sony Electronics Inc. and CANADA RECYCLING LITHIUM-ION BATTERIES Lithium-Ion batteries are located on the bottom. This symbol is subject.... Telephone No.: 858-942-2230 This device complies with Part 15 of electric shock to discontinue midway (fail), restart the application or disconnect and connect the communication cable (USB, etc.) again.
Camera Operations Guide
Page 3
... time may cause malfunctions. If this instruction manual, each local language are for effective use standard 8 mm and Hi8 , Digital8 video cassettes on the LCD panel, viewfinder, and lens • The LCD screen and the viewfinder are manufactured using extremely high... so might cause your camcorder. CCD-TRV138: TRV138 CCD-TRV338: TRV338 DCR-TRV280: TRV280 Instructions with the limits for a digital device pursuant to operate this manual, check the model name of the following measures: - Reorient or relocate the receiving antenna. - Connect the equipment into an outlet...
... time may cause malfunctions. If this instruction manual, each local language are for effective use standard 8 mm and Hi8 , Digital8 video cassettes on the LCD panel, viewfinder, and lens • The LCD screen and the viewfinder are manufactured using extremely high... so might cause your camcorder. CCD-TRV138: TRV138 CCD-TRV338: TRV338 DCR-TRV280: TRV280 Instructions with the limits for a digital device pursuant to operate this manual, check the model name of the following measures: - Reorient or relocate the receiving antenna. - Connect the equipment into an outlet...
Camera Operations Guide
Page 7
... (OTHERS) menu - WORLD TIME/VIDEO EDIT, etc 57 Dubbing/Editing Connecting to a VCR 59 Dubbing to DVD") ( TRV280 79 Troubleshooting Troubleshooting 82 Warning indicators and messages .....92 Additional Information Using your camcorder abroad 94 Usable cassette tapes 95 About the "InfoLITHIUM" battery pack 96... scenes from a tape - LCD B.L./LCD COLOR, etc. ......51 Using the (TAPE SET) menu - Digital program editing ( TRV280 67 Using with your camcorder: • Camera Operations Guide (This manual) • "First Step Guide" for using the supplied applications (included in the ...
... (OTHERS) menu - WORLD TIME/VIDEO EDIT, etc 57 Dubbing/Editing Connecting to a VCR 59 Dubbing to DVD") ( TRV280 79 Troubleshooting Troubleshooting 82 Warning indicators and messages .....92 Additional Information Using your camcorder abroad 94 Usable cassette tapes 95 About the "InfoLITHIUM" battery pack 96... scenes from a tape - LCD B.L./LCD COLOR, etc. ......51 Using the (TAPE SET) menu - Digital program editing ( TRV280 67 Using with your camcorder: • Camera Operations Guide (This manual) • "First Step Guide" for using the supplied applications (included in the ...
Camera Operations Guide
Page 11
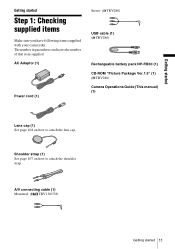
... ( TRV280) Camera Operations Guide (This manual) (1) Lens cap (1) See page 104 on how to attach the lens cap. Shoulder strap (1) See page 107 on how to attach the shoulder strap. The number in parentheses indicates the number of that item supplied. Getting started Getting started 11 A/V connecting cable... (1) Monaural: ( TRV138/338) Getting started Step 1: Checking supplied items Make sure you have following items supplied with your camcorder.
... ( TRV280) Camera Operations Guide (This manual) (1) Lens cap (1) See page 104 on how to attach the lens cap. Shoulder strap (1) See page 107 on how to attach the shoulder strap. The number in parentheses indicates the number of that item supplied. Getting started Getting started 11 A/V connecting cable... (1) Monaural: ( TRV138/338) Getting started Step 1: Checking supplied items Make sure you have following items supplied with your camcorder.
Camera Operations Guide
Page 12
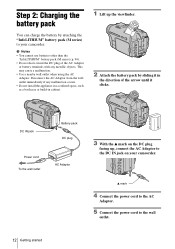
This may cause a malfunction. • Use a nearby wall outlet when using the AC Adaptor. v mark 4 Connect the power cord to the AC Adaptor. 5 Connect the power cord to your camcorder. Step 2: Charging the battery pack You can charge the battery by sliding it clicks. DC IN jack Battery pack DC plug...install the appliance in a confined space, such as a bookcase or build-in the direction of the arrow until it in cabinet. 1 Lift up , connect the AC Adaptor to the DC IN jack on your camcorder. Disconnect the AC Adaptor from the wall outlet immediately if any metallic objects.
This may cause a malfunction. • Use a nearby wall outlet when using the AC Adaptor. v mark 4 Connect the power cord to the AC Adaptor. 5 Connect the power cord to your camcorder. Step 2: Charging the battery pack You can charge the battery by sliding it clicks. DC IN jack Battery pack DC plug...install the appliance in a confined space, such as a bookcase or build-in the direction of the arrow until it in cabinet. 1 Lift up , connect the AC Adaptor to the DC IN jack on your camcorder. Disconnect the AC Adaptor from the wall outlet immediately if any metallic objects.
Camera Operations Guide
Page 15
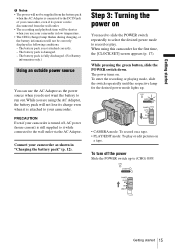
... • The CHG (charge) lamp flashes during charging, or the battery information will not be correctly displayed in "Charging the battery pack" (p. 12). Connect your camcorder as the power source when you use the AC Adaptor as shown in following conditions. - Step 3: Turning the power on a tape. • PLAY/EDIT... still supplied to it is disconnected from the battery pack when the AC Adaptor is connected to the DC IN jack of your camcorder, even if its charge even when it while connected to record or play or edit pictures on . The battery pack is damaged. - The battery pack is...
... • The CHG (charge) lamp flashes during charging, or the battery information will not be correctly displayed in "Charging the battery pack" (p. 12). Connect your camcorder as the power source when you use the AC Adaptor as shown in following conditions. - Step 3: Turning the power on a tape. • PLAY/EDIT... still supplied to it is disconnected from the battery pack when the AC Adaptor is connected to the DC IN jack of your camcorder, even if its charge even when it while connected to record or play or edit pictures on . The battery pack is damaged. - The battery pack is...
Camera Operations Guide
Page 27
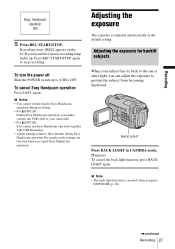
..., press BACK LIGHT again. Previously made settings are restored when you cannot connect the USB cable to your camcorder. • For TRV280: You cannot use Easy Handycam operation together with USB Streaming. • All the settings return to their defaults during Easy Handycam operation. b Note • The back light function is adjusted automatically in CAMERA...
..., press BACK LIGHT again. Previously made settings are restored when you cannot connect the USB cable to your camcorder. • For TRV280: You cannot use Easy Handycam operation together with USB Streaming. • All the settings return to their defaults during Easy Handycam operation. b Note • The back light function is adjusted automatically in CAMERA...
Camera Operations Guide
Page 36
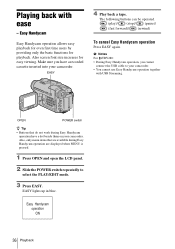
...For TRV280: • During Easy Handycam operation, you have a dot beside them on your camcorder. Also, only menu items that do not work during Easy Handycam operation are available during Easy Handycam operation have a recorded cassette inserted into your camcorder. • You cannot use Easy Handycam ... repeatedly to your camcorder. Make sure you cannot connect the USB cable to select the PLAY/EDIT mode. 3 Press EASY. Also screen font size increases for playback. Easy Handycam operation ON 36 Playback Easy Handycam Easy Handycam operation allows easy playback...
...For TRV280: • During Easy Handycam operation, you have a dot beside them on your camcorder. Also, only menu items that do not work during Easy Handycam operation are available during Easy Handycam operation have a recorded cassette inserted into your camcorder. • You cannot use Easy Handycam ... repeatedly to your camcorder. Make sure you cannot connect the USB cable to select the PLAY/EDIT mode. 3 Press EASY. Also screen font size increases for playback. Easy Handycam operation ON 36 Playback Easy Handycam Easy Handycam operation allows easy playback...
Camera Operations Guide
Page 39
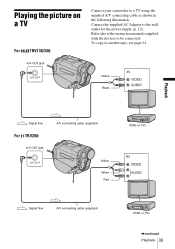
Playing the picture on a TV For TRV138/338: Connect your camcorder to the wall outlet for the power supply (p. 12). Connect the supplied AC Adaptor to a TV using the supplied A/V connecting cable as shown in the following illustration. A/V OUT jack Yellow Black Playback Signal flow For TRV280: A/V OUT jack A/V connecting cable (supplied) Yellow White Red VCRs or TVs Signal flow A/V connecting cable (supplied) VCRs or TVs ,continued Playback 39 To copy to be connected. Refer also to the instruction manuals supplied with the devices to another tape, see page 61.
Playing the picture on a TV For TRV138/338: Connect your camcorder to the wall outlet for the power supply (p. 12). Connect the supplied AC Adaptor to a TV using the supplied A/V connecting cable as shown in the following illustration. A/V OUT jack Yellow Black Playback Signal flow For TRV280: A/V OUT jack A/V connecting cable (supplied) Yellow White Red VCRs or TVs Signal flow A/V connecting cable (supplied) VCRs or TVs ,continued Playback 39 To copy to be connected. Refer also to the instruction manuals supplied with the devices to another tape, see page 61.
Camera Operations Guide
Page 40
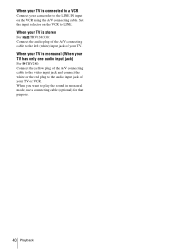
When your TV is stereo For TRV138/338: Connect the audio plug of the A/V connecting cable to the left (white) input jack of your TV or VCR. Set the input selector on the VCR using the A/V connecting cable. When your TV is connected to a VCR Connect your camcorder to the LINE IN input on the VCR... of the A/V connecting cable to the video input jack and connect the white or the red plug to play the sound in monaural mode, use a connecting cable (optional) for that purpose. 40 Playback When your TV is monaural (When your TV has only one audio input jack) For TRV280: Connect the yellow plug ...
When your TV is stereo For TRV138/338: Connect the audio plug of the A/V connecting cable to the left (white) input jack of your TV or VCR. Set the input selector on the VCR using the A/V connecting cable. When your TV is connected to a VCR Connect your camcorder to the LINE IN input on the VCR... of the A/V connecting cable to the video input jack and connect the white or the red plug to play the sound in monaural mode, use a connecting cable (optional) for that purpose. 40 Playback When your TV is monaural (When your TV has only one audio input jack) For TRV280: Connect the yellow plug ...
Camera Operations Guide
Page 47
...[16:9 WIDE] to [ON] in the menu settings when the SteadyShot is working , flashes and the SteadyShot does not function. ,continued Customizing Your Camcorder 47 For TRV280: You can record a 16:9 wide picture on the tape to watch on a standard TV** * Picture appears in full screen when the wide-screen...between video signals. • When you record in the [16:9 FULL], the date or time indicator will be played in full mode when you connect to your camcorder to a TV compatible with your TV. GOFF ON ( ) Standard setting (to record pictures to play a picture in the wide mode, it appears...
...[16:9 WIDE] to [ON] in the menu settings when the SteadyShot is working , flashes and the SteadyShot does not function. ,continued Customizing Your Camcorder 47 For TRV280: You can record a 16:9 wide picture on the tape to watch on a standard TV** * Picture appears in full screen when the wide-screen...between video signals. • When you record in the [16:9 FULL], the date or time indicator will be played in full mode when you connect to your camcorder to a TV compatible with your TV. GOFF ON ( ) Standard setting (to record pictures to play a picture in the wide mode, it appears...

Camera Operations Guide
Page 51
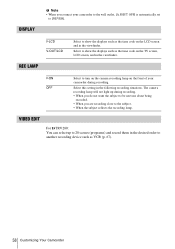
...(p. 41). GBRT NORMAL Standard brightness. LCD COLOR Turn the SEL/PUSH EXEC dial to brighten the LCD screen. Low intensity High intensity Customizing Your Camcorder Customizing Your Camcorder 51 LCD B.L. Using the (LCD SET) menu - The default settings are marked with G. LCD COLOR [MENU] : END LCD BRIGHT See page.... LCD SET LCD BR I GHT LCD B. You can adjust vary depending on the LCD screen. The screen shows the items you connect your camcorder. L. You can operate at the moment. b Notes • When you can select the items listed below in the LCD SET menu.
...(p. 41). GBRT NORMAL Standard brightness. LCD COLOR Turn the SEL/PUSH EXEC dial to brighten the LCD screen. Low intensity High intensity Customizing Your Camcorder Customizing Your Camcorder 51 LCD B.L. Using the (LCD SET) menu - The default settings are marked with G. LCD COLOR [MENU] : END LCD BRIGHT See page.... LCD SET LCD BR I GHT LCD B. You can adjust vary depending on the LCD screen. The screen shows the items you connect your camcorder. L. You can operate at the moment. b Notes • When you can select the items listed below in the LCD SET menu.
Camera Operations Guide
Page 54
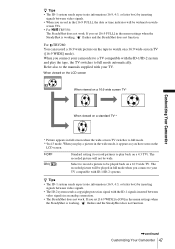
... be able to hide the menu settings. flashes. 9 Press REC START/STOP. The interval recording starts. INT.REC For TRV280: You can silence the beeps during recording (p. 57). 54 Customizing Your Camcorder Connect your camcorder to the wall outlet using the supplied AC Adaptor during the operation. [a] [a] [a] [b] [b] a. [REC TIME] b. [INTERVAL] 1 Turn the SEL/PUSH...
... be able to hide the menu settings. flashes. 9 Press REC START/STOP. The interval recording starts. INT.REC For TRV280: You can silence the beeps during recording (p. 57). 54 Customizing Your Camcorder Connect your camcorder to the wall outlet using the supplied AC Adaptor during the operation. [a] [a] [a] [b] [b] a. [REC TIME] b. [INTERVAL] 1 Turn the SEL/PUSH...
Camera Operations Guide
Page 55
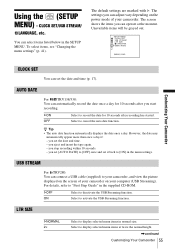
.... ,continued Customizing Your Camcorder 55 GON OFF Select ... vary depending on your camcorder. AUTO DATE For TRV138...MENU] : END Customizing Your Camcorder CLOCK SET You can connect a USB cable (supplied) to... cancel the auto date function. LTR SIZE GNORMAL 2× Select to [ON] in normal size. To select items, see "Changing the menu settings" (p. 41). Unavailable items will be grayed out. you eject and insert the tape again. - Select to your camcorder..., and view the picture displayed on the screen of your camcorder on the...
.... ,continued Customizing Your Camcorder 55 GON OFF Select ... vary depending on your camcorder. AUTO DATE For TRV138...MENU] : END Customizing Your Camcorder CLOCK SET You can connect a USB cable (supplied) to... cancel the auto date function. LTR SIZE GNORMAL 2× Select to [ON] in normal size. To select items, see "Changing the menu settings" (p. 41). Unavailable items will be grayed out. you eject and insert the tape again. - Select to your camcorder..., and view the picture displayed on the screen of your camcorder on the...
Camera Operations Guide
Page 58
VIDEO EDIT For TRV280: You can select up during recording. DISPLAY b Note • When you connect your camcorder during recording. • When you do not want the subject to be ...Select to show the displays such as the time code on the front of your camcorder to the wall outlet, [A.SHUT OFF] is automatically set to another recording device such as VCR (p. 67). ...58 Customizing Your Camcorder Select to the subject. • When the subject reflects the recording lamp. GON OFF Select to...
VIDEO EDIT For TRV280: You can select up during recording. DISPLAY b Note • When you connect your camcorder during recording. • When you do not want the subject to be ...Select to show the displays such as the time code on the front of your camcorder to the wall outlet, [A.SHUT OFF] is automatically set to another recording device such as VCR (p. 67). ...58 Customizing Your Camcorder Select to the subject. • When the subject reflects the recording lamp. GON OFF Select to...

Camera Operations Guide
Page 59
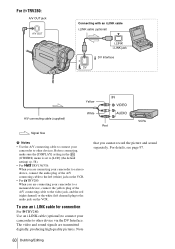
Dubbing/Editing Connecting to a tape on your camcorder (p. 66). For TRV280, you can also record the picture from a VCR to a VCR For TRV138/338: A/V OUT jack You can create a copy of the picture recorded on other recording devices (p. 61). A/V connecting cable (supplied) Signal flow Yellow Black VCRs Dubbing/Editing ,continued Dubbing/Editing 59 Connect your camcorder on your camcorder to a VCR as shown in the following illustration.
Dubbing/Editing Connecting to a tape on your camcorder (p. 66). For TRV280, you can also record the picture from a VCR to a VCR For TRV138/338: A/V OUT jack You can create a copy of the picture recorded on other recording devices (p. 61). A/V connecting cable (supplied) Signal flow Yellow Black VCRs Dubbing/Editing ,continued Dubbing/Editing 59 Connect your camcorder on your camcorder to a VCR as shown in the following illustration.
Camera Operations Guide
Page 60
... to [LCD] (the default setting) (p. 58). • For TRV138/338: When you are connecting your camcorder to a monaural device, connect the yellow plug of the A/V connecting cable to the left channel) plug to the audio jack on the VCR. • For TRV280: When you cannot record the picture and sound separately. Note that you are...
... to [LCD] (the default setting) (p. 58). • For TRV138/338: When you are connecting your camcorder to a monaural device, connect the yellow plug of the A/V connecting cable to the left channel) plug to the audio jack on the VCR. • For TRV280: When you cannot record the picture and sound separately. Note that you are...
Camera Operations Guide
Page 61
...). Otherwise, they will be output via the DV Interface, you cannot record the title or indicators. • For TRV280: Pictures edited with your camcorder is connected to the VCR via the DV Interface. • For TRV280: When connected using the A/V connecting cable, to hide indicators such as time code (p. 37). b Notes • When dubbing using the...
...). Otherwise, they will be output via the DV Interface, you cannot record the title or indicators. • For TRV280: Pictures edited with your camcorder is connected to the VCR via the DV Interface. • For TRV280: When connected using the A/V connecting cable, to hide indicators such as time code (p. 37). b Notes • When dubbing using the...
Camera Operations Guide
Page 62
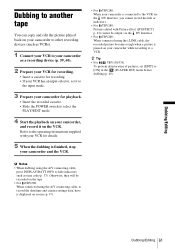
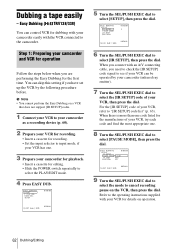
...8 Turn the SEL/PUSH EXEC dial to the camcorder. Refer to the operating instructions supplied with an A/V connecting cable, you are performing the Easy Dubbing for details on a VCR that does not support [IR SETUP] codes. 1 Connect your VCR to your camcorder as a recording device (p. 60). 2 Prepare your...; Insert a cassette for recording. • Set the input selector to input mode, if your camcorder easily with the VCR connected to select [PAUSE MODE], then press the dial. When you connect with your VCR can be operated by the following procedure before. Dubbing a tape easily - Step ...
...8 Turn the SEL/PUSH EXEC dial to the camcorder. Refer to the operating instructions supplied with an A/V connecting cable, you are performing the Easy Dubbing for details on a VCR that does not support [IR SETUP] codes. 1 Connect your VCR to your camcorder as a recording device (p. 60). 2 Prepare your...; Insert a cassette for recording. • Set the input selector to input mode, if your camcorder easily with the VCR connected to select [PAUSE MODE], then press the dial. When you connect with your VCR can be operated by the following procedure before. Dubbing a tape easily - Step ...
Camera Operations Guide
Page 65
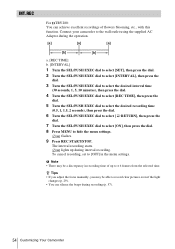
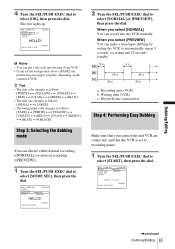
... you set to recording pause. 1 Turn the SEL/PUSH EXEC dial to [FADE], the picture may not appear properly, depending on the connected VCR. Dubbing/Editing 4 Turn the SEL/PUSH EXEC dial to select [NORMAL] or [PREVIEW], then press the dial. The title lights ... HELLO! [ EASY DUB ] : END NORMAL b Notes • You can put a title only into the VCR normally. Waiting time (VCR) c. Playback time (camcorder) Step 4: Performing Easy Dubbing Make sure that your camcorder and VCR are connected, and that the VCR is set the background color to select [START], then press the dial.
... you set to recording pause. 1 Turn the SEL/PUSH EXEC dial to [FADE], the picture may not appear properly, depending on the connected VCR. Dubbing/Editing 4 Turn the SEL/PUSH EXEC dial to select [NORMAL] or [PREVIEW], then press the dial. The title lights ... HELLO! [ EASY DUB ] : END NORMAL b Notes • You can put a title only into the VCR normally. Waiting time (VCR) c. Playback time (camcorder) Step 4: Performing Easy Dubbing Make sure that your camcorder and VCR are connected, and that the VCR is set the background color to select [START], then press the dial.


