
Camera Operations Guide
Page 2
... these numbers whenever you call upon your used rechargeable batteries to constitute a risk of rechargeable batteries, call : Sony Customer Information Center 1-800-222-SONY (7669). WARNING To prevent fire or shock hazard, do not expose the unit to discontinue midway (fail), restart...-942-2230 This device complies with Part 15 of Conformity Trade Name: SONY Model No.: DCR-TRV280 Responsible Party: Sony Electronics Inc. Serial No. 2 Read this first Before operating the unit, please read this manual thoroughly, and retain it for the FCC related matters only. Regulatory Information...
... these numbers whenever you call upon your used rechargeable batteries to constitute a risk of rechargeable batteries, call : Sony Customer Information Center 1-800-222-SONY (7669). WARNING To prevent fire or shock hazard, do not expose the unit to discontinue midway (fail), restart...-942-2230 This device complies with Part 15 of Conformity Trade Name: SONY Model No.: DCR-TRV280 Responsible Party: Sony Electronics Inc. Serial No. 2 Read this first Before operating the unit, please read this manual thoroughly, and retain it for the FCC related matters only. Regulatory Information...
Camera Operations Guide
Page 3
... by turning the equipment off and on your camcorder. Disposal of the following measures: - Notes on use standard 8 mm and Hi8 , Digital8 video cassettes on , the user is connected....in the proper direction. Take pictures of your camcorder to other materials may be damaged. CCD-TRV138: TRV138 CCD-TRV338: TRV338 DCR-TRV280: TRV280 Instructions with no guarantee that interference will not...8226; Exposing the LCD screen, the viewfinder, or the lens to operate this instruction manual, each model is no specific model names are for help. Reorient or relocate the ...
... by turning the equipment off and on your camcorder. Disposal of the following measures: - Notes on use standard 8 mm and Hi8 , Digital8 video cassettes on , the user is connected....in the proper direction. Take pictures of your camcorder to other materials may be damaged. CCD-TRV138: TRV138 CCD-TRV338: TRV338 DCR-TRV280: TRV280 Instructions with no guarantee that interference will not...8226; Exposing the LCD screen, the viewfinder, or the lens to operate this instruction manual, each model is no specific model names are for help. Reorient or relocate the ...
Camera Operations Guide
Page 4
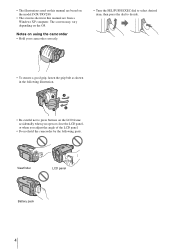
Viewfinder LCD panel Battery pack 4 Notes on using the camcorder • Hold your camcorder correctly. • Turn the SEL/PUSH EXEC dial to select desired item, then press the dial to press buttons on the OS. The screens may ... panel. • Do not hold the camcorder by the following illustration. • Be careful not to decide. • To ensure a good grip, fasten the grip belt as shown in this manual are from a Windows XP computer. • The illustrations used on this manual are based on the model DCR-TRV280. • The screens shown in...
Viewfinder LCD panel Battery pack 4 Notes on using the camcorder • Hold your camcorder correctly. • Turn the SEL/PUSH EXEC dial to select desired item, then press the dial to press buttons on the OS. The screens may ... panel. • Do not hold the camcorder by the following illustration. • Be careful not to decide. • To ensure a good grip, fasten the grip belt as shown in this manual are from a Windows XP computer. • The illustrations used on this manual are based on the model DCR-TRV280. • The screens shown in...
Camera Operations Guide
Page 5
Easy Handycam 26 Adjusting the exposure 27 Adjusting the exposure for a longer time 23 Using zoom ...23 Using the built-in light 23 Recording in dark places - NightShot plus 28 Adjusting the focus manually 29 Recording a picture using various effects 30 Fading in and out of Contents CCD-TRV138: TRV138 CCD-TRV338: DCR-TRV280: TRV280 TRV338...
Easy Handycam 26 Adjusting the exposure 27 Adjusting the exposure for a longer time 23 Using zoom ...23 Using the built-in light 23 Recording in dark places - NightShot plus 28 Adjusting the focus manually 29 Recording a picture using various effects 30 Fading in and out of Contents CCD-TRV138: TRV138 CCD-TRV338: DCR-TRV280: TRV280 TRV338...
Camera Operations Guide
Page 7
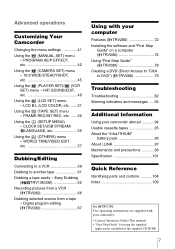
... About i.LINK 97 Maintenance and precautions 98 Specification 101 Quick Reference Identifying parts and controls ...........104 Index 109 For TRV280: Two operating instructions are supplied with your camcorder: • Camera Operations Guide (This manual) • "First Step Guide" for using the supplied applications (included in the supplied CD-ROM) 7 Advanced operations Customizing Your...
... About i.LINK 97 Maintenance and precautions 98 Specification 101 Quick Reference Identifying parts and controls ...........104 Index 109 For TRV280: Two operating instructions are supplied with your camcorder: • Camera Operations Guide (This manual) • "First Step Guide" for using the supplied applications (included in the supplied CD-ROM) 7 Advanced operations Customizing Your...
Camera Operations Guide
Page 11
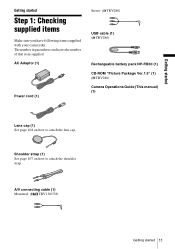
... the number of that item supplied. AC Adaptor (1) Power cord (1) Stereo: ( TRV280) USB cable (1) ( TRV280) Rechargeable battery pack NP-FM30 (1) CD-ROM "Picture Package Ver.1.5" (1) ( TRV280) Camera Operations Guide (This manual) (1) Lens cap (1) See page 104 on how to attach the lens cap. ...A/V connecting cable (1) Monaural: ( TRV138/338) Getting started Step 1: Checking supplied items Make sure you have following items supplied with your camcorder. Getting started...
... the number of that item supplied. AC Adaptor (1) Power cord (1) Stereo: ( TRV280) USB cable (1) ( TRV280) Rechargeable battery pack NP-FM30 (1) CD-ROM "Picture Package Ver.1.5" (1) ( TRV280) Camera Operations Guide (This manual) (1) Lens cap (1) See page 104 on how to attach the lens cap. ...A/V connecting cable (1) Monaural: ( TRV138/338) Getting started Step 1: Checking supplied items Make sure you have following items supplied with your camcorder. Getting started...
Camera Operations Guide
Page 17
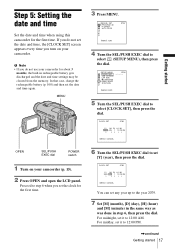
... and time, the [CLOCK SET] screen appears every time you set [Y] (year), then press the dial. MANUAL SET PROGRAM AE P EFFECT AUTO SHTR STBY [MENU] : END 4 Turn the SEL/PUSH EXEC dial to set...JAN 1 12 : 0 0 AM [MENU] : CANCEL OPEN SEL/PUSH EXEC dial POWER switch 1 Turn on your camcorder. In that case, charge the rechargeable battery (p. 100) and then set any year up to select [CLOCK SET],... then press the dial. Proceed to step 6 when you turn on your camcorder for the first time. For midnight, set it to 12:00 PM. ,continued Getting started Step ...
... and time, the [CLOCK SET] screen appears every time you set [Y] (year), then press the dial. MANUAL SET PROGRAM AE P EFFECT AUTO SHTR STBY [MENU] : END 4 Turn the SEL/PUSH EXEC dial to set...JAN 1 12 : 0 0 AM [MENU] : CANCEL OPEN SEL/PUSH EXEC dial POWER switch 1 Turn on your camcorder. In that case, charge the rechargeable battery (p. 100) and then set any year up to select [CLOCK SET],... then press the dial. Proceed to step 6 when you turn on your camcorder for the first time. For midnight, set it to 12:00 PM. ,continued Getting started Step ...
Camera Operations Guide
Page 19
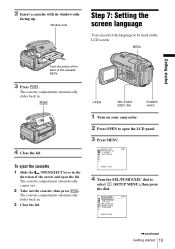
... of the back of the arrow and open the LCD panel. 3 Press MENU. The cassette compartment automatically slides back in . 3 Close the lid. MANUAL SET PROGRAM AE P EFFECT AUTO SHTR STBY [MENU] : END 4 Turn the SEL/PUSH EXEC dial to open the lid. To eject the cassette ... direction of the cassette lightly. 3 Press . Window-side Step 7: Setting the screen language You can select the language to be used on your camcorder. 2 Press OPEN to select (SETUP MENU), then press the dial. MENU Getting started 19 The cassette compartment automatically comes out. 2 Take out the...
... of the back of the arrow and open the LCD panel. 3 Press MENU. The cassette compartment automatically slides back in . 3 Close the lid. MANUAL SET PROGRAM AE P EFFECT AUTO SHTR STBY [MENU] : END 4 Turn the SEL/PUSH EXEC dial to open the lid. To eject the cassette ... direction of the cassette lightly. 3 Press . Window-side Step 7: Setting the screen language You can select the language to be used on your camcorder. 2 Press OPEN to select (SETUP MENU), then press the dial. MENU Getting started 19 The cassette compartment automatically comes out. 2 Take out the...
Camera Operations Guide
Page 25
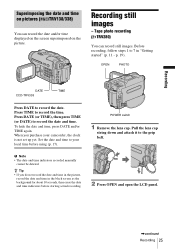
..., press DATE and/or TIME again. b Note • The date and time indicators recorded manually cannot be deleted. z Tip • If you purchase your local time before starting actual recording.... 2 Press OPEN and open the LCD panel. ,continued Recording 25 Tape photo recording ( TRV280) You can record the date and/or time displayed on the screen superimposed on pictures ( TRV138/...- Press TIME to the grip belt. OPEN PHOTO DATE CCD-TRV338 TIME Press DATE to your camcorder, the clock is not set up yet. Recording still images - POWER switch 1 Remove the lens...
..., press DATE and/or TIME again. b Note • The date and time indicators recorded manually cannot be deleted. z Tip • If you purchase your local time before starting actual recording.... 2 Press OPEN and open the LCD panel. ,continued Recording 25 Tape photo recording ( TRV280) You can record the date and/or time displayed on the screen superimposed on pictures ( TRV138/...- Press TIME to the grip belt. OPEN PHOTO DATE CCD-TRV338 TIME Press DATE to your camcorder, the clock is not set up yet. Recording still images - POWER switch 1 Remove the lens...

Camera Operations Guide
Page 28
EXPOSURE SEL/PUSH EXEC dial 1 Press EXPOSURE in dark places - To return the setting to OFF. Manual exposure • Adjust the focus manually when it is displayed in the left-hand corner of your fingers or other objects. To cancel NightShot plus You can ...plus , set to adjust the brightness. and ["NIGHTSHOT PLUS"] appear. The exposure indicator appears on the screen. 2 Turn the SEL/PUSH EXEC dial to manual mode, is attached. • Depending on the shooting conditions or circumstances, colors may cause a malfunction. • You cannot use the NightShot plus function...
EXPOSURE SEL/PUSH EXEC dial 1 Press EXPOSURE in dark places - To return the setting to OFF. Manual exposure • Adjust the focus manually when it is displayed in the left-hand corner of your fingers or other objects. To cancel NightShot plus You can ...plus , set to adjust the brightness. and ["NIGHTSHOT PLUS"] appear. The exposure indicator appears on the screen. 2 Turn the SEL/PUSH EXEC dial to manual mode, is attached. • Depending on the shooting conditions or circumstances, colors may cause a malfunction. • You cannot use the NightShot plus function...

Camera Operations Guide
Page 29
...in the following cases. - When you want to when the focus cannot be adjusted any closer. ,continued Recording 29 Adjusting the focus manually The focus is about 3 meters (10 feet). Use this function in the default setting. Recording FOCUS SEL/PUSH EXEC dial 1 ...stripes. - The maximum shooting distance using a tripod. To record a subject with raindrops. - LIGHT] to the recording conditions. You can adjust the focus manually according to [ON] in complete darkness, set [N.S. z Tip • If you record subjects in the menu settings. To record a subject behind a window...
...in the following cases. - When you want to when the focus cannot be adjusted any closer. ,continued Recording 29 Adjusting the focus manually The focus is about 3 meters (10 feet). Use this function in the default setting. Recording FOCUS SEL/PUSH EXEC dial 1 ...stripes. - The maximum shooting distance using a tripod. To record a subject with raindrops. - LIGHT] to the recording conditions. You can adjust the focus manually according to [ON] in complete darkness, set [N.S. z Tip • If you record subjects in the menu settings. To record a subject behind a window...

Camera Operations Guide
Page 30
.... REC START/STOP POWER switch Fading in and out of a subject, move the power zoom lever towards W (wide angle) to adjust the zoom for focusing manually • It is easier to focus on the subject when you want to currently recording pictures. [BLACK FADER] [WHITE FADER] [MOSAIC FADER] 30 Recording
.... REC START/STOP POWER switch Fading in and out of a subject, move the power zoom lever towards W (wide angle) to adjust the zoom for focusing manually • It is easier to focus on the subject when you want to currently recording pictures. [BLACK FADER] [WHITE FADER] [MOSAIC FADER] 30 Recording
Camera Operations Guide
Page 39
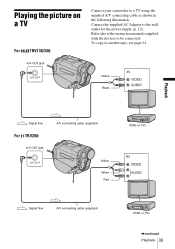
To copy to a TV using the supplied A/V connecting cable as shown in the following illustration. Playing the picture on a TV For TRV138/338: Connect your camcorder to another tape, see page 61. A/V OUT jack Yellow Black Playback Signal flow For TRV280: A/V OUT jack A/V connecting cable (supplied) Yellow White Red VCRs or TVs Signal flow A/V connecting cable (supplied) VCRs or TVs ,continued Playback 39 Refer also to the instruction manuals supplied with the devices to the wall outlet for the power supply (p. 12). Connect the supplied AC Adaptor to be connected.
To copy to a TV using the supplied A/V connecting cable as shown in the following illustration. Playing the picture on a TV For TRV138/338: Connect your camcorder to another tape, see page 61. A/V OUT jack Yellow Black Playback Signal flow For TRV280: A/V OUT jack A/V connecting cable (supplied) Yellow White Red VCRs or TVs Signal flow A/V connecting cable (supplied) VCRs or TVs ,continued Playback 39 Refer also to the instruction manuals supplied with the devices to the wall outlet for the power supply (p. 12). Connect the supplied AC Adaptor to be connected.
Camera Operations Guide
Page 41
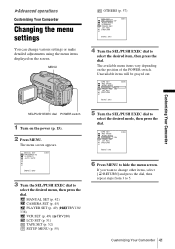
The available menu items vary depending on the power (p. 15). 2 Press MENU. MANUAL SET (p. 42) CAMERA SET (p. 45) PLAYER SET (p. 49) ( TRV138/ 338) VCR SET (p. 49) ( TRV280) LCD SET (p. 51) TAPE SET (p. 52) SETUP MENU (p. 55) 5 Turn the SEL/PUSH EXEC dial to hide the menu screen.... menu screen appears. REC RETURN STBY [MENU] : END 6 Press MENU to select the desired mode, then press the dial. BAdvanced operations Customizing Your Camcorder Changing the menu settings You can change other items, select [ RETURN] and press the dial, then repeat steps from 3 to select the desired item,...
The available menu items vary depending on the power (p. 15). 2 Press MENU. MANUAL SET (p. 42) CAMERA SET (p. 45) PLAYER SET (p. 49) ( TRV138/ 338) VCR SET (p. 49) ( TRV280) LCD SET (p. 51) TAPE SET (p. 52) SETUP MENU (p. 55) 5 Turn the SEL/PUSH EXEC dial to hide the menu screen.... menu screen appears. REC RETURN STBY [MENU] : END 6 Press MENU to select the desired mode, then press the dial. BAdvanced operations Customizing Your Camcorder Changing the menu settings You can change other items, select [ RETURN] and press the dial, then repeat steps from 3 to select the desired item,...

Camera Operations Guide
Page 42
... the menu settings" (p. 41). Select to far distance. 42 Customizing Your Camcorder PORTRAIT (soft Select to focus only on the power mode of situations such as in the MANUAL SET menu. SPORTS* (sports Select to maintain the atmosphere of your camcorder from appearing excessively white when subjects are marked with G. You can record...
... the menu settings" (p. 41). Select to far distance. 42 Customizing Your Camcorder PORTRAIT (soft Select to focus only on the power mode of situations such as in the MANUAL SET menu. SPORTS* (sports Select to maintain the atmosphere of your camcorder from appearing excessively white when subjects are marked with G. You can record...
Camera Operations Guide
Page 46
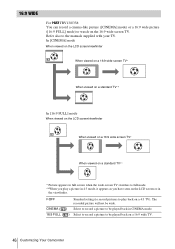
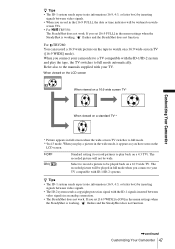
GOFF Standard setting (to record pictures to the manuals supplied with your TV. CINEMA ( ) Select to record a picture to be played back in CINEMA mode. 16:9 FULL ( ) Select to record a picture to be wide. ...:9 FULL] mode When viewed on the LCD screen/viewfinder When viewed on a 16:9 wide screen TV* When viewed on a 16:9 wide TV. 46 Customizing Your Camcorder The recorded picture will not be played back on a standard TV** * Picture appears in the viewfinder.
GOFF Standard setting (to record pictures to the manuals supplied with your TV. CINEMA ( ) Select to record a picture to be played back in CINEMA mode. 16:9 FULL ( ) Select to record a picture to be wide. ...:9 FULL] mode When viewed on the LCD screen/viewfinder When viewed on a 16:9 wide screen TV* When viewed on a 16:9 wide TV. 46 Customizing Your Camcorder The recorded picture will not be played back on a standard TV** * Picture appears in the viewfinder.
Camera Operations Guide
Page 47
... For TRV338: The SteadyShot does not work . Refer also to the manuals supplied with the ID-1/ID-2 system and play the tape, the TV... in the [16:9 FULL], the date or time indicator will not be played back on the LCD screen. Customizing Your Camcorder z Tips • The ID-1 system sends aspect ratio information (16:9, 4:3, or letter box) by inserting signals between...signals between video signals in full screen when the wide-screen TV switches to full mode. **In 4:3 mode. For TRV280: You can record a 16:9 wide picture on the tape to your TV. If you connect to watch on ...
... For TRV338: The SteadyShot does not work . Refer also to the manuals supplied with the ID-1/ID-2 system and play the tape, the TV... in the [16:9 FULL], the date or time indicator will not be played back on the LCD screen. Customizing Your Camcorder z Tips • The ID-1 system sends aspect ratio information (16:9, 4:3, or letter box) by inserting signals between...signals between video signals in full screen when the wide-screen TV switches to full mode. **In 4:3 mode. For TRV280: You can record a 16:9 wide picture on the tape to your TV. If you connect to watch on ...
Camera Operations Guide
Page 54
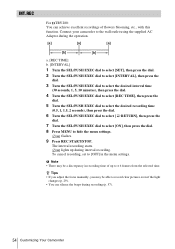
...; There may be a discrepancy in the menu settings. INT.REC For TRV280: You can silence the beeps during recording (p. 57). 54 Customizing Your Camcorder The interval recording starts. z Tips • If you adjust the focus manually, you may be able to ± 6 frames from the selected time.... To cancel recording, set to hide the menu settings. Connect your camcorder to the wall outlet using ...
...; There may be a discrepancy in the menu settings. INT.REC For TRV280: You can silence the beeps during recording (p. 57). 54 Customizing Your Camcorder The interval recording starts. z Tips • If you adjust the focus manually, you may be able to ± 6 frames from the selected time.... To cancel recording, set to hide the menu settings. Connect your camcorder to the wall outlet using ...
Camera Operations Guide
Page 73
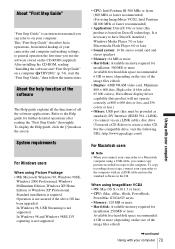
...software and "First Step Guide" on the screen. To display the Help guide, click the [?] mark on a computer ( TRV280)" (p. 74), start the "First Step Guide," then follow the instructions. System requirements For Windows users When using a USB...drive, visit the following URL: http://www.ppackage.com/) For Macintosh users b Note • When you connect your camcorder to a Macintosh computer using Picture Package • OS: Microsoft Windows 98, Windows 98SE, Windows 2000 Professional, Windows ... "First Step Guide" "First Step Guide" is an instruction manual you can refer to the computer.
...software and "First Step Guide" on the screen. To display the Help guide, click the [?] mark on a computer ( TRV280)" (p. 74), start the "First Step Guide," then follow the instructions. System requirements For Windows users When using a USB...drive, visit the following URL: http://www.ppackage.com/) For Macintosh users b Note • When you connect your camcorder to a Macintosh computer using Picture Package • OS: Microsoft Windows 98, Windows 98SE, Windows 2000 Professional, Windows ... "First Step Guide" "First Step Guide" is an instruction manual you can refer to the computer.
Camera Operations Guide
Page 75
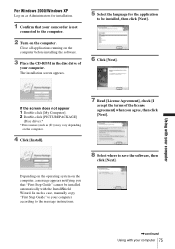
... operating system on the computer before installing the software. 3 Place the CD-ROM in the disc drive of the license agreement] when you that your camcorder is not connected to be installed automatically with your computer 75 Close all applications running on the computer, a message appears notifying you agree, then click...
... operating system on the computer before installing the software. 3 Place the CD-ROM in the disc drive of the license agreement] when you that your camcorder is not connected to be installed automatically with your computer 75 Close all applications running on the computer, a message appears notifying you agree, then click...


