Operating Guide
Page 3
... wall outlet and refer servicing to service the set does not operate normally when following conditions: - If the set . - If the set yourself as a bookcase, or built-in performance - this set may result in the operating instructions. Power-Cord Protection Route the power cord so that it from overheating, these slots and openings must never be sure the service technician has used replacement parts specified by the manufacturer...
... wall outlet and refer servicing to service the set does not operate normally when following conditions: - If the set . - If the set yourself as a bookcase, or built-in performance - this set may result in the operating instructions. Power-Cord Protection Route the power cord so that it from overheating, these slots and openings must never be sure the service technician has used replacement parts specified by the manufacturer...
Operating Guide
Page 4
... LITHIUM-ION BATTERIES Lithium-Ion batteries are located on the bottom. Owner's Record The model and serial numbers are recyclable. If you have any questions about this product, you call your Sony dealer regarding recycling of rechargeable batteries, call : Sony Customer Information Center 1-800222-SONY (7669). Notes DCR-SR40, DCR-SR60 and DCR-SR80 are cautioned that may cause undesired operation. ACSerial No. The number below . Operation is...
... LITHIUM-ION BATTERIES Lithium-Ion batteries are located on the bottom. Owner's Record The model and serial numbers are recyclable. If you have any questions about this product, you call your Sony dealer regarding recycling of rechargeable batteries, call : Sony Customer Information Center 1-800222-SONY (7669). Notes DCR-SR40, DCR-SR60 and DCR-SR80 are cautioned that may cause undesired operation. ACSerial No. The number below . Operation is...
Operating Guide
Page 6
... can save the image data on a DVD using a digital still camera, and thus may not record or playback the camcorder to provide protection to make it using the camcorder in highlands • Do not turn on the camcorder in each local language are based on the model DCR-SR80. • The on-screen displays in a low-pressure area, where its altitude is recommended that you may also be recorded. Note on using VCR/DVD device...
... can save the image data on a DVD using a digital still camera, and thus may not record or playback the camcorder to provide protection to make it using the camcorder in highlands • Do not turn on the camcorder in each local language are based on the model DCR-SR80. • The on-screen displays in a low-pressure area, where its altitude is recommended that you may also be recorded. Note on using VCR/DVD device...
Operating Guide
Page 11
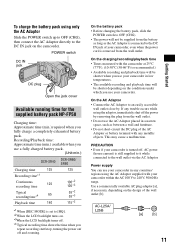
.../ SR80 Charging time 125 Recording time*1 Continuous 125 recording time Typical recording time*4 65 Playback time 140 125 100*2 105*3 55*2 55*3 115*2 *1 When [REC MODE] is removed from the wall outlet. Recording/Playback time: Approximate time (min.) available when you use your camcorder in a narrow space, such as the AC Adaptor is turned off and zooming. AC-L25A/ L25B [a] [b] 11 Getting Started On the battery pack • Before changing the battery pack, slide the POWER switch...
.../ SR80 Charging time 125 Recording time*1 Continuous 125 recording time Typical recording time*4 65 Playback time 140 125 100*2 105*3 55*2 55*3 115*2 *1 When [REC MODE] is removed from the wall outlet. Recording/Playback time: Approximate time (min.) available when you use your camcorder in a narrow space, such as the AC Adaptor is turned off and zooming. AC-L25A/ L25B [a] [b] 11 Getting Started On the battery pack • Before changing the battery pack, slide the POWER switch...
Operating Guide
Page 12
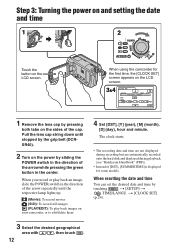
... some models. Pull the lens cap string down until the respective lamp lights up. (Movie): To record movies (Still): To record still images (PLAY/EDIT): To play back an image, slide the POWER switch in the direction of the cap. The clock starts. • The recording date and time are not displayed during recording but are automatically recorded onto the hard disk and displayed during playback (see "Handycam Handbook" (PDF)). • Instead of the arrow repeatedly until stopped...
... some models. Pull the lens cap string down until the respective lamp lights up. (Movie): To record movies (Still): To record still images (PLAY/EDIT): To play back an image, slide the POWER switch in the direction of the cap. The clock starts. • The recording date and time are not displayed during recording but are automatically recorded onto the hard disk and displayed during playback (see "Handycam Handbook" (PDF)). • Instead of the arrow repeatedly until stopped...
Operating Guide
Page 14
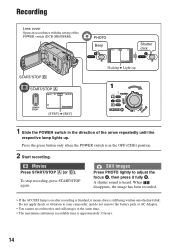
.../STOP A 60min REC 00:01:00 START/ STOP P-MENU [STBY] b [REC] PHOTO Beep 60min 1.0M FINE 123 Shutter click P-MENU Flashing b Lights up . When disappears, the image has been recorded. • If the ACCESS lamp is on after recording is finished, it fully B. Press the green button only when the POWER switch is still being written onto the hard disk. A shutter sound is approximately 13 hours. 14 Movies Press START/STOP A (or B). To stop recording...
.../STOP A 60min REC 00:01:00 START/ STOP P-MENU [STBY] b [REC] PHOTO Beep 60min 1.0M FINE 123 Shutter click P-MENU Flashing b Lights up . When disappears, the image has been recorded. • If the ACCESS lamp is on after recording is finished, it fully B. Press the green button only when the POWER switch is still being written onto the hard disk. A shutter sound is approximately 13 hours. 14 Movies Press START/STOP A (or B). To stop recording...
Operating Guide
Page 15
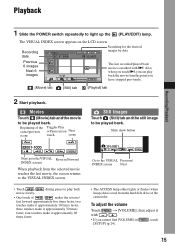
... movie to light up the (PLAY/EDIT) lamp. To adjust the volume Touch t [VOLUME], then adjust it approximately 60 times faster. Playback Recording/Playback 1 Slide the POWER switch repeatedly to be played back. Still Images Touch (Still) tab and the still image to the VISUAL Previous/ INDEX screen Next • The ACCESS lamp either lights or flashes when image data is marked with / . • If you Next scene touch scene 001-1000 P-MENU Stop...
... movie to light up the (PLAY/EDIT) lamp. To adjust the volume Touch t [VOLUME], then adjust it approximately 60 times faster. Playback Recording/Playback 1 Slide the POWER switch repeatedly to be played back. Still Images Touch (Still) tab and the still image to the VISUAL Previous/ INDEX screen Next • The ACCESS lamp either lights or flashes when image data is marked with / . • If you Next scene touch scene 001-1000 P-MENU Stop...
Operating Guide
Page 16
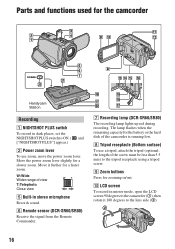
..., set the NIGHTSHOT PLUS switch to ON. ( and ["NIGHTSHOT PLUS"] appear.) 2 Power zoom lever To use zoom, move the power zoom lever. LCD screen To record in mirror mode, open the LCD screen 90 degrees to the camcorder (1), then rotate it further for a faster zoom. Parts and functions used for the camcorder Handycam Station Recording 1 NIGHTSHOT PLUS switch To record in stereo microphone Records sound. 6 Remote sensor (DCR-SR60/SR80) Receive the signal from the Remote Commander. 7 Recording lamp (DCR-SR60/SR80) The recording lamp lights up red...
..., set the NIGHTSHOT PLUS switch to ON. ( and ["NIGHTSHOT PLUS"] appear.) 2 Power zoom lever To use zoom, move the power zoom lever. LCD screen To record in mirror mode, open the LCD screen 90 degrees to the camcorder (1), then rotate it further for a faster zoom. Parts and functions used for the camcorder Handycam Station Recording 1 NIGHTSHOT PLUS switch To record in stereo microphone Records sound. 6 Remote sensor (DCR-SR60/SR80) Receive the signal from the Remote Commander. 7 Recording lamp (DCR-SR60/SR80) The recording lamp lights up red...

Operating Guide
Page 17
... the USB cable. 17 Recording/Playback During Easy Handycam operation, you can change the settings for backlit subjects, press BACK LIGHT to a computer. qg DISP/BATT INFO button You can use some of the LCD screen. 4 Adjust the magnification with W (Wide angle)/T (Telephoto). ql REMOTE jack (DCR-SR60/SR80) Connect other devices qj qk ql ....... qd BACK LIGHT button To adjust the exposure for the screen display settings or check the remaining battery power. To cancel the back light function...
... the USB cable. 17 Recording/Playback During Easy Handycam operation, you can change the settings for backlit subjects, press BACK LIGHT to a computer. qg DISP/BATT INFO button You can use some of the LCD screen. 4 Adjust the magnification with W (Wide angle)/T (Telephoto). ql REMOTE jack (DCR-SR60/SR80) Connect other devices qj qk ql ....... qd BACK LIGHT button To adjust the exposure for the screen display settings or check the remaining battery power. To cancel the back light function...
Operating Guide
Page 18
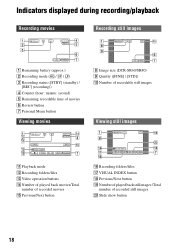
...8 Image size (DCR-SR60/SR80) 9 Quality ([FINE] / [STD]) q; Slide show button 18 Indicators displayed during recording/playback Recording movies 60min REC 00:01:00 [60min] Recording still images 60min 112 P-MENU 1 Remaining battery (approx.) 2 Recording mode (HQ / SP / LP) 3 Recording status ([STBY] (standby) / [REC] (recording)) 4 Counter (hour: minute: second) 5 Remaining recordable time of movies 6 Review button 7 Personal Menu button Viewing movies 60min 100/112 01:01:00 101-0001 P-MENU qa Playback mode qs Recording folders/files qd Video operation buttons qf Number of played...
...8 Image size (DCR-SR60/SR80) 9 Quality ([FINE] / [STD]) q; Slide show button 18 Indicators displayed during recording/playback Recording movies 60min REC 00:01:00 [60min] Recording still images 60min 112 P-MENU 1 Remaining battery (approx.) 2 Recording mode (HQ / SP / LP) 3 Recording status ([STBY] (standby) / [REC] (recording)) 4 Counter (hour: minute: second) 5 Remaining recordable time of movies 6 Review button 7 Personal Menu button Viewing movies 60min 100/112 01:01:00 101-0001 P-MENU qa Playback mode qs Recording folders/files qd Video operation buttons qf Number of played...
Operating Guide
Page 20
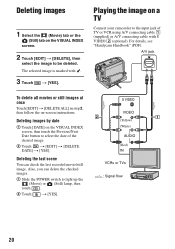
...) (White) AUDIO (Red) IN VCRs or TVs : Signal flow 20 Playing the image on the VISUAL INDEX screen, then touch the Previous/Next Date button to the input jack of the desired image. 2 Touch t [EDIT] t [DELETE DATE] t [YES]. Also, you can check the last recorded movie/still image. Deleting images 1 Select the (Movie) tab or the (Still) tab on -screen instructions. Deleting images by date 1 Touch [DATE] on a TV Connect your camcorder to select the date of TV or VCR using A/V connecting cable...
...) (White) AUDIO (Red) IN VCRs or TVs : Signal flow 20 Playing the image on the VISUAL INDEX screen, then touch the Previous/Next Date button to the input jack of the desired image. 2 Touch t [EDIT] t [DELETE DATE] t [YES]. Also, you can check the last recorded movie/still image. Deleting images 1 Select the (Movie) tab or the (Still) tab on -screen instructions. Deleting images by date 1 Touch [DATE] on a TV Connect your camcorder to select the date of TV or VCR using A/V connecting cable...
Operating Guide
Page 21
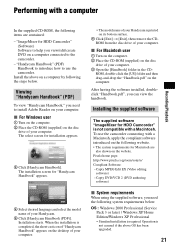
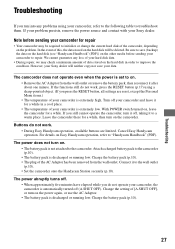
...], then remove the CDROM from the disc drive of your Handycam is not compatible with a computer Recording/Playback In the supplied CD-ROM, the following the steps below . x For Macintosh user 1 Turn on the computer. 2 Place the CD-ROM (supplied) on a computer connected to the camcorder. - Capty MPEG Edit EX (Video editing software) - After having the software installed, doubleclick "Handbook.pdf", you need the following system requirements below . Operation is required...
...], then remove the CDROM from the disc drive of your Handycam is not compatible with a computer Recording/Playback In the supplied CD-ROM, the following the steps below . x For Macintosh user 1 Turn on the computer. 2 Place the CD-ROM (supplied) on a computer connected to the camcorder. - Capty MPEG Edit EX (Video editing software) - After having the software installed, doubleclick "Handbook.pdf", you need the following system requirements below . Operation is required...
Operating Guide
Page 22
... need to install the software to the computer. 2 Turn on the computer. • Log on the computer. 3Double-click [install.exe]. 5 Click [Install]. 6 Select the language for saving image data than 800 × 600 dots, and 256 colors or less. USB port : As standard equipment (USB 2.0 recommended) • The camcorder is compatible with Hi-Speed USB (USB2.0). Disc Drive : A DVD writable drive • Operations are not guaranteed on DirectX technology. Display : 4MB VRAM video card...
... need to install the software to the computer. 2 Turn on the computer. • Log on the computer. 3Double-click [install.exe]. 5 Click [Install]. 6 Select the language for saving image data than 800 × 600 dots, and 256 colors or less. USB port : As standard equipment (USB 2.0 recommended) • The camcorder is compatible with Hi-Speed USB (USB2.0). Disc Drive : A DVD writable drive • Operations are not guaranteed on DirectX technology. Display : 4MB VRAM video card...
Operating Guide
Page 25
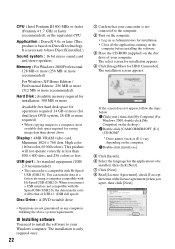
... recording environment. CAMERA SET PROGRAM AE: SPOT METER: EXPOSURE: WHITE BAL.: AUTO SHUTTER: SPOT FOCUS: FOCUS: FLASH SET *1: SUPER NSPLUS: NS LIGHT: COLOR SLOW S: SELF-TIMER: SELF-TIMER: DIGITAL ZOOM: WIDE SELECT *2: STEADYSHOT: Records images effectively in a higher sensitivity than NightShot plus . Fixes the brightness of an image. Adjusts the color balance to "Handycam Handbook" (PDF). Automatically activates the electronic shutter to set the self-timer for connecting the camcorder with the light which emits infrared light while using NightShot plus . Records an image...
... recording environment. CAMERA SET PROGRAM AE: SPOT METER: EXPOSURE: WHITE BAL.: AUTO SHUTTER: SPOT FOCUS: FOCUS: FLASH SET *1: SUPER NSPLUS: NS LIGHT: COLOR SLOW S: SELF-TIMER: SELF-TIMER: DIGITAL ZOOM: WIDE SELECT *2: STEADYSHOT: Records images effectively in a higher sensitivity than NightShot plus . Fixes the brightness of an image. Adjusts the color balance to "Handycam Handbook" (PDF). Automatically activates the electronic shutter to set the self-timer for connecting the camcorder with the light which emits infrared light while using NightShot plus . Records an image...
Operating Guide
Page 26
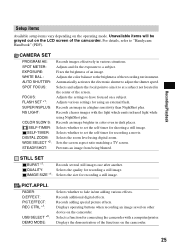
.... REMAINING: Selects whether to receive remote control signals or not. Selects the language to a computer or other device with the AC Adaptor connected to light up or down the setup items. A.SHUT OFF: Automatically turns off the camcorder when it is not operated. STANDARD SET REC MODE: Selects image quality of the hard disk drive. LCD SET: TV TYPE *1: Sets various settings for a movie recording. DISPLAY: Selects a number of the camcorder. HDD SET HDD FORMAT: HDD INFO: DROP SENSOR: EMPTY HDD: Initializes the hard disk drive.
.... REMAINING: Selects whether to receive remote control signals or not. Selects the language to a computer or other device with the AC Adaptor connected to light up or down the setup items. A.SHUT OFF: Automatically turns off the camcorder when it is not operated. STANDARD SET REC MODE: Selects image quality of the hard disk drive. LCD SET: TV TYPE *1: Sets various settings for a movie recording. DISPLAY: Selects a number of the camcorder. HDD SET HDD FORMAT: HDD INFO: DROP SENSOR: EMPTY HDD: Initializes the hard disk drive.
Operating Guide
Page 27
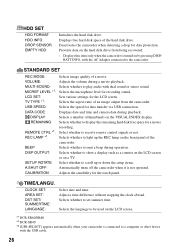
... problems using a sharp-pointed object. (If you press the RESET button, all settings are limited. Note before sending your camcorder to initialize or change the current hard disk of the camcorder, depending on . • Remove the AC Adaptor from the wall outlet. The power does not turn it off (A.SHUT OFF). Cancel Easy Handycam operation. The camcorder does not operate even when the power is set to a warm place. Troubleshooting Troubleshooting...
... problems using a sharp-pointed object. (If you press the RESET button, all settings are limited. Note before sending your camcorder to initialize or change the current hard disk of the camcorder, depending on . • Remove the AC Adaptor from the wall outlet. The power does not turn it off (A.SHUT OFF). Cancel Easy Handycam operation. The camcorder does not operate even when the power is set to a warm place. Troubleshooting Troubleshooting...
Operating Guide
Page 28
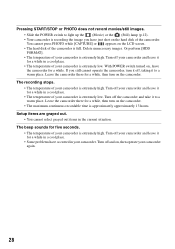
... recordable time is full. Or perform [HDD FORMAT]. • The temperature of your camcorder is extremely high. Leave the camcorder there for a while. Turn off your camcorder is extremely high. Leave the camcorder there for a while in the current situation. You cannot press PHOTO while [CAPTURE] or appears on the LCD screen. • The hard disk of your camcorder is extremely high. Turn off and on the camcorder. Delete...
... recordable time is full. Or perform [HDD FORMAT]. • The temperature of your camcorder is extremely high. Leave the camcorder there for a while. Turn off your camcorder is extremely high. Leave the camcorder there for a while in the current situation. You cannot press PHOTO while [CAPTURE] or appears on the LCD screen. • The hard disk of your camcorder is extremely high. Turn off and on the camcorder. Delete...
Operating Guide
Page 29
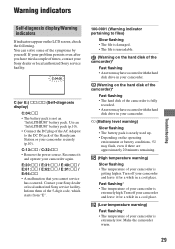
... authorized Sony service facility. Use an "InfoLITHIUM" battery pack (p.10). • Connect the DC plug of the AC Adaptor to files) Slow flashing • The file is damaged. • The file is unreadable. (Warning on the hard disk of the camcorder)* Fast flashing • An error may have occurred with the hard disk drive in a cool place. (Low temperature warning) Fast flashing* • The temperature of your camcorder. Turn off your camcorder again...
... authorized Sony service facility. Use an "InfoLITHIUM" battery pack (p.10). • Connect the DC plug of the AC Adaptor to files) Slow flashing • The file is damaged. • The file is unreadable. (Warning on the hard disk of the camcorder)* Fast flashing • An error may have occurred with the hard disk drive in a cool place. (Low temperature warning) Fast flashing* • The temperature of your camcorder. Turn off your camcorder again...
Operating Guide
Page 31
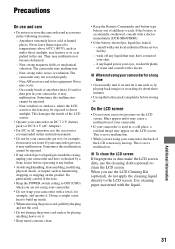
... of the lens. • Keep the POWER switch setting to OFF (CHG) when you are using your camcorder on it. • Keep metal contacts clean. • Keep the Remote Commander and button-type battery out of the LCD screen may heat up the battery pack completely before operating it any liquid that may be repaired. - Use cleaning paper moistened with your camcorder get wet, for example, and operate it checked by...
... of the lens. • Keep the POWER switch setting to OFF (CHG) when you are using your camcorder on it. • Keep metal contacts clean. • Keep the Remote Commander and button-type battery out of the LCD screen may heat up the battery pack completely before operating it any liquid that may be repaired. - Use cleaning paper moistened with your camcorder get wet, for example, and operate it checked by...
Operating Guide
Page 33
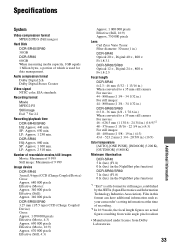
... Industries Association). SP: Approx. 1 300 min. Specifications System Video compression format MPEG2/JPEG (Still images) Hard Disk DCR-SR40/SR60 30 GB DCR-SR80 60 GB When measuring media capacity, 1GB equals 1 billion bytes, a portion of which is a file format for data management. Audio compression format Dolby Digital 2ch Dolby Digital Stereo Creator Video signal NTSC color, EIA standards Recording format Movie MPEG2-PS Still image Exif *1 Ver.2.2 Recording/playback time DCR-SR40/SR60 HQ:Approx. 440 min.
... Industries Association). SP: Approx. 1 300 min. Specifications System Video compression format MPEG2/JPEG (Still images) Hard Disk DCR-SR40/SR60 30 GB DCR-SR80 60 GB When measuring media capacity, 1GB equals 1 billion bytes, a portion of which is a file format for data management. Audio compression format Dolby Digital 2ch Dolby Digital Stereo Creator Video signal NTSC color, EIA standards Recording format Movie MPEG2-PS Still image Exif *1 Ver.2.2 Recording/playback time DCR-SR40/SR60 HQ:Approx. 440 min.


