Handycam® Handbook
Page 2
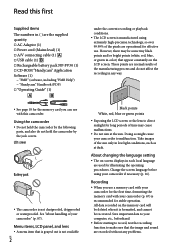
... (1) USB cable (1) Rechargeable battery pack NP-FV30 (1) CD-ROM "Handycam" Application Software (1) "PMB" (software, including "PMB Help") "Handycam" Handbook (PDF) "Operating Guide" (1) under the current recording or playback conditions. The LCD screen is manufactured using your camcorder to make sure that appear constantly on the...
... (1) USB cable (1) Rechargeable battery pack NP-FV30 (1) CD-ROM "Handycam" Application Software (1) "PMB" (software, including "PMB Help") "Handycam" Handbook (PDF) "Operating Guide" (1) under the current recording or playback conditions. The LCD screen is manufactured using your camcorder to make sure that appear constantly on the...
Handycam® Handbook
Page 3
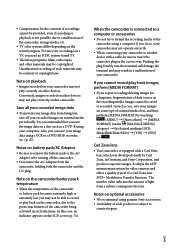
...Sony Corporation, and produces superior images. The number value indicates the amount of such materials may not play correctly on this case, an indicator appears on external media periodically. Unauthorized recording of light from being activated in a malfunction of the camcorder, storage media, etc. TV color systems differ depending on the camcorder/battery...medium (DCR- It is equipped with a cable, be copyrighted. Notes on a TV, you may be sure to country/region. Carl Zeiss lens Your camcorder is recommended that you do so, your camcorder may ...
...Sony Corporation, and produces superior images. The number value indicates the amount of such materials may not play correctly on this case, an indicator appears on external media periodically. Unauthorized recording of light from being activated in a malfunction of the camcorder, storage media, etc. TV color systems differ depending on the camcorder/battery...medium (DCR- It is equipped with a cable, be copyrighted. Notes on a TV, you may be sure to country/region. Carl Zeiss lens Your camcorder is recommended that you do so, your camcorder may ...

Handycam® Handbook
Page 4
...DCR-SR68/SR88) To protect the internal hard disk from images and screen indicators that actually appear on the bottom of your camcorder. When a drop occurs, or under a non-gravity condition, the block noise made when this series are as follows. Confirm the model name on your camcorder... Internal memory + memory card 4 GB 16 GB Notes on the camcorder in specification between models. If the drop sensor catches a drop repeatedly, recording/ playback may damage the internal hard disk drive of your camcorder and accessories are subject to shock or vibration when the (Movie)/...
...DCR-SR68/SR88) To protect the internal hard disk from images and screen indicators that actually appear on the bottom of your camcorder. When a drop occurs, or under a non-gravity condition, the block noise made when this series are as follows. Confirm the model name on your camcorder... Internal memory + memory card 4 GB 16 GB Notes on the camcorder in specification between models. If the drop sensor catches a drop repeatedly, recording/ playback may damage the internal hard disk drive of your camcorder and accessories are subject to shock or vibration when the (Movie)/...

Handycam® Handbook
Page 6
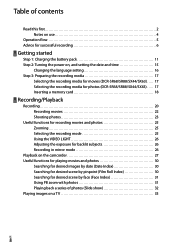
... your movies. Advice for successful recording To get good results in recording Stabilizing your camcorder When you can continue recording without worrying about battery power shortages. Using accessories Make good use zooming sparingly. Evoking a feeling of camcorder accessories. The SteadyShot function is effective against camera-shake, however, it is closer to your...
... your movies. Advice for successful recording To get good results in recording Stabilizing your camcorder When you can continue recording without worrying about battery power shortages. Using accessories Make good use zooming sparingly. Evoking a feeling of camcorder accessories. The SteadyShot function is effective against camera-shake, however, it is closer to your...
Handycam® Handbook
Page 8
... for successful recording 6 Getting started Step 1: Charging the battery pack 11 Step 2: Turning the power on, and setting the date and time 15 Changing the language setting 16 Step 3: Preparing the recording media 17 Selecting the recording media for movies (DCR-SR68/SR88/SX44/SX63).. . . . . 17 Selecting the...recording mode 25 Using the VIDEO LIGHT 26 Adjusting the exposure for backlit subjects 26 Recording in mirror mode 26 Playback on the camcorder 27 Useful functions for playing movies and photos 30 Searching for desired images by date (Date Index 30 Searching for desired scene...
... for successful recording 6 Getting started Step 1: Charging the battery pack 11 Step 2: Turning the power on, and setting the date and time 15 Changing the language setting 16 Step 3: Preparing the recording media 17 Selecting the recording media for movies (DCR-SR68/SR88/SX44/SX63).. . . . . 17 Selecting the...recording mode 25 Using the VIDEO LIGHT 26 Adjusting the exposure for backlit subjects 26 Recording in mirror mode 26 Playback on the camcorder 27 Useful functions for playing movies and photos 30 Searching for desired images by date (Date Index 30 Searching for desired scene...
Handycam® Handbook
Page 10
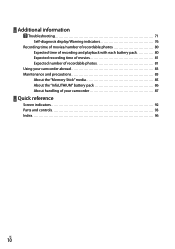
Additional information Troubleshooting 71 Self-diagnosis display/Warning indicators 76 Recording time of movies/number of recordable photos 80 Expected time of recording and playback with each battery pack 80 Expected recording time of movies 81 Expected number of recordable photos 81 Using your camcorder abroad 83 Maintenance and precautions 85 About the "Memory Stick" media 85 About the "InfoLITHIUM" battery pack 86 About handling of your camcorder 87 Quick reference Screen indicators 92 Parts and controls 93 Index 96 US 10
Additional information Troubleshooting 71 Self-diagnosis display/Warning indicators 76 Recording time of movies/number of recordable photos 80 Expected time of recording and playback with each battery pack 80 Expected recording time of movies 81 Expected number of recordable photos 81 Using your camcorder abroad 83 Maintenance and precautions 85 About the "Memory Stick" media 85 About the "InfoLITHIUM" battery pack 86 About handling of your camcorder 87 Quick reference Screen indicators 92 Parts and controls 93 Index 96 US 10

Handycam® Handbook
Page 12
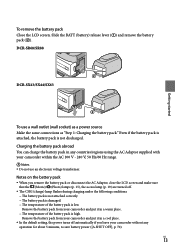
...FV70 NP-FV100 Charging time 115 155 195 390 Times measured with the camcorder at the upper left on the LCD screen. You can check the approximate amount of remaining battery power with the remaining battery indicator at 25 C (77 °F). 10 C to 30 &#... power cord (mains lead) to your camcorder. 1 Turn off your camcorder by closing the LCD screen. 2 Attach the battery pack by sliding it to your camcorder. Notes You cannot attach any "InfoLITHIUM" battery pack other than the V series to your camcorder and the wall outlet (wall socket). ...
...FV70 NP-FV100 Charging time 115 155 195 390 Times measured with the camcorder at the upper left on the LCD screen. You can check the approximate amount of remaining battery power with the remaining battery indicator at 25 C (77 °F). 10 C to 30 &#... power cord (mains lead) to your camcorder. 1 Turn off your camcorder by closing the LCD screen. 2 Attach the battery pack by sliding it to your camcorder. Notes You cannot attach any "InfoLITHIUM" battery pack other than the V series to your camcorder and the wall outlet (wall socket). ...
Handycam® Handbook
Page 13
... in a warm place. The temperature of the battery pack is not discharged. Getting started To remove the battery pack Close the LCD screen. DCR-SR68/SR88 DCR-SX43/SX44/SX63 To use an electronic voltage transformer. Notes on the battery pack When you leave your camcorder without any countries/regions using the AC Adaptor supplied...
... in a warm place. The temperature of the battery pack is not discharged. Getting started To remove the battery pack Close the LCD screen. DCR-SR68/SR88 DCR-SX43/SX44/SX63 To use an electronic voltage transformer. Notes on the battery pack When you leave your camcorder without any countries/regions using the AC Adaptor supplied...

Handycam® Handbook
Page 14
US 14 Disconnect the AC Adaptor from the wall outlet (wall socket) immediately if any malfunction occurs while using the AC Adaptor. This may cause a malfunction. Notes on the AC Adaptor Use the nearby wall outlet (wall socket) when using your camcorder. Do not use the AC Adaptor placed in a narrow space, such as between a wall and furniture. Do not short-circuit the DC plug of the AC Adaptor or battery terminal with any metallic objects.
US 14 Disconnect the AC Adaptor from the wall outlet (wall socket) immediately if any malfunction occurs while using the AC Adaptor. This may cause a malfunction. Notes on the AC Adaptor Use the nearby wall outlet (wall socket) when using your camcorder. Do not use the AC Adaptor placed in a narrow space, such as between a wall and furniture. Do not short-circuit the DC plug of the AC Adaptor or battery terminal with any metallic objects.
Handycam® Handbook
Page 23
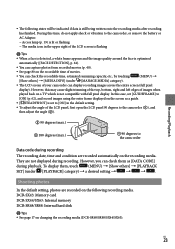
...automatically ([FACE DETECTION], p. 62). You can display recording images across the entire screen (full pixel display). DCR-SX43: Memory card DCR-SX44/SX63: Internal memory DCR-SR68/SR88: Internal hard disk Tips See page 17 on a TV which is still being written onto the recording media after ...the default setting, photos are recorded on the recording media. During this time, do not apply shock or vibration to the camcorder, or remove the battery or AC Adaptor. Access lamp (p. 19) is lit or flashing The media icon in the upper right...
...automatically ([FACE DETECTION], p. 62). You can display recording images across the entire screen (full pixel display). DCR-SX43: Memory card DCR-SX44/SX63: Internal memory DCR-SR68/SR88: Internal hard disk Tips See page 17 on a TV which is still being written onto the recording media after ...the default setting, photos are recorded on the recording media. During this time, do not apply shock or vibration to the camcorder, or remove the battery or AC Adaptor. Access lamp (p. 19) is lit or flashing The media icon in the upper right...
Handycam® Handbook
Page 26
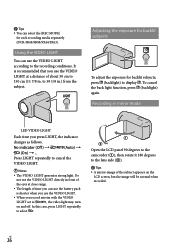
... backlit subjects To adjust the exposure for each recording media separately (DCR-SR68/SR88/SX44/SX63). Press LIGHT repeatedly to display . Do ... LCD screen, but the image will be normal when recorded. Open the LCD panel 90 degrees to the camcorder (), then rotate it 180 degrees to the lens side (). Tips A ... Notes The VIDEO LIGHT generates strong light. Tips You can use the battery pack is recommended that you press LIGHT, the indicator changes as follows. To cancel the back light function, press &#...
... backlit subjects To adjust the exposure for each recording media separately (DCR-SR68/SR88/SX44/SX63). Press LIGHT repeatedly to display . Do ... LCD screen, but the image will be normal when recorded. Open the LCD panel 90 degrees to the camcorder (), then rotate it 180 degrees to the lens side (). Tips A ... Notes The VIDEO LIGHT generates strong light. Tips You can use the battery pack is recommended that you press LIGHT, the indicator changes as follows. To cancel the back light function, press &#...
Handycam® Handbook
Page 36
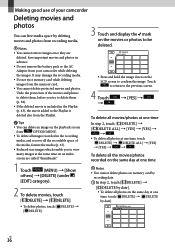
... image on the playback screen from OPTION MENU. To delete all images recorded in advance. Do not remove the battery pack or the AC Adaptor from your camcorder Deleting movies and photos You can free media space by deleting movies and photos from the memory card. You cannot delete... same day at one time Notes You cannot delete photos on the LCD screen to confirm the image. Making good use of your camcorder while deleting the images.
... image on the playback screen from OPTION MENU. To delete all images recorded in advance. Do not remove the battery pack or the AC Adaptor from your camcorder Deleting movies and photos You can free media space by deleting movies and photos from the memory card. You cannot delete... same day at one time Notes You cannot delete photos on the LCD screen to confirm the image. Making good use of your camcorder while deleting the images.
Handycam® Handbook
Page 39
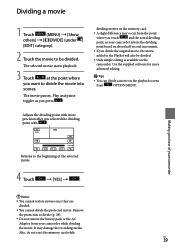
...original movie, the movie added to divide (p. 38). Do not remove the battery pack or the AC Adaptor from your camcorder while dividing the movie. Play and pause toggles as your camcorder Returns to divide the movie into scenes. Making good use of the selected movie 4 ...58320; You cannot divide the protected movie. dividing movies on about half-second increments. If you want to the beginning of your camcorder selects the dividing point based on the memory card. A slight difference may damage the recording media. Adjusts the dividing point with...
...original movie, the movie added to divide (p. 38). Do not remove the battery pack or the AC Adaptor from your camcorder while dividing the movie. Play and pause toggles as your camcorder Returns to divide the movie into scenes. Making good use of the selected movie 4 ...58320; You cannot divide the protected movie. dividing movies on about half-second increments. If you want to the beginning of your camcorder selects the dividing point based on the memory card. A slight difference may damage the recording media. Adjusts the dividing point with...

Handycam® Handbook
Page 43
...dates of the desired movie, then touch . Touch the image on the LCD screen to the Playlist. You can add a maximum of your camcorder while adding movies to the Playlist. Creating the Playlist Touch (MENU) [Show others ] [PLAYLIST] (under [EDIT] category). ... the previous screen. Touch [YES] . Notes Do not remove the battery pack or the AC Adaptor from your camcorder US 43 To add all the movies recorded on the memory card. You cannot add photos to the Playlist appear....
...dates of the desired movie, then touch . Touch the image on the LCD screen to the Playlist. You can add a maximum of your camcorder while adding movies to the Playlist. Creating the Playlist Touch (MENU) [Show others ] [PLAYLIST] (under [EDIT] category). ... the previous screen. Touch [YES] . Notes Do not remove the battery pack or the AC Adaptor from your camcorder US 43 To add all the movies recorded on the memory card. You cannot add photos to the Playlist appear....

Handycam® Handbook
Page 59
... touch [OFF]. Tips When you set with [ONE PUSH], if the lighting conditions changed by bringing your camcorder outdoors US 59 Customizing your camcorder OUTDOOR ( ) The white balance is appropriately adjusted for the following recording conditions: Indoors At party scenes or... while is set to [AUTO]. Tips If you have changed the battery pack while [AUTO] was selected, if keeps flashing after inside use (or vice versa), aim your camcorder at a nearby white object for about 10 seconds for better color balance adjustment. ...
... touch [OFF]. Tips When you set with [ONE PUSH], if the lighting conditions changed by bringing your camcorder outdoors US 59 Customizing your camcorder OUTDOOR ( ) The white balance is appropriately adjusted for the following recording conditions: Indoors At party scenes or... while is set to [AUTO]. Tips If you have changed the battery pack while [AUTO] was selected, if keeps flashing after inside use (or vice versa), aim your camcorder at a nearby white object for about 10 seconds for better color balance adjustment. ...
Handycam® Handbook
Page 68
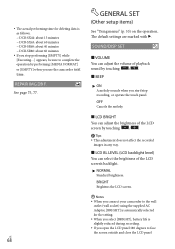
... [EMPTY] when you use the camcorder next time. The default settings are marked with . The actual performing time for the setting. When you select [BRIGHT], battery life is as follows; DCR-SX44: about 13 minutes DCR-SX63: about 60 minutes DCR-SR68: about 40 minutes DCR-SR88: about 60 minutes...
... [EMPTY] when you use the camcorder next time. The default settings are marked with . The actual performing time for the setting. When you select [BRIGHT], battery life is as follows; DCR-SX44: about 13 minutes DCR-SX63: about 60 minutes DCR-SR68: about 40 minutes DCR-SR88: about 60 minutes...
Handycam® Handbook
Page 71
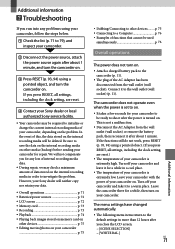
...the clock setting, are reset.) The temperature of your camcorder is extremely low. We will be deleted. Leave your camcorder with the power of your camcorder on . Attach a charged battery pack to the camcorder (p. 11). The plug of the AC Adaptor has... Editing movies/photos on the internal recording media will not compensate you for repair. However, your Sony dealer will neither copy nor retain your data. Overall operations p. 71 Batteries/power sources p. 72 LCD screen p. 72 Memory card p. 73 Recording...
...the clock setting, are reset.) The temperature of your camcorder is extremely low. We will be deleted. Leave your camcorder with the power of your camcorder on . Attach a charged battery pack to the camcorder (p. 11). The plug of the AC Adaptor has... Editing movies/photos on the internal recording media will not compensate you for repair. However, your Sony dealer will neither copy nor retain your data. Overall operations p. 71 Batteries/power sources p. 72 LCD screen p. 72 Memory card p. 73 Recording...
Handycam® Handbook
Page 72
...been charged enough. The buttons do not operate your Sony dealer. US 72 The CHG (charge) lamp flashes while the battery pack is being charged. Close the LCD screen (p. 11). Attach the battery pack to the camcorder correctly (p. 11). Connect the power cord...[SPOT FOCUS] [EXPOSURE] [FOCUS] [BLT-IN ZOOM MIC] [MICREF LEVEL] [DROP SENSOR] (DCR-SR68/SR88) Backlight The following menu items return to the default settings when you do not appear on the power again. Charge the battery pack (p. 11).
...been charged enough. The buttons do not operate your Sony dealer. US 72 The CHG (charge) lamp flashes while the battery pack is being charged. Close the LCD screen (p. 11). Attach the battery pack to the camcorder correctly (p. 11). Connect the power cord...[SPOT FOCUS] [EXPOSURE] [FOCUS] [BLT-IN ZOOM MIC] [MICREF LEVEL] [DROP SENSOR] (DCR-SR68/SR88) Backlight The following menu items return to the default settings when you do not appear on the power again. Charge the battery pack (p. 11).
Operating Guide
Page 9
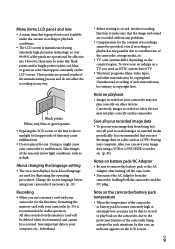
..., test the recording function to the protection features of the camcorder being lost, save the image data on the LCD screen. Note on the camcorder/battery pack temperature When the temperature of the camcorder or battery pack becomes extremely high or extremely low, you save all ...your recorded image data To prevent your camcorder (p. 55) is recommended for the contents of ...
..., test the recording function to the protection features of the camcorder being lost, save the image data on the LCD screen. Note on the camcorder/battery pack temperature When the temperature of the camcorder or battery pack becomes extremely high or extremely low, you save all ...your recorded image data To prevent your camcorder (p. 55) is recommended for the contents of ...
Operating Guide
Page 59
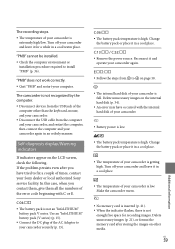
... beginning with the internal hard disk of your camcorder. Battery power is low. The battery pack temperature is low. C:04: The battery pack is extremely high/low. Change the battery pack or place it in a cool place. Change the battery pack or place it... to fix a couple of times, contact your Sony dealer or local authorized Sony service facility. E Follow the steps from the computer and your camcorder, and restart the computer, then connect the computer and your camcorder again in a cool place. The temperature of ...
... beginning with the internal hard disk of your camcorder. Battery power is low. The battery pack temperature is low. C:04: The battery pack is extremely high/low. Change the battery pack or place it in a cool place. Change the battery pack or place it... to fix a couple of times, contact your Sony dealer or local authorized Sony service facility. E Follow the steps from the computer and your camcorder, and restart the computer, then connect the computer and your camcorder again in a cool place. The temperature of ...

