Handycam® Handbook
Page 2
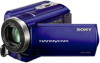
...camcorder for the first time, formatting the memory card with this first Supplied items The numbers in ( ) are the supplied quantity. AC Adaptor (1) Power cord (Mains lead) (1) A/V connecting cable (1) USB cable (1) Rechargeable battery pack NP-FV30 (1) CD-ROM "Handycam... See page 18 for the memory card you use with your camcorder (p. 67) is recommended for illustrating the operating procedures. See "About handling of time may be recovered. All data recorded on -screen displays in low light ...
...camcorder for the first time, formatting the memory card with this first Supplied items The numbers in ( ) are the supplied quantity. AC Adaptor (1) Power cord (Mains lead) (1) A/V connecting cable (1) USB cable (1) Rechargeable battery pack NP-FV30 (1) CD-ROM "Handycam... See page 18 for the memory card you use with your camcorder (p. 67) is recommended for illustrating the operating procedures. See "About handling of time may be recovered. All data recorded on -screen displays in low light ...
Handycam® Handbook
Page 3
... after turning off the camcorder. Disconnect the AC Adaptor from being activated in such situations. Notes on a disc such as a DVD-R using genuine Sony accessories. Availability...58320; We recommend using your camcorder may not play back images, perform [MEDIA FORMAT] If you repeat recording/deleting images for a long time, fragmentation of data occurs on...Save all your recorded image data To prevent your image data from the camcorder, holding both the camcorder and the DC plug. SR68/SR88/SX44/SX63) [YES] [YES] ....
... after turning off the camcorder. Disconnect the AC Adaptor from being activated in such situations. Notes on a disc such as a DVD-R using genuine Sony accessories. Availability...58320; We recommend using your camcorder may not play back images, perform [MEDIA FORMAT] If you repeat recording/deleting images for a long time, fragmentation of data occurs on...Save all your recorded image data To prevent your image data from the camcorder, holding both the camcorder and the DC plug. SR68/SR88/SX44/SX63) [YES] [YES] ....

Handycam® Handbook
Page 5
.... Recording movies and photos (p. 20) Recording movies p. 22 Changing the recording mode (p. 25) Expected recording time (MEDIA INFO, p. 67) Shooting photos p. 23 Playing movies and photos Playback on the camcorder p. 27 Playing images on a TV p. 33 Saving images Saving movies and photos with a computer Saving movies...
.... Recording movies and photos (p. 20) Recording movies p. 22 Changing the recording mode (p. 25) Expected recording time (MEDIA INFO, p. 67) Shooting photos p. 23 Playing movies and photos Playback on the camcorder p. 27 Playing images on a TV p. 33 Saving images Saving movies and photos with a computer Saving movies...

Handycam® Handbook
Page 6
... the viewer feel tired when viewing them. Stabilize yourself, move the camcorder. Stay still at the end of camcorder accessories. By always carrying spare batteries, you turn your camcorder horizontally as you can make a time-lapse recording or record subjects in dim light, such as scenes of...Using accessories Make good use zooming sparingly. Advice for successful recording To get good results in recording Stabilizing your camcorder When you hold the camcorder, keep your upper body upright, and hold your arms close to your movies. Zooming smoothly Zoom in and out slowly...
... the viewer feel tired when viewing them. Stabilize yourself, move the camcorder. Stay still at the end of camcorder accessories. By always carrying spare batteries, you turn your camcorder horizontally as you can make a time-lapse recording or record subjects in dim light, such as scenes of...Using accessories Make good use zooming sparingly. Advice for successful recording To get good results in recording Stabilizing your camcorder When you hold the camcorder, keep your upper body upright, and hold your arms close to your movies. Zooming smoothly Zoom in and out slowly...
Handycam® Handbook
Page 8
... Step 2: Turning the power on, and setting the date and time 15 Changing the language setting 16 Step 3: Preparing the recording media 17 Selecting the recording media for movies (DCR-SR68/SR88/SX44/SX63).. . . . . 17 Selecting the recording media for photos (DCR-SR68/SR88/SX44/SX63).. . . . . 17 Inserting a memory... mode 25 Using the VIDEO LIGHT 26 Adjusting the exposure for backlit subjects 26 Recording in mirror mode 26 Playback on the camcorder 27 Useful functions for playing movies and photos 30 Searching for desired images by date (Date Index 30 Searching for desired scene...
... Step 2: Turning the power on, and setting the date and time 15 Changing the language setting 16 Step 3: Preparing the recording media 17 Selecting the recording media for movies (DCR-SR68/SR88/SX44/SX63).. . . . . 17 Selecting the recording media for photos (DCR-SR68/SR88/SX44/SX63).. . . . . 17 Inserting a memory... mode 25 Using the VIDEO LIGHT 26 Adjusting the exposure for backlit subjects 26 Recording in mirror mode 26 Playback on the camcorder 27 Useful functions for playing movies and photos 30 Searching for desired images by date (Date Index 30 Searching for desired scene...
Handycam® Handbook
Page 10
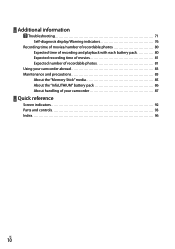
Additional information Troubleshooting 71 Self-diagnosis display/Warning indicators 76 Recording time of movies/number of recordable photos 80 Expected time of recording and playback with each battery pack 80 Expected recording time of movies 81 Expected number of recordable photos 81 Using your camcorder abroad 83 Maintenance and precautions 85 About the "Memory Stick" media 85 About the "InfoLITHIUM" battery pack 86 About handling of your camcorder 87 Quick reference Screen indicators 92 Parts and controls 93 Index 96 US 10
Additional information Troubleshooting 71 Self-diagnosis display/Warning indicators 76 Recording time of movies/number of recordable photos 80 Expected time of recording and playback with each battery pack 80 Expected recording time of movies 81 Expected number of recordable photos 81 Using your camcorder abroad 83 Maintenance and precautions 85 About the "Memory Stick" media 85 About the "InfoLITHIUM" battery pack 86 About handling of your camcorder 87 Quick reference Screen indicators 92 Parts and controls 93 Index 96 US 10

Handycam® Handbook
Page 12
...supplied) NP-FV50 NP-FV70 NP-FV100 Charging time 115 155 195 390 Times measured with that on the LCD screen. Charging time Approximate time (min.) required when you can charge the "InfoLITHIUM" battery pack (V series) after attaching it to your camcorder. Notes You cannot attach... When the battery is charged, disconnect the AC Adaptor from the DC IN jack of your camcorder. Tips See page 80 on recording and playing time. When your camcorder is recommended. The CHG (charge) lamp lights up and charging starts. US 12 You can...
...supplied) NP-FV50 NP-FV70 NP-FV100 Charging time 115 155 195 390 Times measured with that on the LCD screen. Charging time Approximate time (min.) required when you can charge the "InfoLITHIUM" battery pack (V series) after attaching it to your camcorder. Notes You cannot attach... When the battery is charged, disconnect the AC Adaptor from the DC IN jack of your camcorder. Tips See page 80 on recording and playing time. When your camcorder is recommended. The CHG (charge) lamp lights up and charging starts. US 12 You can...

Handycam® Handbook
Page 15
..., press POWER. US 15 The clock starts. If you set the date and time again, touch (MENU) [Show others] [CLOCK/ LANG] (under [GENERAL SET] category) [CLOCK SET]. Your camcorder turns on. To turn on the screen, touch / until the item appears. ...3 Set [DST SET] or [SUMMERTIME], date and time, then touch . Touch the button on , and setting the date and time 1 Open the LCD screen of your camcorder when the LCD screen is not on your camcorder. Getting started Step 2: Turning the power on the LCD screen. ...
..., press POWER. US 15 The clock starts. If you set the date and time again, touch (MENU) [Show others] [CLOCK/ LANG] (under [GENERAL SET] category) [CLOCK SET]. Your camcorder turns on. To turn on the screen, touch / until the item appears. ...3 Set [DST SET] or [SUMMERTIME], date and time, then touch . Touch the button on , and setting the date and time 1 Open the LCD screen of your camcorder when the LCD screen is not on your camcorder. Getting started Step 2: Turning the power on the LCD screen. ...

Handycam® Handbook
Page 16
...; [Show others ] [PLAYBACK SET] (under [PLAYBACK] category) [DATA CODE] [DATE/ TIME] . You can be displayed during recording, but they are automatically recorded on -screen displays to [OFF], turn off your camcorder by touching (MENU) [Show others] [SOUND/DISP SET] (under [GENERAL SET] category...
...; [Show others ] [PLAYBACK SET] (under [PLAYBACK] category) [DATA CODE] [DATE/ TIME] . You can be displayed during recording, but they are automatically recorded on -screen displays to [OFF], turn off your camcorder by touching (MENU) [Show others] [SOUND/DISP SET] (under [GENERAL SET] category...
Handycam® Handbook
Page 17
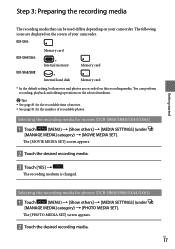
...icons are recorded on this recording media. The recording medium is changed. US 17 You can be used differs depending on your camcorder. The [MOVIE MEDIA SET] screen appears. Touch the desired recording media. Touch [YES] ...the recordable time of movies. See page 81 for photos (DCR-SR68/SR88/SX44/SX63) Touch (MENU) [Show others ] [MEDIA SETTINGS] (under [MANAGE MEDIA] category) [PHOTO MEDIA SET]. DCR-SX43: DCR-SX44/SX63: DCR-SR68/SR88: Memory card * Internal memory * Internal hard disk Memory ...
...icons are recorded on this recording media. The recording medium is changed. US 17 You can be used differs depending on your camcorder. The [MOVIE MEDIA SET] screen appears. Touch the desired recording media. Touch [YES] ...the recordable time of movies. See page 81 for photos (DCR-SR68/SR88/SX44/SX63) Touch (MENU) [Show others ] [MEDIA SETTINGS] (under [MANAGE MEDIA] category) [PHOTO MEDIA SET]. DCR-SX43: DCR-SX44/SX63: DCR-SR68/SR88: Memory card * Internal memory * Internal hard disk Memory ...

Handycam® Handbook
Page 22
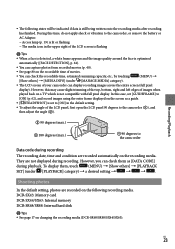
... file is created automatically. It will be displayed for about 3 seconds, then disappear after you can start recording after turning on your camcorder during this time. US 22 DCR-SR68/SR88 DCR-SX43/SX44/SX63 START/STOP button [STBY] [REC] To stop recording, press START/STOP again. You can stop recording also...
... file is created automatically. It will be displayed for about 3 seconds, then disappear after you can start recording after turning on your camcorder during this time. US 22 DCR-SR68/SR88 DCR-SX43/SX44/SX63 START/STOP button [STBY] [REC] To stop recording, press START/STOP again. You can stop recording also...
Handycam® Handbook
Page 23
...camcorder can check them , touch (MENU) [Show others] [PLAYBACK SET] (under [PLAYBACK] category) a desired setting . Shooting photos In the default setting, photos are not displayed during recording. DCR-SX43: Memory card DCR-SX44/SX63: Internal memory DCR-SR68/SR88: Internal hard disk... Tips See page 17 on the screen as [DATA CODE] during recording The recording date, time and condition are recorded...
...camcorder can check them , touch (MENU) [Show others] [PLAYBACK SET] (under [PLAYBACK] category) a desired setting . Shooting photos In the default setting, photos are not displayed during recording. DCR-SX43: Memory card DCR-SX44/SX63: Internal memory DCR-SR68/SR88: Internal hard disk... Tips See page 17 on the screen as [DATA CODE] during recording The recording date, time and condition are recorded...
Handycam® Handbook
Page 25
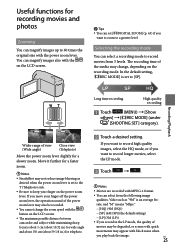
...up to keep your finger off the power zoom lever, the operation sound of movies may appear with the / on the power zoom lever. Long time recording High quality recording Touch (MENU) [Show others] [ REC MODE] (under [SHOOTING SET] category). &#... speed with quick movements may be recorded. You cannot change , depending on the LCD screen. The minimum possible distance between camcorder and subject while maintaining sharp focus is an average bit- If you record in .) for a slower zoom. rate, and "M" means "Mbps."...
...up to keep your finger off the power zoom lever, the operation sound of movies may appear with the / on the power zoom lever. Long time recording High quality recording Touch (MENU) [Show others] [ REC MODE] (under [SHOOTING SET] category). &#... speed with quick movements may be recorded. You cannot change , depending on the LCD screen. The minimum possible distance between camcorder and subject while maintaining sharp focus is an average bit- If you record in .) for a slower zoom. rate, and "M" means "Mbps."...
Handycam® Handbook
Page 26
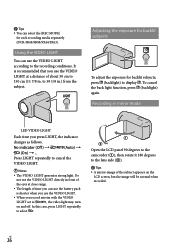
...57744; (backlight) again. Press LIGHT repeatedly to 59 1/8 in . Recording in front of the eyes at a distance of time you can use the battery pack is shorter when you use the VIDEO LIGHT. When you press LIGHT, the indicator... You can use the VIDEO LIGHT according to the recording conditions. Open the LCD panel 90 degrees to the camcorder (), then rotate it 180 degrees to 150 cm (11 7/8 in .) from the subject. Do not use the... Adjusting the exposure for backlit subjects To adjust the exposure for each recording media separately (DCR-SR68/SR88/SX44/SX63).
...57744; (backlight) again. Press LIGHT repeatedly to 59 1/8 in . Recording in front of the eyes at a distance of time you can use the battery pack is shorter when you use the VIDEO LIGHT. When you press LIGHT, the indicator... You can use the VIDEO LIGHT according to the recording conditions. Open the LCD panel 90 degrees to the camcorder (), then rotate it 180 degrees to 150 cm (11 7/8 in .) from the subject. Do not use the... Adjusting the exposure for backlit subjects To adjust the exposure for each recording media separately (DCR-SR68/SR88/SX44/SX63).

Handycam® Handbook
Page 28
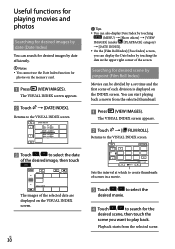
... screen returns to the VISUAL INDEX screen. Touch / during pause to play Tips When playback from the previous time. ( appears on the photo recorded on the previous/next date.* / : Displays the previous/next movie. Returns ...([DATE INDEX]/[ FILM ROLL]/ [ FACE]) (p. 30, 30, 31). / : Displays movies recorded on a memory card.) Playing movies Your camcorder starts playing the selected movie. US 28 If you repeat touching / during playback, movies are recorded automatically during playback by touching (MENU) [Show...
... screen returns to the VISUAL INDEX screen. Touch / during pause to play Tips When playback from the previous time. ( appears on the photo recorded on the previous/next date.* / : Displays the previous/next movie. Returns ...([DATE INDEX]/[ FILM ROLL]/ [ FACE]) (p. 30, 30, 31). / : Displays movies recorded on a memory card.) Playing movies Your camcorder starts playing the selected movie. US 28 If you repeat touching / during playback, movies are recorded automatically during playback by touching (MENU) [Show...
Handycam® Handbook
Page 30
... efficiently. Notes You cannot use the Date Index function for desired scene by pinpoint (Film Roll Index) Movies can be divided by a set time and the first scene of each division is displayed on the INDEX screen. US 30 Tips You can start playing back a movie from...
... efficiently. Notes You cannot use the Date Index function for desired scene by pinpoint (Film Roll Index) Movies can be divided by a set time and the first scene of each division is displayed on the INDEX screen. US 30 Tips You can start playing back a movie from...
Handycam® Handbook
Page 31
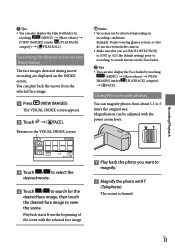
... scene with the selected face image. Play back the photo you set [FACE DETECTION] to [ON] (p. 62) (the default setting) prior to recording, to 5 times the original size. The VISUAL INDEX screen appears. Touch [ FACE]. Example: People wearing glasses or hats, or who do not face towards the...
... scene with the selected face image. Play back the photo you set [FACE DETECTION] to [ON] (p. 62) (the default setting) prior to recording, to 5 times the original size. The VISUAL INDEX screen appears. Touch [ FACE]. Example: People wearing glasses or hats, or who do not face towards the...
Handycam® Handbook
Page 36
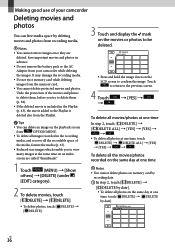
...by recording date. In step 2, touch [ DELETE] [ DELETE by date]. To delete all photos on the same day at one time, touch [ DELETE] [ DELETE by deleting movies and photos from recording media. Notes You cannot restore images once they are called "...OPTION MENU. To delete all images recorded in advance. Do not remove the battery pack or the AC Adaptor from your camcorder while deleting the images. It may damage the recording media. Do not eject memory card while deleting images from the memory card. ...
...by recording date. In step 2, touch [ DELETE] [ DELETE by date]. To delete all photos on the same day at one time, touch [ DELETE] [ DELETE by deleting movies and photos from recording media. Notes You cannot restore images once they are called "...OPTION MENU. To delete all images recorded in advance. Do not remove the battery pack or the AC Adaptor from your camcorder while deleting the images. It may damage the recording media. Do not eject memory card while deleting images from the memory card. ...

Handycam® Handbook
Page 38
... movies and photos Touch the movie or photo marked with in step 3. disappears. To protect all photos on the same day at one time, touch [ PROTECT] [ PRT. Touch to return to the previous screen. 4 Touch [YES] . by date] ... step 2, touch [ PROTECT] [ PRT. by date]. To protect all the movies and photos recorded on the same day at one time Note You cannot select [ PRT. Protecting recorded movies and photos (Protect) Protect movies and photos to avoid deleting them by date]. &#...
... movies and photos Touch the movie or photo marked with in step 3. disappears. To protect all photos on the same day at one time, touch [ PROTECT] [ PRT. Touch to return to the previous screen. 4 Touch [YES] . by date] ... step 2, touch [ PROTECT] [ PRT. by date]. To protect all the movies and photos recorded on the same day at one time Note You cannot select [ PRT. Protecting recorded movies and photos (Protect) Protect movies and photos to avoid deleting them by date]. &#...
Handycam® Handbook
Page 40
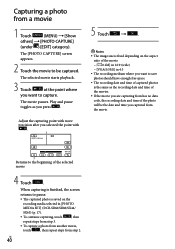
... the point where you want to the beginning of the movie: [ 0.2M] in 16:9 (wide) [VGA(0.3M)] in [PHOTO MEDIA SET] (DCR-SR68/SR88/SX44/ SX63) (p. 17). To continue capturing, touch , then repeat steps from step 3. To capture a photo from another movie, touch , then... 4:3 The recording medium where you press . Returns to save photos should have enough free space. The recording date and time of the photo will be captured. When capturing is finished, the screen returns to pause. The captured photo is the same as ...
... the point where you want to the beginning of the movie: [ 0.2M] in 16:9 (wide) [VGA(0.3M)] in [PHOTO MEDIA SET] (DCR-SR68/SR88/SX44/ SX63) (p. 17). To continue capturing, touch , then repeat steps from step 3. To capture a photo from another movie, touch , then... 4:3 The recording medium where you press . Returns to save photos should have enough free space. The recording date and time of the photo will be captured. When capturing is finished, the screen returns to pause. The captured photo is the same as ...


