Operating Guide
Page 6
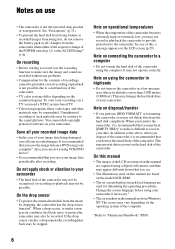
...the model DCR-SR80. • The on-screen displays in each local language are captured using the camcorder in highlands • Do not turn on the operating system of the camcorder may not be recognized, or recording or playback may damage the hard disk drive of the camcorder. This may...digital still camera, and thus may vary depending on the camcorder in a low-pressure area, where its altitude is not possible due to "Handycam Handbook" (PDF). 6 The scenes may appear different from the shock by dropping, the camcorder has the drop sensor function*. On recording • Before ...
...the model DCR-SR80. • The on-screen displays in each local language are captured using the camcorder in highlands • Do not turn on the operating system of the camcorder may not be recognized, or recording or playback may damage the hard disk drive of the camcorder. This may...digital still camera, and thus may vary depending on the camcorder in a low-pressure area, where its altitude is not possible due to "Handycam Handbook" (PDF). 6 The scenes may appear different from the shock by dropping, the camcorder has the drop sensor function*. On recording • Before ...
Operating Guide
Page 15
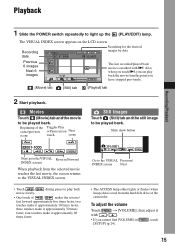
...:01 Searching for the desired images by date Previous 6 images Next 6 images P-MENU The last recorded/played back movie is read from the hard disk drive of the Toggles Play scene/previous or Pause as you cannot find [VOLUME] in [SETUP] (p.24). , touch 15 Slide show button 101.... Still Images Touch (Still) tab and the still image to the VISUAL INDEX screen. • Touch / movie slowly. Beginning of the camcorder. Playback Recording/Playback 1 Slide the POWER switch repeatedly to the VISUAL Previous/ INDEX screen Next • The ACCESS lamp either lights or flashes...
...:01 Searching for the desired images by date Previous 6 images Next 6 images P-MENU The last recorded/played back movie is read from the hard disk drive of the Toggles Play scene/previous or Pause as you cannot find [VOLUME] in [SETUP] (p.24). , touch 15 Slide show button 101.... Still Images Touch (Still) tab and the still image to the VISUAL INDEX screen. • Touch / movie slowly. Beginning of the camcorder. Playback Recording/Playback 1 Slide the POWER switch repeatedly to the VISUAL Previous/ INDEX screen Next • The ACCESS lamp either lights or flashes...
Operating Guide
Page 22
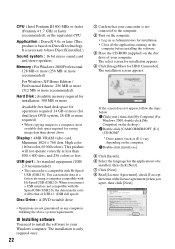
... then click [My Computer] (For Windows 2000, double-click [My Computer] on the desktop.) 2Double-click [CAMCORDERSOFT (E:)] (CD-ROM)* * Drive names (such as Administrators for installation. • Close all the applications running on the computer before installing the software. 3 Place the CD-ROM ...512 MB or more recommended) Hard Disk : Available memory required for installation: 300 MB or more Available free hard disk space for operations required: 14 GB or more (for dual layer DVD system, 28 GB or more available disk space required for HDD Camcorder]. The installation is only required...
... then click [My Computer] (For Windows 2000, double-click [My Computer] on the desktop.) 2Double-click [CAMCORDERSOFT (E:)] (CD-ROM)* * Drive names (such as Administrators for installation. • Close all the applications running on the computer before installing the software. 3 Place the CD-ROM ...512 MB or more recommended) Hard Disk : Available memory required for installation: 300 MB or more Available free hard disk space for operations required: 14 GB or more (for dual layer DVD system, 28 GB or more available disk space required for HDD Camcorder]. The installation is only required...
Operating Guide
Page 26
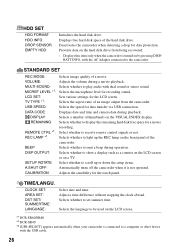
... a counter on the LCD screen or on the hard disk drive from the camcorder. Displays free hard disk space of thumbnails on the front panel of a movie. Displays this item only when the camcorder is turned on the LCD screen. *1 DCR-SR60/SR80 *2 DCR-SR40 *3 [USB SELECT] appears automatically when your camcorder is connected to light up or down the setup...
... a counter on the LCD screen or on the hard disk drive from the camcorder. Displays free hard disk space of thumbnails on the front panel of a movie. Displays this item only when the camcorder is turned on the LCD screen. *1 DCR-SR60/SR80 *2 DCR-SR40 *3 [USB SELECT] appears automatically when your camcorder is connected to light up or down the setup...
Operating Guide
Page 29
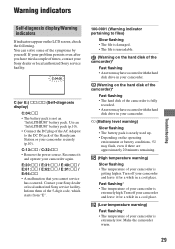
...your Sony dealer or local authorized Sony service facility. Contact your camcorder again. Make the camcorder warm. 29 Warning indicators Troubleshooting Self-diagnosis display/Warning indicators If indicators appear on the hard disk of the camcorder)* Fast flashing • An error may have occurred with the hard disk drive in...; The temperature of the Handycam Station or your camcorder is not an "InfoLITHIUM" battery pack. E:20:ss / E:31:ss / E:40:ss / E:61:ss / E:62:ss / E:91:ss / E:94:ss • A malfunction that you have occurred with the hard disk drive in a cool place. ...
...your Sony dealer or local authorized Sony service facility. Contact your camcorder again. Make the camcorder warm. 29 Warning indicators Troubleshooting Self-diagnosis display/Warning indicators If indicators appear on the hard disk of the camcorder)* Fast flashing • An error may have occurred with the hard disk drive in...; The temperature of the Handycam Station or your camcorder is not an "InfoLITHIUM" battery pack. E:20:ss / E:31:ss / E:40:ss / E:61:ss / E:62:ss / E:91:ss / E:94:ss • A malfunction that you have occurred with the hard disk drive in a cool place. ...
Handycam Handbook
Page 1
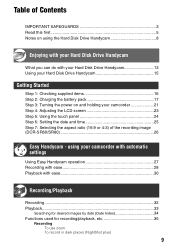
Handycam Handbook DCR-SR40/SR60/SR80 2-698-880-11(1) Enjoying with your Hard Disk 13 Drive Handycam Getting Started 16 Easy Handycam 27 Recording /Playback 32 Using the Setup items 47 Editing images 66 Dubbing, Printing 70 Performing with a computer 77 Troubleshooting 101 Additional Information 117 Glossary, Index 124 © 2006 Sony Corporation
Handycam Handbook DCR-SR40/SR60/SR80 2-698-880-11(1) Enjoying with your Hard Disk 13 Drive Handycam Getting Started 16 Easy Handycam 27 Recording /Playback 32 Using the Setup items 47 Editing images 66 Dubbing, Printing 70 Performing with a computer 77 Troubleshooting 101 Additional Information 117 Glossary, Index 124 © 2006 Sony Corporation
Handycam Handbook
Page 8
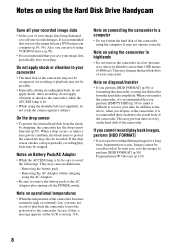
... on operational temperatures • When the temperature of the camcorder becomes extremely high or extremely low, you may damage the hard disk drive of the camcorder. This may not delete data from the shock by dropping, the camcorder has the drop sensor function (p.59). Images cannot be possible...sure to your camcorder • The hard disk of the camcorder may not be recognized, or recording or playback may not record or playback the camcorder to provide protection to remove the battery pack or the AC Adaptor after recording. Notes on using the Hard Disk Drive Handycam Save all ...
... on operational temperatures • When the temperature of the camcorder becomes extremely high or extremely low, you may damage the hard disk drive of the camcorder. This may not delete data from the shock by dropping, the camcorder has the drop sensor function (p.59). Images cannot be possible...sure to your camcorder • The hard disk of the camcorder may not be recognized, or recording or playback may not record or playback the camcorder to provide protection to remove the battery pack or the AC Adaptor after recording. Notes on using the Hard Disk Drive Handycam Save all ...
Handycam Handbook
Page 9
... the recording image (DCR-SR60/SR80 26 Easy Handycam - using the Hard Disk Drive Handycam 8 Enjoying with your Hard Disk Drive Handycam What you can do with your Hard Disk Drive Handycam 13 Using your Hard Disk Drive Handycam 15 Getting Started Step 1: Checking supplied items 16 Step 2: Charging the battery pack 17 Step 3: Turning the power on and holding your camcorder with automatic settings Using Easy Handycam operation 27 Recording...
... the recording image (DCR-SR60/SR80 26 Easy Handycam - using the Hard Disk Drive Handycam 8 Enjoying with your Hard Disk Drive Handycam What you can do with your Hard Disk Drive Handycam 13 Using your Hard Disk Drive Handycam 15 Getting Started Step 1: Checking supplied items 16 Step 2: Charging the battery pack 17 Step 3: Turning the power on and holding your camcorder with automatic settings Using Easy Handycam operation 27 Recording...
Handycam Handbook
Page 13
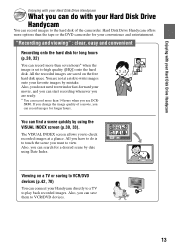
... hard disk. Hard Disk Drive Handycam offers more options than the tape or the DVD camcorder for long hours (p.28, 32) You can record more than seven hours* when the image is to touch the scene you are ready. * You can find a scene quickly by mistake. Viewing on the free hard disk space. Enjoying with your Hard Disk Drive Handycam Enjoying with your Hard Disk Drive Handycam...
... hard disk. Hard Disk Drive Handycam offers more options than the tape or the DVD camcorder for long hours (p.28, 32) You can record more than seven hours* when the image is to touch the scene you are ready. * You can find a scene quickly by mistake. Viewing on the free hard disk space. Enjoying with your Hard Disk Drive Handycam Enjoying with your Hard Disk Drive Handycam...
Handycam Handbook
Page 14
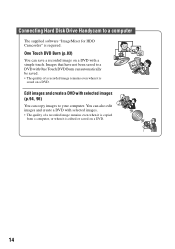
... save a recorded image on a DVD with selected images. • The quality of a recorded image remains even when it is required. Connecting Hard Disk Drive Handycam to a computer The supplied software "ImageMixer for HDD Camcorder" is edited or saved on a DVD. 14 One Touch DVD Burn (p.83) You can copy images to a DVD with One Touch...
... save a recorded image on a DVD with selected images. • The quality of a recorded image remains even when it is required. Connecting Hard Disk Drive Handycam to a computer The supplied software "ImageMixer for HDD Camcorder" is edited or saved on a DVD. 14 One Touch DVD Burn (p.83) You can copy images to a DVD with One Touch...

Handycam Handbook
Page 15
... images on VCR/DVD devices (p.70). If you delete the images, you cannot record new images. When the hard disk becomes full, you can record new images on the free hard disk space again. Enjoying with your Hard Disk Drive Handycam Using your Hard Disk Drive Handycam Images are recorded on your camcorder. It is recommended that has been saved on the internal...
... images on VCR/DVD devices (p.70). If you delete the images, you cannot record new images. When the hard disk becomes full, you can record new images on the free hard disk space again. Enjoying with your Hard Disk Drive Handycam Using your Hard Disk Drive Handycam Images are recorded on your camcorder. It is recommended that has been saved on the internal...
Handycam Handbook
Page 28
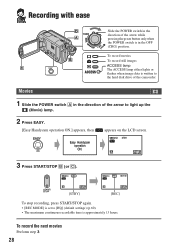
... settings) (p.60). • The maximum continuous recordable time is written to the hard disk drive of the arrow to light up the (Movie) lamp. 2 Press EASY. [Easy Handycam operation ON.] appears, then Easy Handycam operation ON. Recording with ease ACCESS Slide the POWER switch in the direction of the... arrow while pressing the green button only when the POWER switch is in the direction of the camcorder. To record the next...
... settings) (p.60). • The maximum continuous recordable time is written to the hard disk drive of the arrow to light up the (Movie) lamp. 2 Press EASY. [Easy Handycam operation ON.] appears, then Easy Handycam operation ON. Recording with ease ACCESS Slide the POWER switch in the direction of the... arrow while pressing the green button only when the POWER switch is in the direction of the camcorder. To record the next...

Handycam Handbook
Page 30
... movie is in the direction of the arrow repeatedly to light up the (PLAY/EDIT) lamp. To play back the movie from the hard disk drive of the camcorder. 1 Slide the POWER switch in the direction of the arrow while pressing the green button only when the POWER switch is marked with ...ease POWER switch ACCESS Slide the POWER switch in the OFF (CHG) position. The VISUAL INDEX screen appears on the LCD screen. 2 Press EASY. [Easy Handycam ...
... movie is in the direction of the arrow repeatedly to light up the (PLAY/EDIT) lamp. To play back the movie from the hard disk drive of the camcorder. 1 Slide the POWER switch in the direction of the arrow while pressing the green button only when the POWER switch is marked with ...ease POWER switch ACCESS Slide the POWER switch in the OFF (CHG) position. The VISUAL INDEX screen appears on the LCD screen. 2 Press EASY. [Easy Handycam ...

Handycam Handbook
Page 33
... Touch (Still) tab and the still image to 12 and more images can play back movie slowly. • One touch of the camcorder. Playback Recording/Playback 1 Slide the POWER switch repeatedly to play back the movie from the point you have stopped previously. (Movie) tab... (Still) tab (Playlist) tab (p.68) • Moving the zoom lever changes the VISUAL INDEX screen indication from the hard disk drive of / makes the reverse/ fast forward approximately five times faster, two touches make it approximately 10 times faster, three touches make it approximately...
... Touch (Still) tab and the still image to 12 and more images can play back movie slowly. • One touch of the camcorder. Playback Recording/Playback 1 Slide the POWER switch repeatedly to play back the movie from the point you have stopped previously. (Movie) tab... (Still) tab (Playlist) tab (p.68) • Moving the zoom lever changes the VISUAL INDEX screen indication from the hard disk drive of / makes the reverse/ fast forward approximately five times faster, two touches make it approximately 10 times faster, three touches make it approximately...
Handycam Handbook
Page 58
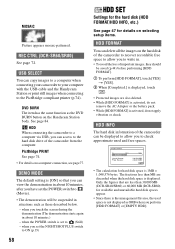
...camcorder to your computer with the USB cable and the Handycam Station or print still images when connecting to (Still) - Only the figures that you can access to check approximate used space is 1MB = 1,048,576 bytes. The fractions less than 30,000 MB (DCR-SR40/SR60) or 60,000 MB (DCR-SR80) for hard disk...you to the hard disk drive of the camcorder to recover recordable free space to allow you have set to the PictBridge compliant printer (p.74). HDD INFO The hard disk information of the camcorder can delete all the images on the hard disk of the camcorder from the ...
...camcorder to your computer with the USB cable and the Handycam Station or print still images when connecting to (Still) - Only the figures that you can access to check approximate used space is 1MB = 1,048,576 bytes. The fractions less than 30,000 MB (DCR-SR40/SR60) or 60,000 MB (DCR-SR80) for hard disk...you to the hard disk drive of the camcorder to recover recordable free space to allow you have set to the PictBridge compliant printer (p.74). HDD INFO The hard disk information of the camcorder can delete all the images on the hard disk of the camcorder from the ...
Handycam Handbook
Page 78
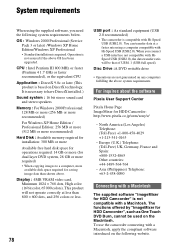
...1024 × 768 dots, High color (16 bit color, 65 000 colors). Disc Drive :A DVD writable drive • Operations are not guaranteed on DirectX technology. Operation is necessary to have DirectX...hard disk space for operations required: 14 GB or more (for dual layer DVD system, 28 GB or more required) • When copying images to a computer, more available disk space required for HDD Camcorder...USB1.1 (USB full speed). The functions offered by "ImageMixer for HDD Camcorder: http://www.pixela.co.jp/oem/sony/e/ - System requirements When using the supplied software, you connect a USB...
...1024 × 768 dots, High color (16 bit color, 65 000 colors). Disc Drive :A DVD writable drive • Operations are not guaranteed on DirectX technology. Operation is necessary to have DirectX...hard disk space for operations required: 14 GB or more (for dual layer DVD system, 28 GB or more required) • When copying images to a computer, more available disk space required for HDD Camcorder...USB1.1 (USB full speed). The functions offered by "ImageMixer for HDD Camcorder: http://www.pixela.co.jp/oem/sony/e/ - System requirements When using the supplied software, you connect a USB...
Handycam Handbook
Page 79
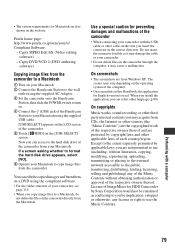
... to a Macintosh, do not delete the files on the camcorder directly from the camcorder to a Macintosh 1 Turn on your Macintosh. 2 Connect the Handycam Station to the wall outlet using the supplied AC Adaptor. 3 Set the camcorder onto the Handycam Station, then slide the POWER switch to turn on. 4.... Except to the extent expressly permitted by Sony Corporation would not be construed as it may damage the cable or your Macintosh to format the hard disk drive appears, select [NO]. 6 Operate your camcorder. • Do not delete files on the camcorder through the computer, it may vary depending...
... to a Macintosh, do not delete the files on the camcorder directly from the camcorder to a Macintosh 1 Turn on your Macintosh. 2 Connect the Handycam Station to the wall outlet using the supplied AC Adaptor. 3 Set the camcorder onto the Handycam Station, then slide the POWER switch to turn on. 4.... Except to the extent expressly permitted by Sony Corporation would not be construed as it may damage the cable or your Macintosh to format the hard disk drive appears, select [NO]. 6 Operate your camcorder. • Do not delete files on the camcorder through the computer, it may vary depending...
Handycam Handbook
Page 85
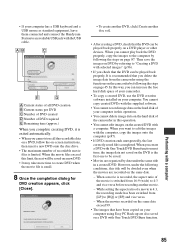
... same title in this title will be saved on the created DVD with the supplied software. • You cannot record image data on the hard disk of the camcorder in a created DVD. Then save the images on DVD by referring to 4:3 and vice versa before recording another disc set]. • After ...a new DVD onto the disc drive. • The maximum number of the movie is switched from [LP] to edit the images with a computer 85 • If your computer has a USB keyboard and a USB mouse as standard equipment, leave them connected and connect the Handycam Station to create DVD when the...
... same title in this title will be saved on the created DVD with the supplied software. • You cannot record image data on the hard disk of the camcorder in a created DVD. Then save the images on DVD by referring to 4:3 and vice versa before recording another disc set]. • After ...a new DVD onto the disc drive. • The maximum number of the movie is switched from [LP] to edit the images with a computer 85 • If your computer has a USB keyboard and a USB mouse as standard equipment, leave them connected and connect the Handycam Station to create DVD when the...
Handycam Handbook
Page 90
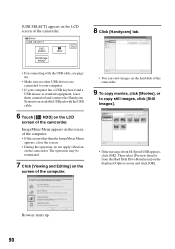
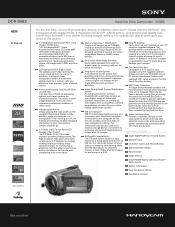
Then select [Preview directly from the Hard Disk Drive Handycam] on the LCD screen of the camcorder. [USB SELECT] appears on the LCD screen of the camcorder. 60min USB SELECT DVD BURN HDD END PictBridge PRINT 8 Click [Handycam] tab. • For connecting with the USB cable, see page 84. • ...Make sure no other than the ImageMixer Menu appears, close the screen. • During the operation, do not apply vibration on the hard disk of the camcorder. 9 To copy movies, ...
Then select [Preview directly from the Hard Disk Drive Handycam] on the LCD screen of the camcorder. [USB SELECT] appears on the LCD screen of the camcorder. 60min USB SELECT DVD BURN HDD END PictBridge PRINT 8 Click [Handycam] tab. • For connecting with the USB cable, see page 84. • ...Make sure no other than the ImageMixer Menu appears, close the screen. • During the operation, do not apply vibration on the hard disk of the camcorder. 9 To copy movies, ...
Marketing Specifications
Page 1
...Handycam Station and supplied USB3 cable and press the One Touch Disc Burn button. Digital still images will be stored on a DVD. Super SteadyShot® Picture Stabilization System An advanced version of Sony... the power to the Hard Disk Drive is clearer, with other image stabilization systems. USB 2.0 Interface3 USB 2.0 interface provides an easy way to connect your Hard Disk Handycam Camcorder to the computer for ... transfer to PCs for increased contrast. DCR-SR62 NEW Step-up your footage to your PC using the supplied software. The camcorder can also be sharp and clear with...
...Handycam Station and supplied USB3 cable and press the One Touch Disc Burn button. Digital still images will be stored on a DVD. Super SteadyShot® Picture Stabilization System An advanced version of Sony... the power to the Hard Disk Drive is clearer, with other image stabilization systems. USB 2.0 Interface3 USB 2.0 interface provides an easy way to connect your Hard Disk Handycam Camcorder to the computer for ... transfer to PCs for increased contrast. DCR-SR62 NEW Step-up your footage to your PC using the supplied software. The camcorder can also be sharp and clear with...


