Handycam Handbook
Page 11
... TV or VCR/DVD device (DCR-SR60/SR80 72 Printing recorded still images (PictBridge compliant printer 74 Jacks to connect external devices 76 Performing with a computer What you can do with the camcorder by connecting to your computer 77 System requirements 78 Installing software 80 Creating a DVD with One Touch... a DVD 98 Deleting image data from a computer 100 Troubleshooting Troubleshooting 101 Warning indicators and messages 113 Additional Information Using your camcorder abroad 117 Files on the camcorder hard disk/folder structure 119 About the "InfoLITHIUM" battery pack 120 11
... TV or VCR/DVD device (DCR-SR60/SR80 72 Printing recorded still images (PictBridge compliant printer 74 Jacks to connect external devices 76 Performing with a computer What you can do with the camcorder by connecting to your computer 77 System requirements 78 Installing software 80 Creating a DVD with One Touch... a DVD 98 Deleting image data from a computer 100 Troubleshooting Troubleshooting 101 Warning indicators and messages 113 Additional Information Using your camcorder abroad 117 Files on the camcorder hard disk/folder structure 119 About the "InfoLITHIUM" battery pack 120 11
Handycam Handbook
Page 35
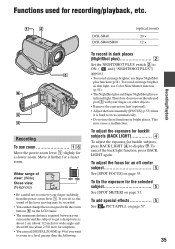
.... • The minimum distance required between your camcorder and the subject to get a sharp focus is hard to ON. ( and ["NIGHTSHOT PLUS"] appear....) • To record an image brighter, use Super NightShot plus use Color Slow Shutter function (p.54). • The NightShot plus and Super NightShot plus function (p.54). If you want to zoom to a level greater than the following: DCR-SR40 DCR-SR60... p.53) when it is about 1 cm (about 1/2 inch) for wide angle and about 80 cm (about 2 5/8 feet) for telephoto. • You can set [DIGITAL ZOOM] (p....
.... • The minimum distance required between your camcorder and the subject to get a sharp focus is hard to ON. ( and ["NIGHTSHOT PLUS"] appear....) • To record an image brighter, use Super NightShot plus use Color Slow Shutter function (p.54). • The NightShot plus and Super NightShot plus function (p.54). If you want to zoom to a level greater than the following: DCR-SR40 DCR-SR60... p.53) when it is about 1 cm (about 1/2 inch) for wide angle and about 80 cm (about 2 5/8 feet) for telephoto. • You can set [DIGITAL ZOOM] (p....
Handycam Handbook
Page 53
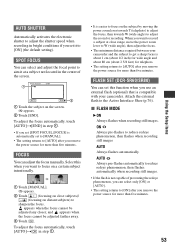
...FOCUS STBY AUTO END 1 Touch the subject on distant subjects) to sharpen the focus. FLASH SET (DCR-SR60/SR80) You can select and adjust the focal point to aim it to [ON] (the default setting.... • If the flash is about 1 cm (about 1/2 inch) for wide angle and about 80 cm (about 2 5/8 feet) for telephoto. • The setting returns to [AUTO] after you ...power zoom lever to W (wide angle), then adjust the focus. • The minimum distance required between your camcorder. To adjust the focus automatically, touch [AUTO]t in step 1. • It is automatically set [SPOT FOCUS...
...FOCUS STBY AUTO END 1 Touch the subject on distant subjects) to sharpen the focus. FLASH SET (DCR-SR60/SR80) You can select and adjust the focal point to aim it to [ON] (the default setting.... • If the flash is about 1 cm (about 1/2 inch) for wide angle and about 80 cm (about 2 5/8 feet) for telephoto. • The setting returns to [AUTO] after you ...power zoom lever to W (wide angle), then adjust the focus. • The minimum distance required between your camcorder. To adjust the focus automatically, touch [AUTO]t in step 1. • It is automatically set [SPOT FOCUS...
Handycam Handbook
Page 77
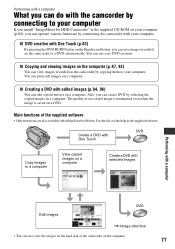
...with your computer. Main functions of the camcorder on the Handycam Station, you can view images recorded on the camcorder by selecting the copied images on the camcorder to a DVD automatically. Performing with a computer What you can do with the camcorder by connecting to your computer If you install... images on the hard disk of the supplied software • Other functions are also available other than described below. For details, see the help in the supplied CD-ROM on your computer (p.80), you can operate various functions by connecting the camcorder with edited images ...
...with your computer. Main functions of the camcorder on the Handycam Station, you can view images recorded on the camcorder by selecting the copied images on the camcorder to a DVD automatically. Performing with a computer What you can do with the camcorder by connecting to your computer If you install... images on the hard disk of the supplied software • Other functions are also available other than described below. For details, see the help in the supplied CD-ROM on your computer (p.80), you can operate various functions by connecting the camcorder with edited images ...
Handycam Handbook
Page 79
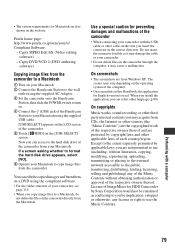
... obtaining authorization or approval of the Handycam Station to copy image files from the camcorder. Capty MPEG Edit EX (Video editing... may acquire from CDs, the Internet or other language (p.80). On screenshots • The screenshots are also shown on...Camcorder by Sony Corporation would not be construed as it may cause a malfunction. License of the camcorder. 5 Touch [ HDD] on the camcorder through the computer, it may damage the cable or your Macintosh. • The system requirements for Macintosh are from Windows XP. If a screen asking whether to format the hard disk...
... obtaining authorization or approval of the Handycam Station to copy image files from the camcorder. Capty MPEG Edit EX (Video editing... may acquire from CDs, the Internet or other language (p.80). On screenshots • The screenshots are also shown on...Camcorder by Sony Corporation would not be construed as it may cause a malfunction. License of the camcorder. 5 Touch [ HDD] on the camcorder through the computer, it may damage the cable or your Macintosh. • The system requirements for Macintosh are from Windows XP. If a screen asking whether to format the hard disk...
Handycam Handbook
Page 80
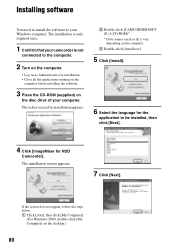
... installation. • Close all the applications running on the computer before installing the software. 3 Place the CD-ROM (supplied) on the desktop.) 80 If the screen does not appear, follow the steps below. 1 Click [start], then click [My Computer] (For Windows 2000, double-click [My.... Installing software You need to install the software to be installed, then click [Next]. 4 Click [ImageMixer for HDD Camcorder]. The installation is only required once. 1 Confirm that your camcorder is not connected to the computer. 2 Turn on the computer. • Log on as (E:)) vary depending on the...
... installation. • Close all the applications running on the computer before installing the software. 3 Place the CD-ROM (supplied) on the desktop.) 80 If the screen does not appear, follow the steps below. 1 Click [start], then click [My Computer] (For Windows 2000, double-click [My.... Installing software You need to install the software to be installed, then click [Next]. 4 Click [ImageMixer for HDD Camcorder]. The installation is only required once. 1 Confirm that your camcorder is not connected to the computer. 2 Turn on the computer. • Log on as (E:)) vary depending on the...
Handycam Handbook
Page 110
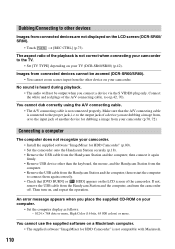
... connected devices cannot be zoomed (DCR-SR60/SR80). • You cannot zoom scenes input from the Handycam Station and the computer, then restart the computer to the TV. • Set [TV TYPE] depending on your camcorder. • Install the supplied software "ImageMixer for HDD Camcorder" (p.80). • Set the camcorder onto the Handycam Station securely (p.18). • Remove...
... connected devices cannot be zoomed (DCR-SR60/SR80). • You cannot zoom scenes input from the Handycam Station and the computer, then restart the computer to the TV. • Set [TV TYPE] depending on your camcorder. • Install the supplied software "ImageMixer for HDD Camcorder" (p.80). • Set the camcorder onto the Handycam Station securely (p.18). • Remove...
Handycam Handbook
Page 126
...Button-type lithium battery 123 126 B&W 57 C CALIBRATION 122 CAMERA DATA 62 CAMERA SET 51 CD-ROM 16, 77, 80 Charging the battery 17 Charging time 19 CHG (charge) lamp 17 CLOCK SET 25 COLOR SLOW S (Color Slow Shutter) ..., 38, 45, 100 DEMO MODE 58 Destination Folder.......... 87, 91 DIGITAL ZOOM 54 DirectX 78 Disc drive ..... 78, 80, 84, 96, 98 DISP OUTPUT 63 DISP/BATT INFO ... 23, 24, 37 DISPLAY 62 Display 78 Display indicators ...-RW 83 D.EFFECT (Digital effect 57, 109 E EASY button 27 Easy Handycam operation 27, 48 Easy PC Back-up 87 Editing images 94 EMPTY HDD 59 EXP.
...Button-type lithium battery 123 126 B&W 57 C CALIBRATION 122 CAMERA DATA 62 CAMERA SET 51 CD-ROM 16, 77, 80 Charging the battery 17 Charging time 19 CHG (charge) lamp 17 CLOCK SET 25 COLOR SLOW S (Color Slow Shutter) ..., 38, 45, 100 DEMO MODE 58 Destination Folder.......... 87, 91 DIGITAL ZOOM 54 DirectX 78 Disc drive ..... 78, 80, 84, 96, 98 DISP OUTPUT 63 DISP/BATT INFO ... 23, 24, 37 DISPLAY 62 Display 78 Display indicators ...-RW 83 D.EFFECT (Digital effect 57, 109 E EASY button 27 Easy Handycam operation 27, 48 Easy PC Back-up 87 Editing images 94 EMPTY HDD 59 EXP.

Handycam Handbook
Page 127
... 94, 96, 98 ImageMixer MPEG Cutter ...94 ImageMixer3 DVD Authoring 97, 98 INDOOR 52 "InfoLITHIUM" battery pack 120 Initialize (Reset 37 Inquire 78 Install 80 Insulation sheet 41 J Jack 76 JPEG 119, 124 L LANDSCAPE 51 LANGUAGE 63 LCD backlight 23 LCD BL LEVEL ..........61, 109 LCD BRIGHT 61 LCD ...21, 32 LETTER BOX 61 LOW 60 LP (Long Play 60 LUMI. H Handycam Station...........16, 17 Hard disk 13, 78 HDD 58, 88, 90, 98 HDD FORMAT 58 HDD INFO 58 HDD SET 58 Highland 8 Hi-Speed USB 78 Holding the camcorder .........21 HQ 60 I Icon ...... KEY (luminance key 57 M Macintosh 78 ...
... 94, 96, 98 ImageMixer MPEG Cutter ...94 ImageMixer3 DVD Authoring 97, 98 INDOOR 52 "InfoLITHIUM" battery pack 120 Initialize (Reset 37 Inquire 78 Install 80 Insulation sheet 41 J Jack 76 JPEG 119, 124 L LANDSCAPE 51 LANGUAGE 63 LCD backlight 23 LCD BL LEVEL ..........61, 109 LCD BRIGHT 61 LCD ...21, 32 LETTER BOX 61 LOW 60 LP (Long Play 60 LUMI. H Handycam Station...........16, 17 Hard disk 13, 78 HDD 58, 88, 90, 98 HDD FORMAT 58 HDD INFO 58 HDD SET 58 Highland 8 Hi-Speed USB 78 Holding the camcorder .........21 HQ 60 I Icon ...... KEY (luminance key 57 M Macintosh 78 ...
Handycam Handbook
Page 128
Pre-installed rechargeable battery 122 Preparation Camcorder 16 Computer 80 Preview 92, 94 Previous/next button.......31, 33 Previous/Next Date button 34, 46, 69 Print 74, 93 PROGRAM AE............51, 108 PROTECT 68 Protection ... 63 Using the Setup items ... 47 SETUP ROTATE 63 Shoe cover 76 Shoulder belt 36 Slide show 36 Slide show button..... 31, 33, 36 Software 80 Sound card 78 SP 60 Speaker 37 SPORTS (Sports lesson) ...... 51 SPOTLIGHT 51 SPOT FOCUS 53, 108 SPOT METER (Flexible spot meter) .... 51, 108 SQUEZE...
Pre-installed rechargeable battery 122 Preparation Camcorder 16 Computer 80 Preview 92, 94 Previous/next button.......31, 33 Previous/Next Date button 34, 46, 69 Print 74, 93 PROGRAM AE............51, 108 PROTECT 68 Protection ... 63 Using the Setup items ... 47 SETUP ROTATE 63 Shoe cover 76 Shoulder belt 36 Slide show 36 Slide show button..... 31, 33, 36 Software 80 Sound card 78 SP 60 Speaker 37 SPORTS (Sports lesson) ...... 51 SPOTLIGHT 51 SPOT FOCUS 53, 108 SPOT METER (Flexible spot meter) .... 51, 108 SQUEZE...
