Operating Guide
Page 11
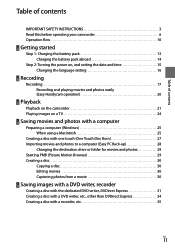
...INSTRUCTIONS 3 Read this before operating your camcorder 6 Operation flow 10 Getting started Step 1: Charging the battery pack 13 Charging the battery pack abroad 14 Step 2: Turning the power on, and setting the date and time 15 Changing the language setting 16 Recording Recording 17 Recording and playing movies and photos easily (Easy Handycam... operation 20 Playback Playback on the camcorder 21 Playing images on a TV 24 Saving movies and photos with a computer Preparing a...
...INSTRUCTIONS 3 Read this before operating your camcorder 6 Operation flow 10 Getting started Step 1: Charging the battery pack 13 Charging the battery pack abroad 14 Step 2: Turning the power on, and setting the date and time 15 Changing the language setting 16 Recording Recording 17 Recording and playing movies and photos easily (Easy Handycam... operation 20 Playback Playback on the camcorder 21 Playing images on a TV 24 Saving movies and photos with a computer Preparing a...

Operating Guide
Page 26
...Handycam Handbook". Confirm that your camcorder is not connected to the computer. Turn on the computer. Log on as an Administrator for installation. Close all applications running on the computer, you agree to the terms, change to , and then click [Next] [Install]. Follow the on-screen instructions... computer screen. Read the terms of your computer. If the installation screen appears, follow the instructions to install the required software. Restart the computer if required to the computer using the supplied ...
...Handycam Handbook". Confirm that your camcorder is not connected to the computer. Turn on the computer. Log on as an Administrator for installation. Close all applications running on the computer, you agree to the terms, change to , and then click [Next] [Install]. Follow the on-screen instructions... computer screen. Read the terms of your computer. If the installation screen appears, follow the instructions to install the required software. Restart the computer if required to the computer using the supplied ...
Operating Guide
Page 28
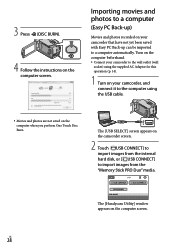
...Movies and photos are not saved on the computer screen. The [Handycam Utility] window appears on the computer when you perform One Touch Disc Burn. The [USB SELECT] screen appears on your camcorder, and connect it to the computer using the supplied AC Adaptor ...camcorder screen. 2 Touch [ USB CONNECT] to import images from the "Memory Stick PRO Duo" media. Importing movies and photos to a computer (Easy PC Back-up can be imported to import images from the internal hard disk, or [ USB CONNECT] to a computer automatically. 3 Press (DISC BURN). 4 Follow the instructions...
...Movies and photos are not saved on the computer screen. The [Handycam Utility] window appears on the computer when you perform One Touch Disc Burn. The [USB SELECT] screen appears on your camcorder, and connect it to the computer using the supplied AC Adaptor ...camcorder screen. 2 Touch [ USB CONNECT] to import images from the "Memory Stick PRO Duo" media. Importing movies and photos to a computer (Easy PC Back-up can be imported to import images from the internal hard disk, or [ USB CONNECT] to a computer automatically. 3 Press (DISC BURN). 4 Follow the instructions...
Operating Guide
Page 41
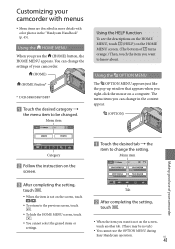
...tab the item to change the setting. You can change the settings of your camcorder Category Follow the instruction on the screen. After completing the setting, touch . When the...appears just like the pop-up window that appears when you can change in the "Handycam Handbook" (p. 45). US 41 Menu item Using the HELP function To see the ... (The bottom of your camcorder. (HOME) (HOME) button* * DCR-SR48/SR67/SR87 Touch the desired category the menu item to know about. Customizing your camcorder with menus Menu...
...tab the item to change the setting. You can change the settings of your camcorder Category Follow the instruction on the screen. After completing the setting, touch . When the...appears just like the pop-up window that appears when you can change in the "Handycam Handbook" (p. 45). US 41 Menu item Using the HELP function To see the ... (The bottom of your camcorder. (HOME) (HOME) button* * DCR-SR48/SR67/SR87 Touch the desired category the menu item to know about. Customizing your camcorder with menus Menu...

Handycam® Handbook
Page 10
...tab the item to change the settings of your camcorder, etc. (HOME) (HOME) button Touch the desired category the menu item to be no tab.) You cannot use the OPTION MENU during Easy Handycam operation. The tabs and items that appears when ...return to know about. The menu items you press (HOME), the HOME MENU appears. Menu item Useful Recording Techniques Index Category Follow the instructions on the screen. After completing the setting, touch . When the item is not on the screen, touch another tab. (There...
...tab the item to change the settings of your camcorder, etc. (HOME) (HOME) button Touch the desired category the menu item to be no tab.) You cannot use the OPTION MENU during Easy Handycam operation. The tabs and items that appears when ...return to know about. The menu items you press (HOME), the HOME MENU appears. Menu item Useful Recording Techniques Index Category Follow the instructions on the screen. After completing the setting, touch . When the item is not on the screen, touch another tab. (There...


