Operating Guide
Page 18
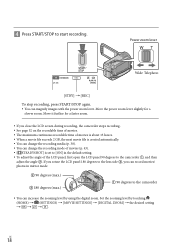
...recording, the camcorder stops recording. See page 52 on the recordable time of movies. The maximum continuous recordable time of movies is about 13 hours. When a movie file exceeds 2 GB, the next movie file is created automatically. You can change the recording media (p. 38). You can change the recording mode... of movies (p. 43). [ STEADYSHOT] is set to [ON] in mirror mode. 90 degrees (max.) 180 ...
...recording, the camcorder stops recording. See page 52 on the recordable time of movies. The maximum continuous recordable time of movies is about 13 hours. When a movie file exceeds 2 GB, the next movie file is created automatically. You can change the recording media (p. 38). You can change the recording mode... of movies (p. 43). [ STEADYSHOT] is set to [ON] in mirror mode. 90 degrees (max.) 180 ...

Operating Guide
Page 21
... the LCD screen is turned on. To turn on the "Memory Stick PRO Duo" media.) US 21 Playback Playback on the camcorder In the default setting, movies and photos on the LCD screen as well. Touch the (Movie) tab a desired movie . If you ... scenes (Face Index) To the list of scenes by pressing (VIEW IMAGES) on the internal hard disk are played (p. 38). To the index screen of recording dates Next To return to recording mode appears with the movie or photo that was most recently played or...
... the LCD screen is turned on. To turn on the "Memory Stick PRO Duo" media.) US 21 Playback Playback on the camcorder In the default setting, movies and photos on the LCD screen as well. Touch the (Movie) tab a desired movie . If you ... scenes (Face Index) To the list of scenes by pressing (VIEW IMAGES) on the internal hard disk are played (p. 38). To the index screen of recording dates Next To return to recording mode appears with the movie or photo that was most recently played or...
Operating Guide
Page 33
It may take more time depending on the recording mode or the number of scenes. You can play back. The disc mark appears on the camcorder screen. DVDirect Express may be cut off. Disc creation time to dub movies to the limit of the disc is reached. US 33 ...Saving images with a DVD writer, recorder The last movie on a general DVD player. If ...
It may take more time depending on the recording mode or the number of scenes. You can play back. The disc mark appears on the camcorder screen. DVDirect Express may be cut off. Disc creation time to dub movies to the limit of the disc is reached. US 33 ...Saving images with a DVD writer, recorder The last movie on a general DVD player. If ...
Operating Guide
Page 52
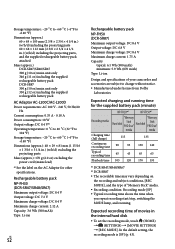
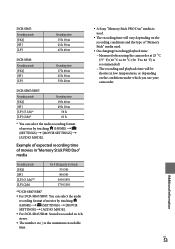
...65 Playback time 105 120 170 195 *2 DCR-SR47/SR48/SR67 *3 DCR-SR87 The recordable time may vary depending on the AC Adaptor for other specifications. In the default setting, the recording mode is [SP] (p. 43). Rechargeable battery pack NP-FH30 (DCR-SR47/SR48/SR67) Maximum output voltage: DC ...pack NP-FH50 (DCR-SR87) Maximum output voltage: DC 8.4 V Output voltage: DC 6.8 V Maximum charge voltage: DC 8.4 V Maximum charge current: 1.75 A Capacity typical: 6.1 Wh (900 mAh) minimum: 5.9 Wh (870 mAh) Type: Li-ion Design and specifications of your camcorder and accessories are subject...
...65 Playback time 105 120 170 195 *2 DCR-SR47/SR48/SR67 *3 DCR-SR87 The recordable time may vary depending on the AC Adaptor for other specifications. In the default setting, the recording mode is [SP] (p. 43). Rechargeable battery pack NP-FH30 (DCR-SR47/SR48/SR67) Maximum output voltage: DC ...pack NP-FH50 (DCR-SR87) Maximum output voltage: DC 8.4 V Output voltage: DC 6.8 V Maximum charge voltage: DC 8.4 V Maximum charge current: 1.75 A Capacity typical: 6.1 Wh (900 mAh) minimum: 5.9 Wh (870 mAh) Type: Li-ion Design and specifications of your camcorder and accessories are subject...
Operating Guide
Page 53
... (SETTINGS) [MOVIE SETTINGS] [AUDIO MODE]. For DCR-SR47/SR48: Sound is recorded in 2ch stereo. The number in ( ) is the minimum recordable time. A Sony "Memory Stick PRO Duo" media is recommended) The recording and playback time will be shorter in minute 55 (50...) 80 (50) 160 (105) 170 (110) ** DCR-SR67/SR87 For DCR-SR67/SR87: You can select the audio recording format of "Memory Stick" media used. On charging/recording/playback time Measured when using the camcorder at 25 C (77 ˚F) (10 C...
... (SETTINGS) [MOVIE SETTINGS] [AUDIO MODE]. For DCR-SR47/SR48: Sound is recorded in 2ch stereo. The number in ( ) is the minimum recordable time. A Sony "Memory Stick PRO Duo" media is recommended) The recording and playback time will be shorter in minute 55 (50...) 80 (50) 160 (105) 170 (110) ** DCR-SR67/SR87 For DCR-SR67/SR87: You can select the audio recording format of "Memory Stick" media used. On charging/recording/playback time Measured when using the camcorder at 25 C (77 ˚F) (10 C...
Operating Guide
Page 55
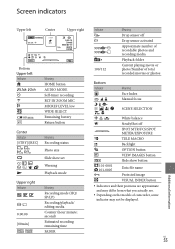
...battery Return button Center Indicator [STBY]/[REC] Meaning Recording status Photo size Slide show set Warning Playback mode Upper right Indicator 0:00:00 [00min] Meaning Recording mode (HQ/ SP/LP) Recording/playback/ editing media Counter (hour:minute: second) Estimated recording remaining time FADER Indicator 9999 9999 100/112 Meaning Drop sensor off... button Indicators and their positions are approximate and may differ from what you actually see. Depending on the models of camcorder, some indicator may not be displayed. US 55 Additional information
...battery Return button Center Indicator [STBY]/[REC] Meaning Recording status Photo size Slide show set Warning Playback mode Upper right Indicator 0:00:00 [00min] Meaning Recording mode (HQ/ SP/LP) Recording/playback/ editing media Counter (hour:minute: second) Estimated recording remaining time FADER Indicator 9999 9999 100/112 Meaning Drop sensor off... button Indicators and their positions are approximate and may differ from what you actually see. Depending on the models of camcorder, some indicator may not be displayed. US 55 Additional information
Handycam® Handbook
Page 8
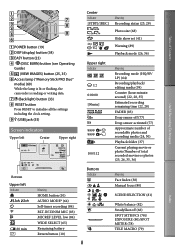
...VIEW IMAGES) button (25, 35) Access lamp ("Memory Stick PRO Duo" media) (60) While the lamp is lit or flashing, the camcorder is reading or writing data. (Back light) button (33) RESET button Press RESET to initialize all the settings including the...Center Indicator [STBY]/[REC] Meaning Recording status (23, 29) Photo size (68) Slide show set (41) Warning (89) Playback mode (26, 36) Upper right Indicator 0:00:00 [00min] 9999 9999 100/112 Meaning Recording mode (HQ/SP/ LP) (64) Recording/playback/ editing media (59) Counter (hour:minute: ...
...VIEW IMAGES) button (25, 35) Access lamp ("Memory Stick PRO Duo" media) (60) While the lamp is lit or flashing, the camcorder is reading or writing data. (Back light) button (33) RESET button Press RESET to initialize all the settings including the...Center Indicator [STBY]/[REC] Meaning Recording status (23, 29) Photo size (68) Slide show set (41) Warning (89) Playback mode (26, 36) Upper right Indicator 0:00:00 [00min] 9999 9999 100/112 Meaning Recording mode (HQ/SP/ LP) (64) Recording/playback/ editing media (59) Counter (hour:minute: ...
Handycam® Handbook
Page 29
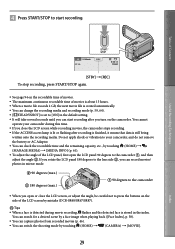
...;, you can start recording. Table of Contents Useful Recording Techniques [STBY] [REC] To stop recording, press START/STOP again. See page 94 on the recordable time of movies. The maximum continuous recordable time of the LCD screen by mistake (DCR-SR48/SR67/SR87). ...the recording media and recording mode (p. 59, 64). [ STEADYSHOT] is stored in the default setting. It will take several seconds until you can record movies/ photos in mirror mode. 90 degrees (max.) 180 degrees (max.) 90 degrees to the camcorder &#...
...;, you can start recording. Table of Contents Useful Recording Techniques [STBY] [REC] To stop recording, press START/STOP again. See page 94 on the recordable time of movies. The maximum continuous recordable time of the LCD screen by mistake (DCR-SR48/SR67/SR87). ...the recording media and recording mode (p. 59, 64). [ STEADYSHOT] is stored in the default setting. It will take several seconds until you can record movies/ photos in mirror mode. 90 degrees (max.) 180 degrees (max.) 90 degrees to the camcorder &#...

Handycam® Handbook
Page 35
Previous Next To return to recording mode To the list of recording dates (p. 39) : Displays the Film Roll Index screen (p. 38). : Displays the Face Index screen (p. 38). : Displays movies. : Displays photos. ... the default setting, movies and photos that was most recently played or recorded. If you touch the movie or photo with the movie or photo that are recorded on the internal hard disk are played (p. 59). Your camcorder is already open, press POWER (p. 19). Press (VIEW IMAGES). Playing movies Open the...
Previous Next To return to recording mode To the list of recording dates (p. 39) : Displays the Film Roll Index screen (p. 38). : Displays the Face Index screen (p. 38). : Displays movies. : Displays photos. ... the default setting, movies and photos that was most recently played or recorded. If you touch the movie or photo with the movie or photo that are recorded on the internal hard disk are played (p. 59). Your camcorder is already open, press POWER (p. 19). Press (VIEW IMAGES). Playing movies Open the...
Handycam® Handbook
Page 55
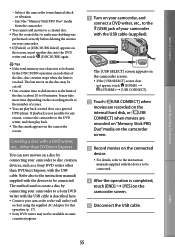
... the wall outlet (wall socket) using the supplied AC Adaptor for any reason, connect the camcorder to be connected. The method used to create a disc by connecting your camcorder to a Sony DVD writer with the devices to the DVD writer, and then play back created discs on a general DVD ... After the operation is completed, touch [END] [YES] on the camcorder screen. Disconnect the USB cable. The last movie on the disc may take more time depending on the recording mode or the number of the disc, disc creation stops when the limit is reached. The [USB...
... the wall outlet (wall socket) using the supplied AC Adaptor for any reason, connect the camcorder to be connected. The method used to create a disc by connecting your camcorder to a Sony DVD writer with the devices to the DVD writer, and then play back created discs on a general DVD ... After the operation is completed, touch [END] [YES] on the camcorder screen. Disconnect the USB cable. The last movie on the disc may take more time depending on the recording mode or the number of the disc, disc creation stops when the limit is reached. The [USB...

Handycam® Handbook
Page 61
...both free and used hard disk space. DCR-SR47: 60,000 MB DCR-SR48: 70,000 MB DCR-SR67/SR87: 80,000 MB Since there is a management file area, the used media space of the recording media. Notes During Easy Handycam...; Notes The calculation for each recording mode is displayed. Tips You can check the remaining recordable time for recording media space is displayed. Table of Contents Useful Recording Techniques Checking the media information You can check the recordable free space, etc., by touching at the...
...both free and used hard disk space. DCR-SR47: 60,000 MB DCR-SR48: 70,000 MB DCR-SR67/SR87: 80,000 MB Since there is a management file area, the used media space of the recording media. Notes During Easy Handycam...; Notes The calculation for each recording mode is displayed. Tips You can check the remaining recordable time for recording media space is displayed. Table of Contents Useful Recording Techniques Checking the media information You can check the recordable free space, etc., by touching at the...
Handycam® Handbook
Page 64
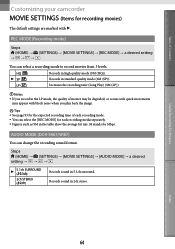
... the recording sound format. AUDIO MODE (DCR-SR67/SR87) You can select a recording mode to record movies from 3 levels. LP ( ) Increases the recording time (Long Play) (3M (LP)). Notes If you play back the image. Tips See page 93 for the expected recording time of Contents Customizing your camcorder MOVIE SETTINGS (Items for Mbps. Records sound...
... the recording sound format. AUDIO MODE (DCR-SR67/SR87) You can select a recording mode to record movies from 3 levels. LP ( ) Increases the recording time (Long Play) (3M (LP)). Notes If you play back the image. Tips See page 93 for the expected recording time of Contents Customizing your camcorder MOVIE SETTINGS (Items for Mbps. Records sound...

Handycam® Handbook
Page 67
... your camcorder recognizes the remaining recording media capacity while the (Movie) lamp lights up When you press DISP to switch the indicator from off to on while the (Movie) lamp lights up When you select the movie recording mode on ...SETTINGS] [ FACE SET] a desired setting ON OFF The camcorder detects faces automatically and displays the Face Index screen (p. 38). Displays the remaining recording time of Contents REMAINING SET Steps (HOME) (SETTINGS) [MOVIE SETTINGS] [ desired setting &#...
... your camcorder recognizes the remaining recording media capacity while the (Movie) lamp lights up When you press DISP to switch the indicator from off to on while the (Movie) lamp lights up When you select the movie recording mode on ...SETTINGS] [ FACE SET] a desired setting ON OFF The camcorder detects faces automatically and displays the Face Index screen (p. 38). Displays the remaining recording time of Contents REMAINING SET Steps (HOME) (SETTINGS) [MOVIE SETTINGS] [ desired setting &#...

Handycam® Handbook
Page 78
This function enables you to [MANUAL]. 78 Index Steps In recording mode, (OPTION) [SPOT MTR/FCS] touch the subject you want to fix and adjust the exposure on stage. Table of Contents Useful Recording Techniques Functions set in the spotlight on the screen [...EXPOSURE] is strong contrast between the subject and the background, such as subjects in the OPTION MENU Items you can set to [MANUAL]. Steps In recording mode, (OPTION) [SPOT METER] touch the point where you want to adjust the brightness and focus on [...
This function enables you to [MANUAL]. 78 Index Steps In recording mode, (OPTION) [SPOT MTR/FCS] touch the subject you want to fix and adjust the exposure on stage. Table of Contents Useful Recording Techniques Functions set in the spotlight on the screen [...EXPOSURE] is strong contrast between the subject and the background, such as subjects in the OPTION MENU Items you can set to [MANUAL]. Steps In recording mode, (OPTION) [SPOT METER] touch the point where you want to adjust the brightness and focus on [...

Handycam® Handbook
Page 79
You can take some time. Adjust the focus manually ([FOCUS], p. 80) when it is useful to focus automatically. Steps In recording mode, (OPTION) [TELE MACRO] a desired setting OFF ON ( ) Cancels TELE MACRO. (TELE MACRO is also canceled... screen. TELE MACRO This is hard to shoot small subjects, such as follows: DCR-SR47/SR48/SR67: down to about 50 cm (19 3/4 in.) DCR-SR87: down to about 38 cm (15 in.) Notes When recording a distant subject, focusing may be focused within the frame on the screen ...
You can take some time. Adjust the focus manually ([FOCUS], p. 80) when it is useful to focus automatically. Steps In recording mode, (OPTION) [TELE MACRO] a desired setting OFF ON ( ) Cancels TELE MACRO. (TELE MACRO is also canceled... screen. TELE MACRO This is hard to shoot small subjects, such as follows: DCR-SR47/SR48/SR67: down to about 50 cm (19 3/4 in.) DCR-SR87: down to about 38 cm (15 in.) Notes When recording a distant subject, focusing may be focused within the frame on the screen ...

Handycam® Handbook
Page 80
..., touch [AUTO]. Notes When you set focus manually 80 Steps In recording mode, (OPTION) (brighter) [EXPOSURE] [MANUAL] (darker)/ Table of a picture manually. Steps In recording mode, (OPTION) [FOCUS] [MANUAL] close range... The minimum possible distance between camcorder and subject while maintaining sharp focus is about 1 cm (about 13/32 in.) for wide angle and about 150 cm (about 59 1/8 in.) (DCR-SR47/SR48/SR67)/80 cm (about 31 1/2 in.) (DCR-SR87) for telephoto. Tips...
..., touch [AUTO]. Notes When you set focus manually 80 Steps In recording mode, (OPTION) (brighter) [EXPOSURE] [MANUAL] (darker)/ Table of a picture manually. Steps In recording mode, (OPTION) [FOCUS] [MANUAL] close range... The minimum possible distance between camcorder and subject while maintaining sharp focus is about 1 cm (about 13/32 in.) for wide angle and about 150 cm (about 59 1/8 in.) (DCR-SR47/SR48/SR67)/80 cm (about 31 1/2 in.) (DCR-SR87) for telephoto. Tips...

Handycam® Handbook
Page 81
...camcorder and the subject. FIREWORKS* ( ) Takes spectacular shots of a candlelit scene. SPORTS** ( ) Select to focus on glass or metal mesh in various situations. CANDLE ( ) Maintains the dim atmosphere of fireworks. Index 81 SPOTLIGHT**( ) Prevents people's faces from focusing on subjects a short distance away. Steps In recording mode..., (OPTION) [SCENE SELECTION] a desired setting AUTO Automatically records images effectively without the [SCENE SELECTION]...
...camcorder and the subject. FIREWORKS* ( ) Takes spectacular shots of a candlelit scene. SPORTS** ( ) Select to focus on glass or metal mesh in various situations. CANDLE ( ) Maintains the dim atmosphere of fireworks. Index 81 SPOTLIGHT**( ) Prevents people's faces from focusing on subjects a short distance away. Steps In recording mode..., (OPTION) [SCENE SELECTION] a desired setting AUTO Automatically records images effectively without the [SCENE SELECTION]...

Handycam® Handbook
Page 82
... or studios where the lighting conditions change quickly Under video lamps in [ONE PUSH] under sodium lamps or incandescent- Steps In recording mode, (OPTION) [WHITE BAL.] a desired setting Table of the recording environment. Notes If you set [SCENE SELECTION], [WHITE BAL.] setting is adjusted automatically.
... or studios where the lighting conditions change quickly Under video lamps in [ONE PUSH] under sodium lamps or incandescent- Steps In recording mode, (OPTION) [WHITE BAL.] a desired setting Table of the recording environment. Notes If you set [SCENE SELECTION], [WHITE BAL.] setting is adjusted automatically.
Handycam® Handbook
Page 83
... effect in [STBY] (to readjust the white balance. Table of Contents Useful Recording Techniques Tips If you have changed the battery pack while [AUTO] was selected, or taken your camcorder outdoors after inside use an effect. Steps In recording mode, (OPTION) [FADER] a desired setting OFF Does...
... effect in [STBY] (to readjust the white balance. Table of Contents Useful Recording Techniques Tips If you have changed the battery pack while [AUTO] was selected, or taken your camcorder outdoors after inside use an effect. Steps In recording mode, (OPTION) [FADER] a desired setting OFF Does...
Handycam® Handbook
Page 84
...) [SELF-TIMER] a desired setting OFF ON ( ) Cancels the self-timer. Useful Recording Techniques Index 84 Starts the self-timer recording. To cancel the recording, touch [RESET]. A photo is not suitable for recording sound. Steps In recording mode, (OPTION) [MICREF LEVEL] a desired setting NORMAL LOW...
...) [SELF-TIMER] a desired setting OFF ON ( ) Cancels the self-timer. Useful Recording Techniques Index 84 Starts the self-timer recording. To cancel the recording, touch [RESET]. A photo is not suitable for recording sound. Steps In recording mode, (OPTION) [MICREF LEVEL] a desired setting NORMAL LOW...


