
Handycam® Handbook
Page 35
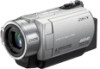
...(Yellow) (White) AUDIO (Red) VIDEO (White) AUDIO (Red) (Yellow) VCRs or TVs 1 A/V connecting cable (supplied) The Handycam Station and your camcorder are both your camcorder to the LINE IN input on the VCR. S VIDEO connection only will not output audio. b Notes • Do not connect ...cable with an S VIDEO cable (optional). Refer also to the instruction manuals supplied with an A/V connecting cable. Connect the A/V connecting cable either to the Handycam Station or to your camcorder, according to your camcorder to [V-OUT/PANEL] (p. 63). The yellow plug connection is connected to...
...(Yellow) (White) AUDIO (Red) VIDEO (White) AUDIO (Red) (Yellow) VCRs or TVs 1 A/V connecting cable (supplied) The Handycam Station and your camcorder are both your camcorder to the LINE IN input on the VCR. S VIDEO connection only will not output audio. b Notes • Do not connect ...cable with an S VIDEO cable (optional). Refer also to the instruction manuals supplied with an A/V connecting cable. Connect the A/V connecting cable either to the Handycam Station or to your camcorder, according to your camcorder to [V-OUT/PANEL] (p. 63). The yellow plug connection is connected to...
Handycam® Handbook
Page 45
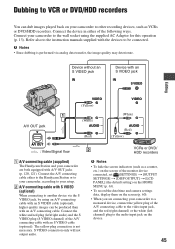
... A/V OUT jack A/V OUT : Video/Signal flow (White) AUDIO (Red) (White) AUDIO (Red) (Yellow) VCRs or DVD/ HDD recorders A A/V connecting cable (supplied) The Handycam Station and your camcorder are connecting your camcorder to the wall socket using an A/V connecting cable with an S VIDEO cable (optional), higher quality images can dub images played back on.... Refer also to be produced than with an A/V connecting cable. Connect the A/V connecting cable either of the A/V connecting cable with the devices to the instruction manuals supplied with an S VIDEO cable (optional).
... A/V OUT jack A/V OUT : Video/Signal flow (White) AUDIO (Red) (White) AUDIO (Red) (Yellow) VCRs or DVD/ HDD recorders A A/V connecting cable (supplied) The Handycam Station and your camcorder are connecting your camcorder to the wall socket using an A/V connecting cable with an S VIDEO cable (optional), higher quality images can dub images played back on.... Refer also to be produced than with an A/V connecting cable. Connect the A/V connecting cable either of the A/V connecting cable with the devices to the instruction manuals supplied with an S VIDEO cable (optional).

Handycam® Handbook
Page 46
...switch to turn on. 3 Connect the (USB) jack of the Handycam Station to the input jacks of the recording device. 4 Start the playback on your camcorder to the printer using a PictBridge compliant printer, without connecting the camcorder to the recording device (VCR or DVD/ HDD recorder) with ...print out still images using the supplied USB cable. 46 Refer to obtain power from the wall socket (p. 13). Connect your camcorder to the AC Adaptor to the instruction manuals supplied with S VIDEO (optional) 2. Set [TV TYPE] according to the display device (p. 62). 2 Insert the recording...
...switch to turn on. 3 Connect the (USB) jack of the Handycam Station to the input jacks of the recording device. 4 Start the playback on your camcorder to the printer using a PictBridge compliant printer, without connecting the camcorder to the recording device (VCR or DVD/ HDD recorder) with ...print out still images using the supplied USB cable. 46 Refer to obtain power from the wall socket (p. 13). Connect your camcorder to the AC Adaptor to the instruction manuals supplied with S VIDEO (optional) 2. Set [TV TYPE] according to the display device (p. 62). 2 Insert the recording...
Handycam® Handbook
Page 47
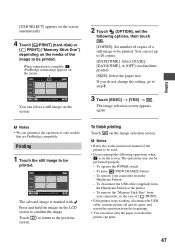
...camcorder from the Handycam Station - The image selection screen appears again. The selected image is on the image selection screen. Touch to return to step 3. 3 Touch [EXEC] t [YES] t . You can print. 47 To remove your camcorder..., go to the previous screen. b Notes • Refer also to the instruction manual of the printer to be used. • Do not attempt the following options, ...Touch on the screen. Editing [USB SELECT] appears on the screen automatically. 4 Touch [ PRINT] (hard disk) or [ PRINT] ("Memory Stick Duo") depending on the screen. 2 Touch (OPTION), set up ...
...camcorder from the Handycam Station - The image selection screen appears again. The selected image is on the image selection screen. Touch to return to step 3. 3 Touch [EXEC] t [YES] t . You can print. 47 To remove your camcorder..., go to the previous screen. b Notes • Refer also to the instruction manual of the printer to be used. • Do not attempt the following options, ...Touch on the screen. Editing [USB SELECT] appears on the screen automatically. 4 Touch [ PRINT] (hard disk) or [ PRINT] ("Memory Stick Duo") depending on the screen. 2 Touch (OPTION), set up ...

Handycam® Handbook
Page 77
...(DCR-SR190E/SR200E/SR290E/ SR300E). The DVDs you can use . For details on the DVDs compatible with your computer, refer to the operations manual ... . If you use a different user account, the image that the Handycam Station is recorded according to the computer. Play them back on the ...data • Compatible with your computer. Then, save images recorded on the hard disk of your computer by a reliable manufacturer. To save images correctly when using ...written to play back some types of DVDs is recorded in your camcorder on a DVD in VIDEO format. The required number of DVDs,...
...(DCR-SR190E/SR200E/SR290E/ SR300E). The DVDs you can use . For details on the DVDs compatible with your computer, refer to the operations manual ... . If you use a different user account, the image that the Handycam Station is recorded according to the computer. Play them back on the ...data • Compatible with your computer. Then, save images recorded on the hard disk of your computer by a reliable manufacturer. To save images correctly when using ...written to play back some types of DVDs is recorded in your camcorder on a DVD in VIDEO format. The required number of DVDs,...

Handycam® Handbook
Page 98
... may not be used during Easy Handycam operation. Turn off your camcorder is extremely low. The auto focus does not function. • Set [FOCUS] to [AUTO] (p. 67). • The recording conditions are recording with [S. Adjust the focus manually (p. 67). [STEADYSHOT] does not function. • Set [... not correctly displayed. • Set the NIGHTSHOT PLUS switch (DCRSR32E/SR33E/SR42E/SR52E/SR62E/ SR72E/SR82E) or NIGHTSHOT switch (DCR-SR190E/SR200E/SR290E/ SR300E) to OFF (p. 27). Turn off the camcorder and take it for a few seconds to turn on the recording conditions...
... may not be used during Easy Handycam operation. Turn off your camcorder is extremely low. The auto focus does not function. • Set [FOCUS] to [AUTO] (p. 67). • The recording conditions are recording with [S. Adjust the focus manually (p. 67). [STEADYSHOT] does not function. • Set [... not correctly displayed. • Set the NIGHTSHOT PLUS switch (DCRSR32E/SR33E/SR42E/SR52E/SR62E/ SR72E/SR82E) or NIGHTSHOT switch (DCR-SR190E/SR200E/SR290E/ SR300E) to OFF (p. 27). Turn off the camcorder and take it for a few seconds to turn on the recording conditions...


