Handycam® Handbook
Page 4
... to remove the battery pack or the AC Adaptor after recording. Doing so may damage the hard disk drive of your camcorder may not operate correctly. In addition to format the hard disk of data occurs on the hard disk. Fragmentation 1 Glossary (p. 127) In this case, a message appears on the LCD screen ... image data on a disc such as DVD-R using your image data periodically, after turning off the POWER switch. Notes on using the Hard Disk Drive Handycam Save all your images on some type of external media first (p. 37), and then perform [ FORMAT] (p. 49). On the drop sensor...
... to remove the battery pack or the AC Adaptor after recording. Doing so may damage the hard disk drive of your camcorder may not operate correctly. In addition to format the hard disk of data occurs on the hard disk. Fragmentation 1 Glossary (p. 127) In this case, a message appears on the LCD screen ... image data on a disc such as DVD-R using your image data periodically, after turning off the POWER switch. Notes on using the Hard Disk Drive Handycam Save all your images on some type of external media first (p. 37), and then perform [ FORMAT] (p. 49). On the drop sensor...
Handycam® Handbook
Page 5
... ratio (16:9 or 4:3) of the recording image ...... 28 Recording the fast action in slow-motion (SMTH SLW REC) (DCR-SR190E/SR200E/SR290E/ SR300E 29 Playback 31 Using PB zoom 33 Searching for desired images by date (Date Index 33 Playing back... HDD/MEMORY) category 49 Formatting the hard disk or the "Memory Stick Duo 49 Checking the hard disk information 50 Preventing data on using the Hard Disk Drive Handycam 4 Subject examples and solutions ..... 7 Enjoying your camcorder 2 Notes on the hard disk of Contents Read this before operating your camcorder Operation flow 8 " HOME" and ...
... ratio (16:9 or 4:3) of the recording image ...... 28 Recording the fast action in slow-motion (SMTH SLW REC) (DCR-SR190E/SR200E/SR290E/ SR300E 29 Playback 31 Using PB zoom 33 Searching for desired images by date (Date Index 33 Playing back... HDD/MEMORY) category 49 Formatting the hard disk or the "Memory Stick Duo 49 Checking the hard disk information 50 Preventing data on using the Hard Disk Drive Handycam 4 Subject examples and solutions ..... 7 Enjoying your camcorder 2 Notes on the hard disk of Contents Read this before operating your camcorder Operation flow 8 " HOME" and ...

Handycam® Handbook
Page 74
... (16 bit color) Others: USB port (this must be provided as standard), DVD burner (CD-ROM drive is necessary for creating a DVD, 5 GB or more Hard disk: Available free hard disk space for installation required: Approximately 600 MB (for installation) When playing still images recorded on a "Memory Stick... computer. On screenshots • The screenshots are recorded into the Memory Stick Duo Adaptor (optional), then insert it , connect your camcorder with the USB cable instead of the computer. • On screenshots in the correct direction. However, imported images and images on ...
... (16 bit color) Others: USB port (this must be provided as standard), DVD burner (CD-ROM drive is necessary for creating a DVD, 5 GB or more Hard disk: Available free hard disk space for installation required: Approximately 600 MB (for installation) When playing still images recorded on a "Memory Stick... computer. On screenshots • The screenshots are recorded into the Memory Stick Duo Adaptor (optional), then insert it , connect your camcorder with the USB cable instead of the computer. • On screenshots in the correct direction. However, imported images and images on ...

Handycam® Handbook
Page 79
...Tips • You can also create a DVD by selecting [One Touch Disc Burn] in the HDD Handycam Utility (p. 80). Also, disconnecting the USB cable improperly may cause a malfunction of the hard disk of your camcorder or of your camcorder (p. 80). • You can also create a DVD by selecting [DISC BURN] on the [...8226; When you insert a burned DVD-RW/DVD+RW in the DVD drive in step 3, a message appears, asking if you want to delete data saved on the LCD screen of your camcorder. 5 Disconnect the USB cable from the Handycam Station and the computer. b Notes • Do not disconnect the USB...
...Tips • You can also create a DVD by selecting [One Touch Disc Burn] in the HDD Handycam Utility (p. 80). Also, disconnecting the USB cable improperly may cause a malfunction of the hard disk of your camcorder or of your camcorder (p. 80). • You can also create a DVD by selecting [DISC BURN] on the [...8226; When you insert a burned DVD-RW/DVD+RW in the DVD drive in step 3, a message appears, asking if you want to delete data saved on the LCD screen of your camcorder. 5 Disconnect the USB cable from the Handycam Station and the computer. b Notes • Do not disconnect the USB...
Handycam® Handbook
Page 80
...1 Turn on the computer. 2 Place the recordable DVD to be saved in the DVD drive of your computer. 3 Connect the Handycam Station to the wall socket using the supplied AC Adaptor. 4 Set the camcorder onto the Handycam Station, then turn the POWER switch to turn on. 80 5 Connect the (USB) ...the DVD properly, import the images to the computer by following the instructions in this operation. • You cannot delete the images on the hard disk of the Handycam Station to a computer using the supplied USB cable. After creating a DVD • After creating a DVD, check that have been imported ...
...1 Turn on the computer. 2 Place the recordable DVD to be saved in the DVD drive of your computer. 3 Connect the Handycam Station to the wall socket using the supplied AC Adaptor. 4 Set the camcorder onto the Handycam Station, then turn the POWER switch to turn on. 80 5 Connect the (USB) ...the DVD properly, import the images to the computer by following the instructions in this operation. • You cannot delete the images on the hard disk of the Handycam Station to a computer using the supplied USB cable. After creating a DVD • After creating a DVD, check that have been imported ...

Handycam® Handbook
Page 81
... Click [OK] when the setting is clicked. To customize the settings of the DVD drive used to save temporary files in the window displayed when [Browse] is completed. 3 Set the camcorder onto the Handycam Station, then turn the POWER switch to the wall socket using the supplied USB cable.... "To perform [One Touch Disc Burn] on the HDD Handycam Utility of a computer". To import images from the camcorder to a computer can import images recorded on the computer screen. The images recorded on the hard disk of your camcorder that have not yet been imported to the computer. When ...
... Click [OK] when the setting is clicked. To customize the settings of the DVD drive used to save temporary files in the window displayed when [Browse] is completed. 3 Set the camcorder onto the Handycam Station, then turn the POWER switch to the wall socket using the supplied USB cable.... "To perform [One Touch Disc Burn] on the HDD Handycam Utility of a computer". To import images from the camcorder to a computer can import images recorded on the computer screen. The images recorded on the hard disk of your camcorder that have not yet been imported to the computer. When ...
Handycam® Handbook
Page 91
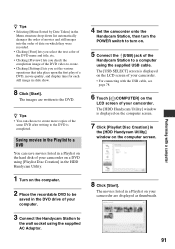
...save movies listed in a Playlist on the hard disk of your camcorder on a DVD using [Playlist Disc Creation] in the HDD Handycam Utility. 1 Turn on the computer. 2 Place the recordable DVD to be saved in the DVD drive of your computer. 3 Connect the Handycam Station to the wall socket using the supplied ... the USB cable, see page 78. 6 Touch [ COMPUTER] on . 5 Connect the (USB) jack of the Handycam Station to a computer using the supplied AC Adaptor. 4 Set the camcorder onto the Handycam Station, then turn the POWER switch to turn on the LCD screen of a DVD, movie quality, and display time...
...save movies listed in a Playlist on the hard disk of your camcorder on a DVD using [Playlist Disc Creation] in the HDD Handycam Utility. 1 Turn on the computer. 2 Place the recordable DVD to be saved in the DVD drive of your computer. 3 Connect the Handycam Station to the wall socket using the supplied ... the USB cable, see page 78. 6 Touch [ COMPUTER] on . 5 Connect the (USB) jack of the Handycam Station to a computer using the supplied AC Adaptor. 4 Set the camcorder onto the Handycam Station, then turn the POWER switch to turn on the LCD screen of a DVD, movie quality, and display time...

Handycam® Handbook
Page 104
...occurred with the hard disk drive in a cool place. Turn off your camcorder and leave it for a while in your Sony dealer or local authorized Sony service facility. Reconnect it for a while in your camcorder is extremely high. Make the camcorder warm. Warning indicators...hard disk of times, contact your camcorder. Contact your camcorder again. Fast flashing* • The temperature of the Handycam Station or your camcorder and leave it and operate your camcorder again. • Turn on the hard disk of the camcorder)* Fast flashing • The hard disk of your camcorder...
...occurred with the hard disk drive in a cool place. Turn off your camcorder and leave it for a while in your Sony dealer or local authorized Sony service facility. Reconnect it for a while in your camcorder is extremely high. Make the camcorder warm. Warning indicators...hard disk of times, contact your camcorder. Contact your camcorder again. Fast flashing* • The temperature of the Handycam Station or your camcorder and leave it and operate your camcorder again. • Turn on the hard disk of the camcorder)* Fast flashing • The hard disk of your camcorder...


