
Handycam® Handbook
Page 3
...points (white, red, blue, or green in Germany, and Sony Corporation, and produces superior images. The number value indicates the ...equipped with a digital still camera, and may cause malfunctions. • Do not aim at dusk. To view your camcorder if necessary (p. 18). About... menu items, LCD panel and lens • A menu item that appear constantly on the LCD screen. These points are used for the contents of light from what you need a PAL system-based TV. • Television programs, films, video tapes, and other DCR-SR32E/SR33E/SR42E...
...points (white, red, blue, or green in Germany, and Sony Corporation, and produces superior images. The number value indicates the ...equipped with a digital still camera, and may cause malfunctions. • Do not aim at dusk. To view your camcorder if necessary (p. 18). About... menu items, LCD panel and lens • A menu item that appear constantly on the LCD screen. These points are used for the contents of light from what you need a PAL system-based TV. • Television programs, films, video tapes, and other DCR-SR32E/SR33E/SR42E...
Handycam® Handbook
Page 4
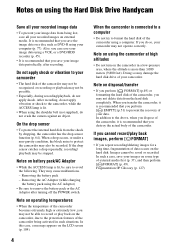
...to prevent the recovery of your data. When you transfer the camcorder, it is recommended that you perform [ FORMAT] (p.49) or formatting the hard disk of the camcorder using your computer (p. 77). Notes on using the Hard Disk Drive Handycam Save all your recorded image data • To prevent your image... shoulder belt (not supplied), do not crash the camera against an object. In addition to remove the battery pack or the AC Adaptor after recording. Fragmentation 1 Glossary (p. 127) They may damage the hard disk drive of the camcorder. In such a case, save your image data ...
...to prevent the recovery of your data. When you transfer the camcorder, it is recommended that you perform [ FORMAT] (p.49) or formatting the hard disk of the camcorder using your computer (p. 77). Notes on using the Hard Disk Drive Handycam Save all your recorded image data • To prevent your image... shoulder belt (not supplied), do not crash the camera against an object. In addition to remove the battery pack or the AC Adaptor after recording. Fragmentation 1 Glossary (p. 127) They may damage the hard disk drive of the camcorder. In such a case, save your image data ...
Handycam® Handbook
Page 9
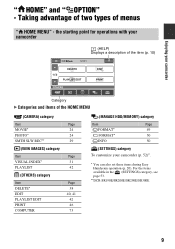
Taking advantage of two types of the HOME MENU (CAMERA) category Item MOVIE* PHOTO* SMTH SLW REC** (VIEW IMAGES) category Item VISUAL INDEX* PLAYLIST (OTHERS) category Item DELETE* EDIT PLAYLIST EDIT PRINT COMPUTER ...operations with your camcorder (HELP) Displays a description of the item (p. 10) Enjoying your camcorder Category B Categories and items of menus " HOME MENU" - " HOME" and " Enjoying your camcorder (p. 52)*. * You can also set these items during Easy Handycam operation (p. 20). For the items available in the (SETTINGS) category, see page 53. **DCR-SR190E/SR200E/SR290E...
Taking advantage of two types of the HOME MENU (CAMERA) category Item MOVIE* PHOTO* SMTH SLW REC** (VIEW IMAGES) category Item VISUAL INDEX* PLAYLIST (OTHERS) category Item DELETE* EDIT PLAYLIST EDIT PRINT COMPUTER ...operations with your camcorder (HELP) Displays a description of the item (p. 10) Enjoying your camcorder Category B Categories and items of menus " HOME MENU" - " HOME" and " Enjoying your camcorder (p. 52)*. * You can also set these items during Easy Handycam operation (p. 20). For the items available in the (SETTINGS) category, see page 53. **DCR-SR190E/SR200E/SR290E...

Handycam® Handbook
Page 24
... (HOME) D (or E) button On the HOME MENU, touch (CAMERA) t [MOVIE] or [PHOTO]. To change the recording media. Recording still images You can record movies on the hard disk of your camcorder in the default setting. To capture high resolution still images during recording a movie (Dual Rec) (DCR-SR190E/SR200E/SR290E/SR300E) t For details, see page...
... (HOME) D (or E) button On the HOME MENU, touch (CAMERA) t [MOVIE] or [PHOTO]. To change the recording media. Recording still images You can record movies on the hard disk of your camcorder in the default setting. To capture high resolution still images during recording a movie (Dual Rec) (DCR-SR190E/SR200E/SR290E/SR300E) t For details, see page...

Handycam® Handbook
Page 29
...DCR-SR190E/SR200E, the size of still images is [ 3.0M] (16:9 (wide)) or [4.0M] (4:3) at maximum. • For DCR...DCR-SR32E/ SR33E/SR42E) 1 Turn ...the POWER switch until the (Movie) lamp lights up . Recording the fast action in slow-motion (SMTH SLW REC) (DCR...-SR190E/SR200E/SR290E/ SR300E) Fast moving subjects and actions, which cannot be captured under the ordinary shooting conditions, can be shot in the angle of still images is useful to shoot fast actions such as a golf or tennis swing. (HOME) B (HOME) A 1 Turn the POWER switch to turn on the camcorder.... DCR-SR52E...
...DCR-SR190E/SR200E, the size of still images is [ 3.0M] (16:9 (wide)) or [4.0M] (4:3) at maximum. • For DCR...DCR-SR32E/ SR33E/SR42E) 1 Turn ...the POWER switch until the (Movie) lamp lights up . Recording the fast action in slow-motion (SMTH SLW REC) (DCR...-SR190E/SR200E/SR290E/ SR300E) Fast moving subjects and actions, which cannot be captured under the ordinary shooting conditions, can be shot in the angle of still images is useful to shoot fast actions such as a golf or tennis swing. (HOME) B (HOME) A 1 Turn the POWER switch to turn on the camcorder.... DCR-SR52E...
Handycam® Handbook
Page 45
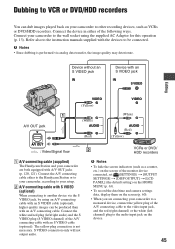
...HOME MENU (p. 63). • To record the date/time and camera settings data, display them on the device. 45 b Notes • To hide the screen indicators (such as VCRs or DVD/HDD recorders. Connect your camcorder to the wall socket using an A/V connecting cable with an S VIDEO... with an A/V connecting cable. S VIDEO connection only will not output audio. Connect the device in either to the Handycam Station or to your camcorder, according to your camcorder to another device via analog data transfer, the image quality may deteriorate. Device without an S VIDEO jack IN Device ...
...HOME MENU (p. 63). • To record the date/time and camera settings data, display them on the device. 45 b Notes • To hide the screen indicators (such as VCRs or DVD/HDD recorders. Connect your camcorder to the wall socket using an A/V connecting cable with an S VIDEO... with an A/V connecting cable. S VIDEO connection only will not output audio. Connect the device in either to the Handycam Station or to your camcorder, according to your camcorder to another device via analog data transfer, the image quality may deteriorate. Device without an S VIDEO jack IN Device ...

Handycam® Handbook
Page 48
... MB - The image edited by other devices - The image recorded by a computer - You can print a still image when viewing it by the Camera & Imaging Products Association (CIPA). If you print a still image recorded in a 16:9 (wide) ratio, the left edges of images may not support ...the date printing function. Refer to a digital video camera or digital still camera, regardless of model or manufacturer. • You can print still images without using a computer by connecting a printer directly to your printer's...
... MB - The image edited by other devices - The image recorded by a computer - You can print a still image when viewing it by the Camera & Imaging Products Association (CIPA). If you print a still image recorded in a 16:9 (wide) ratio, the left edges of images may not support ...the date printing function. Refer to a digital video camera or digital still camera, regardless of model or manufacturer. • You can print still images without using a computer by connecting a printer directly to your printer's...

Handycam® Handbook
Page 55
... 10 × zoom is performed optically, and after that , up to the TV connected for camera shake (the default setting is [ON]). b Notes • Set [TV TYPE] correctly according ... × zoom is performed digitally. The zooming zone appears when you use the digital zoom. DCR-SR32E/SR33E/SR42E: B OFF Up to 40 × zoom is performed optically. 80 × Up to ...is performed optically, and after that the image quality decreases when you select the zooming level. Customizing your camcorder B 4:3 Records images to the full screen on a 16:9 (wide) TV screen. Set [STEADYSHOT] to...
... 10 × zoom is performed optically, and after that , up to the TV connected for camera shake (the default setting is [ON]). b Notes • Set [TV TYPE] correctly according ... × zoom is performed digitally. The zooming zone appears when you use the digital zoom. DCR-SR32E/SR33E/SR42E: B OFF Up to 40 × zoom is performed optically. 80 × Up to ...is performed optically, and after that the image quality decreases when you select the zooming level. Customizing your camcorder B 4:3 Records images to the full screen on a 16:9 (wide) TV screen. Set [STEADYSHOT] to...

Handycam® Handbook
Page 60
...8226; The indicator toggles through the following sequences as you connect your camcorder to set (HOME MENU) t page 52 (OPTION MENU) t page 65 The default settings are marked with B. CAMERA DATA (below) Displays camera setting data. DATE/TIME A Date B Time Still image C SteadyShot... off D Brightness E White balance F Gain G Shutter speed H Aperture value I Exposure z Tips • appears for an image recorded using a flash (except for DCR-SR32E/SR33E/SR42E). • Depending on the hard disk...
...8226; The indicator toggles through the following sequences as you connect your camcorder to set (HOME MENU) t page 52 (OPTION MENU) t page 65 The default settings are marked with B. CAMERA DATA (below) Displays camera setting data. DATE/TIME A Date B Time Still image C SteadyShot... off D Brightness E White balance F Gain G Shutter speed H Aperture value I Exposure z Tips • appears for an image recorded using a flash (except for DCR-SR32E/SR33E/SR42E). • Depending on the hard disk...
Handycam® Handbook
Page 84
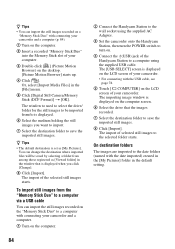
... 5 Click [Digital Still Camera/Memory Stick (DCF Format)] t [OK]. z Tips • You can import the still images recorded on a "Memory Stick Duo" with connecting your camcorder and a computer (p. 84...of your camcorder and a computer. 1 Turn on the computer. 2 Connect the Handycam Station to the wall socket using the supplied AC Adaptor. 3 Set the camcorder onto the Handycam Station, ...on the LCD screen of your camcorder. • For connecting with connecting your computer. 3 Double-click [ ] (Picture Motion Browser) on the computer screen. 6 Select the drive that is displayed. 6 Select...
... 5 Click [Digital Still Camera/Memory Stick (DCF Format)] t [OK]. z Tips • You can import the still images recorded on a "Memory Stick Duo" with connecting your camcorder and a computer (p. 84...of your camcorder and a computer. 1 Turn on the computer. 2 Connect the Handycam Station to the wall socket using the supplied AC Adaptor. 3 Set the camcorder onto the Handycam Station, ...on the LCD screen of your camcorder. • For connecting with connecting your computer. 3 Double-click [ ] (Picture Motion Browser) on the computer screen. 6 Select the drive that is displayed. 6 Select...

Handycam® Handbook
Page 105
... sensor function (p. 64) is activated, and has detected that the camera-shake warning indicator does not disappear. (Warning indicator pertaining to protect the hard disk. Description of the camcorder. x Hard disk Movie folder full. Hold the camcorder steady with the flash. (Warning indicator pertaining to use your camcorder. This will delete all possible situations. Data error. • An...
... sensor function (p. 64) is activated, and has detected that the camera-shake warning indicator does not disappear. (Warning indicator pertaining to protect the hard disk. Description of the camcorder. x Hard disk Movie folder full. Hold the camcorder steady with the flash. (Warning indicator pertaining to use your camcorder. This will delete all possible situations. Data error. • An...

Handycam® Handbook
Page 112
... subject to corrosive gases. On image data compatibility • Image data files recorded on a "Memory Stick Duo" by your camcorder conform to the "Design rule for Camera File system" universal standard established by the JEITA (Japan Electronics and Information Technology Industries Association). • On your... Adaptor/ charger. An "InfoLITHIUM" battery pack is inserted facing in the correct direction, then insert it all information on the Handycam Station or your camcorder, then remove the battery pack. Also, if you can be able to the operating conditions of the unit. Doing so may...
... subject to corrosive gases. On image data compatibility • Image data files recorded on a "Memory Stick Duo" by your camcorder conform to the "Design rule for Camera File system" universal standard established by the JEITA (Japan Electronics and Information Technology Industries Association). • On your... Adaptor/ charger. An "InfoLITHIUM" battery pack is inserted facing in the correct direction, then insert it all information on the Handycam Station or your camcorder, then remove the battery pack. Also, if you can be able to the operating conditions of the unit. Doing so may...

Handycam® Handbook
Page 122
... Displays the date and time or camera setting data of the recorded images when you press any of the Remote Commander 1 While pressing on the tab, inset your camcorder (p. 120). • When no...Insert the battery case back into the slit to pull out the battery case. 2 Place a new battery with a Sony CR2025 lithium battery. To change the battery of b / B / v / V, or ENTER again, the frame .... Use of the Remote Commander may shorten, or the Remote Commander may not function properly. Remote Commander (DCR-SR52E/SR62E/SR72E/SR82E/ SR190E/SR200E/SR290E/SR300E) button or an item with b / B / v...
... Displays the date and time or camera setting data of the recorded images when you press any of the Remote Commander 1 While pressing on the tab, inset your camcorder (p. 120). • When no...Insert the battery case back into the slit to pull out the battery case. 2 Place a new battery with a Sony CR2025 lithium battery. To change the battery of b / B / v / V, or ENTER again, the frame .... Use of the Remote Commander may shorten, or the Remote Commander may not function properly. Remote Commander (DCR-SR52E/SR62E/SR72E/SR82E/ SR190E/SR200E/SR290E/SR300E) button or an item with b / B / v...

Handycam® Handbook
Page 128
... CALIBRATION 115 CAMERA DATA 60 CANDLE 68 CD-ROM 73 Charging time 15 CLOCK SET 17 CLOCK/LANG 63 128 COLOR SLOW SHTR (Color Slow Shutter 70 Compression format........... 111 COMPUTER 73 Hard disk 80, 82... DVD 77, 90 D.EFFECT (Digital effect 71 E Easy Handycam 20 Easy PC Back-up 81 EDIT 40, 41 Editing 38 On the camcorder....40, 41 On the computer 88 EMPTY 51 ERASE 43 ... LEVEL 59 FLASH MODE 72 FOCUS 67 FORMAT Hard disk 49 "Memory Stick Duo" ....50 Fragmentation 127 G GENERAL SET 64 GUIDEFRAME 56 H Handycam Station ........ 13, 121 HDD Handycam Utility 80, 81, 82, 85, 91 ...
... CALIBRATION 115 CAMERA DATA 60 CANDLE 68 CD-ROM 73 Charging time 15 CLOCK SET 17 CLOCK/LANG 63 128 COLOR SLOW SHTR (Color Slow Shutter 70 Compression format........... 111 COMPUTER 73 Hard disk 80, 82... DVD 77, 90 D.EFFECT (Digital effect 71 E Easy Handycam 20 Easy PC Back-up 81 EDIT 40, 41 Editing 38 On the camcorder....40, 41 On the computer 88 EMPTY 51 ERASE 43 ... LEVEL 59 FLASH MODE 72 FOCUS 67 FORMAT Hard disk 49 "Memory Stick Duo" ....50 Fragmentation 127 G GENERAL SET 64 GUIDEFRAME 56 H Handycam Station ........ 13, 121 HDD Handycam Utility 80, 81, 82, 85, 91 ...


