Operating Guide
Page 4
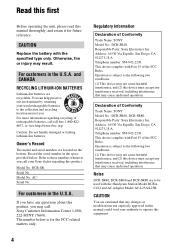
... following two conditions: (1) This device may not cause harmful interference, and (2) this product. DCR-SR Serial No. Notes DCR-SR40, DCR-SR60 and DCR-SR80 are cautioned that may call: Sony Customer Information Center 1-800222-SONY (7669). CAUTION Replace the battery with the Handycam Station Model DCRAC162 and AC Adaptor Model AC-L25A/L25B. Model No. For customers in...
... following two conditions: (1) This device may not cause harmful interference, and (2) this product. DCR-SR Serial No. Notes DCR-SR40, DCR-SR60 and DCR-SR80 are cautioned that may call: Sony Customer Information Center 1-800222-SONY (7669). CAUTION Replace the battery with the Handycam Station Model DCRAC162 and AC Adaptor Model AC-L25A/L25B. Model No. For customers in...
Operating Guide
Page 8
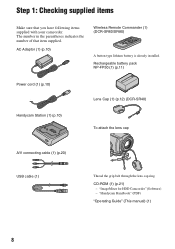
... parentheses indicates the number of that you have following items supplied with your camcorder. Rechargeable battery pack NP-FP50 (1) (p.11) Power cord (1) (p.10) Handycam Station (1) (p.10) Lens Cap (1) (p.12) (DCR-SR40) To attach the lens cap A/V connecting cable (1) (p.20) USB cable (1) Thread the grip belt through the lens cap ring. Step 1: Checking supplied items...
... parentheses indicates the number of that you have following items supplied with your camcorder. Rechargeable battery pack NP-FP50 (1) (p.11) Power cord (1) (p.10) Handycam Station (1) (p.10) Lens Cap (1) (p.12) (DCR-SR40) To attach the lens cap A/V connecting cable (1) (p.20) USB cable (1) Thread the grip belt through the lens cap ring. Step 1: Checking supplied items...
Operating Guide
Page 10
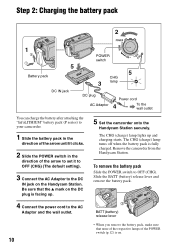
...charge) lamp turns off when the battery pack is facing up and charging starts. Remove the camcorder from the Handycam Station. The CHG (charge) lamp lights up . 5 Set the camcorder onto the Handycam Station securely. To remove the battery pack Slide the POWER switch to OFF (CHG). Slide the BATT (battery) ... respective lamps of the arrow to set it to OFF (CHG) (The default setting). 3 Connect the AC Adaptor to the DC IN jack on the Handycam Station. Step 2: Charging the battery pack 2 1 5 Battery pack DC IN jack POWER switch 5 CHG 3 lamp DC plug AC Adaptor Power cord 4 To...
...charge) lamp turns off when the battery pack is facing up and charging starts. Remove the camcorder from the Handycam Station. The CHG (charge) lamp lights up . 5 Set the camcorder onto the Handycam Station securely. To remove the battery pack Slide the POWER switch to OFF (CHG). Slide the BATT (battery) ... respective lamps of the arrow to set it to OFF (CHG) (The default setting). 3 Connect the AC Adaptor to the DC IN jack on the Handycam Station. Step 2: Charging the battery pack 2 1 5 Battery pack DC IN jack POWER switch 5 CHG 3 lamp DC plug AC Adaptor Power cord 4 To...
Operating Guide
Page 16
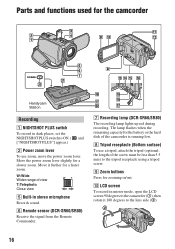
The lamp flashes when the remaining capacity for the battery or the hard disk of the screw must be less than 5.5 mm) to the tripod receptacle using a tripod screw. 9 Zoom buttons Press for zooming in mirror mode, open the ... switch to the lens side (2). 16 q; Parts and functions used for the camcorder Handycam Station Recording 1 NIGHTSHOT PLUS switch To record in stereo microphone Records sound. 6 Remote sensor (DCR-SR60/SR80) Receive the signal from the Remote Commander. 7 Recording lamp (DCR-SR60/SR80) The recording lamp lights up red during recording. Move the power...
The lamp flashes when the remaining capacity for the battery or the hard disk of the screw must be less than 5.5 mm) to the tripod receptacle using a tripod screw. 9 Zoom buttons Press for zooming in mirror mode, open the ... switch to the lens side (2). 16 q; Parts and functions used for the camcorder Handycam Station Recording 1 NIGHTSHOT PLUS switch To record in stereo microphone Records sound. 6 Remote sensor (DCR-SR60/SR80) Receive the signal from the Remote Commander. 7 Recording lamp (DCR-SR60/SR80) The recording lamp lights up red during recording. Move the power...

Operating Guide
Page 17
... Connect to 5 times the original size (Playback zoom). 1 Play back the image you can magnify images from the speaker while playing back. ql REMOTE jack (DCR-SR60/SR80) Connect other devices qj qk ql ....... DVD BURN button Create a DVD by connecting the camcorder to the instructions on EASY button in the... the remaining battery power. To cancel the back light function, press BACK LIGHT again. Connecting to magnify. 2 Magnify the image with the camcorder and the Handycam Station. To cancel, touch [END].
... Connect to 5 times the original size (Playback zoom). 1 Play back the image you can magnify images from the speaker while playing back. ql REMOTE jack (DCR-SR60/SR80) Connect other devices qj qk ql ....... DVD BURN button Create a DVD by connecting the camcorder to the instructions on EASY button in the... the remaining battery power. To cancel the back light function, press BACK LIGHT again. Connecting to magnify. 2 Magnify the image with the camcorder and the Handycam Station. To cancel, touch [END].
Operating Guide
Page 27
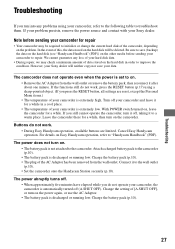
... to "Handycam Handbook" (PDF). Attach a charged battery pack to repair. Change the setting of your Sony dealer will be required to the wall outlet (p.10). • Set the camcorder onto the Handycam Station securely (p.10...Handycam operation, available buttons are reset, except the Personal Menu items.) • The temperature of your Sony dealer. The power abruptly turns off. • When approximately five minutes have elapsed while you press the RESET button, all settings are limited. If your problem persists, remove the power source and contact with your hard disk...
... to "Handycam Handbook" (PDF). Attach a charged battery pack to repair. Change the setting of your Sony dealer will be required to the wall outlet (p.10). • Set the camcorder onto the Handycam Station securely (p.10...Handycam operation, available buttons are reset, except the Personal Menu items.) • The temperature of your Sony dealer. The power abruptly turns off. • When approximately five minutes have elapsed while you press the RESET button, all settings are limited. If your problem persists, remove the power source and contact with your hard disk...
Operating Guide
Page 29
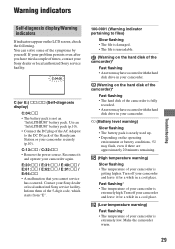
... environment or battery conditions, E may have occurred with the hard disk drive in a cool place. (Low temperature warning) Fast flashing* • The temperature of the Handycam Station or your Sony dealer or local authorized Sony service facility. You can solve some of your camcorder. Reconnect... it for a while in your camcorder. (Warning on the hard disk of the camcorder)* Fast flashing • An error...
... environment or battery conditions, E may have occurred with the hard disk drive in a cool place. (Low temperature warning) Fast flashing* • The temperature of the Handycam Station or your Sony dealer or local authorized Sony service facility. You can solve some of your camcorder. Reconnect... it for a while in your camcorder. (Warning on the hard disk of the camcorder)* Fast flashing • An error...
Operating Guide
Page 34
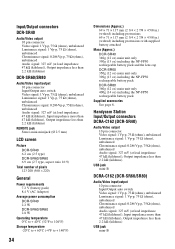
Handycam Station Input/Output connectors DCRA-C162 (DCR-SR40) Audio/Video output 10 pin connector Video signal: 1 Vp-p, 75 Ω (ohms), unbalanced Luminance signal: 1 Vp-p, 75 Ω (ohms), unbalanced Chrominance signal: 0.286 Vp-p, 75... 6.9 cm (2.7 type, aspect ratio 16:9) Total number of pixels 123 200 (560 × 220) General Power requirements 7.2 V (battery pack) 8.4 V (AC Adaptor) Average power consumption DCR-SR40 2.2 W DCR-SR60/SR80 2.8 W Operating temperature 0°C to + 40°C (32°F to 104°F) Storage temperature -20°C to + 60°C (-4°F to + 140°F) ...
Handycam Station Input/Output connectors DCRA-C162 (DCR-SR40) Audio/Video output 10 pin connector Video signal: 1 Vp-p, 75 Ω (ohms), unbalanced Luminance signal: 1 Vp-p, 75 Ω (ohms), unbalanced Chrominance signal: 0.286 Vp-p, 75... 6.9 cm (2.7 type, aspect ratio 16:9) Total number of pixels 123 200 (560 × 220) General Power requirements 7.2 V (battery pack) 8.4 V (AC Adaptor) Average power consumption DCR-SR40 2.2 W DCR-SR60/SR80 2.8 W Operating temperature 0°C to + 40°C (32°F to 104°F) Storage temperature -20°C to + 60°C (-4°F to + 140°F) ...


