
Operating Guide
Page 7
... images on DCR-SR300. • The screenshots are from what you actually see. • Design and specifications of recording media and other accessories are recorded without notice. • Unless otherwise specially indicated, illustrations in this case, an indicator appears on disposal/transfer • If you perform [ FORMAT]* or formatting the hard disk of the camcorder, you need...
... images on DCR-SR300. • The screenshots are from what you actually see. • Design and specifications of recording media and other accessories are recorded without notice. • Unless otherwise specially indicated, illustrations in this case, an indicator appears on disposal/transfer • If you perform [ FORMAT]* or formatting the hard disk of the camcorder, you need...

Operating Guide
Page 28
Windows Media Format 9 Series Runtime (Windows 2000 only) Software required to install the ...sony.net/support-disoft/ Performing various functions - Follow the on the website, you may need to change the recording functions and the operating settings for your convenience. Depending on the screen, touch v/V to install third party software (shown below). To see "Handycam...Browser), appear on the HOME MENU (HELP) 1 Press (HOME). 28 qa Remove the CD-ROM from the disc drive of your camcorder, then press (HOME) A (or B). 2 Touch the desired setup item. 3 Follow the guide on the screen...
Windows Media Format 9 Series Runtime (Windows 2000 only) Software required to install the ...sony.net/support-disoft/ Performing various functions - Follow the on the website, you may need to change the recording functions and the operating settings for your convenience. Depending on the screen, touch v/V to install third party software (shown below). To see "Handycam...Browser), appear on the HOME MENU (HELP) 1 Press (HOME). 28 qa Remove the CD-ROM from the disc drive of your camcorder, then press (HOME) A (or B). 2 Touch the desired setup item. 3 Follow the guide on the screen...
Operating Guide
Page 29
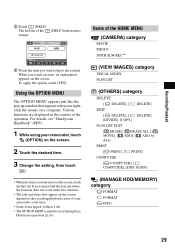
...MENU appears just like the pop-up window that appear on the screen depend on a computer. For details, see "Handycam Handbook" (PDF). 1 While using your camcorder at the time. • Some items appear without a tab. • The OPTION MENU cannot be used during Easy... ALL], [ MOVE], [ ADD], [ ADD by date] PRINT [ PRINT], [ PRINT] COMPUTER [ COMPUTER], [ COMPUTER], [DISC BURN] (MANAGE HDD/MEMORY) category FORMAT FORMAT INFO 29 The bottom of your camcorder, touch (OPTION) on the screen. 2 Touch the desired item. 3 Change the setting, then touch . • When the item you want is not...
...MENU appears just like the pop-up window that appear on the screen depend on a computer. For details, see "Handycam Handbook" (PDF). 1 While using your camcorder at the time. • Some items appear without a tab. • The OPTION MENU cannot be used during Easy... ALL], [ MOVE], [ ADD], [ ADD by date] PRINT [ PRINT], [ PRINT] COMPUTER [ COMPUTER], [ COMPUTER], [DISC BURN] (MANAGE HDD/MEMORY) category FORMAT FORMAT INFO 29 The bottom of your camcorder, touch (OPTION) on the screen. 2 Touch the desired item. 3 Change the setting, then touch . • When the item you want is not...
Operating Guide
Page 33
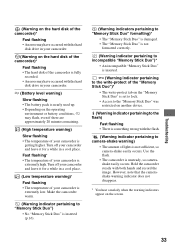
... may have occurred with the hard disk drive in your camcorder. (Warning on the hard disk of the camcorder)* Fast flashing • The hard disk of the camcorder is extremely low. Make the camcorder warm. (Warning indicator pertaining to "Memory Stick Duo") • No "Memory Stick Duo" is inserted (p.16). (Warning indicators pertaining to "Memory Stick Duo" formatting)* • The "Memory Stick...
... may have occurred with the hard disk drive in your camcorder. (Warning on the hard disk of the camcorder)* Fast flashing • The hard disk of the camcorder is extremely low. Make the camcorder warm. (Warning indicator pertaining to "Memory Stick Duo") • No "Memory Stick Duo" is inserted (p.16). (Warning indicators pertaining to "Memory Stick Duo" formatting)* • The "Memory Stick...
Operating Guide
Page 35
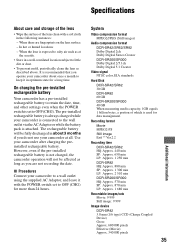
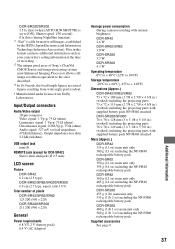
... your camcorder is connected to the wall outlet via the AC Adaptor or while the battery pack is attached. System Video compression format MPEG2/JPEG (Still images) Audio compression format DCR-SR42/SR62/SR82 Dolby Digital 2ch Dolby Digital Stereo Creator DCR-SR200/SR300 Dolby Digital 2/5.1ch Dolby Digital 5.1 Creator Video signal NTSC color, EIA standards Hard Disk DCR...
... your camcorder is connected to the wall outlet via the AC Adaptor or while the battery pack is attached. System Video compression format MPEG2/JPEG (Still images) Audio compression format DCR-SR42/SR62/SR82 Dolby Digital 2ch Dolby Digital Stereo Creator DCR-SR200/SR300 Dolby Digital 2/5.1ch Dolby Digital 5.1 Creator Video signal NTSC color, EIA standards Hard Disk DCR...
Operating Guide
Page 37
... with normal brightness. DCR-SR200/SR300 1.5 lx (lux) (when [AUTO SLW SHUTTR] is a file format for DCR-SR42) Stereo mini-minijack (Ø 2.5 mm) LCD screen Picture DCR-SR42 6.2 cm (2.5 type) DCR-SR62/SR82/SR200/SR300 6.9 cm (2.7 type, aspect ratio 16:9) Total number of Sony's ClearVid CMOS Sensor... NP-FH40 attached DCR-SR200/SR300 76 × 78 × 128 mm (3 × 3 1/8 × 5 1/8 in.) (w×h×d) including the projecting parts 76 × 78 × 149 mm (3 × 3 1/8 × 5 7/8 in this format can have additional information such as your camcorder's setting information at...
... with normal brightness. DCR-SR200/SR300 1.5 lx (lux) (when [AUTO SLW SHUTTR] is a file format for DCR-SR42) Stereo mini-minijack (Ø 2.5 mm) LCD screen Picture DCR-SR42 6.2 cm (2.5 type) DCR-SR62/SR82/SR200/SR300 6.9 cm (2.7 type, aspect ratio 16:9) Total number of Sony's ClearVid CMOS Sensor... NP-FH40 attached DCR-SR200/SR300 76 × 78 × 128 mm (3 × 3 1/8 × 5 1/8 in.) (w×h×d) including the projecting parts 76 × 78 × 149 mm (3 × 3 1/8 × 5 7/8 in this format can have additional information such as your camcorder's setting information at...
Handycam® Handbook
Page 4
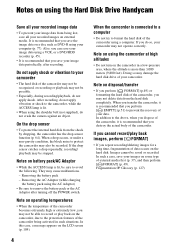
...case, a message appears on disposal/transfer • If you perform [ FORMAT] (p.49) or formatting the hard disk of the camcorder, you cannot record/play back on the hard disk. Note on the LCD screen (p. 104). 4 When the camcorder is connected to a computer • Do not try to the protection ... If you save your images on external media. Fragmentation 1 Glossary (p. 127) Notes on using the Hard Disk Drive Handycam Save all your recorded images on some type of the camcorder being lost, save your image data periodically, after turning off the POWER switch. Do not apply shock...
...case, a message appears on disposal/transfer • If you perform [ FORMAT] (p.49) or formatting the hard disk of the camcorder, you cannot record/play back on the hard disk. Note on the LCD screen (p. 104). 4 When the camcorder is connected to a computer • Do not try to the protection ... If you save your images on external media. Fragmentation 1 Glossary (p. 127) Notes on using the Hard Disk Drive Handycam Save all your recorded images on some type of the camcorder being lost, save your image data periodically, after turning off the POWER switch. Do not apply shock...
Handycam® Handbook
Page 5
...Easy Handycam operation) ......... 20 Recording 23 Zooming 25 Recording sound with more presence (5.1ch surround recording) (DCR-SR200/SR300 25 Using the flash (DCR-SR200/ SR300 26 Capturing high quality still images during movie recording (Dual Rec) (DCR-SR200/SR300 26...) category 49 Formatting the hard disk or the "Memory Stick Duo 49 Checking the hard disk information 50 Preventing data on the hard disk of Contents Read this before operating your camcorder 2 Notes on using the Hard Disk Drive Handycam 4 Subject examples and solutions ..... 7 Enjoying your camcorder Operation flow ...
...Easy Handycam operation) ......... 20 Recording 23 Zooming 25 Recording sound with more presence (5.1ch surround recording) (DCR-SR200/SR300 25 Using the flash (DCR-SR200/ SR300 26 Capturing high quality still images during movie recording (Dual Rec) (DCR-SR200/SR300 26...) category 49 Formatting the hard disk or the "Memory Stick Duo 49 Checking the hard disk information 50 Preventing data on the hard disk of Contents Read this before operating your camcorder 2 Notes on using the Hard Disk Drive Handycam 4 Subject examples and solutions ..... 7 Enjoying your camcorder Operation flow ...
Handycam® Handbook
Page 8
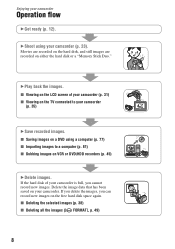
... flow B Get ready (p. 12). If the hard disk of your camcorder (p. 31) x Viewing on the TV connected to a computer (p. 81) x Dubbing images on your camcorder (p. 35) B Save recorded images. Enjoying your camcorder (p. 23). B Shoot using a computer (p. 77) x Importing images to your camcorder. x Deleting the selected images (p. 38) x Deleting all the images ([ FORMAT], p. 49) 8 B Play back the images...
... flow B Get ready (p. 12). If the hard disk of your camcorder (p. 31) x Viewing on the TV connected to a computer (p. 81) x Dubbing images on your camcorder (p. 35) B Save recorded images. Enjoying your camcorder (p. 23). B Shoot using a computer (p. 77) x Importing images to your camcorder. x Deleting the selected images (p. 38) x Deleting all the images ([ FORMAT], p. 49) 8 B Play back the images...
Handycam® Handbook
Page 9
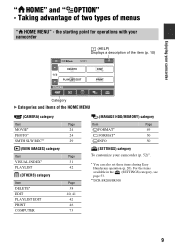
...)*. * You can also set these items during Easy Handycam operation (p. 20). For the items available in the (SETTINGS) category, see page 53. **DCR-SR200/SR300 9 the starting point for operations with your camcorder (HELP) Displays a description of the item (p. 10) Enjoying your camcorder Category B Categories and items of menus " HOME MENU" - Taking advantage of two...* EDIT PLAYLIST EDIT PRINT COMPUTER Page 24 24 29 Page 31 42 Page 38 40, 41 42 46 73 (MANAGE HDD/MEMORY) category Item Page FORMAT* 49 FORMAT* 50 INFO 50 (SETTINGS) category To customize your camcorder OPTION" -
...)*. * You can also set these items during Easy Handycam operation (p. 20). For the items available in the (SETTINGS) category, see page 53. **DCR-SR200/SR300 9 the starting point for operations with your camcorder (HELP) Displays a description of the item (p. 10) Enjoying your camcorder Category B Categories and items of menus " HOME MENU" - Taking advantage of two...* EDIT PLAYLIST EDIT PRINT COMPUTER Page 24 24 29 Page 31 42 Page 38 40, 41 42 46 73 (MANAGE HDD/MEMORY) category Item Page FORMAT* 49 FORMAT* 50 INFO 50 (SETTINGS) category To customize your camcorder OPTION" -

Handycam® Handbook
Page 39
...On the (HOME MENU), touch (OTHERS) t [DELETE] t [ DELETE]. 2 Touch [ DELETE by date] or [ DELETE by this camcorder and stored onto the hard disk are called "original." b Notes • Do not remove the battery pack or the AC Adaptor from the Playlist. To delete all the movies... on the screen. To delete all the recordable space of hard disk, format the hard disk (p. 49). • The images recorded by date] according to the type of the desired image. 4 Touch while the selected recording date is deleted also from your camcorder before the operation. 1 On the (HOME MENU), touch ...
...On the (HOME MENU), touch (OTHERS) t [DELETE] t [ DELETE]. 2 Touch [ DELETE by date] or [ DELETE by this camcorder and stored onto the hard disk are called "original." b Notes • Do not remove the battery pack or the AC Adaptor from the Playlist. To delete all the movies... on the screen. To delete all the recordable space of hard disk, format the hard disk (p. 49). • The images recorded by date] according to the type of the desired image. 4 Touch while the selected recording date is deleted also from your camcorder before the operation. 1 On the (HOME MENU), touch ...

Handycam® Handbook
Page 40
... still image on the hard disk of the selected movie. "Memory Stick Duo" is marked with . The movie pauses. The selected still image is write-protected (p. 111). - z Tips • To delete all still images on the "Memory Stick Duo," format the "Memory Stick Duo... cases: - Returns to the beginning of your camcorder. To delete all images recorded on the "Memory Stick Duo" In step 3, touch [ DELETE ALL] t [YES] t [YES] t . b Notes • During Easy Handycam operation, you press . 5 Touch t [YES] t . 40 Cancel Easy Handycam operation. 1 On the (HOME MENU), touch ...
... still image on the hard disk of the selected movie. "Memory Stick Duo" is marked with . The movie pauses. The selected still image is write-protected (p. 111). - z Tips • To delete all still images on the "Memory Stick Duo," format the "Memory Stick Duo... cases: - Returns to the beginning of your camcorder. To delete all images recorded on the "Memory Stick Duo" In step 3, touch [ DELETE ALL] t [YES] t [YES] t . b Notes • During Easy Handycam operation, you press . 5 Touch t [YES] t . 40 Cancel Easy Handycam operation. 1 On the (HOME MENU), touch ...

Handycam® Handbook
Page 49
...touch . b Notes • To avoid the loss of the camcorder to recover recordable free space to write in. Connect your camcorder to use the hard disk or a "Memory Stick Duo" for this operation (p. 13). b Notes • While [ FORMAT] is activated, do not remove the AC Adaptor or the battery... pack. 49 FORMAT You can display the hard disk capacity (p. 50). Utilizing recording...
...touch . b Notes • To avoid the loss of the camcorder to recover recordable free space to write in. Connect your camcorder to use the hard disk or a "Memory Stick Duo" for this operation (p. 13). b Notes • While [ FORMAT] is activated, do not remove the AC Adaptor or the battery... pack. 49 FORMAT You can display the hard disk capacity (p. 50). Utilizing recording...

Handycam® Handbook
Page 50
... area, the used hard disk space. - DCR-SR82: 60 000MB - DCR-SR42/SR62: 30 000 MB - To operate the POWER switch or buttons - b Notes • Even the still images protected with another device against accidental deletion are discarded when the hard disk space is on your camcorder. 3 On the (HOME MENU), touch (MANAGE HDD/MEMORY) t [ FORMAT]. 4 Touch [YES...
... area, the used hard disk space. - DCR-SR82: 60 000MB - DCR-SR42/SR62: 30 000 MB - To operate the POWER switch or buttons - b Notes • Even the still images protected with another device against accidental deletion are discarded when the hard disk space is on your camcorder. 3 On the (HOME MENU), touch (MANAGE HDD/MEMORY) t [ FORMAT]. 4 Touch [YES...

Handycam® Handbook
Page 51
...MENU), touch (MANAGE HDD/MEMORY) t [ FORMAT]. Connect your camcorder to write non important data onto the hard disk of the camcorder. DCR-SR82: approx. 60 minutes - Utilizing recording media Preventing data on . The [ EMPTY] screen appears. 4 Touch [YES] t [YES]. 5 When [Completed.] appears, touch . DCR-SR200/SR300: approx. 40 minutes • If you ...• You can perform this way, it is connected, then turn the POWER switch to turn on the hard disk of the camcorder from being recovered [ EMPTY] allows you to the wall outlet using the supplied AC Adaptor for a few seconds...
...MENU), touch (MANAGE HDD/MEMORY) t [ FORMAT]. Connect your camcorder to write non important data onto the hard disk of the camcorder. DCR-SR82: approx. 60 minutes - Utilizing recording media Preventing data on . The [ EMPTY] screen appears. 4 Touch [YES] t [YES]. 5 When [Completed.] appears, touch . DCR-SR200/SR300: approx. 40 minutes • If you ...• You can perform this way, it is connected, then turn the POWER switch to turn on the hard disk of the camcorder from being recovered [ EMPTY] allows you to the wall outlet using the supplied AC Adaptor for a few seconds...

Handycam® Handbook
Page 76
.../registration/di/ • For the information about Picture Motion Browser, visit the following URL: http://www.sony.net/support-disoft/ 11Remove the CD-ROM from the disc drive of your computer. The short-cut icons, such as [ ] (Picture Motion Browser), appear on the computer, you can ...get secure and useful customer support. x Windows Media Format 9 Series Runtime (Windows 2000 only) Software required to create a DVD x...
.../registration/di/ • For the information about Picture Motion Browser, visit the following URL: http://www.sony.net/support-disoft/ 11Remove the CD-ROM from the disc drive of your computer. The short-cut icons, such as [ ] (Picture Motion Browser), appear on the computer, you can ...get secure and useful customer support. x Windows Media Format 9 Series Runtime (Windows 2000 only) Software required to create a DVD x...
Handycam® Handbook
Page 77
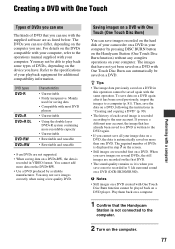
...To save images recorded on the hard disk of your computer by pressing DISC BURN button on the Handycam Station (One Touch Disc Burn...You may not be saved on a DVD, following the instructions in your camcorder on a DVD in "Creating and copying a DVD" (p. 90). &#...DCR-SR200/SR300). The DVDs you save a movie recorded in this operation cannot be played back on more recordable capacity • Unrewritable • Rewritable and reusable • Rewritable and reusable • 8 cm DVDs are not supported. • When saving data on a DVD again after it is displayed in VIDEO format...
...To save images recorded on the hard disk of your computer by pressing DISC BURN button on the Handycam Station (One Touch Disc Burn...You may not be saved on a DVD, following the instructions in your camcorder on a DVD in "Creating and copying a DVD" (p. 90). &#...DCR-SR200/SR300). The DVDs you save a movie recorded in this operation cannot be played back on more recordable capacity • Unrewritable • Rewritable and reusable • Rewritable and reusable • 8 cm DVDs are not supported. • When saving data on a DVD again after it is displayed in VIDEO format...
Handycam® Handbook
Page 84
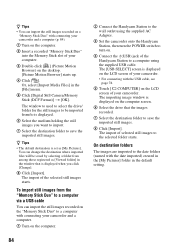
...the (USB) jack of the Handycam Station to a computer with the date imported) created in the [My Pictures] folder in the [File] menu. 5 Click [Digital Still Camera/Memory Stick (DCF Format)] t [OK]. z Tips • The default destination is displayed on the LCD screen of your camcorder. • For connecting with ...images to save the imported still images. Or, select [Import Media Files] in the default setting. 84 The window to used to select the drive/ folder for the still images to be saved by selecting a folder from the "Memory Stick Duo" to a computer via a USB cable You...
...the (USB) jack of the Handycam Station to a computer with the date imported) created in the [My Pictures] folder in the [File] menu. 5 Click [Digital Still Camera/Memory Stick (DCF Format)] t [OK]. z Tips • The default destination is displayed on the LCD screen of your camcorder. • For connecting with ...images to save the imported still images. Or, select [Import Media Files] in the default setting. 84 The window to used to select the drive/ folder for the still images to be saved by selecting a folder from the "Memory Stick Duo" to a computer via a USB cable You...
Handycam® Handbook
Page 96
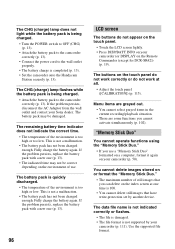
... or flashes. • The file is damaged. • The file format is completed (p. 13). • Set the camcorder onto the Handycam Station securely (p. 13). The CHG (charge) lamp does not light while... Touch the LCD screen lightly. • Press DISP/BATT INFO on the Remote Commander (except for DCR-SR42)) (p. 19). The CHG (charge) lamp flashes while the battery pack is not a malfunction..... If the problem persists, disconnect the AC Adaptor from the wall outlet and contact your camcorder (or DISPLAY on your Sony dealer. This is being charged. • Turn the POWER switch to OFF (CHG)...
... or flashes. • The file is damaged. • The file format is completed (p. 13). • Set the camcorder onto the Handycam Station securely (p. 13). The CHG (charge) lamp does not light while... Touch the LCD screen lightly. • Press DISP/BATT INFO on the Remote Commander (except for DCR-SR42)) (p. 19). The CHG (charge) lamp flashes while the battery pack is not a malfunction..... If the problem persists, disconnect the AC Adaptor from the wall outlet and contact your camcorder (or DISPLAY on your Sony dealer. This is being charged. • Turn the POWER switch to OFF (CHG)...
Handycam® Handbook
Page 97
...format the "Memory Stick Duo" (p. 50). Recording Refer also to a warm place. Turn off the camcorder and take it for a while, then turn on the condition of the camcorder is extremely low. You cannot make new recording during movie recording (DCR-SR200/ SR300). • The "Memory Stick Duo" has run out of the hard disk.... • Depending on the hard disk. Leave the camcorder there for a while...
...format the "Memory Stick Duo" (p. 50). Recording Refer also to a warm place. Turn off the camcorder and take it for a while, then turn on the condition of the camcorder is extremely low. You cannot make new recording during movie recording (DCR-SR200/ SR300). • The "Memory Stick Duo" has run out of the hard disk.... • Depending on the hard disk. Leave the camcorder there for a while...


