
Operating Guide
Page 7
...camcorder • The hard disk of the camcorder may not be recognized, or recording or playback may be possible. About language setting • The on-screen displays in each local language are based on the camcorder, due to the protection features of the camcorder...8226; The camcorder is not dustproofed, dripproofed or waterproofed. If the drop sensor catches a drop repeatedly, recording/play back on DCR-SR300. •... may not operate correctly. In addition to "Handycam Handbook" (PDF). 7 The scenes may damage the hard disk drive of the POWER switch (p.13) or the ...
...camcorder • The hard disk of the camcorder may not be recognized, or recording or playback may be possible. About language setting • The on-screen displays in each local language are based on the camcorder, due to the protection features of the camcorder...8226; The camcorder is not dustproofed, dripproofed or waterproofed. If the drop sensor catches a drop repeatedly, recording/play back on DCR-SR300. •... may not operate correctly. In addition to "Handycam Handbook" (PDF). 7 The scenes may damage the hard disk drive of the POWER switch (p.13) or the ...

Operating Guide
Page 8
... and time 13 Changing the language setting 13 Step 4: Preparing for recording 14 Recording/Playback Recording 15 Playback 17 Parts and functions used for the camcorder 19 Indicators displayed during recording/playback 22 Saving images 24 Deleting images 24 Playing the image on a TV 25 Performing with a computer 26 Performing various functions -
... and time 13 Changing the language setting 13 Step 4: Preparing for recording 14 Recording/Playback Recording 15 Playback 17 Parts and functions used for the camcorder 19 Indicators displayed during recording/playback 22 Saving images 24 Deleting images 24 Playing the image on a TV 25 Performing with a computer 26 Performing various functions -

Operating Guide
Page 13
..., and setting the date and time Touch the button on the LCD screen. 1 While pressing the green button, turn on the hard disc, and can change the on-screen displays to 4:3 automatically. 2 Select the desired geographical area with v/V, then touch [NEXT]. 3 Set [DST SET] or [SUMMERTIME], ...[Y] (year), [M] (month), [D] (day), hour and minute. • The date and time does not appear during playback. POWER switch When using the camcorder for ...
..., and setting the date and time Touch the button on the LCD screen. 1 While pressing the green button, turn on the hard disc, and can change the on-screen displays to 4:3 automatically. 2 Select the desired geographical area with v/V, then touch [NEXT]. 3 Set [DST SET] or [SUMMERTIME], ...[Y] (year), [M] (month), [D] (day), hour and minute. • The date and time does not appear during playback. POWER switch When using the camcorder for ...
Operating Guide
Page 17
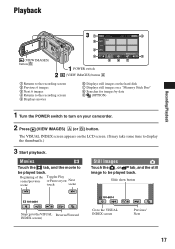
... on your camcorder. 2 Press (VIEW IMAGES) A (or B) button. Movies Touch the tab, and the movie to display the thumbnails.) 3 Start playback. Playback Recording/Playback (VIEW IMAGES) button B POWER switch (VIEW IMAGES) button A 1 Returns to the recording screen 2 Previous 6 images 3 Next 6 images 4 Returns to the recording screen 5 Displays movies 6 Displays still images on the hard disk 7 Displays still...
... on your camcorder. 2 Press (VIEW IMAGES) A (or B) button. Movies Touch the tab, and the movie to display the thumbnails.) 3 Start playback. Playback Recording/Playback (VIEW IMAGES) button B POWER switch (VIEW IMAGES) button A 1 Returns to the recording screen 2 Previous 6 images 3 Next 6 images 4 Returns to the recording screen 5 Displays movies 6 Displays still images on the hard disk 7 Displays still...

Operating Guide
Page 20
... you press while the power is set to OFF (CHG), you touched will be turned on your camcorder. qg Shoulder belt hook Attach the shoulder belt (optional). Zoom buttons You can switch the screen display when you operate the POWER switch on or off as a video light, a flash, or a microphone.... Zoom buttons Press for zooming in the center of the screw must be less than 5.5 mm (7/32 in mirror mode, open the LCD screen 90 degrees to the camcorder (1), then rotate...
... you press while the power is set to OFF (CHG), you touched will be turned on your camcorder. qg Shoulder belt hook Attach the shoulder belt (optional). Zoom buttons You can switch the screen display when you operate the POWER switch on or off as a video light, a flash, or a microphone.... Zoom buttons Press for zooming in the center of the screw must be less than 5.5 mm (7/32 in mirror mode, open the LCD screen 90 degrees to the camcorder (1), then rotate...
Operating Guide
Page 22
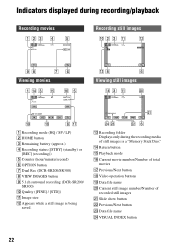
... Recording folder Displays only during recording/playback Recording movies Recording still images Viewing movies Viewing still images 1 Recording mode (HQ / SP / LP) 2 HOME button 3 Remaining battery (approx.) 4 Recording status ([STBY] (standby) or [REC] (recording)) 5 Counter (hour/minute/second) 6 OPTION button 7 Dual Rec (DCR-SR200/SR300) 8 VIEW IMAGES button 9 5.1ch surround recording (DCR-SR200/ SR300) q; Current...
... Recording folder Displays only during recording/playback Recording movies Recording still images Viewing movies Viewing still images 1 Recording mode (HQ / SP / LP) 2 HOME button 3 Remaining battery (approx.) 4 Recording status ([STBY] (standby) or [REC] (recording)) 5 Counter (hour/minute/second) 6 OPTION button 7 Dual Rec (DCR-SR200/SR300) 8 VIEW IMAGES button 9 5.1ch surround recording (DCR-SR200/ SR300) q; Current...
Operating Guide
Page 23
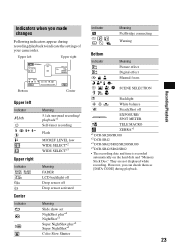
... when you can check them as [DATA CODE] during recording/playback to indicate the settings of your camcorder. They are not displayed while recording. However, you made changes Following indicators appear during playback. 23 Recording/Playback Upper left Upper... backlight off Drop sensor off EXPOSURE/ SPOT METER TELE MACRO ZEBRA*1 *1 DCR-SR200/SR300 *2 DCR-SR42 *3 DCR-SR62/SR82/SR200/SR300 *4 DCR-SR42/SR62/SR82 • The recording date and time is recorded automatically on the hard disk and "Memory Stick Duo." Backlight n White balance SteadyShot off Drop sensor ...
... when you can check them as [DATA CODE] during recording/playback to indicate the settings of your camcorder. They are not displayed while recording. However, you made changes Following indicators appear during playback. 23 Recording/Playback Upper left Upper... backlight off Drop sensor off EXPOSURE/ SPOT METER TELE MACRO ZEBRA*1 *1 DCR-SR200/SR300 *2 DCR-SR42 *3 DCR-SR62/SR82/SR200/SR300 *4 DCR-SR42/SR62/SR82 • The recording date and time is recorded automatically on the hard disk and "Memory Stick Duo." Backlight n White balance SteadyShot off Drop sensor ...

Operating Guide
Page 27
...8226; If you use a Notebook computer, connect it at this must be provided as standard), Disc drive that your camcorder is set up for your selected country/region. 7 Read [License Agreement], select [I accept the ...drive of the computer. The sound is required only for the first time. Restart your computer after completing the installation. 27 Provide the camcorder and the Handycam Station, and a USB cable beforehand. Recording/Playback Hard disk: Available free hard disk space for installation required: Approximately 600 MB (for creating a DVD, 5 GB or more may be required) Display...
...8226; If you use a Notebook computer, connect it at this must be provided as standard), Disc drive that your camcorder is set up for your selected country/region. 7 Read [License Agreement], select [I accept the ...drive of the computer. The sound is required only for the first time. Restart your computer after completing the installation. 27 Provide the camcorder and the Handycam Station, and a USB cable beforehand. Recording/Playback Hard disk: Available free hard disk space for installation required: Approximately 600 MB (for creating a DVD, 5 GB or more may be required) Display...
Operating Guide
Page 29
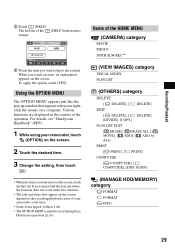
Various functions are displayed in the context of the HOME MENU (CAMERA) category MOVIE PHOTO SMTH SLW ... COMPUTER [ COMPUTER], [ COMPUTER], [DISC BURN] (MANAGE HDD/MEMORY) category FORMAT FORMAT INFO 29 For details, see "Handycam Handbook" (PDF). 1 While using your camcorder at the time. • Some items appear without a tab. • The OPTION MENU cannot be used during Easy... tabs and items that appears when you want is not on the screen, touch another tab. The bottom of your camcorder, touch (OPTION) on the screen. 2 Touch the desired item. 3 Change the setting, then touch . •...
Various functions are displayed in the context of the HOME MENU (CAMERA) category MOVIE PHOTO SMTH SLW ... COMPUTER [ COMPUTER], [ COMPUTER], [DISC BURN] (MANAGE HDD/MEMORY) category FORMAT FORMAT INFO 29 For details, see "Handycam Handbook" (PDF). 1 While using your camcorder at the time. • Some items appear without a tab. • The OPTION MENU cannot be used during Easy... tabs and items that appears when you want is not on the screen, touch another tab. The bottom of your camcorder, touch (OPTION) on the screen. 2 Touch the desired item. 3 Change the setting, then touch . •...
Operating Guide
Page 30
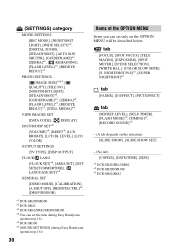
...DISPLAY] SOUND/DISP SET*6 [VOLUME]*4, [BEEP]*4, [LCD BRIGHT], [LCD BL LEVEL], [LCD COLOR] OUTPUT SETTINGS [TV TYPE], [DISP OUTPUT] CLOCK/ LANG [CLOCK SET]*4, [AREA SET], [DST SET]/[SUMMERTIME], [ LANGUAGE SET]*4 GENERAL SET [DEMO MODE], [CALIBRATION], [A.SHUT OFF], [REMOTE CTRL]*3, [DROP SENSOR] *1 DCR-SR200/SR300 *2 DCR-SR42 *3 DCR-SR62/SR82/SR200.../SR300 *4 You can set the item during Easy Handycam operation (p.16). *5 DCR-SR300 *6 [SOUND SETTINGS] (during Easy Handycam operation (p.16)) 30 Items of the ...
...DISPLAY] SOUND/DISP SET*6 [VOLUME]*4, [BEEP]*4, [LCD BRIGHT], [LCD BL LEVEL], [LCD COLOR] OUTPUT SETTINGS [TV TYPE], [DISP OUTPUT] CLOCK/ LANG [CLOCK SET]*4, [AREA SET], [DST SET]/[SUMMERTIME], [ LANGUAGE SET]*4 GENERAL SET [DEMO MODE], [CALIBRATION], [A.SHUT OFF], [REMOTE CTRL]*3, [DROP SENSOR] *1 DCR-SR200/SR300 *2 DCR-SR42 *3 DCR-SR62/SR82/SR200.../SR300 *4 You can set the item during Easy Handycam operation (p.16). *5 DCR-SR300 *6 [SOUND SETTINGS] (during Easy Handycam operation (p.16)) 30 Items of the ...

Operating Guide
Page 31
... work . • During Easy Handycam operation, available buttons/functions are reset.) • The temperature of your camcorder is extremely low. This is displayed. Change the setting of [A.SHUT OFF], or turn on . • Attach a charged battery pack to the camcorder (p.11). • Connect the...sure to shoot after about 1 minute. However, your Sony dealer will be ready to save the data on the internal hard disk (see "Handycam Handbook" (PDF)) on other media (backup) before sending your camcorder for repair • Your camcorder may check a minimum amount of data stored on . ...
... work . • During Easy Handycam operation, available buttons/functions are reset.) • The temperature of your camcorder is extremely low. This is displayed. Change the setting of [A.SHUT OFF], or turn on . • Attach a charged battery pack to the camcorder (p.11). • Connect the...sure to shoot after about 1 minute. However, your Sony dealer will be ready to save the data on the internal hard disk (see "Handycam Handbook" (PDF)) on other media (backup) before sending your camcorder for repair • Your camcorder may check a minimum amount of data stored on . ...

Operating Guide
Page 32
...occurred. Self-diagnosis display/Warning indicators If indicators appear on your camcorder again. Use an "InfoLITHIUM" battery pack (p.11). • Connect the DC plug of the AC Adaptor to files) Slow flashing • The file is damaged. • The file is closed (DCR-SR42/ SR62/SR82)....you can fix by yourself. Contact your Sony dealer or local authorized Sony service facility. Inform them of the 5-digit code, which starts from "E." 101-0001 (Warning indicator pertaining to the DC IN jack of the Handycam Station or your camcorder securely (p.11). Lights appear on the screen...
...occurred. Self-diagnosis display/Warning indicators If indicators appear on your camcorder again. Use an "InfoLITHIUM" battery pack (p.11). • Connect the DC plug of the AC Adaptor to files) Slow flashing • The file is damaged. • The file is closed (DCR-SR42/ SR62/SR82)....you can fix by yourself. Contact your Sony dealer or local authorized Sony service facility. Inform them of the 5-digit code, which starts from "E." 101-0001 (Warning indicator pertaining to the DC IN jack of the Handycam Station or your camcorder securely (p.11). Lights appear on the screen...


