Insert: Getting Online with your Camera
Page 2
... ISP setting procedure DCR-IP7BT DCR-PC120BT DCR-TRV50, 950 DCR-IP55 Not compatible Not compatible P.37 P.39 P.23 P.28 DCR-TRV80, 70, 39 P.48 P.54 P.32 DCR-IP220 P.37 P.43 P.27 * If you do not have a PC or Internet access, please call 1-800-222-SONY for assistance. For... further information...? Customer must separately acquire its desired dial-up ISP service.) Please refer to the table below for the page number in the Operating Instructions manual containing the appropriate instructions for connecting your Network Handycam camcorder to ...
... ISP setting procedure DCR-IP7BT DCR-PC120BT DCR-TRV50, 950 DCR-IP55 Not compatible Not compatible P.37 P.39 P.23 P.28 DCR-TRV80, 70, 39 P.48 P.54 P.32 DCR-IP220 P.37 P.43 P.27 * If you do not have a PC or Internet access, please call 1-800-222-SONY for assistance. For... further information...? Customer must separately acquire its desired dial-up ISP service.) Please refer to the table below for the page number in the Operating Instructions manual containing the appropriate instructions for connecting your Network Handycam camcorder to ...
MovieShaker v3.1 Operating Instructions
Page 2
...; Other system names and product names appearing in this document are generally registered trademarks or trademarks of Sony Corporation. MovieShaker is a trademark of Sony Corporation. About the screenshots used in this manual: The screenshots used in this manual may be utilized (utilised) for any inability to make video or audio files recordings that specified...
...; Other system names and product names appearing in this document are generally registered trademarks or trademarks of Sony Corporation. MovieShaker is a trademark of Sony Corporation. About the screenshots used in this manual: The screenshots used in this manual may be utilized (utilised) for any inability to make video or audio files recordings that specified...

MovieShaker v3.1 Operating Instructions
Page 3
Table of Contents Before Use What you can do with MovieShaker 5 Precautions for Use 6 About the MICROMV 6 Using MovieShaker 7 How to Use this Manual 9 How to Use this Help 9 Installing the software 11 To install MovieShaker 11 To Install QuickTime 5 16 To Install DirectX 8.0a 17 If you are ...
Table of Contents Before Use What you can do with MovieShaker 5 Precautions for Use 6 About the MICROMV 6 Using MovieShaker 7 How to Use this Manual 9 How to Use this Help 9 Installing the software 11 To install MovieShaker 11 To Install QuickTime 5 16 To Install DirectX 8.0a 17 If you are ...
MovieShaker v3.1 Operating Instructions
Page 9
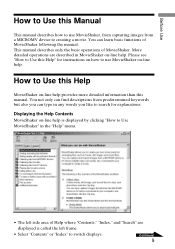
...," "Index," and "Search" are described in any words you can type in MovieShaker on-line help provides more detailed information than this manual. More detailed operations are displayed is called the left frame. • Select "Contents" or "Index" to use MovieShaker, from capturing images... on how to switch displays. Continued 9 Before Use How to Use this Manual This manual describes how to use MovieShaker on-line help. This manual describes only the basic operations of MovieShaker following the manual. How to creating a movie. You not only can learn basic functions of...
...," "Index," and "Search" are described in any words you can type in MovieShaker on-line help provides more detailed information than this manual. More detailed operations are displayed is called the left frame. • Select "Contents" or "Index" to use MovieShaker, from capturing images... on how to switch displays. Continued 9 Before Use How to Use this Manual This manual describes how to use MovieShaker on-line help. This manual describes only the basic operations of MovieShaker following the manual. How to creating a movie. You not only can learn basic functions of...
MovieShaker v3.1 Operating Instructions
Page 23
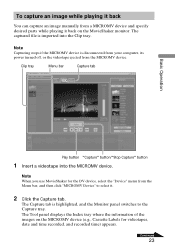
... the Capture tray. The Capture tab is imported into the MICROMV device. To capture an image while playing it back You can capture an image manually from a MICROMV device and specify desired parts while playing it . 2 Click the Capture tab. The captured file is highlighted, and the Monitor panel switches to...
... the Capture tray. The Capture tab is imported into the MICROMV device. To capture an image while playing it back You can capture an image manually from a MICROMV device and specify desired parts while playing it . 2 Click the Capture tab. The captured file is highlighted, and the Monitor panel switches to...
Network Function Operating Instructions
Page 2
...accept any interference, including interference that is installed outdoors is insufficient in NETWORK mode. If you use the network function without setting the clock, you may be lost when the camcorder is repaired by Sony Corporation on 1. 8. 2001) When using the battery pack When ... AC power adaptor while in NETWORK mode, use "Setup memo", described on network operation when using the camcorder in a country or area not described above, the network function is available only in this device is subject to the licensed service, this manual. Furthermore, "™" and...
...accept any interference, including interference that is installed outdoors is insufficient in NETWORK mode. If you use the network function without setting the clock, you may be lost when the camcorder is repaired by Sony Corporation on 1. 8. 2001) When using the battery pack When ... AC power adaptor while in NETWORK mode, use "Setup memo", described on network operation when using the camcorder in a country or area not described above, the network function is available only in this device is subject to the licensed service, this manual. Furthermore, "™" and...

Network Function Operating Instructions
Page 27
Preparation Setting network preferences Note Although you have selected a specific time for the "Time Out" function, the line connection may be able to access the ..."Note on "Save Mail to email. Reset: Reset all the items on the Web page you try to be cancelled automatically, depends on the Network Options screen except "Signature" and "Modem Init". Note If you access. Mail Send&Receive: Select whether to accept a cookie. Signature: Set up...This item is checked at the default setting. Note A verification message does not appear when you can cancel the line connection manually.
Preparation Setting network preferences Note Although you have selected a specific time for the "Time Out" function, the line connection may be able to access the ..."Note on "Save Mail to email. Reset: Reset all the items on the Web page you try to be cancelled automatically, depends on the Network Options screen except "Signature" and "Modem Init". Note If you access. Mail Send&Receive: Select whether to accept a cookie. Signature: Set up...This item is checked at the default setting. Note A verification message does not appear when you can cancel the line connection manually.

Network Function Operating Instructions
Page 40
Be careful to "Accessing the network" in the address book. Up to 50 addresses can send email without entering the e-mail address manually. Registering destination addresses in the address book You can register frequently used e-mail addresses in the address book, you register frequently used e-mail addresses in ...
Be careful to "Accessing the network" in the address book. Up to 50 addresses can send email without entering the e-mail address manually. Registering destination addresses in the address book You can register frequently used e-mail addresses in the address book, you register frequently used e-mail addresses in ...

Network Function Operating Instructions
Page 72
... the following ; Check the connection status. • The telephone number entered on the PPP screen during manual setup may be broken. Exit the NETWORK mode, then enter the NETWORK mode again. Register the Bluetooth device (p. 15). Check the setup. The "Memory Stick" may be wrong... device is missing, set up again referring to a telephone terminal. exit the NETWORK mode, turn off . • The Bluetooth device is connected to your notes. Check the corresponding descriptions in manual setup may be wrong. Messages Various messages appear on "Verify Password", see "...
... the following ; Check the connection status. • The telephone number entered on the PPP screen during manual setup may be broken. Exit the NETWORK mode, then enter the NETWORK mode again. Register the Bluetooth device (p. 15). Check the setup. The "Memory Stick" may be wrong... device is missing, set up again referring to a telephone terminal. exit the NETWORK mode, turn off . • The Bluetooth device is connected to your notes. Check the corresponding descriptions in manual setup may be wrong. Messages Various messages appear on "Verify Password", see "...

Network Function Operating Instructions
Page 73
...not set up the clock. Loading Error Connect to the page again after a while. • Your password entered on the Mail screen during manual setup may be wrong. • The DNS entry on the camcorder. Your password entered on the camcorder. Browser Message Meaning You are About to... that the page is safe, select [OK], then press the centre z on the control button. Check this page on the Mail screen during manual setup may be wrong. Opening Error Invalid File Type You cannot display this item. • Connect to Continue? Additional Information Messages E-mail Message ...
...not set up the clock. Loading Error Connect to the page again after a while. • Your password entered on the Mail screen during manual setup may be wrong. • The DNS entry on the camcorder. Your password entered on the camcorder. Browser Message Meaning You are About to... that the page is safe, select [OK], then press the centre z on the control button. Check this page on the Mail screen during manual setup may be wrong. Opening Error Invalid File Type You cannot display this item. • Connect to Continue? Additional Information Messages E-mail Message ...

Operating Instructions
Page 1
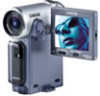
Serial No. Model No. DCR-IP5/IP7BT ©2001 Sony Corporation Model No. AC- 3-069-933-12 (1) Digital Video Camera Recorder Operating Instructions Before operating the unit, please read this product. Owner's Record The model and serial numbers are located on the bottom. Record the serial number in the space provided below. Refer to these numbers whenever you call upon your Sony dealer regarding this manual thoroughly, and retain it for future reference. Serial No.
Serial No. Model No. DCR-IP5/IP7BT ©2001 Sony Corporation Model No. AC- 3-069-933-12 (1) Digital Video Camera Recorder Operating Instructions Before operating the unit, please read this product. Owner's Record The model and serial numbers are located on the bottom. Record the serial number in the space provided below. Refer to these numbers whenever you call upon your Sony dealer regarding this manual thoroughly, and retain it for future reference. Serial No.

Operating Instructions
Page 3
Telephone No.: 201-930-6972 This device complies with Part 15 of Conformity Trade Name: SONY Model No.: DCR-IP5, DCR-IP7 Responsible Party:Sony Electronics Inc. However, there is encouraged to try to radio communications. CAUTION You are ...designed to which can radiate radio frequency energy and, if not installed and used in this equipment. Note: This equipment has been tested and found to operate this manual...
Telephone No.: 201-930-6972 This device complies with Part 15 of Conformity Trade Name: SONY Model No.: DCR-IP5, DCR-IP7 Responsible Party:Sony Electronics Inc. However, there is encouraged to try to radio communications. CAUTION You are ...designed to which can radiate radio frequency energy and, if not installed and used in this equipment. Note: This equipment has been tested and found to operate this manual...

Operating Instructions
Page 4
... (p. 156) (DCR-IP7BT only) Accessing the Internet via a Bluetooth device (DCR-IP7BT only) •Accessing the Internet and sending/receiving your camcorder. For details, refer to adjust exposure in recording mode •Back light (p. 36) •PROGRAM AE (p. 59) •White balance (p. 62) •Adjusting the exposure manually (p. 64) 4 Other uses Functions to the network function...
... (p. 156) (DCR-IP7BT only) Accessing the Internet via a Bluetooth device (DCR-IP7BT only) •Accessing the Internet and sending/receiving your camcorder. For details, refer to adjust exposure in recording mode •Back light (p. 36) •PROGRAM AE (p. 59) •White balance (p. 62) •Adjusting the exposure manually (p. 64) 4 Other uses Functions to the network function...

Operating Instructions
Page 5
... settings.) •Fader (p. 51) •Picture effect (p. 54) •Digital effect (p. 56) •Title (p. 89, 95) •MEMORY MIX (p. 132) (DCR-IP7BT only) Functions to give a natural appearance to your recordings •Manual focus (p. 65) •Landscape mode (p. 59) Functions used after recording •END SEARCH (p. 38) •DATA CODE (p. 41) •Multi...
... settings.) •Fader (p. 51) •Picture effect (p. 54) •Digital effect (p. 56) •Title (p. 89, 95) •MEMORY MIX (p. 132) (DCR-IP7BT only) Functions to give a natural appearance to your recordings •Manual focus (p. 65) •Landscape mode (p. 59) Functions used after recording •END SEARCH (p. 38) •DATA CODE (p. 41) •Multi...

Operating Instructions
Page 10
... ZOOM 145 Playing back images in a "Memory Stick" on a moving pictures on a "Memory Stick" - SLIDE SHOW 147 Preventing accidental erasure - DCR-IP7BT only Using a "Memory Stick" - MPEG movie playback 140 Dubbing images recorded on the "Memory Stick" onto the tape .... 143 Enlarging still images ...recorded on a tape - Basic operations 6 Quick Start Guide 12 Getting started Using this manual 14 Checking supplied accessories 16 Step 1 Preparing the power supply ... 18 Installing the battery pack 18 Charging the battery pack 19 ...
... ZOOM 145 Playing back images in a "Memory Stick" on a moving pictures on a "Memory Stick" - SLIDE SHOW 147 Preventing accidental erasure - DCR-IP7BT only Using a "Memory Stick" - MPEG movie playback 140 Dubbing images recorded on the "Memory Stick" onto the tape .... 143 Enlarging still images ...recorded on a tape - Basic operations 6 Quick Start Guide 12 Getting started Using this manual 14 Checking supplied accessories 16 Step 1 Preparing the power supply ... 18 Installing the battery pack 18 Charging the battery pack 19 ...

Operating Instructions
Page 14
... carry out an operation, you start reading this manual are for about 60 minutes with all MICROMV cassettes. Unauthorized recording of the copyright laws. 14 The DCR-IP7BT is being carried out. Any differences in operation ...NETWORK mark1) (on TV color systems TV color systems differ from country to indicate that the operation is the model used for DVD (digital video disc). Note on the MICROMV format. - Getting started - Using this manual The instructions in the illustrations. Before you can only use MICROMV cassettes with your camcorder (The DCR-IP7BT...
... carry out an operation, you start reading this manual are for about 60 minutes with all MICROMV cassettes. Unauthorized recording of the copyright laws. 14 The DCR-IP7BT is being carried out. Any differences in operation ...NETWORK mark1) (on TV color systems TV color systems differ from country to indicate that the operation is the model used for DVD (digital video disc). Note on the MICROMV format. - Getting started - Using this manual The instructions in the illustrations. Before you can only use MICROMV cassettes with your camcorder (The DCR-IP7BT...

Operating Instructions
Page 15
.... These points are operational for long periods may cause your camcorder exposed to temperatures above 60°C (140°F), such as dusk [d]. [a] [b] [c] [d] 15 Sometimes this manual Precautions on camcorder care Lens and LCD screen/finder (on the LCD screen and the finder. Letting your camcorder get wet may cause malfunctions [c]. •...
.... These points are operational for long periods may cause your camcorder exposed to temperatures above 60°C (140°F), such as dusk [d]. [a] [b] [c] [d] 15 Sometimes this manual Precautions on camcorder care Lens and LCD screen/finder (on the LCD screen and the finder. Letting your camcorder get wet may cause malfunctions [c]. •...

Operating Instructions
Page 36
... backlight function is deactivated. 36 To display the recording data, press DATA CODE on the screen. BACK LIGHT When you set EXPOSURE to MANUAL on the PAGE3 screen via the FN screen. To cancel, press BACK LIGHT again. However, they are not displayed during playback. Shooting ... background, use DATA CODE on the PAGE1 screen via the FN screen for this operation (p. 41). Press BACK LIGHT in CAMERA or MEMORY (DCR-IP7BT only) mode. Recording a picture Recording data The recording data (date/time or various settings when recorded) are recorded automatically onto the tape. ...
... backlight function is deactivated. 36 To display the recording data, press DATA CODE on the screen. BACK LIGHT When you set EXPOSURE to MANUAL on the PAGE3 screen via the FN screen. To cancel, press BACK LIGHT again. However, they are not displayed during playback. Shooting ... background, use DATA CODE on the PAGE1 screen via the FN screen for this operation (p. 41). Press BACK LIGHT in CAMERA or MEMORY (DCR-IP7BT only) mode. Recording a picture Recording data The recording data (date/time or various settings when recorded) are recorded automatically onto the tape. ...

Operating Instructions
Page 54
... (2) Select MENU, then press the center z on TV. Picture effect You can digitally process images to turn off the menu. 1 FN 5 2 MENU 3,4 MANUAL SET PROGRAM AE P EFFECT WHT BAL AUTO SHTR RETURN OFF NEG. ART [a] : The color and brightness of the picture is emphasized, and the picture looks... z on the control button. NEG. PASTEL [e] : The contrast of the picture are reversed. ART 54 ART SEPIA B&W SOLARIZE SLIM STRETCH PASTEL MOSAIC MANUAL SET PROGRAM AE P EFFECT WHT BAL AUTO SHTR RETURN NEG. B&W : The picture is clearer, and the picture looks like those in films or on...
... (2) Select MENU, then press the center z on TV. Picture effect You can digitally process images to turn off the menu. 1 FN 5 2 MENU 3,4 MANUAL SET PROGRAM AE P EFFECT WHT BAL AUTO SHTR RETURN OFF NEG. ART [a] : The color and brightness of the picture is emphasized, and the picture looks... z on the control button. NEG. PASTEL [e] : The contrast of the picture are reversed. ART 54 ART SEPIA B&W SOLARIZE SLIM STRETCH PASTEL MOSAIC MANUAL SET PROGRAM AE P EFFECT WHT BAL AUTO SHTR RETURN NEG. B&W : The picture is clearer, and the picture looks like those in films or on...

Operating Instructions
Page 58
... screen appears. Notes •The following functions do not work in slow shutter mode Auto focus may not be automatically canceled. Fader - Picture effect - Focus manually using a tripod. Wide mode - When recording in old movie mode: - Shutter speed Shutter speed number SLOW SHTR 1 SLOW SHTR 2 SLOW SHTR 3 SLOW SHTR 4 Shutter speed...
... screen appears. Notes •The following functions do not work in slow shutter mode Auto focus may not be automatically canceled. Fader - Picture effect - Focus manually using a tripod. Wide mode - When recording in old movie mode: - Shutter speed Shutter speed number SLOW SHTR 1 SLOW SHTR 2 SLOW SHTR 3 SLOW SHTR 4 Shutter speed...


