Operating Guide
Page 6
... in your camcorder You can radiate radio frequency energy and, if not installed and used in this manual could void your Sony dealer regarding this equipment. Notes on the bottom. DCR-HC Serial No...to provide reasonable protection against harmful interference in order to comply with the limits for a digital device pursuant to which can be determined by one or more of the following two ...a residential installation. Notes • DCR-HC46 is to be used with the Handycam Station Model DCRA-C151 and AC Adaptor Model AC-L25A/L25B. • DCR-HC96 is no guarantee that may ...
... in your camcorder You can radiate radio frequency energy and, if not installed and used in this manual could void your Sony dealer regarding this equipment. Notes on the bottom. DCR-HC Serial No...to provide reasonable protection against harmful interference in order to comply with the limits for a digital device pursuant to which can be determined by one or more of the following two ...a residential installation. Notes • DCR-HC46 is to be used with the Handycam Station Model DCRA-C151 and AC Adaptor Model AC-L25A/L25B. • DCR-HC96 is no guarantee that may ...

Operating Guide
Page 7
... terminal, or cause a malfunction of "Memory Stick." When using a "Memory Stick Duo" with your camcorder. • For DCR-HC46/HC96: Disconnect the AC Adaptor from the Handycam Station holding both the Handycam Station and the DC plug. • For DCR-HC46/HC96: Be sure to slide the POWER switch to insert the "Memory Stick Duo...
... terminal, or cause a malfunction of "Memory Stick." When using a "Memory Stick Duo" with your camcorder. • For DCR-HC46/HC96: Disconnect the AC Adaptor from the Handycam Station holding both the Handycam Station and the DC plug. • For DCR-HC46/HC96: Be sure to slide the POWER switch to insert the "Memory Stick Duo...
Operating Guide
Page 8
...points (white, red, blue, or green in Germany, and Sony Corporation, and produces superior images. About the Carl Zeiss lens • Your camcorder is T -coated to malfunction. The number value indicates the...Read this first (Continued) • The LCD screen and the viewfinder are manufactured using a digital still camera, and therefore may appear different. • The on-screen displays in each local ....99% of the pixels are normal results of the camcorder, storage media, etc. • TV color systems differ depending on the model DCR-HC96. Black point White, red, blue or green ...
...points (white, red, blue, or green in Germany, and Sony Corporation, and produces superior images. About the Carl Zeiss lens • Your camcorder is T -coated to malfunction. The number value indicates the...Read this first (Continued) • The LCD screen and the viewfinder are manufactured using a digital still camera, and therefore may appear different. • The on-screen displays in each local ....99% of the pixels are normal results of the camcorder, storage media, etc. • TV color systems differ depending on the model DCR-HC96. Black point White, red, blue or green ...
Operating Guide
Page 9
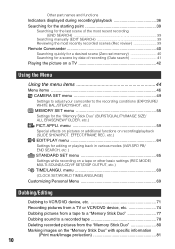
...first 5 Getting Started Step 1: Checking supplied items 12 Step 2: Charging the battery pack 13 Step 3: Turning the power on and holding your camcorder firmly ..........18 Step 4: Adjusting the LCD panel and viewfinder 20 Step 5: Using the touch panel 21 Changing the language setting 21 Checking the... Easy Recording/Playback (Easy Handycam 28 Recording 30 Playback 31 Functions used for recording/playback, etc 32 Recording To use zoom To use the flash (DCR-HC96) To record in dark places (NightShot plus) (DCR-HC36/HC46) To record in dark places (NightShot) (DCR-HC96) To adjust the ...
...first 5 Getting Started Step 1: Checking supplied items 12 Step 2: Charging the battery pack 13 Step 3: Turning the power on and holding your camcorder firmly ..........18 Step 4: Adjusting the LCD panel and viewfinder 20 Step 5: Using the touch panel 21 Changing the language setting 21 Checking the... Easy Recording/Playback (Easy Handycam 28 Recording 30 Playback 31 Functions used for recording/playback, etc 32 Recording To use zoom To use the flash (DCR-HC96) To record in dark places (NightShot plus) (DCR-HC36/HC46) To record in dark places (NightShot) (DCR-HC96) To adjust the ...
Operating Guide
Page 10
... or additional functions on a TV 42 Using the Menu Using the menu items 44 Menu items 46 CAMERA SET menu 49 Settings to adjust your camcorder to a recorded tape 78 Deleting recorded pictures from the "Memory Stick Duo 80 Marking images on a tape or other basic settings (REC MODE/ MULTI-SOUND...
... or additional functions on a TV 42 Using the Menu Using the menu items 44 Menu items 46 CAMERA SET menu 49 Settings to adjust your camcorder to a recorded tape 78 Deleting recorded pictures from the "Memory Stick Duo 80 Marking images on a tape or other basic settings (REC MODE/ MULTI-SOUND...
Operating Guide
Page 11
... a DVD (Direct Access to "Click to DVD 94 Connecting an analog VCR to the computer via your camcorder (Signal convert function) (DCR-HC96 97 Troubleshooting Troubleshooting 99 Warning indicators and messages 117 Additional Information Using your camcorder abroad 122 Usable cassette tapes 123 About the "Memory Stick 124 About the "InfoLITHIUM" battery pack...
... a DVD (Direct Access to "Click to DVD 94 Connecting an analog VCR to the computer via your camcorder (Signal convert function) (DCR-HC96 97 Troubleshooting Troubleshooting 99 Warning indicators and messages 117 Additional Information Using your camcorder abroad 122 Usable cassette tapes 123 About the "Memory Stick 124 About the "InfoLITHIUM" battery pack...

Operating Guide
Page 12
... in the parentheses indicates the number of the Grip belt, as illustrated below, using the strap. Handycam Station (1) (DCR-HC46/HC96) (p. 13) Rechargeable battery pack (1) (p. 13, 126) NP-FP30 (DCR-HC36) NP-FP50 (DCR-HC46/HC96) Wireless Remote Commander (1) (p. 40) A button-type lithium battery is already installed. AC... (1) (p. 82, 86) Lens cap (1) (DCR-HC36/HC46) (p. 18, 28, 30) Power cord (1) (p. 13) • To attach the lens cap Attach the lens cap to the metal fittings of that you have following items supplied with your camcorder. See page 6, 123, 124, for compatible cassettes...
... in the parentheses indicates the number of the Grip belt, as illustrated below, using the strap. Handycam Station (1) (DCR-HC46/HC96) (p. 13) Rechargeable battery pack (1) (p. 13, 126) NP-FP30 (DCR-HC36) NP-FP50 (DCR-HC46/HC96) Wireless Remote Commander (1) (p. 40) A button-type lithium battery is already installed. AC... (1) (p. 82, 86) Lens cap (1) (DCR-HC36/HC46) (p. 18, 28, 30) Power cord (1) (p. 13) • To attach the lens cap Attach the lens cap to the metal fittings of that you have following items supplied with your camcorder. See page 6, 123, 124, for compatible cassettes...
Operating Guide
Page 13
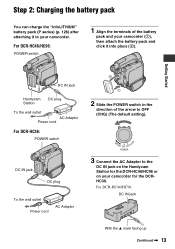
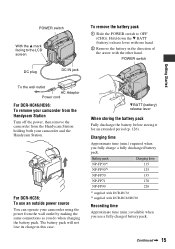
... the v mark facing up Continued , 13 Getting Started DC IN jack Handycam Station DC plug To the wall outlet AC Adaptor Power cord For DCR-HC36: POWER switch 2 1 2 Slide the POWER switch in the direction of the battery pack and your camcorder (1), then attach the battery pack and click it to OFF (CHG) (The...
... the v mark facing up Continued , 13 Getting Started DC IN jack Handycam Station DC plug To the wall outlet AC Adaptor Power cord For DCR-HC36: POWER switch 2 1 2 Slide the POWER switch in the direction of the battery pack and your camcorder (1), then attach the battery pack and click it to OFF (CHG) (The...
Operating Guide
Page 14
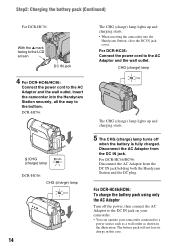
... up and charging starts. • When inserting the camcorder into the Handycam Station securely, all the way to a power source such as a wall outlet as shown in this case. The battery pack will not lose its charge in the illustration. For DCR-HC36: Connect the power cord to the AC Adaptor and .... Disconnect the AC Adaptor from the DC IN jack holding both the Handycam Station and the DC plug. Step2: Charging the battery pack (Continued) For DCR-HC36: With the v mark facing to the LCD screen DC IN jack 4 For DCR-HC46/HC96: Connect the power cord to the AC Adaptor and the ...
... up and charging starts. • When inserting the camcorder into the Handycam Station securely, all the way to a power source such as a wall outlet as shown in this case. The battery pack will not lose its charge in the illustration. For DCR-HC36: Connect the power cord to the AC Adaptor and .... Disconnect the AC Adaptor from the DC IN jack holding both the Handycam Station and the DC plug. Step2: Charging the battery pack (Continued) For DCR-HC36: With the v mark facing to the LCD screen DC IN jack 4 For DCR-HC46/HC96: Connect the power cord to the AC Adaptor and the ...
Operating Guide
Page 15
...the battery pack. Battery pack NP-FP30*1 NP-FP50*2 NP-FP70 NP-FP71 NP-FP90 Charging time 115 125 155 170 220 *1 supplied with DCR-HC36 *2 supplied with one hand. 2 Remove the battery in this case. 2 V BATT (battery) release lever When storing the battery pack Fully ...battery) release lever with DCR-HC46/HC96 Recording time Approximate time (min.) available when you use an outside power source You can operate your camcorder using the power from the Handycam Station holding both your camcorder from the Handycam Station Turn off the power, then remove the camcorder from the wall outlet...
...the battery pack. Battery pack NP-FP30*1 NP-FP50*2 NP-FP70 NP-FP71 NP-FP90 Charging time 115 125 155 170 220 *1 supplied with DCR-HC36 *2 supplied with one hand. 2 Remove the battery in this case. 2 V BATT (battery) release lever When storing the battery pack Fully ...battery) release lever with DCR-HC46/HC96 Recording time Approximate time (min.) available when you use an outside power source You can operate your camcorder using the power from the Handycam Station holding both your camcorder from the Handycam Station Turn off the power, then remove the camcorder from the wall outlet...
Operating Guide
Page 17
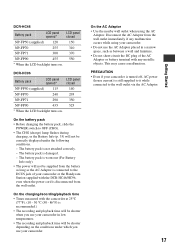
... • The recording and playback time will be shorter when you use your camcorder in low temperatures. • The recording and playback time will not be correctly displayed under the following conditions. - DCR-HC96 Battery pack LCD panel opened * LCD panel closed NP-FP50 (supplied) 115...any metallic objects. On the AC Adaptor • Use the nearby wall outlet when using your camcorder or the Handycam Station supplied with any malfunction occurs while using the AC Adaptor. DCR-HC46 Battery pack LCD panel opened * LCD panel closed NP-FP50 (supplied) 120 150 NP...
... • The recording and playback time will be shorter when you use your camcorder in low temperatures. • The recording and playback time will not be correctly displayed under the following conditions. - DCR-HC96 Battery pack LCD panel opened * LCD panel closed NP-FP50 (supplied) 115...any metallic objects. On the AC Adaptor • Use the nearby wall outlet when using your camcorder or the Handycam Station supplied with any malfunction occurs while using the AC Adaptor. DCR-HC46 Battery pack LCD panel opened * LCD panel closed NP-FP50 (supplied) 120 150 NP...

Operating Guide
Page 18
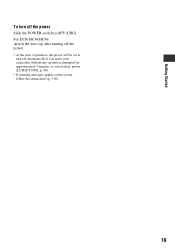
... date and time ([CLOCK SET], p. 23), the next time you turn on the power of your camcorder firmly To record or play back, slide the POWER switch repeatedly to turn on the respective lamp. For DCR-HC36/HC46: Remove the lens cap by pressing both knobs on the sides of the arrow to... turn on the respective lamp. For DCR-HC96: The lens cover opens automatically when the POWER switch is set to OFF (CHG), slide it for a few seconds. 2 Hold the camcorder correctly. 1 Slide the...
... date and time ([CLOCK SET], p. 23), the next time you turn on the power of your camcorder firmly To record or play back, slide the POWER switch repeatedly to turn on the respective lamp. For DCR-HC36/HC46: Remove the lens cap by pressing both knobs on the sides of the arrow to... turn on the respective lamp. For DCR-HC96: The lens cover opens automatically when the POWER switch is set to OFF (CHG), slide it for a few seconds. 2 Hold the camcorder correctly. 1 Slide the...
Operating Guide
Page 19
For DCR-HC36/HC46: Attach the lens cap after turning off the power. • At the time of purchase, the power will be set to turn off automatically if you leave your camcorder without any operation attempted for approximately 5 minutes, to OFF (CHG). Getting Started To turn off the power Slide the POWER switch to save battery power ([A.SHUT OFF], p. 68). • If warning messages appear on the screen, follow the instructions (p. 118). 19
For DCR-HC36/HC46: Attach the lens cap after turning off the power. • At the time of purchase, the power will be set to turn off automatically if you leave your camcorder without any operation attempted for approximately 5 minutes, to OFF (CHG). Getting Started To turn off the power Slide the POWER switch to save battery power ([A.SHUT OFF], p. 68). • If warning messages appear on the screen, follow the instructions (p. 118). 19
Operating Guide
Page 20
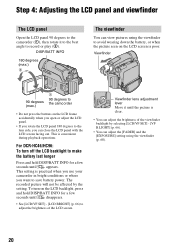
... seconds until disappears. • See [LCD/VF SET] - [LCD BRIGHT] (p. 66) to adjust the brightness of the viewfinder backlight by the setting. For DCR-HC46/HC96: To turn on the LCD backlight, press and hold DISP/BATT INFO for a few seconds until appears. Viewfinder lens adjustment lever Move it... side, you want to save battery power. Step 4: Adjusting the LCD panel and viewfinder The LCD panel Open the LCD panel 90 degrees to the camcorder (1), then rotate it until the picture is clear. • You can adjust the brightness of the LCD screen. Viewfinder 90 degrees (max.) 1...
... seconds until disappears. • See [LCD/VF SET] - [LCD BRIGHT] (p. 66) to adjust the brightness of the viewfinder backlight by the setting. For DCR-HC46/HC96: To turn on the LCD backlight, press and hold DISP/BATT INFO for a few seconds until appears. Viewfinder lens adjustment lever Move it... side, you want to save battery power. Step 4: Adjusting the LCD panel and viewfinder The LCD panel Open the LCD panel 90 degrees to the camcorder (1), then rotate it until the picture is clear. • You can adjust the brightness of the LCD screen. Viewfinder 90 degrees (max.) 1...
Operating Guide
Page 23
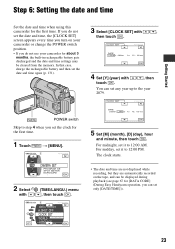
... starts. • The date and time are not displayed while recording, but they are automatically recorded on your camcorder or change the POWER switch position. • If you do not use your camcorder for about 3 months, the built-in rechargeable battery gets discharged and the date and time settings may be displayed... the tape, and can be cleared from the memory. Step 6: Setting the date and time Getting Started Set the date and time when using this camcorder for [DATA CODE] (During Easy Handycam operation, you can set only [DATE/TIME])). 23
... starts. • The date and time are not displayed while recording, but they are automatically recorded on your camcorder or change the POWER switch position. • If you do not use your camcorder for about 3 months, the built-in rechargeable battery gets discharged and the date and time settings may be displayed... the tape, and can be cleared from the memory. Step 6: Setting the date and time Getting Started Set the date and time when using this camcorder for [DATA CODE] (During Easy Handycam operation, you can set only [DATE/TIME])). 23
Operating Guide
Page 24
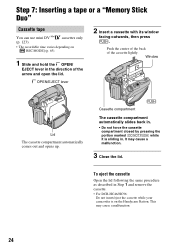
...To eject the cassette Open the lid following the same procedure as described in Step 1 and remove the cassette. • For DCR-HC46/HC96: Do not insert/eject the cassette while your camcorder is sliding in. This may cause a malfunction. 3 Close the lid. OPEN/EJECT lever 2 Insert a cassette with its window...EJECT lever in . • Do not force the cassette compartment closed by pressing the portion marked {DO NOT PUSH} while it is on the Handycam Station. Push the center of the back of the arrow and open the lid. It may cause a malfunction. 24 Window Lid The cassette compartment...
...To eject the cassette Open the lid following the same procedure as described in Step 1 and remove the cassette. • For DCR-HC46/HC96: Do not insert/eject the cassette while your camcorder is sliding in. This may cause a malfunction. 3 Close the lid. OPEN/EJECT lever 2 Insert a cassette with its window...EJECT lever in . • Do not force the cassette compartment closed by pressing the portion marked {DO NOT PUSH} while it is on the Handycam Station. Push the center of the back of the arrow and open the lid. It may cause a malfunction. 24 Window Lid The cassette compartment...

Operating Guide
Page 25
DCR-HC36/HC46: Access lamp With the v mark facing to the LCD screen 25 Do not shake or knock your camcorder is lit or flashing, your camcorder, turn the power off, eject the "Memory Stick Duo," or remove the battery pack. With the v mark facing to the LCD screen • If you... Otherwise, image data may be damaged. 2 Insert the "Memory Stick Duo" into the slot in once and slide out the "Memory Stick Duo" alongside the camcorder body. • Do not remove the "Memory Stick Duo" forcibly with or (p. 124). • The number and time of recordable pictures varies depending on the...
DCR-HC36/HC46: Access lamp With the v mark facing to the LCD screen 25 Do not shake or knock your camcorder is lit or flashing, your camcorder, turn the power off, eject the "Memory Stick Duo," or remove the battery pack. With the v mark facing to the LCD screen • If you... Otherwise, image data may be damaged. 2 Insert the "Memory Stick Duo" into the slot in once and slide out the "Memory Stick Duo" alongside the camcorder body. • Do not remove the "Memory Stick Duo" forcibly with or (p. 124). • The number and time of recordable pictures varies depending on the...
Operating Guide
Page 32
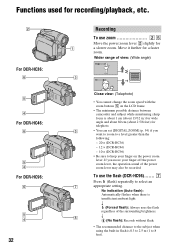
... frame. • The minimum possible distance between camcorder and subject while maintaining sharp focus is about 1 cm (about 2 5/8 feet) for telephoto. 3 • You can set [DIGITAL ZOOM] (p. 54) if you move your finger... on the power zoom lever. No indication (Auto flash): Automatically flashes when there is 0.3 to 2.5 m (1 to 8 feet). To use zoom 2 5 Move the power zoom lever 2 slightly for 1 a slower zoom. Move it further for a faster zoom. Functions used for recording/playback, etc. 2 For DCR-HC36: 6 5 4 For DCR...
... frame. • The minimum possible distance between camcorder and subject while maintaining sharp focus is about 1 cm (about 2 5/8 feet) for telephoto. 3 • You can set [DIGITAL ZOOM] (p. 54) if you move your finger... on the power zoom lever. No indication (Auto flash): Automatically flashes when there is 0.3 to 2.5 m (1 to 8 feet). To use zoom 2 5 Move the power zoom lever 2 slightly for 1 a slower zoom. Move it further for a faster zoom. Functions used for recording/playback, etc. 2 For DCR-HC36: 6 5 4 For DCR...

Operating Guide
Page 34
... .)) to the tripod receptacle qj using a tripod screw. qs qa For DCR-HC36: qd qh 2 5 4 qg qf For DCR-HC46/HC96: qd qh 2 5 4 qg qf qj 34 To record in mirror mode qh Open the LCD panel qh 90 degrees to the camcorder (1), then rotate it 180 degrees to the lens side (2). 2 1 • A mirror...
... .)) to the tripod receptacle qj using a tripod screw. qs qa For DCR-HC36: qd qh 2 5 4 qg qf For DCR-HC46/HC96: qd qh 2 5 4 qg qf qj 34 To record in mirror mode qh Open the LCD panel qh 90 degrees to the camcorder (1), then rotate it 180 degrees to the lens side (2). 2 1 • A mirror...

Operating Guide
Page 35
... battery information for about 7 seconds. J Recording lamp (DCR-HC96) The recording lamp lights up to 20 seconds by pressing DISP/BATT INFO again while the battery information is low. O Speaker Playback sound come out from the speaker. • For how to operate your camcorder. To initialize the settings (RESET qf Press RESET...
... battery information for about 7 seconds. J Recording lamp (DCR-HC96) The recording lamp lights up to 20 seconds by pressing DISP/BATT INFO again while the battery information is low. O Speaker Playback sound come out from the speaker. • For how to operate your camcorder. To initialize the settings (RESET qf Press RESET...


