Operating Guide
Page 1
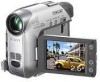
Printed on 100% recycled paper using VOC (Volatile Organic Compound)-free vegetable oil based ink. Printed in Japan 2-584-906-11 (1) Digital Video Camera Recorder Operating Guide DCR-HC32/HC42 Getting Started 9 Recording/ Playback 20 Using the Menu 36 Dubbing/Editing 59 Using a Computer 70 Troubleshooting 82 Additional Information 105 © 2005 Sony Corporation
Printed on 100% recycled paper using VOC (Volatile Organic Compound)-free vegetable oil based ink. Printed in Japan 2-584-906-11 (1) Digital Video Camera Recorder Operating Guide DCR-HC32/HC42 Getting Started 9 Recording/ Playback 20 Using the Menu 36 Dubbing/Editing 59 Using a Computer 70 Troubleshooting 82 Additional Information 105 © 2005 Sony Corporation
Operating Guide
Page 3
...Part 15 of the FCC Rules. Continued 3 Bernardo Dr, San Diego, CA 92127 U.S.A. Note DCR-HC32/HC42 is to be used with the equipment in the space provided below is no guarantee that to Part 15 of... to radio or television reception, which the receiver is encouraged to try to comply with the Handycam Station Model DCRA-C121 and AC Adaptor Model AC-L25A/L25B. Model No. If you have... any changes or modifications not expressly approved in this manual could void your Sony dealer regarding this device must be used in the U.S.A. Record the serial number in order ...
...Part 15 of the FCC Rules. Continued 3 Bernardo Dr, San Diego, CA 92127 U.S.A. Note DCR-HC32/HC42 is to be used with the equipment in the space provided below is no guarantee that to Part 15 of... to radio or television reception, which the receiver is encouraged to try to comply with the Handycam Station Model DCRA-C121 and AC Adaptor Model AC-L25A/L25B. Model No. If you have... any changes or modifications not expressly approved in this manual could void your Sony dealer regarding this device must be used in the U.S.A. Record the serial number in order ...
Operating Guide
Page 5
...illustration purposes are based on -screen displays in Germany, and Sony Corporation, and produces superior images. On this manual • The images of the LCD screen and the viewfinder used in this manual are captured using your camcorder if necessary (p. 16). • The illustrations used for ... into the lens. 5 Change the screen language before using a digital still camera, and therefore may appear different. • The on the model DCR-HC42. The number value indicates the amount of a Carl Zeiss lens. * MTF stands for illustrating the operating procedures.
...illustration purposes are based on -screen displays in Germany, and Sony Corporation, and produces superior images. On this manual • The images of the LCD screen and the viewfinder used in this manual are captured using your camcorder if necessary (p. 16). • The illustrations used for ... into the lens. 5 Change the screen language before using a digital still camera, and therefore may appear different. • The on the model DCR-HC42. The number value indicates the amount of a Carl Zeiss lens. * MTF stands for illustrating the operating procedures.
Operating Guide
Page 6
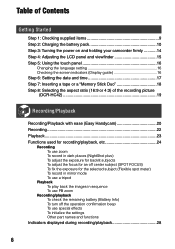
...Contents Getting Started Step 1: Checking supplied items 9 Step 2: Charging the battery pack 10 Step 3: Turning the power on and holding your camcorder firmly ...........14 Step 4: Adjusting the LCD panel and viewfinder 15 Step 5: Using the touch panel 16 Changing the ...8: Selecting the aspect ratio (16:9 or 4:3) of the recording picture (DCR-HC42 19 Recording/Playback Recording/Playback with ease (Easy Handycam 20 Recording 22 Playback 23 Functions used for recording/playback, etc 24 Recording To use zoom To record in dark places (NightShot plus) To adjust the exposure for ...
...Contents Getting Started Step 1: Checking supplied items 9 Step 2: Charging the battery pack 10 Step 3: Turning the power on and holding your camcorder firmly ...........14 Step 4: Adjusting the LCD panel and viewfinder 15 Step 5: Using the touch panel 16 Changing the ...8: Selecting the aspect ratio (16:9 or 4:3) of the recording picture (DCR-HC42 19 Recording/Playback Recording/Playback with ease (Easy Handycam 20 Recording 22 Playback 23 Functions used for recording/playback, etc 24 Recording To use zoom To record in dark places (NightShot plus) To adjust the exposure for ...
Operating Guide
Page 9
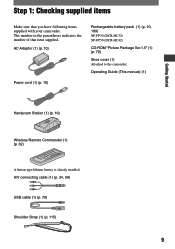
...) Rechargeable battery pack (1) (p. 10, 109) NP-FP30 (DCR-HC32) NP-FP50 (DCR-HC42) CD-ROM "Picture Package Ver.1.5" (1) (p. 70) Shoe cover (1) Attached to the camcorder. The number in the parentheses indicates the number of that you have following items supplied with your camcorder. Operating Guide (This manual) (1) Getting Started Handycam Station (1) (p. 10) Wireless Remote Commander (1) (p. 32) A button...
...) Rechargeable battery pack (1) (p. 10, 109) NP-FP30 (DCR-HC32) NP-FP50 (DCR-HC42) CD-ROM "Picture Package Ver.1.5" (1) (p. 70) Shoe cover (1) Attached to the camcorder. The number in the parentheses indicates the number of that you have following items supplied with your camcorder. Operating Guide (This manual) (1) Getting Started Handycam Station (1) (p. 10) Wireless Remote Commander (1) (p. 32) A button...
Operating Guide
Page 12
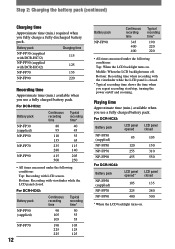
...zooming. For DCR-HC32: Battery pack Continuous recording time Typical recording time* NP-FP30 (supplied) NP-FP50 NP-FP70 NP-FP90 80 40 95 45 110 55 135 65 235 115 280 140 415 205 500 250 • All times measured under the following conditions: Top: Recording with DCR-HC42...) 125 NP-FP70 155 NP-FP90 220 Recording time Approximate time (min.) available when you repeat recording start/stop, turning the power on/off . For DCR-HC32: Battery pack LCD panel LCD panel opened closed ...
...zooming. For DCR-HC32: Battery pack Continuous recording time Typical recording time* NP-FP30 (supplied) NP-FP50 NP-FP70 NP-FP90 80 40 95 45 110 55 135 65 235 115 280 140 415 205 500 250 • All times measured under the following conditions: Top: Recording with DCR-HC42...) 125 NP-FP70 155 NP-FP90 220 Recording time Approximate time (min.) available when you repeat recording start/stop, turning the power on/off . For DCR-HC32: Battery pack LCD panel LCD panel opened closed ...
Operating Guide
Page 15
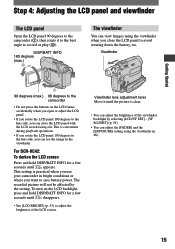
... viewfinder You can adjust the brightness of the LCD screen. For DCR-HC42: To darken the LCD screen Press and hold DISP/BATT INFO for a few seconds until the picture is practical when you use your camcorder in the viewfinder. Getting Started Step 4: Adjusting the LCD panel and... viewfinder The LCD panel Open the LCD panel 90 degrees to the camcorder (), then rotate it until disappears. • See [LCD BRIGHT] (p. 53) to avoid wearing down the battery, etc. This setting is clear. &#...
... viewfinder You can adjust the brightness of the LCD screen. For DCR-HC42: To darken the LCD screen Press and hold DISP/BATT INFO for a few seconds until the picture is practical when you use your camcorder in the viewfinder. Getting Started Step 4: Adjusting the LCD panel and... viewfinder The LCD panel Open the LCD panel 90 degrees to the camcorder (), then rotate it until disappears. • See [LCD BRIGHT] (p. 53) to avoid wearing down the battery, etc. This setting is clear. &#...
Operating Guide
Page 19
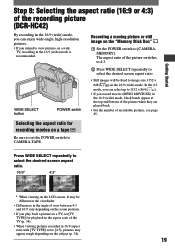
... POWER switch to view pictures on the subject (p. 34). 19 Getting Started Step 8: Selecting the aspect ratio (16:9 or 4:3) of the recording picture (DCR-HC42) By recording in the 16:9 (wide) mode, you can select up to [4:3], pictures may be different in the viewfinder. • Differences ... depending on a wide TV, recording in the 16:9 (wide) mode. The aspect ratio of view between 4:3 and 16:9 vary depending on the zoom position. • If you can enjoy wide-angle, high-resolution pictures. • If you intend to CAMERA-TAPE. Press WIDE SELECT repeatedly to ...
... POWER switch to view pictures on the subject (p. 34). 19 Getting Started Step 8: Selecting the aspect ratio (16:9 or 4:3) of the recording picture (DCR-HC42) By recording in the 16:9 (wide) mode, you can select up to [4:3], pictures may be different in the viewfinder. • Differences ... depending on a wide TV, recording in the 16:9 (wide) mode. The aspect ratio of view between 4:3 and 16:9 vary depending on the zoom position. • If you can enjoy wide-angle, high-resolution pictures. • If you intend to CAMERA-TAPE. Press WIDE SELECT repeatedly to ...
Operating Guide
Page 21
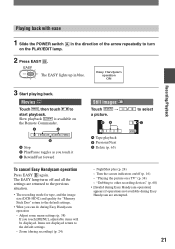
...playback Previous/Next Delete (p. 65) / to start playback. NightShot plus (p. 24) - Easy Handycam operation ON Recording/Playback 3 Start playing back. Zoom (during Easy Handycam operation - Turn the screen indicators on the PLAY/EDIT lamp. 2 Press EASY . Slow playback is available on...devices" (p. 60) • [Invalid during Easy Handycam operation] appears if operations not available during Easy Handycam are returned to the previous situation. • The recording mode for tape, and the image size (DCR-HC42) and quality for "Memory Stick Duo" return to...
...playback Previous/Next Delete (p. 65) / to start playback. NightShot plus (p. 24) - Easy Handycam operation ON Recording/Playback 3 Start playing back. Zoom (during Easy Handycam operation - Turn the screen indicators on the PLAY/EDIT lamp. 2 Press EASY . Slow playback is available on...devices" (p. 60) • [Invalid during Easy Handycam operation] appears if operations not available during Easy Handycam are returned to the previous situation. • The recording mode for tape, and the image size (DCR-HC42) and quality for "Memory Stick Duo" return to...
Operating Guide
Page 22
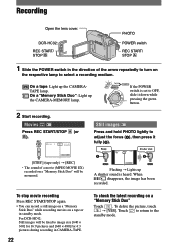
...Stick Duo" while recording movies on a tape or in the direction of a movie (MPEG MOVIE EX) recorded on a "Memory Stick Duo" will be monaural. For DCR-HC42: Still images will be fixed to OFF, slide it fully (). [STBY] (tape only) [REC] • The sound of the arrow repeatedly... ). When disappears, the image has been recorded. Recording Open the lens cover. Still images Press and hold PHOTO lightly to the standby mode. DCR-HC32: REC START/ STOP PHOTO POWER switch REC START/ STOP 1 Slide the POWER switch in standby mode.
...Stick Duo" while recording movies on a tape or in the direction of a movie (MPEG MOVIE EX) recorded on a "Memory Stick Duo" will be monaural. For DCR-HC42: Still images will be fixed to OFF, slide it fully (). [STBY] (tape only) [REC] • The sound of the arrow repeatedly... ). When disappears, the image has been recorded. Recording Open the lens cover. Still images Press and hold PHOTO lightly to the standby mode. DCR-HC32: REC START/ STOP PHOTO POWER switch REC START/ STOP 1 Slide the POWER switch in standby mode.
Operating Guide
Page 24
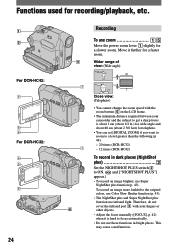
...playback, etc. 1 2 For DCR-HC42: 4 5 6 For DCR-HC32: 4 5 6 24 Recording To use zoom Move the power zoom lever slightly for telephoto. • You can set [DIGITAL ZOOM] if you want to zoom to a level greater than the following (p 44): - 20 times (DCR-HC32) - 12 times (DCR-HC42) To record in dark places... the focus manually ([FOCUS], p. 42) when it further for a faster zoom. 3 Wider range of view: (Wide angle) 7 7 8 Close view: (Telephoto) • You cannot change the zoom speed with your camcorder and the subject to the original colors, use these functions in .) for ...
...playback, etc. 1 2 For DCR-HC42: 4 5 6 For DCR-HC32: 4 5 6 24 Recording To use zoom Move the power zoom lever slightly for telephoto. • You can set [DIGITAL ZOOM] if you want to zoom to a level greater than the following (p 44): - 20 times (DCR-HC32) - 12 times (DCR-HC42) To record in dark places... the focus manually ([FOCUS], p. 42) when it further for a faster zoom. 3 Wider range of view: (Wide angle) 7 7 8 Close view: (Telephoto) • You cannot change the zoom speed with your camcorder and the subject to the original colors, use these functions in .) for ...
Operating Guide
Page 26
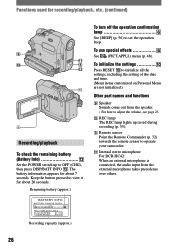
...over others. Remaining battery (approx.) To turn off the operation confirmation beep See [BEEP] (p. 56) to operate your camcorder. Internal stereo microphone For DCR-HC42: When an external microphone is connected, the audio input from the speaker. • For how to adjust the volume, see ...page 23. REC lamp The REC lamp lights up to view it for about 20 seconds. Recording capacity (approx.) 26 ...
...over others. Remaining battery (approx.) To turn off the operation confirmation beep See [BEEP] (p. 56) to operate your camcorder. Internal stereo microphone For DCR-HC42: When an external microphone is connected, the audio input from the speaker. • For how to adjust the volume, see ...page 23. REC lamp The REC lamp lights up to view it for about 20 seconds. Recording capacity (approx.) 26 ...

Operating Guide
Page 34
...the VCR. Connect the white and red plugs (left/right audio) and S VIDEO plug (S VIDEO channel) of the TV you connect your camcorder to the wall outlet using the A/V connecting cable with an S VIDEO cable (optional), pictures can be reproduced more faithfully than with the ID...jack of the other device. A/V connecting cable with S VIDEO (optional) When connecting to the screen size of an A/V connecting cable (optional). For DCR-HC42: To set [TV TYPE] to be connected. In this operation (p. 10). Set the input selector on the PLAY/EDIT lamp. Touch ...
...the VCR. Connect the white and red plugs (left/right audio) and S VIDEO plug (S VIDEO channel) of the TV you connect your camcorder to the wall outlet using the A/V connecting cable with an S VIDEO cable (optional), pictures can be reproduced more faithfully than with the ID...jack of the other device. A/V connecting cable with S VIDEO (optional) When connecting to the screen size of an A/V connecting cable (optional). For DCR-HC42: To set [TV TYPE] to be connected. In this operation (p. 10). Set the input selector on the PLAY/EDIT lamp. Touch ...
Operating Guide
Page 38
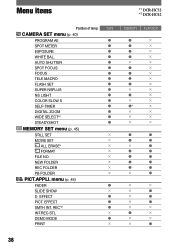
...; × × × × × × × × 38 Menu items *1 DCR-HC32 *2 DCR-HC42 Position of lamp: TAPE CAMERA SET menu (p. 40) PROGRAM AE SPOT METER EXPOSURE WHITE BAL. AUTO SHUTTER SPOT ...TELE MACRO FLASH SET SUPER NSPLUS NS LIGHT COLOR SLOW S SELF-TIMER DIGITAL ZOOM WIDE SELECT*1 STEADYSHOT MEMORY SET menu (p. 45) STILL SET × MOVIE SET × ALL ERASE*...
...; × × × × × × × × 38 Menu items *1 DCR-HC32 *2 DCR-HC42 Position of lamp: TAPE CAMERA SET menu (p. 40) PROGRAM AE SPOT METER EXPOSURE WHITE BAL. AUTO SHUTTER SPOT ...TELE MACRO FLASH SET SUPER NSPLUS NS LIGHT COLOR SLOW S SELF-TIMER DIGITAL ZOOM WIDE SELECT*1 STEADYSHOT MEMORY SET menu (p. 45) STILL SET × MOVIE SET × ALL ERASE*...
Operating Guide
Page 42
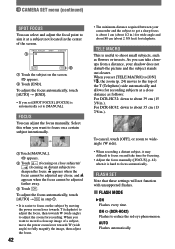
... clearer. ON (DCR-HC42) Flashes to shoot small subjects, such as follows: For DCR-HC32: down to about 35 cm (13 7/8 in.). TELE MACRO This is useful to reduce the red-eye phenomenon. To adjust the focus automatically, touch [AUTO] in step . • It is automatically set to adjust the zoom for recording... 2 5/8 feet) for telephoto. As you want to record a close-up image of the screen. 1 2 Touch the subject on and take closeups from a distance, your camcorder and the subject to get a sharp focus is hard to focus automatically.
... clearer. ON (DCR-HC42) Flashes to shoot small subjects, such as follows: For DCR-HC32: down to about 35 cm (13 7/8 in.). TELE MACRO This is useful to reduce the red-eye phenomenon. To adjust the focus automatically, touch [AUTO] in step . • It is automatically set to adjust the zoom for recording... 2 5/8 feet) for telephoto. As you want to record a close-up image of the screen. 1 2 Touch the subject on and take closeups from a distance, your camcorder and the subject to get a sharp focus is hard to focus automatically.
Operating Guide
Page 43
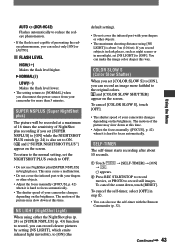
If you can record an image more than 5 minutes. Continued 43 Using the Menu AUTO (DCR-HC42) Flashes automatically to reduce the redeye phenomenon. • If the flash is hard to focus automatically. and ["SUPER NIGHTSHOT PLUS"] appear on the screen....clearer pictures by setting [NS LIGHT], which emits infrared light (invisible), to [ON] (the default setting). • Do not cover the infrared port with your camcorder changes depending on the brightness. SELF-TIMER The self-timer starts recording after about 3 m (10 feet). To cancel the count down at a maximum of 16...
If you can record an image more than 5 minutes. Continued 43 Using the Menu AUTO (DCR-HC42) Flashes automatically to reduce the redeye phenomenon. • If the flash is hard to focus automatically. and ["SUPER NIGHTSHOT PLUS"] appear on the screen....clearer pictures by setting [NS LIGHT], which emits infrared light (invisible), to [ON] (the default setting). • Do not cover the infrared port with your camcorder changes depending on the brightness. SELF-TIMER The self-timer starts recording after about 3 m (10 feet). To cancel the count down at a maximum of 16...
Operating Guide
Page 44
... viewed on a tape. For DCR-HC32: OFF Up to 20 × zoom is performed optically. 40 × Up to 20 × zoom is performed optically, and after that, up to 40 × zoom is performed digitally. 800 × Up to 20 × zoom is performed optically, and after that, up to...camcorder to a TV compatible with [16:9 WIDE ( )] selected. The zooming zone appears when you select the zooming level. Refer also to [OFF] ( ) when using the digital zoom. For DCR-HC42: OFF Up to 12 × zoom is performed optically. 24 × Up to 12 × zoom is performed optically...
... viewed on a tape. For DCR-HC32: OFF Up to 20 × zoom is performed optically. 40 × Up to 20 × zoom is performed optically, and after that, up to 40 × zoom is performed digitally. 800 × Up to 20 × zoom is performed optically, and after that, up to...camcorder to a TV compatible with [16:9 WIDE ( )] selected. The zooming zone appears when you select the zooming level. Refer also to [OFF] ( ) when using the digital zoom. For DCR-HC42: OFF Up to 12 × zoom is performed optically. 24 × Up to 12 × zoom is performed optically...

Operating Guide
Page 45
...in the self-timer mode or when you have space for fewer than 3 images remaining on selecting menu items. STILL SET For DCR-HC42: BURST You can compare the 3 images and select an image recorded at about 0.5 second intervals. The maximum number of images will not ...function when you are marked with different exposures at the standard image quality level. For DCR-HC42: IMAGE SIZE 1152 × 864 ( ) Records still images clearly. 640 × 480 ( ) Allows for the maximum number of the screen,...
...in the self-timer mode or when you have space for fewer than 3 images remaining on selecting menu items. STILL SET For DCR-HC42: BURST You can compare the 3 images and select an image recorded at about 0.5 second intervals. The maximum number of images will not ...function when you are marked with different exposures at the standard image quality level. For DCR-HC42: IMAGE SIZE 1152 × 864 ( ) Records still images clearly. 640 × 480 ( ) Allows for the maximum number of the screen,...

Operating Guide
Page 46
... 05:41:20 11:22:40 • When using the "Memory Stick Duo" made by Sony Corporation. approx. 60kB. approx. 500kB. - [FINE] is selected for an image size of [1152 × 864] - approx. 120kB. - [STANDARD] is selected for more movie recording time. MEMORY SET menu (continued) In 16:9 aspect ratio (DCR-HC42) 1152 ×...
... 05:41:20 11:22:40 • When using the "Memory Stick Duo" made by Sony Corporation. approx. 60kB. approx. 500kB. - [FINE] is selected for an image size of [1152 × 864] - approx. 120kB. - [STANDARD] is selected for more movie recording time. MEMORY SET menu (continued) In 16:9 aspect ratio (DCR-HC42) 1152 ×...
Operating Guide
Page 50
... tape (p. 60). menu (continued) SLOW SHUTTR (slow shutter) The shutter speed is useful to red. REC (Smooth interval tape recording) (DCR-HC42) Your camcorder will shoot 1 frame of daylight. B&W Pictures appear in your camcorder to externally input pictures. This function is slowed down. Also, you cannot output playback pictures edited with strong contrast. PASTEL...
... tape (p. 60). menu (continued) SLOW SHUTTR (slow shutter) The shutter speed is useful to red. REC (Smooth interval tape recording) (DCR-HC42) Your camcorder will shoot 1 frame of daylight. B&W Pictures appear in your camcorder to externally input pictures. This function is slowed down. Also, you cannot output playback pictures edited with strong contrast. PASTEL...
