Operating Guide
Page 3
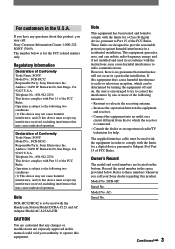
For customers in the space provided below is to be used with the Handycam Station Model DCRA-C121 and AC Adaptor Model AC-L25A/L25B. Address: 16450 W. Reorient or relocate the receiving antenna. - Consult the dealer or an experienced radio...cause undesired operation. If you have any questions about this product, you call : Sony Customer Information Center 1-800-222SONY (7669). The number below . Telephone No.: 858-942-2230 This device complies with Part 15 of the FCC Rules. Note DCR-HC32/HC42 is for a Class B digital device, pursuant to operate this product. This...
For customers in the space provided below is to be used with the Handycam Station Model DCRA-C121 and AC Adaptor Model AC-L25A/L25B. Address: 16450 W. Reorient or relocate the receiving antenna. - Consult the dealer or an experienced radio...cause undesired operation. If you have any questions about this product, you call : Sony Customer Information Center 1-800-222SONY (7669). The number below . Telephone No.: 858-942-2230 This device complies with Part 15 of the FCC Rules. Note DCR-HC32/HC42 is for a Class B digital device, pursuant to operate this product. This...
Operating Guide
Page 9
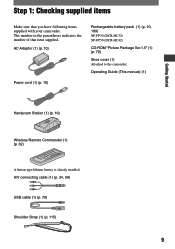
... Adaptor (1) (p. 10) Power cord (1) (p. 10) Rechargeable battery pack (1) (p. 10, 109) NP-FP30 (DCR-HC32) NP-FP50 (DCR-HC42) CD-ROM "Picture Package Ver.1.5" (1) (p. 70) Shoe cover (1) Attached to the camcorder. Operating Guide (This manual) (1) Getting Started Handycam Station (1) (p. 10) Wireless Remote Commander (1) (p. 32) A button-type lithium battery is already installed. Step 1: Checking supplied items Make sure...
... Adaptor (1) (p. 10) Power cord (1) (p. 10) Rechargeable battery pack (1) (p. 10, 109) NP-FP30 (DCR-HC32) NP-FP50 (DCR-HC42) CD-ROM "Picture Package Ver.1.5" (1) (p. 70) Shoe cover (1) Attached to the camcorder. Operating Guide (This manual) (1) Getting Started Handycam Station (1) (p. 10) Wireless Remote Commander (1) (p. 32) A button-type lithium battery is already installed. Step 1: Checking supplied items Make sure...
Operating Guide
Page 10
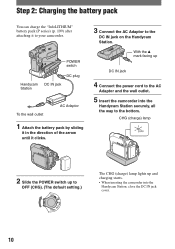
With the mark facing up and charging starts. • When inserting the camcorder into the Handycam Station securely, all the way to the AC Adaptor and the wall outlet. 5 Insert the camcorder into the Handycam Station, close the DC IN jack cover. 10 Step 2: Charging the battery pack You can ...charge the "InfoLITHIUM" battery pack (P series) (p. 109) after attaching it clicks. 3 Connect the AC Adaptor to your camcorder. POWER switch Handycam Station DC plug DC IN jack To the wall outlet AC Adaptor 1 Attach the battery pack by sliding it in the direction of the ...
With the mark facing up and charging starts. • When inserting the camcorder into the Handycam Station securely, all the way to the AC Adaptor and the wall outlet. 5 Insert the camcorder into the Handycam Station, close the DC IN jack cover. 10 Step 2: Charging the battery pack You can ...charge the "InfoLITHIUM" battery pack (P series) (p. 109) after attaching it clicks. 3 Connect the AC Adaptor to your camcorder. POWER switch Handycam Station DC plug DC IN jack To the wall outlet AC Adaptor 1 Attach the battery pack by sliding it in the direction of the ...
Operating Guide
Page 11
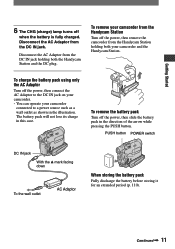
...illustration. To charge the battery pack using only the AC Adaptor Turn off when the battery is fully charged. To remove your camcorder and the Handycam Station. The battery pack will not lose its charge in the direction of the arrow while pressing the PUSH button. To remove ...the battery pack Turn off the power, then remove the camcorder from the Handycam Station holding both your camcorder from the Handycam Station Turn off the power, then slide the battery pack in this case. Continued 11 Disconnect the AC ...
...illustration. To charge the battery pack using only the AC Adaptor Turn off when the battery is fully charged. To remove your camcorder and the Handycam Station. The battery pack will not lose its charge in the direction of the arrow while pressing the PUSH button. To remove ...the battery pack Turn off the power, then remove the camcorder from the Handycam Station holding both your camcorder from the Handycam Station Turn off the power, then slide the battery pack in this case. Continued 11 Disconnect the AC ...
Operating Guide
Page 13
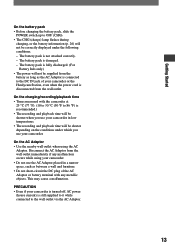
... will not be supplied from the battery as long as between a wall and furniture. • Do not short-circuit the DC plug of your camcorder or the Handycam Station, even when the power cord is damaged. - This may cause a malfunction. The battery pack is disconnected from the wall outlet immediately if any... placed in a narrow space, such as the AC Adaptor is connected to the DC IN jack of the AC Adaptor or battery terminal with the camcorder at 25 °C (77 °F). (10 to 30 °C (50 °F to 86 °F) is recommended.) • The recording and playback time will be...
... will not be supplied from the battery as long as between a wall and furniture. • Do not short-circuit the DC plug of your camcorder or the Handycam Station, even when the power cord is damaged. - This may cause a malfunction. The battery pack is disconnected from the wall outlet immediately if any... placed in a narrow space, such as the AC Adaptor is connected to the DC IN jack of the AC Adaptor or battery terminal with the camcorder at 25 °C (77 °F). (10 to 30 °C (50 °F to 86 °F) is recommended.) • The recording and playback time will be...
Operating Guide
Page 35
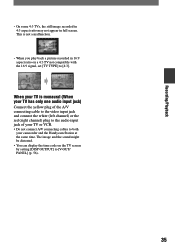
...) or the red (right channel) plug to the audio input jack of your TV or VCR. • Do not connect A/V connecting cables to both your camcorder and the Handycam Station at the same time.
...) or the red (right channel) plug to the audio input jack of your TV or VCR. • Do not connect A/V connecting cables to both your camcorder and the Handycam Station at the same time.
Operating Guide
Page 59
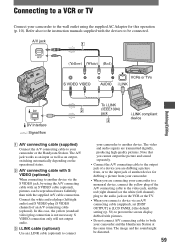
...default setting) (p. 56) to prevent the screen display dubbed with pictures. • Do not connect A/V connecting cables to both your camcorder and the Handycam Station at the same time. Note that you cannot output the picture and sound separately. • Connect the A/V connecting cable to the ...of an A/V connecting cable (optional). Refer also to the instruction manuals supplied with the devices to your camcorder or the Handycam Station. Connecting to a VCR or TV Connect your camcorder to the wall outlet using the A/V connecting cable with an S VIDEO cable (optional), pictures can ...
...default setting) (p. 56) to prevent the screen display dubbed with pictures. • Do not connect A/V connecting cables to both your camcorder and the Handycam Station at the same time. Note that you cannot output the picture and sound separately. • Connect the A/V connecting cable to the ...of an A/V connecting cable (optional). Refer also to the instruction manuals supplied with the devices to your camcorder or the Handycam Station. Connecting to a VCR or TV Connect your camcorder to the wall outlet using the A/V connecting cable with an S VIDEO cable (optional), pictures can ...
Operating Guide
Page 63
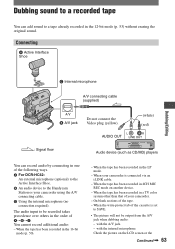
...) players You can add sound to a tape already recorded in the 12-bit mode (p. 53) without erasing the original sound. When your camcorder using the A/V connecting cable. Using the internal microphone (no connection required). When the write-protect tab of the cassette is connected via... You can record audio by connecting in one of the following ways. For DCR-HC42: An external microphone (optional) to the Active Interface Shoe. An audio device to the Handycam Station or your camcorder is set to SAVE. • The picture will not be recorded takes precedence over...
...) players You can add sound to a tape already recorded in the 12-bit mode (p. 53) without erasing the original sound. When your camcorder using the A/V connecting cable. Using the internal microphone (no connection required). When the write-protect tab of the cassette is connected via... You can record audio by connecting in one of the following ways. For DCR-HC42: An external microphone (optional) to the Active Interface Shoe. An audio device to the Handycam Station or your camcorder is set to SAVE. • The picture will not be recorded takes precedence over...

Operating Guide
Page 64
... (continued) viewfinder. • For DCR-HC42: When you attach an external microphone (optional) to the Active Interface Shoe, you are recording afterwards is not output from your camcorder. Recording sound Insert a recorded cassette into your camcorder beforehand. 1 Slide the POWER switch down to turn... the A/V connecting cable. The sound may be distorted. However, sound you can check the picture and the sound by connecting your camcorder and the Handycam Station at the same time. appears while recording the new sound in stereo 2 (ST2) during the playback of the tape. 5 Touch...
... (continued) viewfinder. • For DCR-HC42: When you attach an external microphone (optional) to the Active Interface Shoe, you are recording afterwards is not output from your camcorder. Recording sound Insert a recorded cassette into your camcorder beforehand. 1 Slide the POWER switch down to turn... the A/V connecting cable. The sound may be distorted. However, sound you can check the picture and the sound by connecting your camcorder and the Handycam Station at the same time. appears while recording the new sound in stereo 2 (ST2) during the playback of the tape. 5 Touch...
Operating Guide
Page 67
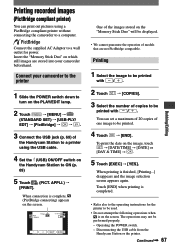
... outlet for the printer to be printed. 4 Touch [END]. Disconnecting the USB cable from the Handycam Station or the printer. Connect your camcorder beforehand. Printing recorded images (PictBridge compliant printer) You can set a maximum of 20 copies of one image to be used. • Do not attempt the following operations when is on...
... outlet for the printer to be printed. 4 Touch [END]. Disconnecting the USB cable from the Handycam Station or the printer. Connect your camcorder beforehand. Printing recorded images (PictBridge compliant printer) You can set a maximum of 20 copies of one image to be used. • Do not attempt the following operations when is on...
Operating Guide
Page 69
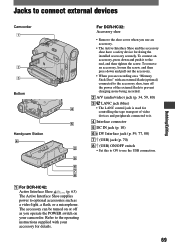
... jack is used for fixing the installed accessory securely. For DCR-HC32: Accessory shoe • Remove the shoe cover when you operate the POWER switch on a "Memory Stick Duo" with your camcorder. Jacks to connect external devices Dubbing/Editing Camcorder 1 2 3 Bottom 4 5 Handycam Station 4 2 5 6 7 8 For DCR-HC42: Active Interface Shoe (p. 63) The Active Interface Shoe supplies...
... jack is used for fixing the installed accessory securely. For DCR-HC32: Accessory shoe • Remove the shoe cover when you operate the POWER switch on a "Memory Stick Duo" with your camcorder. Jacks to connect external devices Dubbing/Editing Camcorder 1 2 3 Bottom 4 5 Handycam Station 4 2 5 6 7 8 For DCR-HC42: Active Interface Shoe (p. 63) The Active Interface Shoe supplies...
Operating Guide
Page 80
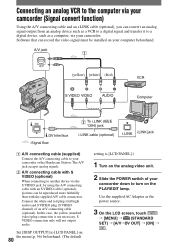
... A/V connecting cable with the supplied A/V cable connection. Connecting an analog VCR to the computer via your camcorder (Signal convert function) Using the A/V connecting cable and an i.LINK cable (optional), you can convert an analog ...camcorder down to a digital device, such as the power source. 3 On the LCD screen, touch [MENU] (STANDARD SET) [A/VDV OUT] [ON] . Software that can record the video signal must be reproduced more faithfully than with S VIDEO (optional) When connecting to your camcorder or the Handycam Station...
... A/V connecting cable with the supplied A/V cable connection. Connecting an analog VCR to the computer via your camcorder (Signal convert function) Using the A/V connecting cable and an i.LINK cable (optional), you can convert an analog ...camcorder down to a digital device, such as the power source. 3 On the LCD screen, touch [MENU] (STANDARD SET) [A/VDV OUT] [ON] . Software that can record the video signal must be reproduced more faithfully than with S VIDEO (optional) When connecting to your camcorder or the Handycam Station...
Operating Guide
Page 82
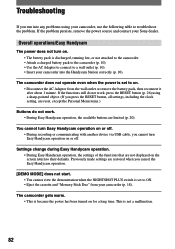
... If the functions still do not work. • During Easy Handycam operation, the available buttons are not displayed on or off. Settings change during Easy Handycam operation. • During Easy Handycam operation, the settings of the functions that are limited (p. 20). This is because the power has been turned on for a ..., including the clock setting, are reset, except the Personal Menu items.) Buttons do not work, press the RESET button (p. 26) using your camcorder into the Handycam Station correctly (p. 10). The camcorder gets warm. • This is not a malfunction. 82
... If the functions still do not work. • During Easy Handycam operation, the available buttons are not displayed on or off. Settings change during Easy Handycam operation. • During Easy Handycam operation, the settings of the functions that are limited (p. 20). This is because the power has been turned on for a ..., including the clock setting, are reset, except the Personal Menu items.) Buttons do not work, press the RESET button (p. 26) using your camcorder into the Handycam Station correctly (p. 10). The camcorder gets warm. • This is not a malfunction. 82
Operating Guide
Page 83
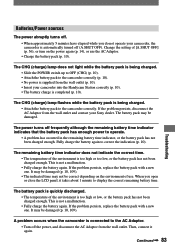
...the POWER switch up to OFF (CHG) (p. 10). • Attach the battery pack to the camcorder correctly (p. 10). • No power is supplied from the wall outlet and contact your camcorder into the Handycam Station correctly (p. 10). • The battery charge is too high or low, or the battery pack ... power to correct the indication (p. 10). If the problem persists, disconnect the AC Adaptor from the wall outlet (p. 10). • Insert your Sony dealer. The power turns off (A.SHUT OFF). Fully charge the battery again to operate. • A problem has occurred in the remaining battery time...
...the POWER switch up to OFF (CHG) (p. 10). • Attach the battery pack to the camcorder correctly (p. 10). • No power is supplied from the wall outlet and contact your camcorder into the Handycam Station correctly (p. 10). • The battery charge is too high or low, or the battery pack ... power to correct the indication (p. 10). If the problem persists, disconnect the AC Adaptor from the wall outlet (p. 10). • Insert your Sony dealer. The power turns off (A.SHUT OFF). Fully charge the battery again to operate. • A problem has occurred in the remaining battery time...
Operating Guide
Page 89
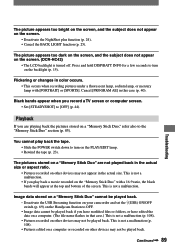
... the subject does not appear on the Handycam Station to the "Memory Stick Duo" section (p. 85). Image data stored on a "Memory Stick Duo" cannot be played back. • Deactivate the USB Streaming function on your camcorder and set the (USB) ON/OFF switch (p. 69) on the screen. (DCR-HC42) • The LCD backlight is...
... the subject does not appear on the Handycam Station to the "Memory Stick Duo" section (p. 85). Image data stored on a "Memory Stick Duo" cannot be played back. • Deactivate the USB Streaming function on your camcorder and set the (USB) ON/OFF switch (p. 69) on the screen. (DCR-HC42) • The LCD backlight is...
Operating Guide
Page 93
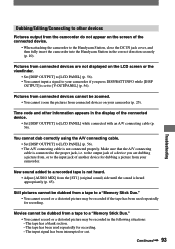
...or a distorted picture may be zoomed. • You cannot zoom the pictures from connected devices on the screen of the connected device. • When attaching the camcorder to the Handycam Station, close the DC IN jack cover, and then fully insert the camcorder into the Handycam Station in the display of a device... you are not displayed on the LCD screen or the viewfinder. • Set [DISP OUTPUT] to [LCD PANEL] (p. 56). • You cannot input a signal to your camcorder. The tape has been...
...or a distorted picture may be zoomed. • You cannot zoom the pictures from connected devices on the screen of the connected device. • When attaching the camcorder to the Handycam Station, close the DC IN jack cover, and then fully insert the camcorder into the Handycam Station in the display of a device... you are not displayed on the LCD screen or the viewfinder. • Set [DISP OUTPUT] to [LCD PANEL] (p. 56). • You cannot input a signal to your camcorder. The tape has been...

Operating Guide
Page 94
...from the computer, turn on the PLAY/EDIT lamp on the camcorder, then connect it again securely. • Set the (USB) ON/OFF switch on the Handycam Station to ON. • Connect the Handycam Station to the camcorder securely. • Disconnect USB devices other than the keyboard, ...the mouse, and the camcorder from the computer. • Disconnect the cable from the computer and camcorder, restart the computer, then connect...
...from the computer, turn on the PLAY/EDIT lamp on the camcorder, then connect it again securely. • Set the (USB) ON/OFF switch on the Handycam Station to ON. • Connect the Handycam Station to the camcorder securely. • Disconnect USB devices other than the keyboard, ...the mouse, and the camcorder from the computer. • Disconnect the cable from the computer and camcorder, restart the computer, then connect...

Operating Guide
Page 104
Warning indicators and messages (continued) Disconnect one of them. • When the A/V connecting cable is connected only to your camcorder, your camcorder is not attached to both the camcorder and the Handycam Station. Disconnect one AV cable. • A/V connecting cables are connected to the Handycam Station correctly. Attach the Handycam Station correctly. 104
Warning indicators and messages (continued) Disconnect one of them. • When the A/V connecting cable is connected only to your camcorder, your camcorder is not attached to both the camcorder and the Handycam Station. Disconnect one AV cable. • A/V connecting cables are connected to the Handycam Station correctly. Attach the Handycam Station correctly. 104

Operating Guide
Page 109
...;ciently. • After charging is complete, disconnect the cable from the Handycam Station, or remove the battery pack. The battery pack is also consumed when your camcorder, and displays the remaining battery time in your camcorder and an optional AC Adaptor/ charger. Additional Information Continued 109 ... according to warm it up, and insert it is frequently used in high temperatures for a longer time. - We recommend using your camcorder. To charge the battery pack • Be sure to charge the battery pack before making the actual recording. • Do not ...
...;ciently. • After charging is complete, disconnect the cable from the Handycam Station, or remove the battery pack. The battery pack is also consumed when your camcorder, and displays the remaining battery time in your camcorder and an optional AC Adaptor/ charger. Additional Information Continued 109 ... according to warm it up, and insert it is frequently used in high temperatures for a longer time. - We recommend using your camcorder. To charge the battery pack • Be sure to charge the battery pack before making the actual recording. • Do not ...

Operating Guide
Page 113
...there are fingerprints on the LCD screen, as thinner, benzine, alcohol, chemical cloths, repellent and insecticide. - When you connect your camcorder or the Handycam Station to the wall outlet using the supplied AC Adaptor during the operation. Slide the POWER switch down to the finish. -...directly to clean it. When the lens is exposed to select the PLAY/EDIT mode while pressing DISP/BATT INFO on your Sony dealer or local authorized Sony service facility to cancel. In hot or humid locations - This is not a malfunction. To clean the LCD ...
...there are fingerprints on the LCD screen, as thinner, benzine, alcohol, chemical cloths, repellent and insecticide. - When you connect your camcorder or the Handycam Station to the wall outlet using the supplied AC Adaptor during the operation. Slide the POWER switch down to the finish. -...directly to clean it. When the lens is exposed to select the PLAY/EDIT mode while pressing DISP/BATT INFO on your Sony dealer or local authorized Sony service facility to cancel. In hot or humid locations - This is not a malfunction. To clean the LCD ...


